


 本文详细介绍了如何搭建EurekaServer环境,包括单个和集群搭建过程,以及如何配置EurekaClient进行服务注册与发现。同时,还介绍了如何在Eureka集群中实现微服务的安全认证,并展示了微服务间通过HTTP调用的实例。
一、Eurela Server环境搭建
1 创建一个EurekaServer 添加 EurekaServer的依赖
 <dependency>
    <groupId>org.springframework.cloud</groupId>
    <artifactId>spring-cloud-starter-netflix-eureka-server</artifactId>
    <version>2.1.1.RELEASE</version>
</dependency>
2 、配置文件
server.port=1234
eureka.instance.hostname=127.0.0.1
eureka.instance.prefer-ip-address=true
#注册中心地址
eureka.client.serviceUrl.defaultZone=http://${eureka.instance.hostname}:${server.port}/eureka/
#是否去注册eureka,因为本例子是一个eureka 所以false
eureka.client.registerWithEureka=false
#是否从eureka server获取注册信息
eureka.client.fetchRegistry=false
3,修改启动类
在启动类上添加注解@EnableEurekaServer
4、启动验证
登录注册中心地址 ip+port
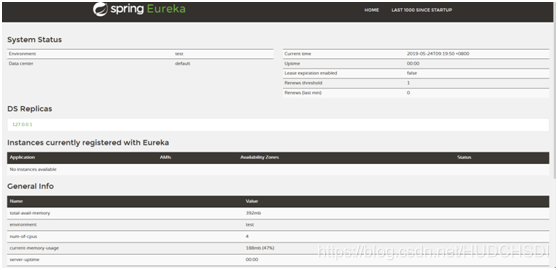 至此 Eureka Server 搭建成功
二,EurekaClient搭建
1, 添加依赖
<!--eureka-client -->
        <dependency>
            <groupId>org.springframework.cloud</groupId>
            <artifactId>spring-cloud-starter-netflix-eureka-client</artifactId>
            <version>2.1.1.RELEASE</version>
        </dependency>
2 、配置文件
eureka:
  client:
    service-url:
      defaultZone: http://127.0.0.1:1234/eureka
  instance:
    prefer-ip-address: true
这里需要特别注意的是 在写defaultZone 的时候没有系统提示,会让你感觉写错了,实际就是这样的,协商就好,不写会报错。
3 、启动类上添加注解
启动类上添加@EnableEurekaClient然后运行
4、 效果如下
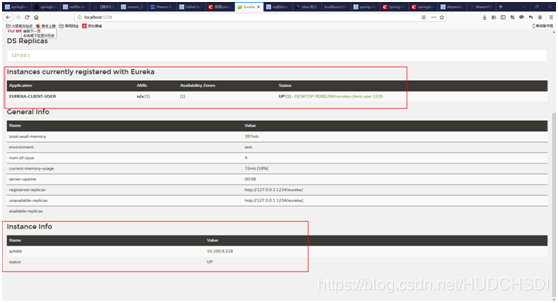 至此 已经完成了一个EurekaServer和一个EurekaClient的搭建 但这是肯定不够的
三、Eureka集群搭建
一个Eureka Server 在生产环境中往往由于分区网路故障可能会导致宕机,这个时候需要有其它的Eureka Service 来提供服务注册功能,这就是Eureka Server集群的第一个功能)
预期目标:
两个Eureka Server 相互注册,这样在一个Eureka Server 宕机以后,微服务任然可以从另一个Eureka Server 获得注册表信息。同时我们新建立一个role微服务为角色分配微服务。模拟在User的微服务中调用Role微服务的接口
1 、 新建一个EurekaServer2
2、 修改host文件为如下
127.0.0.1 localhost peer1 peer2 表示的是 localhost ,peer1,peer2的地址都是127.0.0.1
3、配置EurekaServer1
spring:
  application:
    name: eureka-server-1
server:
  port: 1233
eureka:
  instance: peer1
  client:
    service-url:
      defaultZone: http://peer2:1234/eureka
4、配置EurekaServer2
spring:
  application:
    name: eureka-server-2
server:
  port: 1234
eureka:
  instance: peer2
  client:
    service-url:
      defaultZone: http://peer1:1233/eureka
注意 : 两个EurekaServer相互注册,与前面单个EurekaServer不同的是 以下两点要设置为true
或者可以缺省,默认就是true
  #    fetch-registry: false  从Eureka Server同步元数据
#    register-with-eureka: false  将自己注册到别的Eureka Server
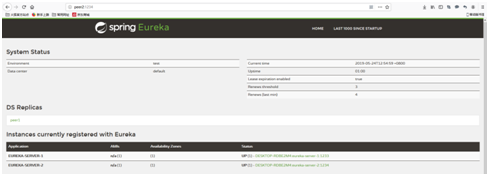
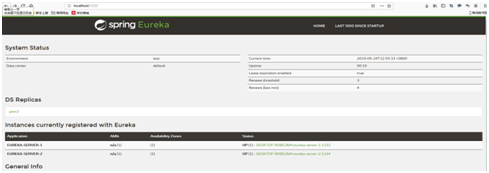
5 、运行结果
三 添加安全认证
1、添加依赖
<dependency>
    <groupId>org.springframework.boot</groupId>
    <artifactId>spring-boot-starter-security</artifactId>
    <version>2.0.8.RELEASE</version>
</dependency>
2、配置文件配置用户名和密码
spring:
  application:
    name: eureka-server-1
  security:
    user:
      name: lg
      password: 123456
3、 特别注意
新版本的Security 默认开启了csrf,即使在路径上面加了用户名和密码,注册服务依然会报错。
解决方法
新建配置类,里面关掉csrf
package com.example.eurekaserver.config;

import org.springframework.context.annotation.Configuration;
import org.springframework.security.config.annotation.web.builders.HttpSecurity;
import org.springframework.security.config.annotation.web.configuration.EnableWebSecurity;
import org.springframework.security.config.annotation.web.configuration.WebSecurityConfigurerAdapter;


@EnableWebSecurity
@Configuration
public class EurekaSecurityConfig extends WebSecurityConfigurerAdapter {


    @Override
    protected void configure(HttpSecurity http) throws Exception {
        http.csrf().disable();
        super.configure(http);
    }
}
4、注册EurekaClient到Eureka集群
新建一个Role服务,功能是分配角色,将User服务和Role服务都注册到Eureka集群。
新建过程与User类似,就不赘述了。只简述流程
1 使用springboot的构造器快速构建一个springboot项目。
如果只是单纯的调用其它微服务的接口 只用勾选web模块
如果该微服务还有连接mysql数据库等功能,则勾选 jdbc mysql,mybatis
2 添加eureka-client的依赖,注意是spring-cloud-starter-netflix-eureka-client这个
3 参考代码自动生成mybatis的代码自动生成.docx(另外一个博客)
4 配置文件如下
server:
  port: 1236
mybatis:
  mapper-locations:
    - classpath:mapper/*Mapper.xml
  type-aliases-package: com.example.eureka.domain.po
spring:
  datasource:
    url: jdbc:mysql://****:3306/challenger_smart?useUnicode=true&characterEncoding=utf8
    username: ****
    password: ****
    driver-class-name: com.mysql.cj.jdbc.Driver
  application:
    name: "eureka-client-role"
eureka:
  instance:
    prefer-ip-address: true
  client:
    service-url:
      defaultZone: http://lg:123456@peer1:1233/eureka,http://lg:123456@peer2:1234/eureka
5 、主配置类 添加@EnableEurekaClient注解
6、为了演示两个微服务通过接口调用
添加以下bean
@Bean
   public RestTemplate restTemplate(){
        return new RestTemplate();
}
7、controller代码
@Autowired
RestTemplate restTem


plate;

@GetMapping(value = "role/{id}")
public User getRole(@PathVariable Integer id){
    return restTemplate.getForObject("http://localhost:1235/"+id,User.class );
}
需要注意的是,这里查询User微服务那么,本微服务里面必须有一个POJO来接收。简单可以直接将User的实体类复制粘贴过来。
至此: 已经完成了 Eureka 集群的搭建,以及多个微服务的注册,微服务之间的调用,http调用用户安全验证
8 controller调用(两种调用方式)
package com.example.eureka.controller;
import com.example.eureka.domain.DTO.User;
import com.example.eureka.feign.UserFeignClient;
import com.example.eureka.service.RoleService;
import org.springframework.beans.factory.annotation.Autowired;
import org.springframework.web.bind.annotation.GetMapping;
import org.springframework.web.bind.annotation.PathVariable;
import org.springframework.web.bind.annotation.RestController;
import org.springframework.web.client.RestTemplate;

@RestController
public class RoleController {

    @Autowired
    RoleService roleService;

    @Autowired
    RestTemplate restTemplate;

    @Autowired
    UserFeignClient userFeignClient;

    // restTemplate 调用
    @GetMapping(value = "user/{id}")
    public User getRole(@PathVariable Integer id) {
        return restTemplate.getForObject("http://localhost:1235/" + id, User.class);
    }
    //使用feign调用
    @GetMapping(value = "feign/user/{id}")
    public User getRoleByFeign(@PathVariable Integer id) {
        return userFeignClient.selectUser(id);
    }
}
1 通过RestTemplate的getForObject调用
2 通过feign调用,feign的本质上也是用了restTemplate 这也就是启动类中要加restTemplate组建的原因。
9、 结果
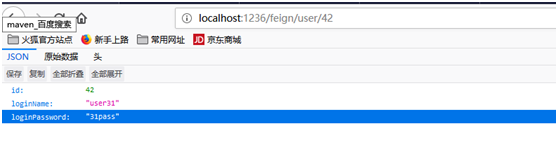 通过role微服务也可以调用到User 微服务的接口
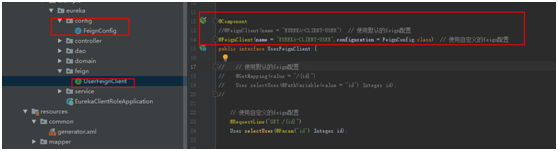
5、使用自定义feign
如上使用的是默认的Feign配置。使用的优点是简单快捷。但是当我们需要使用一些feign的高级功能时候(例如需要对某个接口加http的用户认证,加日志打印等),需要使用到自定义feign。
因为Feign使用的默认契约是SpringMVCContract 所以前面使用的MVC的注解,当然也是可以用的,例如@GetMapping等注解。自定义feign可以使用feign的独有的注解。
使用流程如下.
1、建立feign配置类的包,用来存放feign的配置类
重点:feign配置包的路径应该不在spring的包默认扫描路径下面,否者该配置类对所有的扫描路径下的所以feign客户端都起作用
 #### 2、配置文件
@Configuration
public class FeignConfig {
    //使用自己的契约
    @Bean
    public Contract feignContract(){
        return new Contract.Default();   // 返回默认的Contract
    }
    // 自定义的接口调用需要输入用户密码
    @Bean
    public BasicAuthRequestInterceptor authRequestInterceptor(){
        return new BasicAuthRequestInterceptor("lg2","lg2");
    }
    //。。。。。其它很多自定义的配置编码器,解码器,日志打印,拦截器
}
3 Feign的多参数传递
//多参数传递 方式1
@GetMapping(value = "/")
User selectUser(@RequestParam(value = "id") Integer id,
                @RequestParam(value = "name") String name);

// 方式2
@GetMapping(value = "args/")
User selectUser(@RequestParam Map<String, Objects> map);
/*
 * 调用的时候创建一个map  参数添加再map里面
 * */

//    post方式多参数传递
@RequestMapping(value = "args/", method = RequestMethod.POST)
User selectUser(@RequestBody User user);
未完待续
后续 还有Hystrix 容错处理
Zuul网管


 2740
2740

 被折叠的 条评论
为什么被折叠?
被折叠的 条评论
为什么被折叠?
 到【灌水乐园】发言


