


 本文详细介绍了Vue框架的发展历程及核心概念,并深入探讨了Vuex的状态管理机制,包括其基本使用方法、核心概念如State、Getters、Mutations、Actions和Modules等。

Vue 相关知识梳理系列文章将在本号持续发布,一起查漏补缺学个痛快!若您有遇到其它相关问题,非常欢迎在评论中留言讨论,达到帮助更多人的目的。若感本文对您有所帮助请点个赞吧!
从1989年 Tim 发明了超文本标记语言 HTML 开始,前端的发展就此开始了。从开始的静态网页,再到 ASP、JSP 和 PHP 等创建动态 HTML 方式的诞生,之后是 JavaScript的加入,JavaScript 操作 HTML,JQuery 的诞生。从 MVC 模式演变到 MVVM框架模式等等,前端在悄无声息间茁壮成长。
2013年,在 Google 工作的尤雨溪,受到 Angular 的启发,开发出了一款轻量框架,最初命名为 Seed。2013年12月,更名为 Vue,图标颜色是代表勃勃生机的绿色,版本号是 0.6.0。2014.01.24,Vue 正式对外发布,版本号是 0.8.0。
2015.10.26,vue-router、vuex、vue-cli 相继发布,标志着 Vue 从一个视图层库发展为一个渐进式框架。2016.10.01,Vue 2.0 发布,它吸收了 React 的虚拟 Dom 方案,还支持服务端渲染。2019.12.05,在万众期待中,尤雨溪公布了 Vue 3 源代码,目前 Vue 3 处于 Alpha 版本。
本系列旨在梳理 Vue 2.0 相关知识,接下来让我们一起Vue的旅途吧!
一、vuex简介
Vuex 是一个专为 Vue.js 应用程序开发的状态管理模式应用于多个组件之间的共享。把共享数据保存到一个实例里,让其他组件也可以使用,方便数据的获取和修改。
二、vuex的基本使用
在code终端安装vuex
npm install vuex --save
在src下创建store文件夹,加入index.js。把多界面的共享状态部分抽取出来,提取出一个全局实例对象 store ,用于保存在多个组件中的状态。
index.js
import Vue from 'vue'
//1.导入vuex
import Vuex from 'vuex'
Vue.use(Vuex)


//2.创建store对象
export default new Vuex.Store({
  state: {  //单一状态数
    count: 0
  },
  mutations: { //变更数据
    increment(state) {
      state.count++
    },
    decrement(state) {
      state.count--
    }
  }
})
将 store 对象放置在 new Vue 对象中,这样在其它组件中都能获取到这个对象。
main.js
import Vue from 'vue'
import App from './App'
import App from './store'
// 导入store对象,并且放在new Vue中,
// 在其他Vue组件中,通过this.$store的方式,获取到这个store对象
new Vue({
  el: '#app',
   //3.将store对象挂载到vue实例中
  store,
  render: h => h(App)
})
最后在其它组件中使用 store 对象中保存的状态。
通过 this.$store.state 属性的方式来访问状态。
通过 this.$store.commit 来修改状态。
new.vue
<template>
  <div class="about">
    <div>计数器:{{count}}</div>
    <button @click="increment">+1</button>
    <button @click="decrement">-1</button>
  </div>
</template>


<script>
export default {
  name: "new",
  computed: {
    count: function () {
      return this.$store.state.count; //访问状态
    },
  },
  methods: {
    increment: function () {
      this.$store.commit("increment"); //修改状态
    },
    decrement: function () {
      this.$store.commit("decrement"); //修改状态
    },
  },
};
</script>
<style scoped>
</style>
三、Vuex的核心概念
State单一树状态
一个项目里只有一个store,用一个全局实例对象包含了所有组件状态(代码详见vuex的基本使用)。
Getters
类似于单个组件里的计算属性,用于进行运算等逻辑处理,和计算属性一样最终返回一个结果。
Index.js
import Vue from 'vue'
import Vuex from 'vuex'


Vue.use(Vuex)


export default new Vuex.Store({
  state: {
    counter: 10, //getters
    stu: [{ //getters
        id: 1,
        name: 'wyy',
        age: 21
      },
      {
        id: 2,
        name: 'gy',
        age: 21
      }
    ],
    info: {
      id: 3,
      name: 'ly',
      age: 10
    }
  },
  getters: {
    power(state) { //counter平方
      return state.counter * state.counter
    },
    more(state) {//students大于20岁的
      return state.stu.filter(s => s.age > 20)
    }
  },
})
main.js
import Vue from 'vue'
import App from './App'
import App from './store'
// 导入store对象,并且放在new Vue中,
// 在其他Vue组件中,通过this.$store的方式,获取到这个store对象
new Vue({
  el: '#app',
   //3.将store对象挂载到vue实例中
  store,
  render: h => h(App)
})
getters.vue
 <template>
  <div class="about">
    <!-- 获取getters直接使用 -->
    <h2>{{$store.getters.power}}</h2>
    <h2>{{$store.getters.more}}</h2>
  </div>
</template>


<script>
export default {
  name: "getters",
};
</script>
<style scoped>
</style>
Mutations
用于状态更新,每个 mutation 都有一个字符串类型( type ) 和一个回调函数( handler ),回调函数的第一个参数是 state ,修改 state 的值必须通过mutations。
Index.js
import Vue from 'vue'
import Vuex from 'vuex'


Vue.use(Vuex)


export default new Vuex.Store({
  state: {
    count: 0, //多界面状态管理 mutations
  },
  mutations: {
    //  -------多界面状态管理 count: 0---------
    increment(state) {
      state.count++
    },
    decrement(state) {
      state.count--
    },
    //携带参数
    incrementCount(state, count) {
      state.count += count
    }
  },
})
main.js
import Vue from 'vue'
import App from './App'
import App from './store'
// 导入store对象,并且放在new Vue中,
// 在其他Vue组件中,通过this.$store的方式,获取到这个store对象
new Vue({
  el: '#app',
   //3.将store对象挂载到vue实例中
  store,
  render: h => h(App)
})
mutations.vue
<template>
  <div class="about">
    <div>计数器:{{count}}</div>
    <!--mutations多界面状态管理-->
    <button @click="increment">+1</button>
    <button @click="decrement">-1</button>
    <!-- mutations携带参数 -->
    <button @click="addCount(3)">+3</button>
  </div>
</template>


<script>
export default {
  name: "mutations",
  computed: {
    count: function () {
      return this.$store.state.count; //访问状态
    },
  },
  methods: {
    //多界面
    increment() {
      this.$store.commit("increment"); //修改状态+1
    },
    decrement() {
      this.$store.commit("decrement"); //修改状态-1
    },
    //携带参数
    addCount(count) {
      //载荷
      //1.普通提交封装
      this.$store.commit("incrementCount", count); //修改状态+3
      // 2.特殊提交封装
      // this.$store.commit({
      //   type: "incrementCount",
      //   count,
      // });
    },
  },
};
</script>
<style scoped>
</style>
向 store.commit 传入额外的参数,即为 mutations 的载荷 payload 。
(1)mutations 对象风格的提交方式
普通提交方式直接通过this.$store.commit提交对象。
对象提交方式要使用type属性的对象。
mutations.vue
<template>
  <div class="about">
    <div>计数器:{{count}}</div>
    <!-- mutations携带参数 -->
    <button @click="add(5)">+5</button>
  </div>
</template>


<script>
export default {
  name: "mutations",
  computed: {
    count: function () {
      return this.$store.state.count; //访问状态
    },
  },
  methods: {
    //多界面
    increment() {
      this.$store.commit("increment"); //修改状态+1
    },
    decrement() {
      this.$store.commit("decrement"); //修改状态-1
    },
    //携带参数
    add(count) {
      //载荷
      //1.普通提交封装
      // this.$store.commit("incrementCount", count); //修改状态+5
      //对象中的属性要加引号
      // 2.特殊提交封装
      this.$store.commit({
        type: "incrementCount",
        count,
      });
    },
  },
};
</script>
<style scoped>
</style>
main.js
import Vue from 'vue'
import App from './App'
import App from './store'
// 导入store对象,并且放在new Vue中,
// 在其他Vue组件中,通过this.$store的方式,获取到这个store对象
new Vue({
  el: '#app',
   //3.将store对象挂载到vue实例中
  store,
  render: h => h(App)
})
index.js
import Vue from 'vue'
import Vuex from 'vuex'


Vue.use(Vuex)


export default new Vuex.Store({
  state: {
    count: 0, //多界面状态管理 mutations
  },
  mutations: {
    //  -------多界面状态管理 count: 0---------
    increment(state) {
      state.count++
    },
    decrement(state) {
      state.count--
    },
    //携带参数
    incrementCount(state, payload) {
      state.count += payload.count
    }
  },
})
(2)mutations 需遵守 Vue 的响应规则
Vuex 的 store 中的 state 是响应式的, 当 state 中的数据发生改变时, Vue 组件会自动更新.这就要求我们必须遵守一些 Vuex 对应的规则。
当给 state 中的对象添加新属性时, 使用Vue.set(obj, 'newProp', 123)
当给 state 中用新对象给旧对象重新赋值时,使用 obj . prop = 123
index.js
import Vue from 'vue'
import Vuex from 'vuex'


Vue.use(Vuex)


export default new Vuex.Store({
  state: {
    info: {
      id: 3,
      name: 'ly',
      age: 10
    }
  },
  mutations: {
    updateInfo(state) {
      state.info.name = 'wahaha'//旧对象重新赋值
      Vue.set(state.info, 'height', '1.75') //添加新属性
      // Vue.delete(state.info, 'height') 删除
    }
  },
})
main.js
import Vue from 'vue'
import App from './App'
import App from './store'
// 导入store对象,并且放在new Vue中,
// 在其他Vue组件中,通过this.$store的方式,获取到这个store对象
new Vue({
  el: '#app',
   //3.将store对象挂载到vue实例中
  store,
  render: h => h(App)
})
new.vue
<template>
  <div class="about">
    <!-- mutations携带参数 -->
    <h2>{{$store.state.info}}</h2>
    <button @click="updateInfo">修改</button>
  </div>
</template>


<script>
export default {
  name: "new",
  computed: {
    count: function () {
      return this.$store.state.count; //访问状态
    },
  },
  methods: {
    updateInfo() {
      this.$store.commit("updateInfo");
    },
  },
};
</script>
<style scoped>
</style>
mutations 必须是同步函数。
Actions
actions 类似于mutations,但actions 不直接更改状态,提交的是 mutations,并且actions 可以执行异步操作。
index.js
import Vue from 'vue'
import Vuex from 'vuex'


Vue.use(Vuex)


export default new Vuex.Store({
  state: {
    info: {
      id: 3,
      name: 'ly',
      age: 21
    }
  },
  mutations: {
    updateInfo(state) {
      state.info.name = 'wyy'  //修改name
    }
  },
  actions: {
    aUpdateInfo(context) {
      setTimeout(() => {    //异步操作
        context.commit('updateInfo')
      }, 1000)
    }
  },
})
在 Vuex 中, 需要使用 dispatch 来调用 actions 中的方法。
new.vue
 <template>
  <div class="about">
    <!-- modules内容 -->
    <h2>{{$store.state.a.name}}</h2>
    <!---vuex 数据的响应式原理------->
    <h2>{{$store.state.info}}</h2>
    <button @click="updateInfo">修改</button>
  </div>
</template>


<script>
export default {
  name: "vuex",
  computed: {
    count: function () {
      return this.$store.state.count; //访问状态
    },
  },
  methods: {
    updateInfo() {
      this.$store.dispatch("updateInfo");
    },
  },
};
</script>
<style scoped>
</style>
Actions 支持同样的载荷方式和对象方式进行分发。
// 以载荷形式分发
store.dispatch('incrementAsync', {
  amount: 5
})


// 以对象形式分发
store.dispatch({
  type: 'incrementAsync',
  amount: 5
})
Modules
由于store对象过多较为繁琐,Vuex 将 store 分割成模块。每个模块都能拥有自己的 state、mutations、actions 和 getters 等。对于模块内部moduleA中的 mutations 和 getters,接收的第一个参数是模块的局部状态对象state。
index.js
import Vue from 'vue'
import Vuex from 'vuex'


Vue.use(Vuex)


const moduleA = {
  state: {
    name: 'gy'
  },
  mutations: {
    updateName(state, payload) {
      state.name = payload
    }
  },
  getters: {
    name(state) {
      return state.name + 'hahaha'
    }
  }
}
export default new Vuex.Store({
  modules: {
    a: moduleA,
  }
})
new.vue
<template>
  <div class="about">
    <!-- modules中的内容 -->
    <h2>{{$store.state.a.name}}</h2>
    <!--mutations中的内容 -->
    <button @click="updateName">修改名字</button>
    <!-- getters中的内容 -->
    <h2>{{$store.getters.name}}</h2>
  </div>
</template>


<script>
export default {};
</script>
<style scoped>
</style>
对于模块内部的 action,局部状态通过 context.state 暴露出来,根节点状态用context.rootState(只存在于模块中)。
index.js
import Vue from 'vue'
import Vuex from 'vuex'


Vue.use(Vuex)


const moduleA = {
  state: () => ({
    count: 0
  }),
  mutations: {
    increment (state) { //这里的state对象是模块的局部状态
      state.count++
    }
  },


  getters: {
    sumWithRootCount(state, getters, rootState) {
      return state.count * 2
    }
  },
  actions: {
    incrementIfOddOnRootSum({
      state,
      commit,
      rootState
    }) {
      if ((state.count + rootState.count) % 2 === 1) {
        commit('increment')
      }
    }
  },
  modules: {
    a: moduleA,
  }
})
四、Vuex 的目录结构
项目结构能够让我们的更清晰直观的了解代码结构。
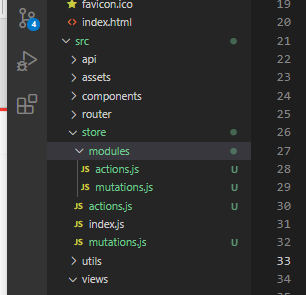
store文件夹——存放vuex文件
index.js——组装模块并导出store的地方
store/mutations.js——根节点的mutation
store/actions.js——根节点的action
modules/mutations.js——模块内的mutation
actions/mutations.js——模块内的action
Vue 相关知识梳理系列文章将在本号持续发布,一起查漏补缺学个痛快!若您有遇到其它相关问题,非常欢迎在评论中留言讨论,达到帮助更多人的目的。若感本文对您有所帮助请点个赞吧!

葛媛
HFun 前端攻城狮


 625
625

 被折叠的 条评论
为什么被折叠?
被折叠的 条评论
为什么被折叠?
 到【灌水乐园】发言


