


热部署
手动启动热部署
使用热部署需要先导入坐标:
<dependency>
    <groupId>org.springframework.boot</groupId>
    <artifactId>spring-boot-devtools</artifactId>
    <optional>true</optional>
</dependency>
重启(Restart):自定义开发代码,包含类、页面、配置文件等,加载位置restart类加载器
重载(ReLoad):jar包,加载位置base类加载器
热部署会将项目重启,不会重新加载jar包。在idea中进行热部署可以使用快捷键Ctrl + F9
自动启动热部署
设置自动构建项目后,当idea失去焦点5秒后自动启动热部署。
在设置中的Compiler勾选Build project automatically并确认

然后点击CTRL + ALT + SHIFT + /键,选择第一项Registry

进去后将compiler.automake.allow.when.app.running的value勾选上(2022版本之后的idea需要在seting里的Advanced Settings里设置)
热部署范围配置
默认不触发重启的目录列表:
/META-INF/maven
/META-INF/resources
/resources
/static
/public
/templates
自定义不参与重启排除项(写在application配置文件中)
devtools:
  restart:
    exclude: public/**,static/**
关闭热部署
可以按照上述打开方式关闭热部署
还可以使用系统的setProperty方法设置高优先级属性禁用热部署
public static void main(String[] args) {
    System.setProperty("spring.devtools.restart.enabled", "false");
    SpringApplication.run(SSMPApplication.class);
}
配置高级
@ConfigurationProperties
使用@ConfigurationProperties为第三方bean绑定属性
@Bean
@ConfigurationProperties(prefix = "datasource")
public DruidDataSource dataSource() {
    DruidDataSource ds = new DruidDataSource();
    return ds;
}使用@ConfigurationProperties注释警告 可能会有注释警告,可以加入下列坐标
<dependency>
    <groupId>org.springframework.boot</groupId>
    <artifactId>spring-boot-configuration-processor</artifactId>
</dependency>
@EnableConfigurationProperties
@EnableConfigurationProperties注解可以将使用@ConfigurationProperties注解对应的类加入Spring容器
@SpringBootApplication
@EnableConfigurationProperties(ServerConfig.class)
public class DemoApplication {
}
//@Component
@Data
@ConfigurationProperties(prefix = "servers")
public class ServerConfig {
}@EnableConfigurationProperties与@Component不能同时使用
宽松绑定
@ConfigurationProperties绑定属性支持属性名宽松绑定
属性可用驼峰模式、下划线模式、中划线模式、常量模式
宽松绑定不支持注解@Value引用单个属性的方式
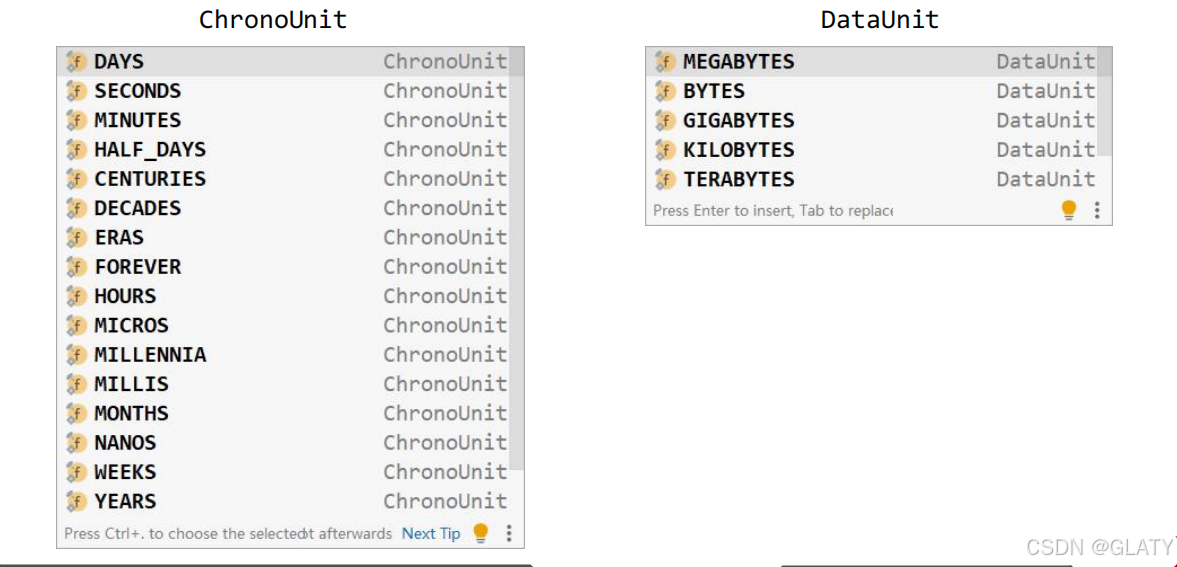
常用计量单位
SpringBoot支持JDK8提供的时间与空间计量单位,时间单位使用@DurationUnit()注解,数据大小单位使用DataSizeUnit()注解
@Component
@Data
@ConfigurationProperties(prefix = "servers")
public class ServerConfig {
    private String ipAddress;
    private int port;
    private long timeout;
    @DurationUnit(ChronoUnit.MINUTES)
    private Duration serverTimeOut;
    @DataSizeUnit(DataUnit.MEGABYTES)
    private DataSize dataSize;
}
JDK8支持的时间与空间计量单位:
数据校验
开启数据校验有助于系统安全性,J2EE规范中JSR303规范定义了一组有关数据校验相关的API。但不仅要导入JSR303规范坐标还要导入Hibernate校验框架对应坐标,因为JSR303规范只是一个接口。
<!--导入JSR303规范坐标(接口)-->
<dependency>
    <groupId>javax.validation</groupId>
    <artifactId>validation-api</artifactId>
</dependency>
<!--导入JSR303规范的具体实现-->
<dependency>
    <groupId>org.hibernate.validator</groupId>
    <artifactId>hibernate-validator</artifactId>
</dependency>
对Bean开启校验功能
@Component
@Data
@ConfigurationProperties(prefix = "servers")
@Validated
public class ServerConfig {
}
注意yaml文件中对于数字的定义支持进制书写格式,如需使用字符 串请使用引号明确标注
测试
加载测试专用属性
在启动测试环境时可以通过properties参数设置测试环境专用的属性
@SpringBootTest(classes = Application.class, properties = "server.port=1234")
class TestSpringBoot {

}
在启动测试环境时还可以通过args参数设置测试环境专用的传入参数
@SpringBootTest(classes = Application.class, args = "--server.port=1234")
class TestSpringBoot {

}
后者的优先级高于前者
加载测试专用配置
使用@Import注解加载当前测试类专用的配置
@Import(MsgConfig.class)  //当有多个时写成数组形式
class TestSpringBoot {

    @Autowired
    private String msg;
}
下列是为了上边展示书写格式而配置的一个bean:
@Configuration
public class MsgConfig {

    @Bean
    public String msg(){
        return "msg";
    }
}
加载测试范围配置应用于小范围测试环境
Web环境模拟测试
模拟端口
@SpringBootTest(webEnvironment = SpringBootTest.WebEnvironment.RANDOM_PORT)  //RANDOM_PORT为使用随机端口
public class WebTest {

    @Test
    void testRandomPort() {
    }
}
虚拟请求测试(各组成部分信息均可匹配)
@Test
void testWeb(@Autowired MockMvc mvc) throws Exception {
    //创建虚拟请求,当前访问/hero/index
    MockHttpServletRequestBuilder builder = MockMvcRequestBuilders.get("/hero/index");
    //执行请求
    ResultActions action = mvc.perform(builder);

    //匹配执行状态(是否预期值)
    //定义执行状态匹配器
    StatusResultMatchers status = MockMvcResultMatchers.status();
    //定义预期执行状态
    ResultMatcher ok = status.isOk();
    //使用本次真实执行结果与预期结果进行比对
    action.andExpect(ok);

    //匹配执行结果(是否预期值)
    //定义执行结果匹配器
    ContentResultMatchers content = MockMvcResultMatchers.content();
    //定义预期执行结果
    ResultMatcher result = content.string("index");
    //使用本次真实执行结果与预期结果进行比对
    action.andExpect(result);

    //匹配执行结果(是否预期值(json))
    //定义预期执行结果
    result = content.json("{\"id\":1,\"name\":\"SpringBoot2\"}");
    //使用本次真实执行结果与预期结果进行比对
    action.andExpect(result);

    //虚拟请求响应头匹配
    HeaderResultMatchers header = MockMvcResultMatchers.header();
    ResultMatcher resultHeader = header.string("Content-Type", "application/json");
    action.andExpect(resultHeader);
}
数据层测试回滚
为测试用例添加事务,SpringBoot会对测试用例对应的事务提交操作进行回滚。使用@Transactional注解(可以放在类上,也可以放在方法上)
@SpringBootTest()
@Transactional
public class DaoTest {

    @Test
    void test(@Autowired MockMvc mvc) throws Exception {

    }
}
如果想在测试用例中提交事务,可以通过@Rollback注解设置(可以放在类上,也可以放在方法上)
@SpringBootTest()
@Transactional
@Rollback(false)
public class DaoTest {

    @Test
    void test(@Autowired MockMvc mvc) throws Exception {

    }
}
测试用例数据设定
测试用例数据通常采用随机值进行测试,使用SpringBoot提供的随机数为其赋值
testCast:
  book:
    id: ${random.int} # 随机整数
    id2: ${random.int(10)} # 10以内随机数
    type: ${random.int(10,20)} # 10到20随机数
    uuid: ${random.uuid} # 随机uuid
    name: ${random.value} # 随机字符串,MD5字符串,32位
    publishTime: ${random.long} #
${random.int}表示随机整数
${random.int(10)}表示10以内的随机数
${random.int(10,20)}表示10到20的随机数
其中()可以是任意字符,例如[],!!均可
数据层解决方案
SQL
现有数据层解决方案技术选型
Druid + MyBatis-Plus + MySQL
数据源:DruidDataSource
持久化技术:MyBatis-Plus / MyBatis
数据库:MySQL
数据源配置
SpringBoot提供了3种内嵌的数据源对象供开发者选择
HikariCP:默认内置数据源对象
Tomcat提供DataSource:HikariCP不可用的情况下,且在web环境中,将使用tomcat服务器配置的数据源对象
Commons DBCP:Hikari不可用,tomcat数据源也不可用,将使用dbcp数据源
通用配置无法设置具体的数据源配置信息,仅提供基本的连接相关配置,如需配置,在下一级配置中设置具体设定
内置持久化解决方案
SpringBoot内置JdbcTemplate持久化解决方案
@SpringBootTest
class Springboot15SqlApplicationTests {
    @Autowired
    private JdbcTemplate jdbcTemplate;

    @Test
    void testJdbc() {
        String sql = "select * from tbl_book where id = 1";
        List<Book> query = jdbcTemplate.query(sql, new RowMapper<Book>() {
            @Override
            public Book mapRow(ResultSet rs, int rowNum) throws SQLException {
                Book temp = new Book();
                temp.setId(rs.getInt("id"));
                temp.setName(rs.getString("name"));
                temp.setType(rs.getString("type"));
                temp.setDescription(rs.getString("description"));
                return temp;
            }
        });
        System.out.println(query);
    }
}
使用JdbcTemplate需要导入spring-boot-starter-jdbc
<dependency>
    <groupId>org.springframework.boot</groupId>
    <artifactId>spring-boot-starter-jdbc</artifactId>
</dependency>
JdbcTemplate配置:
spring:
  jdbc:
    template:
      query-timeout: -1 # 查询超时时间
      max-rows: 500 # 最大行数
      fetch-size: -1  # 缓存行数
数据库
SpringBoot提供了3种内嵌数据库供开发者选择,提高开发测试效率
H2
HSQL
Derby
导入H2相关坐标
<!--导入H2相关坐标-->
<dependency>
    <groupId>org.springframework.boot</groupId>
    <artifactId>spring-boot-starter-data-jpa</artifactId>
</dependency>
<dependency>
    <groupId>com.h2database</groupId>
    <artifactId>h2</artifactId>
    <scope>runtime</scope>
</dependency>
设置当前项目为web工程,并配置H2管理控制台参数(控制台在浏览器访问,路径为设置的路径访问用户名sa,默认密码123456)
spring:
  h2:
    console:
      path: /h2
      enabled: true
第一次会报错应为有一些初始值未设置,可以配置一下数据源开启
spring:
  datasource:
    driver-class-name: org.h2.Driver
    url: jdbc:h2:~/test
    username: sa
    password: 123456
  h2:
    console:
      path: /h2
      enabled: true
H2数据库控制台仅用于开发阶段,线上项目请务必关闭控制台功能(将enabled的值设置未false)
NoSQL
市面上常见的NoSQL解决方案
Redis
Mongo
ES
Solr
说明:上述技术通常在Linux系统中安装部署,为降低学习者压力,本课程制作基于Windows版安装所有的软件并基 于Windows版安装的软件进行课程制作
Redis(Windows):
下载:https://github.com/tporadowski/redis/releases
服务端启动命令:redis-server.exe redis.windows.conf
客户端启动命令:redis-cli.exe
springboot整合redis:
导入SpringBoot整合Redis坐标
<dependency>
    <groupId>org.springframework.boot</groupId>
    <artifactId>spring-boot-starter-data-redis</artifactId>
</dependency>
配置Redis(采用默认配置)
redis:
  host: localhost # 127.0.0.1
  port: 6379
主机:localhost(默认)
端口:6379(默认)
使用redis:
RedisTemplate提供操作各种数据存储类型的接口API(在使用时要启动服务端)

@SpringBootTest
public class RedisTest {
    @Autowired
    RedisTemplate redisTemplate;

    @Test
    void Test(){
        ValueOperations ops = redisTemplate.opsForValue();
        ops.set("id", 12);
        System.out.println(ops.get("id"));
    }
}
除了RedisTemplate还有StringRedisTemplate,在cmd上运行的是以StringRedisTemplate操作的
    @Test
    void test2(@Autowired StringRedisTemplate redisTemplate) {
        ValueOperations<String, String> ops = redisTemplate.opsForValue();
        ops.set("id", "1");
        System.out.println(ops.get("id"
最低0.47元/天 解锁文章


 4326
4326

 被折叠的 条评论
为什么被折叠?
被折叠的 条评论
为什么被折叠?
 到【灌水乐园】发言


