


 本文解决了一系列在使用TensorFlow和OpenCV过程中遇到的常见错误,包括编码问题、属性错误及尺寸不匹配等问题,并提供了详细的解决步骤。
1.'utf-8' codec can't encode character '\udcd5' in position 1946: surrogates not allowed
直接运行load_inception.py,出现如下报错:
  File "D:\Anaconda3\lib\site-packages\zmq\utils\jsonapi.py", line 43, in dumps
    s = s.encode('utf8')

UnicodeEncodeError: 'utf-8' codec can't encode character '\udcd5' in position 1946: surrogates not allowed
经查阅资料,通常而言,出现这个问题,但凡在代码中加入了#coding:utf-8,十有八九是文件路径的问题,经过排查,找到问题所在。
解决方法:事实证明,看代码之前先阅读README文件很重要啊…
Chapter 4的README文件中写着:
**4.2.1 导入Inception 模型**

在chapter_4_data/中或者网址https://storage.googleapis.com/download.tensorflow.org/models/inception5h.zip 下载解压得到模型文件tensorflow_inception_graph.pb,将该文件拷贝到当前文件夹中(即chapter_4/中)。
先去以上网址把数据下载下来,将解压后得到的三个文件和load_inception.py放在同一个文件夹下,此时再运行load_inception.py即可。
运行结果:
Number of layers 59
shape of mixed4d_3x3_bottleneck_pre_relu: (?, ?, ?, 144)
补充内容:
如果想要查看其他卷积层的形状,则可以先通过
print(layers)确定所有卷积层的name,运行结果如下:
['import/conv2d0_pre_relu/conv', 'import/conv2d1_pre_relu/conv', 'import/conv2d2_pre_relu/conv', 'import/mixed3a_1x1_pre_relu/conv', 'import/mixed3a_3x3_bottleneck_pre_relu/conv', 'import/mixed3a_3x3_pre_relu/conv', 'import/mixed3a_5x5_bottleneck_pre_relu/conv', 'import/mixed3a_5x5_pre_relu/conv', 'import/mixed3a_pool_reduce_pre_relu/conv', 'import/mixed3b_1x1_pre_relu/conv', 'import/mixed3b_3x3_bottleneck_pre_relu/conv', 'import/mixed3b_3x3_pre_relu/conv', 'import/mixed3b_5x5_bottleneck_pre_relu/conv', 'import/mixed3b_5x5_pre_relu/conv', 'import/mixed3b_pool_reduce_pre_relu/conv', 'import/mixed4a_1x1_pre_relu/conv', 'import/mixed4a_3x3_bottleneck_pre_relu/conv', 'import/mixed4a_3x3_pre_relu/conv', 'import/mixed4a_5x5_bottleneck_pre_relu/conv', 'import/mixed4a_5x5_pre_relu/conv', 'import/mixed4a_pool_reduce_pre_relu/conv', 'import/mixed4b_1x1_pre_relu/conv', 'import/mixed4b_3x3_bottleneck_pre_relu/conv', 'import/mixed4b_3x3_pre_relu/conv', 'import/mixed4b_5x5_bottleneck_pre_relu/conv', 'import/mixed4b_5x5_pre_relu/conv', 'import/mixed4b_pool_reduce_pre_relu/conv', 'import/mixed4c_1x1_pre_relu/conv', 'import/mixed4c_3x3_bottleneck_pre_relu/conv', 'import/mixed4c_3x3_pre_relu/conv', 'import/mixed4c_5x5_bottleneck_pre_relu/conv', 'import/mixed4c_5x5_pre_relu/conv', 'import/mixed4c_pool_reduce_pre_relu/conv', 'import/mixed4d_1x1_pre_relu/conv', 'import/mixed4d_3x3_bottleneck_pre_relu/conv', 'import/mixed4d_3x3_pre_relu/conv', 'import/mixed4d_5x5_bottleneck_pre_relu/conv', 'import/mixed4d_5x5_pre_relu/conv', 'import/mixed4d_pool_reduce_pre_relu/conv', 'import/mixed4e_1x1_pre_relu/conv', 'import/mixed4e_3x3_bottleneck_pre_relu/conv', 'import/mixed4e_3x3_pre_relu/conv', 'import/mixed4e_5x5_bottleneck_pre_relu/conv', 'import/mixed4e_5x5_pre_relu/conv', 'import/mixed4e_pool_reduce_pre_relu/conv', 'import/mixed5a_1x1_pre_relu/conv', 'import/mixed5a_3x3_bottleneck_pre_relu/conv', 'import/mixed5a_3x3_pre_relu/conv', 'import/mixed5a_5x5_bottleneck_pre_relu/conv', 'import/mixed5a_5x5_pre_relu/conv', 'import/mixed5a_pool_reduce_pre_relu/conv', 'import/mixed5b_1x1_pre_relu/conv', 'import/mixed5b_3x3_bottleneck_pre_relu/conv', 'import/mixed5b_3x3_pre_relu/conv', 'import/mixed5b_5x5_bottleneck_pre_relu/conv', 'import/mixed5b_5x5_pre_relu/conv', 'import/mixed5b_pool_reduce_pre_relu/conv', 'import/head0_bottleneck_pre_relu/conv', 'import/head1_bottleneck_pre_relu/conv']挑选感兴趣的卷积层,在load_inception.py最后加上以下代码,即可查看其他卷积层的形状,以mixed5b_1x1_pre_relu/conv为例:
name_test = 'mixed5b_1x1_pre_relu/conv'
print('shape of %s: %s' % (name_test, str(graph.get_tensor_by_name('import/' + name_test + ':0').get_shape())))
输出的结果:
shape of mixed5b_1x1_pre_relu/conv: (?, ?, ?, 384)2. AttributeError: module 'scipy.misc' has no attribute 'toimage'
运行gen_naive.py时出现以下问题,主要原因是The scipy.misc.toimage() function was deprecated in Scipy 1.0.0, and was completely removed in version 1.3.0。而我的版本是1.5.2。自然没法使用。
  File "E:/Research/My_Research/Code/DLCode/Deep-Learning-21-Examples-master/chapter_4/gen_naive.py", line 25, in savearray
    scipy.misc.toimage(img_array).save(img_name)

AttributeError: module 'scipy.misc' has no attribute 'toimage'
解决方法:
利用opencv保存图片,导入opencv package,import cv2 as cv,之后将gen_naive.py的第25行代码改写成:
cv.imwrite(img_name, img_array)即可正常运行。
3.运行gen_multiscale.py出现以下报错:
(1) AttributeError: module 'scipy.misc' has no attribute 'imresize'
  File "E:/Research/My_Research/Code/DLCode/Deep-Learning-21-Examples-master/chapter_4/gen_multiscale.py", line 33, in resize_ratio
    img = np.float32(scipy.misc.imresize(img, ratio))

AttributeError: module 'scipy.misc' has no attribute 'imresize'
解决方法:
借鉴链接的方法,利用skimage package中的transform rescale函数,实现上述scipy.misc中的imresize的功能。
(2)之后遇到 cannot import name '_validate_lengths'
解决方法:upgrade skimage package,在conda中执行 pip install --user --upgrade scikit-image==0.14.2。(不执行conda install 因为我的电脑报错Solving environment: failed with initial frozen solve.)(直接输入pip install --uograde scikit-image==0.14.2报错 ERROR: Could not install packages due to an OSError: [WinError 5] 拒绝访问。所以添加上了--user。)
(3)报错cannot import name 'img_as_float32'
解决方法:将scikit-learn和scikit-image两个packages 全部pip uninstall,之后利用conda重装,之后一定要Restart Kernel!!!参考链接。
(4)报错InvalidArgumentError: input depth must be evenly divisible by filter depth: 4 vs 3
  File "D:\Anaconda3\lib\site-packages\tensorflow\python\client\session.py", line 1348, in _do_call
    raise type(e)(node_def, op, message)

InvalidArgumentError: input depth must be evenly divisible by filter depth: 4 vs 3
解决方法:
经过debug,发现在calc_grad_tiled函数中的sub.shape进行print,出现了以下结果,就是在最后一个sub的地方,通道数和图像大小有变化,现在还没搞清楚是为什么会出现这种变化。
. (224, 224, 3)
. (224, 224, 3)
. (224, 224, 3)
. (224, 224, 3)
. (224, 224, 3)
. (224, 224, 3)
. (224, 224, 3)
. (224, 224, 3)
. (224, 224, 3)
. (224, 224, 3)
. (224, 224, 3)
. (224, 224, 3)
. (224, 224, 3)
. (224, 224, 3)
. (224, 224, 3)
. (224, 224, 3)
. (224, 224, 3)
. (224, 224, 3)
. (224, 224, 3)
. (224, 224, 3)
. (314, 314, 4)
图1是断掉的时候各个参数的值:
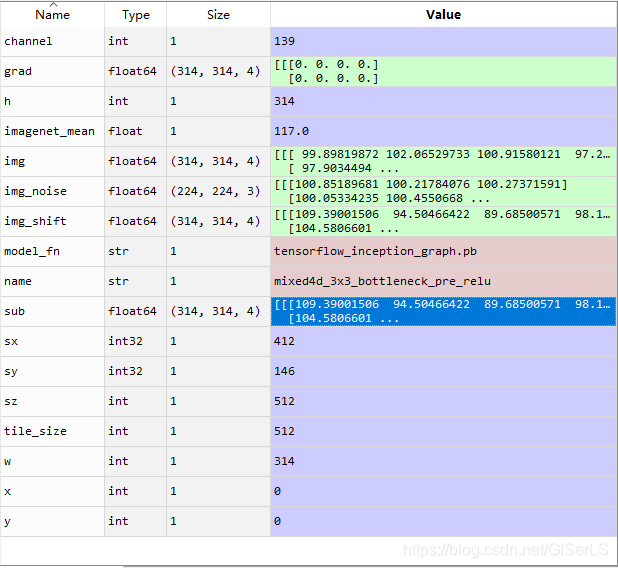
图1
因为执行了resize_ratio函数,所以img的维度由(244,244,3)三个维度分别扩大了1.4倍,得到了(314,314,4)的img。将render_multiscale函数中的img = resize_ratio(img, octave_scale)注释掉即可正常运行。暂时没弄清楚为什么要把img放大1.4倍。
(5)对于gen_multiscale.py,总结解决方法:
将原始的img = np.float32(scipy.misc.imresize(img, ratio))替换成img = transform.rescale(img, ratio),并导入from skimage import transform,data,之后restart kernel解决问题。
4. 运行gen_lapnorm.py的报错
module 'scipy.misc' has no attribute 'toimage'见 2。
---持续更新---


 2016
2016

 被折叠的 条评论
为什么被折叠?
被折叠的 条评论
为什么被折叠?
 到【灌水乐园】发言


