


一、开发环境「极简配置」:5 分钟搞定 JDK+Maven+IDEA
目标:100% 避免版本冲突,快速搭建稳定开发环境。
1. JDK 配置(以 1.8 为例)
- 下载地址:Oracle JDK1.8
- 环境变量:
bash
运行
# Windows
JAVA_HOME=C:\Program Files\Java\jdk1.8.0_301
Path=%JAVA_HOME%\bin
# 验证:cmd输入java -version
2. Maven 配置(3.8.x)
- 下载地址:Maven 官网
- 核心配置(
settings.xml):xml
<!-- 阿里云镜像加速 -->
<mirror>
  <id>aliyunmaven</id>
  <mirrorOf>central</mirrorOf>
  <url>https://maven.aliyun.com/repository/public</url>
</mirror>
<!-- JDK1.8编译 -->
<profile>
  <id>jdk-1.8</id>
  <activation>
    <activeByDefault>true</activeByDefault>
    <jdk>1.8</jdk>
  </activation>
  <properties>
    <maven.compiler.source>1.8</maven.compiler.source>
    <maven.compiler.target>1.8</maven.compiler.target>
  </properties>
</profile>
3. IDEA 配置
- 打开 IDEA →
File→Settings→Build, Execution, Deployment→Build Tools→Maven,指定本地 Maven 路径 + settings.xml。 - 插件推荐:
Lombok(自动生成 getter/setter)、MyBatisX(MyBatis 代码生成)。
二、1 分钟极速创建 SpringBoot 项目
工具:Spring Initializr(IDEA 内置)
- 打开 IDEA →
New Project→选择Spring Initializr→配置:- Project:Maven
- Language:Java
- Spring Boot:2.7.x(稳定版)
- Group:
com.example - Artifact:
user-manage
- 选择依赖:
Spring Web(Web 应用)MySQL Driver(数据库驱动)Lombok(简化代码)
- 点击
Finish,等待 Maven 自动下载依赖。
三、MyBatis-Plus 持久层整合:CRUD 代码「0 手写」
核心优势:MyBatis-Plus 封装了 80% 的 CRUD 操作,无需写 XML 即可实现数据库交互。
1. 引入依赖(pom.xml)
xml
<!-- MyBatis-Plus核心依赖 -->
<dependency>
  <groupId>com.baomidou</groupId>
  <artifactId>mybatis-plus-boot-starter</artifactId>
  <version>3.5.3</version>
</dependency>
<!-- 代码生成器(可选) -->
<dependency>
  <groupId>com.baomidou</groupId>
  <artifactId>mybatis-plus-generator</artifactId>
  <version>3.5.3</version>
</dependency>
2. 数据库配置(application.yml)
yaml
spring:
  datasource:
    driver-class-name: com.mysql.cj.jdbc.Driver
    url: jdbc:mysql://localhost:3306/user_db?useSSL=false&serverTimezone=Asia/Shanghai
    username: root
    password: 123456

mybatis-plus:
  mapper-locations: classpath:mapper/*.xml
  type-aliases-package: com.example.usermanage.entity
  configuration:
    map-underscore-to-camel-case: true # 开启驼峰映射
3. 代码自动生成(10 秒搞定实体类 + Mapper)
java
运行
// 代码生成器示例
public class CodeGenerator {
  public static void main(String[] args) {
    AutoGenerator mpg = new AutoGenerator();
    // 1. 数据源配置
    DataSourceConfig dsc = new DataSourceConfig();
    dsc.setUrl("jdbc:mysql://localhost:3306/user_db?useSSL=false&serverTimezone=Asia/Shanghai");
    dsc.setDriverName("com.mysql.cj.jdbc.Driver");
    dsc.setUsername("root");
    dsc.setPassword("123456");
    mpg.setDataSource(dsc);

    // 2. 全局配置
    GlobalConfig gc = new GlobalConfig();
    gc.setOutputDir(System.getProperty("user.dir") + "/src/main/java");
    gc.setAuthor("你的名字");
    gc.setOpen(false); // 生成后不打开文件夹
    mpg.setGlobalConfig(gc);

    // 3. 包配置
    PackageConfig pc = new PackageConfig();
    pc.setParent("com.example.usermanage");
    mpg.setPackageInfo(pc);

    // 4. 策略配置
    StrategyConfig strategy = new StrategyConfig();
    strategy.setInclude("user"); // 生成user表对应的代码
    strategy.setNaming(NamingStrategy.underline_to_camel); // 表名转驼峰
    mpg.setStrategy(strategy);

    mpg.execute(); // 执行生成
  }
}
执行后会自动生成User实体类、UserMapper接口(继承BaseMapper<User>)。
四、Thymeleaf 视图开发:动态页面「秒渲染」
特点:无需重启服务即可实时预览页面,支持 HTML 原生语法。
1. 引入依赖(pom.xml)
xml
<dependency>
  <groupId>org.springframework.boot</groupId>
  <artifactId>spring-boot-starter-thymeleaf</artifactId>
</dependency>
2. 页面配置(application.yml)
yaml
spring:
  thymeleaf:
    prefix: classpath:/templates/ # 页面存放路径
    suffix: .html
    cache: false # 开发环境关闭缓存
3. 实战:用户列表页面(templates/user/list.html)
html
预览
<!DOCTYPE html>
<html lang="zh-CN" xmlns:th="http://www.thymeleaf.org">
<head>
  <meta charset="UTF-8">
  <title>用户列表</title>
  <link rel="stylesheet" href="https://cdn.jsdelivr.net/npm/bootstrap@5.3.0/dist/css/bootstrap.min.css">
</head>
<body>
  <div class="container mt-5">
    <h2>用户管理</h2>
    <table class="table table-striped">
      <thead>
        <tr>
          <th>ID</th>
          <th>用户名</th>
          <th>邮箱</th>
          <th>操作</th>
        </tr>
      </thead>
      <tbody>
        <!-- 循环遍历用户列表 -->
        <tr th:each="user : ${userList}">
          <td th:text="${user.id}"></td>
          <td th:text="${user.userName}"></td>
          <td th:text="${user.email}"></td>
          <td>
            <a th:href="@{/user/edit(id=${user.id})}" class="btn btn-sm btn-primary">编辑</a>
          </td>
        </tr>
      </tbody>
    </table>
  </div>
</body>
</html>
4. Controller 层关联(UserController.java)
java
运行
@Controller
@RequestMapping("/user")
public class UserController {
  @Autowired
  private UserMapper userMapper;

  @GetMapping("/list")
  public String list(Model model) {
    List<User> userList = userMapper.selectList(null); // MyBatis-Plus自带查询
    model.addAttribute("userList", userList);
    return "user/list"; // 对应templates/user/list.html
  }
}
五、Spring Security 权限控制:3 步实现「RBAC 权限模型」
目标:不同角色(管理员 / 普通用户)访问不同资源。
1. 引入依赖(pom.xml)
xml
<dependency>
  <groupId>org.springframework.boot</groupId>
  <artifactId>spring-boot-starter-security</artifactId>
</dependency>
2. 核心配置(SecurityConfig.java)
java
运行
@Configuration
@EnableWebSecurity
public class SecurityConfig extends WebSecurityConfigurerAdapter {
  @Override
  protected void configure(HttpSecurity http) throws Exception {
    http
      .authorizeRequests()
        .antMatchers("/user/list").hasRole("ADMIN") // 管理员才能访问用户列表
        .antMatchers("/user/**").hasAnyRole("ADMIN", "USER") // 管理员/普通用户可访问
        .anyRequest().authenticated() // 其他请求需登录
      .and()
      .formLogin() // 表单登录
        .loginPage("/login") // 自定义登录页
        .permitAll()
      .and()
      .logout()
        .permitAll();
  }

  // 内存用户(实际项目用数据库存储)
  @Override
  protected void configure(AuthenticationManagerBuilder auth) throws Exception {
    auth.inMemoryAuthentication()
      .withUser("admin").password("{noop}admin123").roles("ADMIN")
      .and()
      .withUser("user").password("{noop}user123").roles("USER");
  }
}
3. 页面权限控制(Thymeleaf 整合)
html
预览
<!-- 在list.html中添加权限判断 -->
<div th:if="${#authorization.expression('hasRole(''ADMIN'')')}">
  <a th:href="@{/user/add}" class="btn btn-success">添加用户</a>
</div>
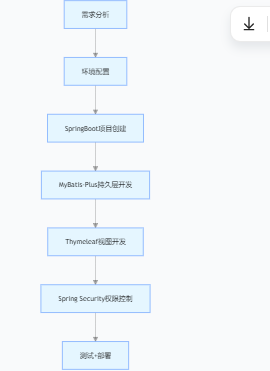
六、完整项目开发流程总结


 1412
1412

 被折叠的 条评论
为什么被折叠?
被折叠的 条评论
为什么被折叠?
 到【灌水乐园】发言


