


 本文详细介绍了有源矩阵电泳显示屏(AMEPD)的特性,如低刷新率、逐行刷新和可能的残影现象。屏幕控制器SSD1680采用SPI通信,支持3线9dataSPI和4线SPI模式。调试注意事项包括SPI时序、电压配置和BUSY管脚的使用。此外,文章还提供了初始化代码示例和显示数据的发送方法。
AMEPD Active Martix Electrophoretic Display,有源矩阵电泳显示屏。
就是电纸书那种屏,调试效果使用感受和我的Kindle差不多。
屏幕参数
屏幕 IC为SSD1680
122*250,单bit控制,1为白,0为黑
逐行刷新,一个字节8bit,控制横向8个像素
内置温度传感器(IIC接口,本次未使用)
内置OTP(10Byte,本次未使用)
屏幕控制器为 On-Chip封装
SPI 速率设置4M 足以
显示效果特征
刷新率低,更新一次数据以秒计
单独更新某块数据,可能有残影。
更新整个屏幕数据,会有很大的闪烁波动
掉电、硬件复位、软件复位,不影响显示,但需要重新下发配置,直到下次写入新的显示数据。
调试注意事项
整个屏逻辑通信电压2为3.3v。
spi 为mode 0,clk 空闲低,在第一个上升沿采样
BSI管脚:通过拉高、拉低配置为3线9data SPI(H)或4线SPI通信模式(L)
CS 片选管脚:低有效,拉低时可以读写
DC管脚:数据/命令指示脚。(L,下命令;H,写数据)
BUSY管脚:屏幕IC在 刷新数据期间或复位期间,输出高:此时对外界的读写操作无响应。在屏幕的读写逻辑中尤其要注意这一点。(空闲低,忙碌高)
RST 管脚:低电平复位,工作期间保持高
VGL、VGH管脚:屏幕翻转液晶粒子所需的偏置电压,软件可配置,16-20v。通过自身的 GDR和 RESE 以及外围电路,组成升压电路
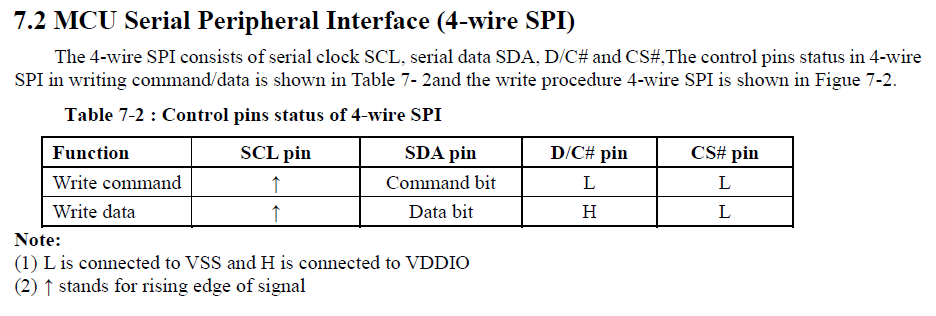
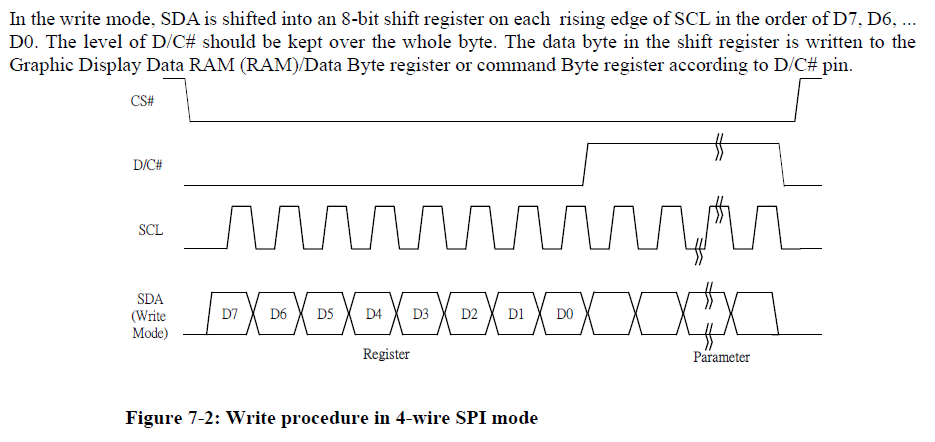
SPI通信时序
4-Wire SPI

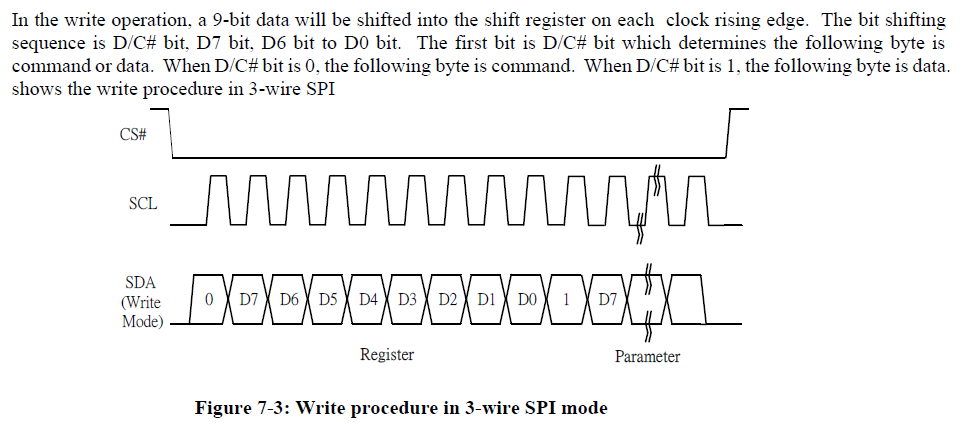
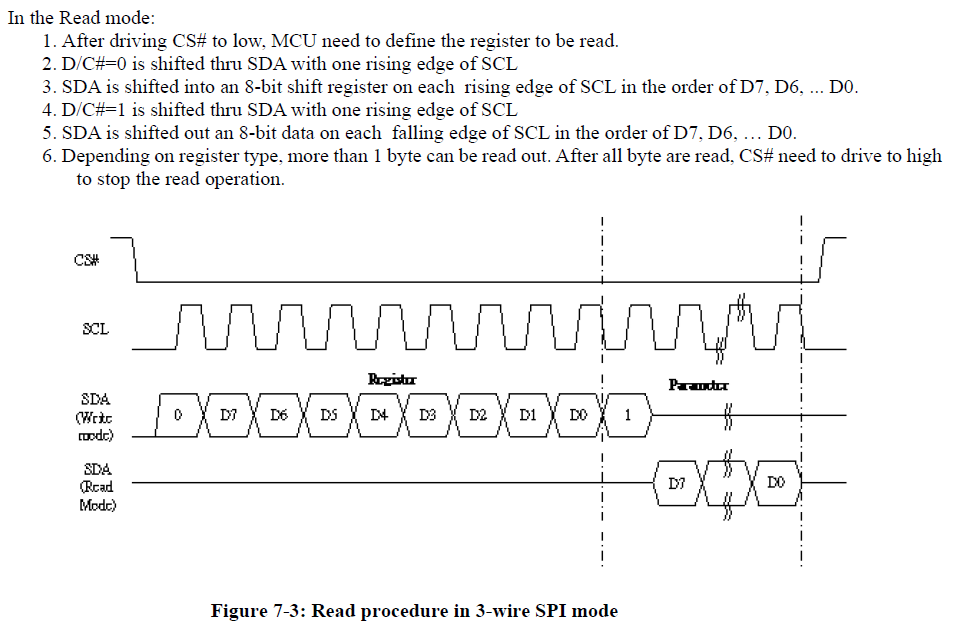
3-Wire 9Bit SPI
代码demo
寄存器配置
static void my_amepd_RegInit(void)
{
    AMEPD_SSD1680_WriteCmd(0x12);  // SW Reset
    my_sleep(20);
    my_amepd_ReadBusy();          // wait busy
    my_test_cli_echo("my_amepd_RegInit 0x12 \r\n");

    AMEPD_SSD1680_WriteCmd(0x01);
    AMEPD_SSD1680_WriteData(0xF9);
    AMEPD_SSD1680_WriteData(0x00);
    AMEPD_SSD1680_WriteData(0x00);

    AMEPD_SSD1680_WriteCmd(0x11);  // data enter mode
    AMEPD_SSD1680_WriteData(0x01);

    AMEPD_SSD1680_WriteCmd(0x44);  // set RAM x address
    AMEPD_SSD1680_WriteData(0x00); // set x start, range: 0-15
    AMEPD_SSD1680_WriteData(0x0F); // set x end

    AMEPD_SSD1680_WriteCmd(0x45);  // set RAM y address
    AMEPD_SSD1680_WriteData(0xF9); // RAM y address start, range: 0-249
    AMEPD_SSD1680_WriteData(0x00);
    AMEPD_SSD1680_WriteData(0x00); // RAM y address end
    AMEPD_SSD1680_WriteData(0x00);

    AMEPD_SSD1680_WriteCmd(0x3C);  // Border
    AMEPD_SSD1680_WriteData(0x05);

    AMEPD_SSD1680_WriteCmd(0x21);  // Display update control
    AMEPD_SSD1680_WriteData(0x00);
    AMEPD_SSD1680_WriteData(0x80); // S8-S167 for 1675 type panel

    // use internal temperature sernsor
    AMEPD_SSD1680_WriteCmd(0x18);
    AMEPD_SSD1680_WriteData(0x80);

    my_amepd_ReadBusy();          // wait busy
    my_test_cli_echo("my_amepd_RegInit 0x18 \r\n");
}
设置显示坐标
static void my_amepd_SetPosition(int x_start, int x_end, int y_start, int y_end)
{
    my_test_cli_echo("%d \r\n", x_start);
    my_test_cli_echo("%d \r\n", x_end);
    my_test_cli_echo("%d \r\n", y_start);
    my_test_cli_echo("%d \r\n", y_end);

    my_amepd_RegInit();
    my_test_cli_echo("my_amepd_SetPosition X \r\n");

    AMEPD_SSD1680_WriteCmd(0x44);
    AMEPD_SSD1680_WriteData(x_start);
    AMEPD_SSD1680_WriteData(x_end);

    AMEPD_SSD1680_WriteCmd(0x45);
    AMEPD_SSD1680_WriteData(y_start);
    AMEPD_SSD1680_WriteData(0x00);
    AMEPD_SSD1680_WriteData(y_end);
    AMEPD_SSD1680_WriteData(0x00);

    AMEPD_SSD1680_WriteCmd(0x4E);
    AMEPD_SSD1680_WriteData(x_start);

    AMEPD_SSD1680_WriteCmd(0x4F);
    AMEPD_SSD1680_WriteData(y_start);
    AMEPD_SSD1680_WriteData(0x00);
    AMEPD_SSD1680_WriteCmd(0x24);
}
发送显示数据
    for(col=0; col<max_col; col++) // send 122x250bits ram 2D13
    {
        for(row=0; row<max_row; row++)
        {
            AMEPD_SSD1680_WriteData(Image_demo[pcnt]);
            pcnt++;
        }
    }
更新显示数据
    // 在发送显示数据之后调用
    AMEPD_SSD1680_WriteCmd(0x22);
    AMEPD_SSD1680_WriteData(0xF7);
    AMEPD_SSD1680_WriteCmd(0x20);
X/Y 轴镜像显示
设置RAMX、Y轴的起始和结束地址可以,让显示效果X镜像、Y镜像,或者X、Y一起镜像。
正常刷新
    AMEPD_SSD1680_WriteCmd(0x44);
    AMEPD_SSD1680_WriteData(0);  // x start
    AMEPD_SSD1680_WriteData(15); // x end

    AMEPD_SSD1680_WriteCmd(0x45);
    AMEPD_SSD1680_WriteData(0);  // y start
    AMEPD_SSD1680_WriteData(0x00);
    AMEPD_SSD1680_WriteData(249); // y end
    AMEPD_SSD1680_WriteData(0x00);
X轴镜像显示
    AMEPD_SSD1680_WriteCmd(0x44);
    AMEPD_SSD1680_WriteData(16);  // x start
    AMEPD_SSD1680_WriteData(10); // x end

    AMEPD_SSD1680_WriteCmd(0x45);
    AMEPD_SSD1680_WriteData(0);  // y start
    AMEPD_SSD1680_WriteData(0x00);
    AMEPD_SSD1680_WriteData(249); // y end
    AMEPD_SSD1680_WriteData(0x00);
Y轴镜像显示
    AMEPD_SSD1680_WriteCmd(0x44);
    AMEPD_SSD1680_WriteData(0);  // x start
    AMEPD_SSD1680_WriteData(15); // x end

    AMEPD_SSD1680_WriteCmd(0x45);
    AMEPD_SSD1680_WriteData(249);  // y start
    AMEPD_SSD1680_WriteData(0x00);
    AMEPD_SSD1680_WriteData(0); // y end
    AMEPD_SSD1680_WriteData(0x00);
XY轴镜像同理


 826
826

 被折叠的 条评论
为什么被折叠?
被折叠的 条评论
为什么被折叠?
 到【灌水乐园】发言


