



mmdetection的使用
官方文档:Welcome to MMDetection’s documentation! — MMDetection 2.15.0 documentation
mmdetection进行目标检测实验时,需要下载好预训练的模型以及设置好相应的配置文件,配置文件中主要是设置一些学习率还有anchor,因为是继承的关系,所以直接加载原有的配置文件,在原有的配置文件上进行修改即可。关键在于数据集的加载,数据集的加载部分需要指定好文件的路径,另外一定要记得保存修改之后的配置文件,方便后面推理的时候使用,流程大概是这样的。
- 下载并查看数据,分析数据,比如可以针对数据对anchor进行调整
- 转化数据格式,考虑到大部分的预训练模型都在coco上整,所以我们也统一处理成coco形式
- 下载预训练的模型,在modelzoo中找到合适的模型和配置文件
- 修改配置文件,修改类名,文件路径以及保存好修改之后的配置文件
- 开始训练,注意上面的步骤要按照原先的8卡2图调整我们的学习率
开始之前,需要说明的是预训练的权重是可以直接使用的,我们主要是做一些微调的任务,推理的脚本如下:
# 这段代码主要是用来在linux系统下检查版本信息的
# Check Pytorch installation
import torch, torchvision
print(torch.__version__, torch.cuda.is_available())

# Check MMDetection installation
import mmdet
print(mmdet.__version__)

# Check mmcv installation
from mmcv.ops import get_compiling_cuda_version, get_compiler_version
print(get_compiling_cuda_version())
print(get_compiler_version())

from mmdet.apis import inference_detector, init_detector, show_result_pyplot

# Choose to use a config and initialize the detector
config = 'configs/mask_rcnn/mask_rcnn_r50_caffe_fpn_mstrain-poly_3x_coco.py'
# Setup a checkpoint file to load
checkpoint = 'checkpoints/mask_rcnn_r50_caffe_fpn_mstrain-poly_3x_coco_bbox_mAP-0.408__segm_mAP-0.37_20200504_163245-42aa3d00.pth'
# initialize the detector
model = init_detector(config, checkpoint, device='cuda:0')

img = 'demo/demo.jpg'
result = inference_detector(model, img)

# Let's plot the result
show_result_pyplot(model, img, result, score_thr=0.3)
kitti-tiny训练流程
kitti-tiny使用的是kitti格式的数据集,一张图对应一个标注文件,这玩意不是很标准,后面换一下。
下载数据
下载数据之后解压就完事了,下载地址是: https://download.openmmlab.com/mmdetection/data/kitti_tiny.zip
解压之后的目录结构如下图所示,记住这里的目录结构,后面改配置文件的时候会使用到
kitti_tiny
├── training
│   ├── image_2
│   │   ├── 000000.jpeg
│   │   ├── 000001.jpeg
│   │   ├── 000002.jpeg
│   │   ├── 000003.jpeg
│   │   ├── 000004.jpeg
│   │   ├── 000005.jpeg
│   │   ├── 000006.jpeg
│   └── label_2
│       ├── 000000.txt
│       ├── 000001.txt
│       ├── 000002.txt
│       ├── 000003.txt
│       ├── 000004.txt
│       ├── 000005.txt
│       ├── 000006.txt
├── train.txt
└── val.txt

3 directories, 152 files
这里有一段脚本是用来显示图片的
# Let's take a look at the dataset image
import mmcv
import matplotlib.pyplot as plt

img = mmcv.imread('kitti_tiny/training/image_2/000073.jpeg')
plt.figure(figsize=(15, 10))
plt.imshow(mmcv.bgr2rgb(img))
plt.show()
处理数据集
数据集的处理主要是用在kitti格式的数据集上,这里就简单的把处理的api放在这里
这里的api主要是用来将一般形式的数据集转化为mmdet格式的数据集
According to the KITTI’s documentation, the first column indicates the class of the object, and the 5th to 8th columns indicates the bboxes. We need to read annotations of each image and convert them into middle format MMDetection accept is as below:
mmdet格式的数据集
[
    {
        'filename': 'a.jpg',
        'width': 1280,
        'height': 720,
        'ann': {
            'bboxes': <np.ndarray> (n, 4),
            'labels': <np.ndarray> (n, ),
            'bboxes_ignore': <np.ndarray> (k, 4), (optional field)
            'labels_ignore': <np.ndarray> (k, 4) (optional field)
        }
    },
    ...
]
import copy
import os.path as osp

import mmcv
import numpy as np

from mmdet.datasets.builder import DATASETS
from mmdet.datasets.custom import CustomDataset

@DATASETS.register_module()
class KittiTinyDataset(CustomDataset):

    CLASSES = ('Car', 'Pedestrian', 'Cyclist')

    def load_annotations(self, ann_file):
        cat2label = {k: i for i, k in enumerate(self.CLASSES)}
        # load image list from file
        image_list = mmcv.list_from_file(self.ann_file)

        data_infos = []
        # convert annotations to middle format
        for image_id in image_list:
            filename = f'{self.img_prefix}/{image_id}.jpeg'
            image = mmcv.imread(filename)
            height, width = image.shape[:2]

            data_info = dict(filename=f'{image_id}.jpeg', width=width, height=height)

            # load annotations
            label_prefix = self.img_prefix.replace('image_2', 'label_2')
            lines = mmcv.list_from_file(osp.join(label_prefix, f'{image_id}.txt'))

            content = [line.strip().split(' ') for line in lines]
            bbox_names = [x[0] for x in content]
            bboxes = [[float(info) for info in x[4:8]] for x in content]

            gt_bboxes = []
            gt_labels = []
            gt_bboxes_ignore = []
            gt_labels_ignore = []

            # filter 'DontCare'
            for bbox_name, bbox in zip(bbox_names, bboxes):
                if bbox_name in cat2label:
                    gt_labels.append(cat2label[bbox_name])
                    gt_bboxes.append(bbox)
                else:
                    gt_labels_ignore.append(-1)
                    gt_bboxes_ignore.append(bbox)

            data_anno = dict(
                bboxes=np.array(gt_bboxes, dtype=np.float32).reshape(-1, 4),
                labels=np.array(gt_labels, dtype=np.long),
                bboxes_ignore=np.array(gt_bboxes_ignore,
                                       dtype=np.float32).reshape(-1, 4),
                labels_ignore=np.array(gt_labels_ignore, dtype=np.long))

            data_info.update(ann=data_anno)
            data_infos.append(data_info)

        return data_infos
修改配置文件
这里选用的模型的maskrcnn,所以请先下载maskrcnn的预训练权重,下载地址是:https://download.openmmlab.com/mmdetection/v2.0/mask_rcnn/mask_rcnn_r50_caffe_fpn_mstrain-poly_3x_coco/mask_rcnn_r50_caffe_fpn_mstrain-poly_3x_coco_bbox_mAP-0.408__segm_mAP-0.37_20200504_163245-42aa3d00.pth
下载完成之后请放在项目根目录的checkpoints目录下
然后编写代码加载原先的配置文件,并在原先的配置文件上修改相应的参数就可以了
记得新建一个tutorial_exps的目录,用来保存模型训练的结果
from mmcv import Config
cfg = Config.fromfile('./configs/faster_rcnn/faster_rcnn_r50_caffe_fpn_mstrain_1x_coco.py')
from mmdet.apis import set_random_seed

# Modify dataset type and path
cfg.dataset_type = 'KittiTinyDataset'
cfg.data_root = 'kitti_tiny/'

cfg.data.test.type = 'KittiTinyDataset'
cfg.data.test.data_root = 'kitti_tiny/'
cfg.data.test.ann_file = 'train.txt'
cfg.data.test.img_prefix = 'training/image_2'

cfg.data.train.type = 'KittiTinyDataset'
cfg.data.train.data_root = 'kitti_tiny/'
cfg.data.train.ann_file = 'train.txt'
cfg.data.train.img_prefix = 'training/image_2'

cfg.data.val.type = 'KittiTinyDataset'
cfg.data.val.data_root = 'kitti_tiny/'
cfg.data.val.ann_file = 'val.txt'
cfg.data.val.img_prefix = 'training/image_2'

# modify num classes of the model in box head
cfg.model.roi_head.bbox_head.num_classes = 3
# We can still use the pre-trained Mask RCNN model though we do not need to
# use the mask branch
cfg.load_from = 'checkpoints/mask_rcnn_r50_caffe_fpn_mstrain-poly_3x_coco_bbox_mAP-0.408__segm_mAP-0.37_20200504_163245-42aa3d00.pth'

# Set up working dir to save files and logs.
cfg.work_dir = './tutorial_exps'

# The original learning rate (LR) is set for 8-GPU training.
# We divide it by 8 since we only use one GPU.
cfg.optimizer.lr = 0.02 / 8
cfg.lr_config.warmup = None
cfg.log_config.interval = 10

# Change the evaluation metric since we use customized dataset.
cfg.evaluation.metric = 'mAP'
# We can set the evaluation interval to reduce the evaluation times
cfg.evaluation.interval = 12
# We can set the checkpoint saving interval to reduce the storage cost
cfg.checkpoint_config.interval = 12

# Set seed thus the results are more reproducible
cfg.seed = 0
set_random_seed(0, deterministic=False)
cfg.gpu_ids = range(1)


# We can initialize the logger for training and have a look
# at the final config used for training
print(f'Config:\n{cfg.pretty_text}')
# 保存模型的各种参数(一定要记得嗷)
cfg.dump(F'{cfg.work_dir}/customformat_kitti.py')
开始训练
这里我们加载完了之后,直接在原先的基础上添加这段代码逻辑,开冲就可以了!
from mmdet.datasets import build_dataset
from mmdet.models import build_detector
from mmdet.apis import train_detector


# Build dataset
datasets = [build_dataset(cfg.data.train)]

# Build the detector
model = build_detector(
    cfg.model, train_cfg=cfg.get('train_cfg'), test_cfg=cfg.get('test_cfg'))
# Add an attribute for visualization convenience
model.CLASSES = datasets[0].CLASSES

# Create work_dir
mmcv.mkdir_or_exist(osp.abspath(cfg.work_dir))
train_detector(model, datasets, cfg, distributed=False, validate=True)
下面是我训练过程中的记录:
2021-08-10 17:15:32,486 - mmdet - INFO - Epoch [1][10/25]	lr: 2.500e-03, eta: 0:06:14, time: 1.290, data_time: 0.218, memory: 2139, loss_rpn_cls: 0.0310, loss_rpn_bbox: 0.0178, loss_cls: 0.5760, acc: 77.6367, loss_bbox: 0.4280, loss: 1.0528
2021-08-10 17:15:42,869 - mmdet - INFO - Epoch [1][20/25]	lr: 2.500e-03, eta: 0:05:25, time: 1.039, data_time: 0.031, memory: 2139, loss_rpn_cls: 0.0118, loss_rpn_bbox: 0.0122, loss_cls: 0.1723, acc: 93.9355, loss_bbox: 0.3070, loss: 0.5032
2021-08-10 17:16:00,542 - mmdet - INFO - Epoch [2][10/25]	lr: 2.500e-03, eta: 0:04:30, time: 1.242, data_time: 0.222, memory: 2140, loss_rpn_cls: 0.0170, loss_rpn_bbox: 0.0145, loss_cls: 0.1613, acc: 94.5703, loss_bbox: 0.2700, loss: 0.4628
2021-08-10 17:16:10,856 - mmdet - INFO - Epoch [2][20/25]	lr: 2.500e-03, eta: 0:04:20, time: 1.031, data_time: 0.031, memory: 2140, loss_rpn_cls: 0.0120, loss_rpn_bbox: 0.0126, loss_cls: 0.1298, acc: 95.2734, loss_bbox: 0.2011, loss: 0.3555
2021-08-10 17:16:28,355 - mmdet - INFO - Epoch [3][10/25]	lr: 2.500e-03, eta: 0:03:52, time: 1.218, data_time: 0.219, memory: 2140, loss_rpn_cls: 0.0066, loss_rpn_bbox: 0.0105, loss_cls: 0.1025, acc: 96.2402, loss_bbox: 0.1548, loss: 0.2744
2021-08-10 17:16:38,935 - mmdet - INFO - Epoch [3][20/25]	lr: 2.500e-03, eta: 0:03:45, time: 1.058, data_time: 0.031, memory: 2140, loss_rpn_cls: 0.0079, loss_rpn_bbox: 0.0138, loss_cls: 0.1425, acc: 94.5020, loss_bbox: 0.2535, loss: 0.4178
2021-08-10 17:16:56,906 - mmdet - INFO - Epoch [4][10/25]	lr: 2.500e-03, eta: 0:03:25, time: 1.259, data_time: 0.219, memory: 2140, loss_rpn_cls: 0.0052, loss_rpn_bbox: 0.0138, loss_cls: 0.1157, acc: 95.5859, loss_bbox: 0.2130, loss: 0.3477
2021-08-10 17:17:07,575 - mmdet - INFO - Epoch [4][20/25]	lr: 2.500e-03, eta: 0:03:18, time: 1.066, data_time: 0.031, memory: 2140, loss_rpn_cls: 0.0051, loss_rpn_bbox: 0.0118, loss_cls: 0.1255, acc: 95.2734, loss_bbox: 0.2106, loss: 0.3531
2021-08-10 17:17:25,318 - mmdet - INFO - Epoch [5][10/25]	lr: 2.500e-03, eta: 0:03:00, time: 1.258, data_time: 0.223, memory: 2140, loss_rpn_cls: 0.0036, loss_rpn_bbox: 0.0103, loss_cls: 0.1051, acc: 96.0352, loss_bbox: 0.2106, loss: 0.3297
2021-08-10 17:17:35,903 - mmdet - INFO - Epoch [5][20/25]	lr: 2.500e-03, eta: 0:02:52, time: 1.058, data_time: 0.031, memory: 2140, loss_rpn_cls: 0.0038, loss_rpn_bbox: 0.0103, loss_cls: 0.0920, acc: 96.7383, loss_bbox: 0.1769, loss: 0.2831
2021-08-10 17:17:53,811 - mmdet - INFO - Epoch [6][10/25]	lr: 2.500e-03, eta: 0:02:36, time: 1.252, data_time: 0.222, memory: 2140, loss_rpn_cls: 0.0045, loss_rpn_bbox: 0.0080, loss_cls: 0.0839, acc: 97.0996, loss_bbox: 0.1706, loss: 0.2670
2021-08-10 17:18:04,497 - mmdet - INFO - Epoch [6][20/25]	lr: 2.500e-03, eta: 0:02:27, time: 1.070, data_time: 0.032, memory: 2140, loss_rpn_cls: 0.0018, loss_rpn_bbox: 0.0101, loss_cls: 0.0797, acc: 96.9824, loss_bbox: 0.1668, loss: 0.2584
2021-08-10 17:18:22,466 - mmdet - INFO - Epoch [7][10/25]	lr: 2.500e-03, eta: 0:02:12, time: 1.257, data_time: 0.221, memory: 2140, loss_rpn_cls: 0.0034, loss_rpn_bbox: 0.0089, loss_cls: 0.0776, acc: 97.0215, loss_bbox: 0.1510, loss: 0.2409
2021-08-10 17:18:33,351 - mmdet - INFO - Epoch [7][20/25]	lr: 2.500e-03, eta: 0:02:03, time: 1.088, data_time: 0.031, memory: 2140, loss_rpn_cls: 0.0025, loss_rpn_bbox: 0.0106, loss_cls: 0.0818, acc: 96.6895, loss_bbox: 0.1633, loss: 0.2583
2021-08-10 17:18:51,395 - mmdet - INFO - Epoch [8][10/25]	lr: 2.500e-03, eta: 0:01:48, time: 1.261, data_time: 0.222, memory: 2140, loss_rpn_cls: 0.0018, loss_rpn_bbox: 0.0088, loss_cls: 0.0677, acc: 97.1973, loss_bbox: 0.1450, loss: 0.2233
2021-08-10 17:19:02,148 - mmdet - INFO - Epoch [8][20/25]	lr: 2.500e-03, eta: 0:01:39, time: 1.075, data_time: 0.031, memory: 2140, loss_rpn_cls: 0.0027, loss_rpn_bbox: 0.0078, loss_cls: 0.0686, acc: 97.2266, loss_bbox: 0.1636, loss: 0.2427
2021-08-10 17:19:20,218 - mmdet - INFO - Epoch [9][10/25]	lr: 2.500e-04, eta: 0:01:24, time: 1.262, data_time: 0.220, memory: 2140, loss_rpn_cls: 0.0031, loss_rpn_bbox: 0.0084, loss_cls: 0.0633, acc: 97.6562, loss_bbox: 0.1297, loss: 0.2044
2021-08-10 17:19:30,916 - mmdet - INFO - Epoch [9][20/25]	lr: 2.500e-04, eta: 0:01:15, time: 1.070, data_time: 0.032, memory: 2140, loss_rpn_cls: 0.0014, loss_rpn_bbox: 0.0066, loss_cls: 0.0556, acc: 97.8711, loss_bbox: 0.1095, loss: 0.1731
2021-08-10 17:19:48,986 - mmdet - INFO - Epoch [10][10/25]	lr: 2.500e-04, eta: 0:01:01, time: 1.264, data_time: 0.221, memory: 2140, loss_rpn_cls: 0.0031, loss_rpn_bbox: 0.0084, loss_cls: 0.0655, acc: 97.3242, loss_bbox: 0.1253, loss: 0.2024
2021-08-10 17:19:59,744 - mmdet - INFO - Epoch [10][20/25]	lr: 2.500e-04, eta: 0:00:52, time: 1.077, data_time: 0.031, memory: 2140, loss_rpn_cls: 0.0021, loss_rpn_bbox: 0.0055, loss_cls: 0.0585, acc: 97.7539, loss_bbox: 0.1239, loss: 0.1901
2021-08-10 17:20:17,822 - mmdet - INFO - Epoch [11][10/25]	lr: 2.500e-04, eta: 0:00:37, time: 1.259, data_time: 0.222, memory: 2140, loss_rpn_cls: 0.0021, loss_rpn_bbox: 0.0069, loss_cls: 0.0652, acc: 97.3633, loss_bbox: 0.1189, loss: 0.1931
2021-08-10 17:20:28,604 - mmdet - INFO - Epoch [11][20/25]	lr: 2.500e-04, eta: 0:00:28, time: 1.077, data_time: 0.031, memory: 2140, loss_rpn_cls: 0.0027, loss_rpn_bbox: 0.0071, loss_cls: 0.0552, acc: 98.0176, loss_bbox: 0.1205, loss: 0.1856
2021-08-10 17:20:46,684 - mmdet - INFO - Epoch [12][10/25]	lr: 2.500e-05, eta: 0:00:14, time: 1.268, data_time: 0.221, memory: 2140, loss_rpn_cls: 0.0008, loss_rpn_bbox: 0.0060, loss_cls: 0.0563, acc: 97.8125, loss_bbox: 0.1209, loss: 0.1840
2021-08-10 17:20:57,348 - mmdet - INFO - Epoch [12][20/25]	lr: 2.500e-05, eta: 0:00:04, time: 1.066, data_time: 0.031, memory: 2140, loss_rpn_cls: 0.0014, loss_rpn_bbox: 0.0050, loss_cls: 0.0510, acc: 97.9883, loss_bbox: 0.0930, loss: 0.1503
2021-08-10 17:21:02,629 - mmdet - INFO - Saving checkpoint at 12 epochs
[>>>>>>>>>>>>>>>>>>>>>>>>>>>>>>>>>] 25/25, 4.1 task/s, elapsed: 6s, ETA:     0s
---------------iou_thr: 0.5---------------
2021-08-10 17:21:09,877 - mmdet - INFO -
+------------+-----+------+--------+-------+
| class      | gts | dets | recall | ap    |
+------------+-----+------+--------+-------+
| Car        | 62  | 121  | 0.968  | 0.874 |
| Pedestrian | 13  | 46   | 0.846  | 0.762 |
| Cyclist    | 7   | 43   | 0.571  | 0.102 |
+------------+-----+------+--------+-------+
| mAP        |     |      |        | 0.579 |
+------------+-----+------+--------+-------+
2021-08-10 17:21:09,878 - mmdet - INFO - Epoch(val) [12][25]	AP50: 0.5790, mAP: 0.5789

Process finished with exit code 0
使用训练好的模型
同样的,回到文章开头的位置,指定我们的模型和配置文件,就能测试我们的模型了
img = mmcv.imread('kitti_tiny/training/image_2/000068.jpeg')
model.cfg = cfg
result = inference_detector(model, img)
show_result_pyplot(model, img, result)
kitti这个就到此结束上,总的来说意义不是很大,建议不学习,下面这个才是我们的重磅代码,建议加强。
牛仔装备训练流程
这个是李沐老师给的一个数据集,这个数据集非常好用,使用的是标准的coco标注形式,另外通过yolov5还拿到一本书,非常nice!
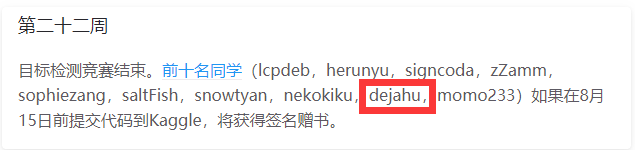
课程地址:课程公告 - 动手学深度学习课程 (d2l.ai)
数据集地址:https://www.kaggle.com/c/cowboyoutfits/
比赛地址:https://competitions.codalab.org/competitions/33573
数据集说明
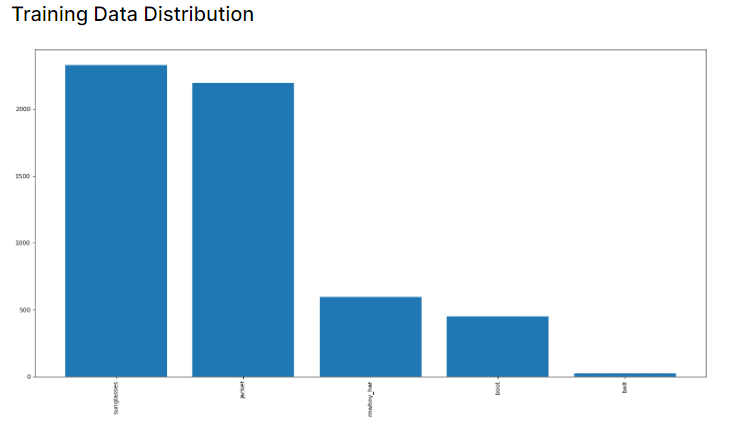
这个数据包含了5个类别,主要是为了解决数据不均衡的问题,并且这里使用到的也是coco的标注形式。
The evaluation metric for this competition is Mean Average Precition for Bounding Box IoU. The Bbox IoU score, commonly used in object detection tasks, measures how accurate the model can localize objects of interest while being able to predict the true categories.
While there are many different settings you can tune for e.g. IoU threshold, we use the popular AP 0.5:0.95 metric used in COCO as the primary challenge metric.
Submission Format
For every author in the dataset, submission files should be json serialized list of annotations with the following keys: image_id, category_id, bbox, and score. image_id should be a unique image identifier provided by either valid.csv or test.csv. category_id should be a unique category id as in
category_id = { 'belt': 87, 'sunglasses': 1034, 'boot': 131, 'cowboy_hat': 318, 'jacket': 588}
bbox should be a list of 4 float coordinates. score should be a float number for confidence score, in range 0-1.
The file should contain a serialized json string and have the following format:
[{"image_id": 2817499345625518079, "category_id": 588, "bbox": [0, 0, 0, 0], "score": 0.8323169745334087}, {"image_id": 4780409558104969215, "category_id": 131, "bbox": [0, 0, 0, 0], "score": 0.19203804173293615}, {"image_id": 7518610131770248858, "category_id": 1034, "bbox": [0, 0, 0, 0], "score": 0.1928978657543734},]
数据集处理
数据集是coco的形式,但是严格的数据是划分成训练集和验证集的,所以首先是数据集的划分
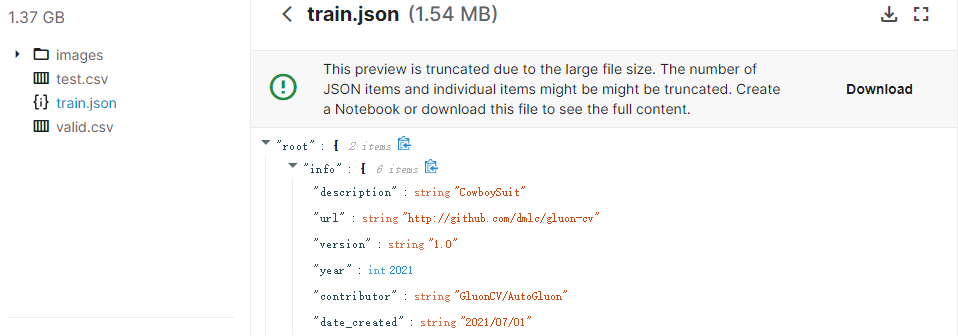
数据集的目录是这样的,首先所有的图片数据都存放在images目录下,然后两个csv文件分别是公榜和私榜需要测试的图片,最后一定要按照官方给定的格式提交你的测试结果。
coco的标注形式是这样的:
详细信息请查看:COCO - Common Objects in Context (cocodataset.org)
关于bbox的描述:In addition, an enclosing bounding box is provided for each object (box coordinates are measured from the top left image corner and are 0-indexed)
{
    "images": [image],
    "annotations": [annotation],
    "categories": [category]
}


image = {
    "id": int,
    "width": int,
    "height": int,
    "file_name": str,
}

annotation = {
    "id": int,
    "image_id": int,
    "category_id": int,
    "segmentation": RLE or [polygon],
    "area": float,
    "bbox": [x,y,width,height],
    "iscrowd": 0 or 1,
}

categories = [{
    "id": int,
    "name": str,
    "supercategory": str,
}]
首先是关于脚本转化的代码
如下面的代码所示,非常的nice哈,只需要修改下类名就可以了,test_n是用来设置测试集数量的,nice
import sys
# sys.path.insert(0, "./mmdetection")

import os
# Check Pytorch installation
import torch, torchvision
print(torch.__version__, torch.cuda.is_available())

# Check mmcv installation
from mmcv.ops import get_compiling_cuda_version, get_compiler_version
print(get_compiling_cuda_version())
print(get_compiler_version())

# Check MMDetection installation
from mmdet.apis import set_random_seed

# Imports
import mmdet
from mmdet.apis import set_random_seed
from mmdet.datasets import build_dataset
from mmdet.models import build_detector
from mmdet.apis import train_detector

import random
import numpy as np
from pathlib import Path
import copy
import json
from pycocotools.coco import COCO

seed = 123

"""Sets the random seeds."""
set_random_seed(seed, deterministic=False)
random.seed(seed)
np.random.seed(seed)
torch.manual_seed(seed)
torch.cuda.manual_seed(seed)
torch.backends.cudnn.deterministic = True
torch.backends.cudnn.benchmark = False
os.environ['PYTHONHASHSEED'] = str(seed)

random.seed(seed)

def create_subset(c, cats, test_n=180):
    new_coco = {}
    new_coco['info'] = {"description": "CowboySuit",
                        "url": "http://github.com/dmlc/gluon-cv",
                        "version": "1.0","year": 2021,
                        "contributor": "GluonCV/AutoGluon",
                        "date_created": "2021/07/01"}
    new_coco["licenses"]: [
        {"url": "http://creativecommons.org/licenses/by/2.0/","id": 4,"name": "Attribution License"}]
    cat_ids = c.getCatIds(cats)
    train_img_ids = set()

    test_img_ids = set()
    for cat in cat_ids[::-1]:
        img_ids = copy.copy(c.getImgIds(catIds=[cat]))
        random.shuffle(img_ids)
        tn = min(test_n, int(len(img_ids) * 0.5))
        new_test = set(img_ids[:tn])
        exist_test_ids = new_test.intersection(train_img_ids)
        test_ids = new_test.difference(exist_test_ids)
        train_ids = set(img_ids).difference(test_ids)
        print(tn, len(img_ids), len(new_test), len(test_ids), len(train_ids))
        train_img_ids.update(train_ids)
        test_img_ids.update(test_ids)
#         print(len(test_img_ids))

    # prune duplicates
    dup = train_img_ids.intersection(test_img_ids)
    train_img_ids = train_img_ids - dup

    train_anno_ids = set()
    test_anno_ids = set()
    for cat in cat_ids:
        train_anno_ids.update(c.getAnnIds(imgIds=list(train_img_ids), catIds=[cat]))
        test_anno_ids.update(c.getAnnIds(imgIds=list(test_img_ids), catIds=[cat]))

    assert len(train_img_ids.intersection(test_img_ids)) == 0, 'img id conflicts, {} '.format(train_img_ids.intersection(test_img_ids))
    assert len(train_anno_ids.intersection(test_anno_ids)) == 0, 'anno id conflicts'
    print('train img ids #:', len(train_img_ids), 'train anno #:', len(train_anno_ids))
    print('valid img ids #:', len(test_img_ids), 'test anno #:', len(test_anno_ids))
    new_coco_test = copy.deepcopy(new_coco)

    new_coco["images"] = c.loadImgs(list(train_img_ids))
    new_coco["annotations"] = c.loadAnns(list(train_anno_ids))
    for ann in new_coco["annotations"]:
        ann.pop('segmentation', None)
    new_coco["categories"] = c.loadCats(cat_ids)

    new_coco_test["images"] = c.loadImgs(list(test_img_ids))
    new_coco_test["annotations"] = c.loadAnns(list(test_anno_ids))
    for ann in new_coco_test["annotations"]:
        ann.pop('segmentation', None)
    new_coco_test["categories"] = c.loadCats(cat_ids)
    print('new train split, images:', len(new_coco["images"]), 'annos:', len(new_coco["annotations"]))
    print('new valid split, images:', len(new_coco_test["images"]), 'annos:', len(new_coco_test["annotations"]))
    return new_coco, new_coco_test

coco = COCO('../input/cowboyoutfits/train.json')
nc, nc_test = create_subset(coco, ['belt', 'sunglasses', 'boot', 'cowboy_hat', 'jacket', ])

with open('./new_anno/new_train.json', 'w') as f:
    json.dump(nc, f)
with open('./new_anno/new_valid.json', 'w') as f:
    json.dump(nc_test, f)
开始训练吧
训练的过程同样是需要先修改配置文件,然后开始训练
这个版本的代码使用了wandb,可以在网页上进行可视化,我的脑子有点接受不过来,一会还是搞个简单版本的跑跑看吧
# 目前这个程序只能通过jupyter的形式来产生
import sys
import wandb
import os
# Check Pytorch installation
import torch, torchvision
print(torch.__version__, torch.cuda.is_available())
# Check mmcv installation
from mmcv.ops import get_compiling_cuda_version, get_compiler_version
print(get_compiling_cuda_version())
print(get_compiler_version())
# Check MMDetection installation
from mmdet.apis import set_random_seed
# Imports
import mmdet
from mmdet.apis import set_random_seed
from mmdet.datasets import build_dataset
from mmdet.models import build_detector
from mmdet.apis import train_detector
import random
import numpy as np
from pathlib import Path
import copy
import json
from pycocotools.coco import COCO

seed = 123

"""Sets the random seeds."""
set_random_seed(seed, deterministic=False)
random.seed(seed)
np.random.seed(seed)
torch.manual_seed(seed)
torch.cuda.manual_seed(seed)
torch.backends.cudnn.deterministic = True
torch.backends.cudnn.benchmark = False
os.environ['PYTHONHASHSEED'] = str(seed)

random.seed(seed)
wandb.login(key="d60ae7823da89718f70116c19628a0fd3787bf49")

# 加载配置文件
from mmcv import Config
baseline_cfg_path = "configs/cascade_rcnn/cascade_rcnn_r50_fpn_1x_coco.py"
cfg = Config.fromfile(baseline_cfg_path)
print(cfg)

model_name = 'cascade_rcnn_r50_fpn_1x' # 设置模型的名称
job = 3
# Folder to store model logs and weight files
job_folder = f'kaggle/working/job{job}_{model_name}'
cfg.work_dir = job_folder
# Change the wandb username and project name below
wnb_username = 'dejahu'
wnb_project_name = 'kaggle_cowboy_outfits'
# Set seed thus the results are more reproducible
cfg.seed = seed
# You should change this if you use different model
# 通过loadfrom来加载模型
cfg.load_from = 'checkpoints/cascade_rcnn_r50_fpn_1x_coco_20200316-3dc56deb.pth'

if not os.path.exists(job_folder):
    os.makedirs(job_folder)

print("Job folder:", job_folder)

# 修改分类头的数量,修改为模型对应的5个类别
for head in cfg.model.roi_head.bbox_head:
    head.num_classes = 5

cfg.gpu_ids = [1]

# cfg.runner.max_epochs = 4  # Epochs for the runner that runs the workflow
# cfg.total_epochs = 4

cfg.runner.max_epochs = 20  # todo Epochs for the runner that runs the workflow
cfg.total_epochs = 20

# Learning rate of optimizers. The LR is divided by 8 since the config file is originally for 8 GPUs
cfg.optimizer.lr = 0.02 / 8

## Learning rate scheduler config used to register LrUpdater hook
cfg.lr_config = dict(
    policy='CosineAnnealing',
    # The policy of scheduler, also support CosineAnnealing, Cyclic, etc. Refer to details of supported LrUpdater from https://github.com/open-mmlab/mmcv/blob/master/mmcv/runner/hooks/lr_updater.py#L9.
    by_epoch=False,
    warmup='linear',  # The warmup policy, also support `exp` and `constant`.
    warmup_iters=500,  # The number of iterations for warmup
    warmup_ratio=0.001,  # The ratio of the starting learning rate used for warmup
    min_lr=1e-07)

# config to register logger hook
cfg.log_config.interval = 10  # Interval to print the log

# Config to set the checkpoint hook, Refer to https://github.com/open-mmlab/mmcv/blob/master/mmcv/runner/hooks/checkpoint.py for implementation.
cfg.checkpoint_config.interval = 1  # The save interval is 1

cfg.dataset_type = 'CocoDataset'  # Dataset type, this will be used to define the dataset
cfg.classes = ("belt", "sunglasses", "boot", "cowboy_hat", "jacket")

data_images = '../input/cowboyoutfits/images'

cfg.data.train.img_prefix = data_images
cfg.data.train.classes = cfg.classes
cfg.data.train.ann_file = 'new_anno/new_train.json'
cfg.data.train.type = 'CocoDataset'

cfg.data.val.img_prefix = data_images
cfg.data.val.classes = cfg.classes
cfg.data.val.ann_file = 'new_anno/new_valid.json'
cfg.data.val.type = 'CocoDataset'

cfg.data.test.img_prefix = data_images
cfg.data.test.classes = cfg.classes
cfg.data.test.ann_file = 'new_anno/new_valid.json'
cfg.data.test.type = 'CocoDataset'

cfg.data.samples_per_gpu = 2  # Batch size of a single GPU used in testing
cfg.data.workers_per_gpu = 2  # Worker to pre-fetch data for each single GPU

# The config to build the evaluation hook, refer to https://github.com/open-mmlab/mmdetection/blob/master/mmdet/core/evaluation/eval_hooks.py#L7 for more details.
cfg.evaluation.metric = 'bbox'  # Metrics used during evaluation

# Set the epoch intervel to perform evaluation
cfg.evaluation.interval = 1

cfg.evaluation.save_best = 'bbox_mAP'

# 这块的作用主要是把日志给他写进去,方便训练
cfg.log_config.hooks = [dict(type='TextLoggerHook'),
                        dict(type='WandbLoggerHook',
                             init_kwargs=dict(project=wnb_project_name,
                                              name=f'exp-{model_name}-job{job}',
                                              entity=wnb_username))
                        ]

cfg_path = f'{job_folder}/job{job}_{Path(baseline_cfg_path).name}'
print(cfg_path)
# Save config file for inference later
cfg.dump(cfg_path)
print(f'Config:\n{cfg.pretty_text}')

model = build_detector(cfg.model,
                       train_cfg=cfg.get('train_cfg'),
                       test_cfg=cfg.get('test_cfg'))
model.init_weights()

datasets = [build_dataset(cfg.data.train)]

# todo 到这里,一个完整的训练过程就完成了
train_detector(model, datasets[0], cfg, distributed=False, validate=True)
这里是简单版本的
# 目前这个程序只能通过jupyter的形式来产生
import os
# Check Pytorch installation
import torch, torchvision
print(torch.__version__, torch.cuda.is_available())
# Check mmcv installation
from mmcv.ops import get_compiling_cuda_version, get_compiler_version
print(get_compiling_cuda_version())
print(get_compiler_version())
from mmdet.apis import set_random_seed
from mmdet.datasets import build_dataset
from mmdet.models import build_detector
from mmdet.apis import train_detector
import random
import numpy as np
from pycocotools.coco import COCO

"""Sets the random seeds."""
seed = 123
set_random_seed(seed, deterministic=False)
random.seed(seed)
np.random.seed(seed)
torch.manual_seed(seed)
torch.cuda.manual_seed(seed)
torch.backends.cudnn.deterministic = True
torch.backends.cudnn.benchmark = False
os.environ['PYTHONHASHSEED'] = str(seed)

random.seed(seed)
# wandb.login(key="d60ae7823da89718f70116c19628a0fd3787bf49")

# 加载配置文件
from mmcv import Config

# todo 设置基本的配置文件的加载和模型的保存
baseline_cfg_path = "configs/cascade_rcnn/cascade_rcnn_r50_fpn_1x_coco.py"
cfg = Config.fromfile(baseline_cfg_path)
print(cfg)
model_name = 'cascade_rcnn_r50_fpn_1x'  # 设置模型的名称
# 这里的job主要是用来指定保存的目录吧
# job = 3
# Folder to store model logs and weight files
job_folder = f'runs/cow'
cfg.work_dir = job_folder
# Change the wandb username and project name below
# wnb_username = 'dejahu'
# wnb_project_name = 'kaggle_cowboy_outfits'
# Set seed thus the results are more reproducible
cfg.seed = seed
# You should change this if you use different model
cfg.load_from = 'checkpoints/cascade_rcnn_r50_fpn_1x_coco_20200316-3dc56deb.pth'

if not os.path.exists(job_folder):
    os.makedirs(job_folder)

print("Job folder:", job_folder)
for head in cfg.model.roi_head.bbox_head:
    head.num_classes = 5


# todo 配置模型保存的策略
# 修改分类头的数量,修改为模型对应的5个类别
cfg.gpu_ids = [1]  # gpu的id,因为是单卡的训练
cfg.runner.max_epochs = 5  # 非必须 Epochs for the runner that runs the workflow
cfg.total_epochs = 5  # 总共跑了多少轮
# Learning rate of optimizers. The LR is divided by 8 since the config file is originally for 8 GPUs
cfg.optimizer.lr = 0.02 / 8  # 根据实际情况调整学习率
# config to register logger hook
cfg.log_config.interval = 5  # Interval to print the log
# Config to set the checkpoint hook, Refer to https://github.com/open-mmlab/mmcv/blob/master/mmcv/runner/hooks/checkpoint.py for implementation.
cfg.checkpoint_config.interval = 1  # The save interval is 1 这个是权重保存的间隔
cfg.evaluation.interval = 1  # 这个相当于是1轮验证一次

# todo 配置显示的策略
# The config to build the evaluation hook, refer to https://github.com/open-mmlab/mmdetection/blob/master/mmdet/core/evaluation/eval_hooks.py#L7 for more details.
cfg.evaluation.metric = 'bbox'  # Metrics used during evaluation
cfg.evaluation.save_best = 'bbox_mAP'  # Set the epoch intervel to perform evaluation

# todo 学习率设置
# Learning rate scheduler config used to register LrUpdater hook
cfg.lr_config = dict(
    policy='CosineAnnealing',
    # The policy of scheduler, also support CosineAnnealing, Cyclic, etc. Refer to details of supported LrUpdater from https://github.com/open-mmlab/mmcv/blob/master/mmcv/runner/hooks/lr_updater.py#L9.
    by_epoch=False,
    warmup='linear',  # The warmup policy, also support `exp` and `constant`.
    warmup_iters=500,  # The number of iterations for warmup
    warmup_ratio=0.001,  # The ratio of the starting learning rate used for warmup
    min_lr=1e-07)

# todo 配置数据集
cfg.dataset_type = 'CocoDataset'  # Dataset type, this will be used to define the dataset
cfg.classes = ("belt", "sunglasses", "boot", "cowboy_hat", "jacket")
# 指定数据集的路径
data_images = '/mnt/data/scm/2021/openmmlab/kitti_test/input/cowboyoutfits/images'
cfg.data.train.img_prefix = data_images
cfg.data.train.classes = cfg.classes
cfg.data.train.ann_file = 'data/annos/cow/new_train.json'
cfg.data.train.type = 'CocoDataset'
cfg.data.val.img_prefix = data_images
cfg.data.val.classes = cfg.classes
cfg.data.val.ann_file = 'data/annos/cow/new_valid.json'
cfg.data.val.type = 'CocoDataset'
cfg.data.test.img_prefix = data_images
cfg.data.test.classes = cfg.classes
cfg.data.test.ann_file = 'data/annos/cow/new_valid.json'
cfg.data.test.type = 'CocoDataset'
cfg.data.samples_per_gpu = 2  # Batch size of a single GPU used in testing
cfg.data.workers_per_gpu = 2  # Worker to pre-fetch data for each single GPU

# 保存配置文件
cfg_path = f'{job_folder}/current_cfg.py'
print(cfg_path)
# Save config file for inference later
cfg.dump(cfg_path)
print(f'Config:\n{cfg.pretty_text}')

# 开始训练
model = build_detector(cfg.model,
                       train_cfg=cfg.get('train_cfg'),
                       test_cfg=cfg.get('test_cfg'))
model.init_weights()
datasets = [build_dataset(cfg.data.train)]
model.CLASSES = datasets[0].CLASSES
# todo 到这里,一个完整的训练过程就完成了
train_detector(model, datasets[0], cfg, distributed=False, validate=True)
测试
测试的代码如下:
import numpy as np
from tqdm import tqdm
import json  # for dumping json serialized results
import zipfile  # for creating submission zip file
import pandas as pd
import cv2
import os
from matplotlib import pyplot as plt
from mmdet.apis import inference_detector, init_detector, show_result_pyplot

# 获取效果最佳的目录
# Get the best epoch number
import json
from collections import defaultdict

job_folder = f'runs/cow'
cfg_path = f'{job_folder}/current_cfg.py'
log_file = f'{job_folder}/None.log.json'
# Source: mmdetection/tools/analysis_tools/analyze_logs.py
def load_json_logs(json_logs):
    # load and convert json_logs to log_dict, key is epoch, value is a sub dict
    # keys of sub dict is different metrics, e.g. memory, bbox_mAP
    # value of sub dict is a list of corresponding values of all iterations
    log_dicts = [dict() for _ in json_logs]
    for json_log, log_dict in zip(json_logs, log_dicts):
        with open(json_log, 'r') as log_file:
            for line in log_file:
                log = json.loads(line.strip())
                # skip lines without `epoch` field
                if 'epoch' not in log:
                    continue
                epoch = log.pop('epoch')
                if epoch not in log_dict:
                    log_dict[epoch] = defaultdict(list)
                for k, v in log.items():
                    log_dict[epoch][k].append(v)
    return log_dicts


log_dict = load_json_logs([log_file])
best_epoch = np.argmax([item['bbox_mAP'][0] for item in log_dict[0].values()]) + 1
print(best_epoch)


def create_submission(df, model, score_thresh=0.1):
    results = []
    for index, row in tqdm(df.iterrows()):
        img_id = row['id']
        file_name = row['file_name']
        img_base = '/mnt/data/scm/2021/openmmlab/kitti_test/input/cowboyoutfits/images/'
        img = img_base + file_name
        result = inference_detector(model, img)

        for i in range(5):
            if len(result[i]) != 0:
                for j in result[i]:
                    j = np.array(j).tolist()
                    if j[-1] >= score_thresh:
                        # 这里注意原来是xmin, ymin, xmax, ymax.
                        # coco 需要的数据格式是xmin, ymin, w, h.
                        pred = {'image_id': img_id,
                                'category_id': int(classes_id[i]),
                                'bbox': [j[0], j[1], j[2] - j[0], j[3] - j[1]],
                                'score': j[-1]}
                        results.append(pred)
    return results


# 写入结果文件
#  zip name
zip_name = 'cascade_job1'
# classes
classes = ('belt', 'sunglasses', 'boot', 'cowboy_hat', 'jacket')
classes_id = ('87', '1034', '131', '318', '588')

# Choose to use a config and checkpoint
config = cfg_path
# Setup a checkpoint file to load
checkpoint = f'{job_folder}/epoch_{best_epoch}.pth'
# val path
val_path = '/mnt/data/scm/2021/openmmlab/kitti_test/input/cowboyoutfits/valid.csv'

# submission path
submission_path = 'runs/cow/answer.json'
# zipfile path
zipfile_path = 'runs/cow/' + 'zip_' + zip_name + '.zip'

model = init_detector(config, checkpoint, device='cuda:0')
submission_df = pd.read_csv(val_path)
submission = create_submission(submission_df, model)
print(config)
print(checkpoint)
with open(submission_path, 'w') as f:
    json.dump(submission, f)
zf = zipfile.ZipFile(zipfile_path, 'w')
zf.write(submission_path, 'answer.json')
zf.close()
可视化
可视化的代码如下:
# 可视化使用
def get_xyxy_from_cowboy(img_name, df, json_label):
    xy_list = []
    fname_id_dict = {}
    for idx, row in df.iterrows():
        fname_id_dict.update({row['file_name']: row['id']})
    print('len(valid)=', len(fname_id_dict))
    with open(json_label) as f:
        jdata = json.load(f)
        for dict in tqdm(jdata):
            image_id = fname_id_dict[img_name]
            if image_id == dict['image_id']:
                # x_min, y_min, x_max, y_max = dict['bbox']
                x, y, w, h = dict['bbox']
                x_min, y_min, x_max, y_max = x, y, x + w, y + h
                xy_list.append([int(x_min), int(y_min), int(x_max), int(y_max)])

    return xy_list


def draw_rect(img, xy_list):
    for xy in xy_list:
        cv2.rectangle(img, (xy[0], xy[1]), (xy[2], xy[3]), (0, 0, 255), 2)


dataset_path = '/kaggle/input/cowboyoutfits/images/'
df = pd.read_csv('/kaggle/input/cowboyoutfits/valid.csv')
img_name = df['file_name'].sample(1).tolist()[0]
json_label = '/kaggle/working/answer.json'

print(img_name)
img = cv2.imread(os.path.join(dataset_path, img_name))
print(img.shape)  # (h,w,c)

xy_list = get_xyxy_from_cowboy(img_name, df, json_label)
draw_rect(img, xy_list)
plt.imshow(img)

 3966


 扫一扫


 被折叠的 条评论
为什么被折叠?
 到【灌水乐园】发言


