


 本文详细介绍了Spring Bean的生命周期,包括初始化过程(构造、依赖注入、Aware接口、BeanPostProcessor、@PostConstruct、init-method)和销毁过程(@PreDestroy、DisposableBean、destroy-method)。文中通过代码示例展示了如何在Bean类中实现InitializingBean、DisposableBean接口,以及使用@PostConstruct、@PreDestroy注解,并利用BeanPostProcessor自定义处理。文章强调了使用init-method和destroy-method属性优于直接实现接口,同时提到了从Spring 2.5开始可以使用注解介入Bean生命周期。
本篇文章介绍spring bean 生命周期的各个阶段,包括初始化、和销毁过程。
一、bean 的生命周期
当Spring容器启动时,通过不同的方式实例化完成bean以后,bean将放入容器中进行管理。放入到容器的bean需要执行一系列初始化后,才能使其进行可用的状态。之后,当我们不再需要bean时,bean将会被从容器中移除。
SpringBeanFactory在bean的全生命周期过程中参与管理,起到至关重要的作用。
1.1 启动初始化过程
在容器启动后,SpringBeanFactory就会开始工作。在整个初始化的过程中,严格意义上来讲,实际上会有三个层级的初始化处理,包括工厂级别的处理(BeanFactoryPostProcessor等)、容器级别的处理(InstantiationAwareBeanPostProcessor、BeanPostProcessor等)、Bean级别的处理(专属某一个bean)。
工厂级别的处理,还有容器级别的处理基本上是Spring框架层面的内容,不做太深入的研究,在代码中引入这些处理,会加深代码对Spring的耦合。不过这篇文章会简单说一下可能会使用到的BeanPostProcessor。
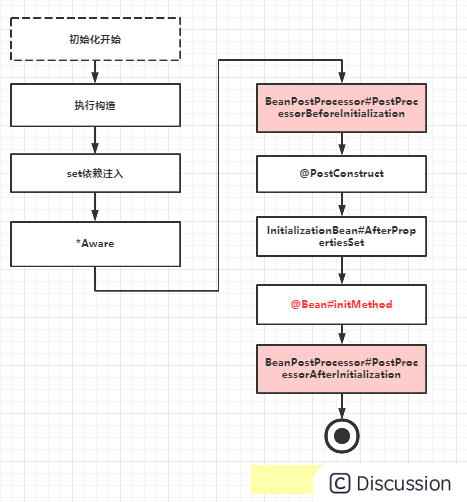
图上是bean的初始化过程,除开BeanPostProcessor后置处理器,其它的过程都是Bean级别的初始化处理。
- 初始化开始是java本身的实例化构造对象
- 接着set依赖注入(SDI)
- 再接着通过*Aware接口让bean感知Spring容器资源,比如
beanName,ApplicationContext等 - 然后是容器级别的
BeanPostProcessor##PostProcessorBeforeInitializationbean初始化前置操作 - 接着是执行有注解
@PostConstruct的方法 - 然后是执行接口
InitializationBean#AfterPropertiesSet的实现 - 其次是执行
@Bean#initMethod - 最后是容器级别的
BeanPostProcessor##PostProcessorBeforeInitializationbean初始化后置操作,至此bean初始化完成
1.2 容器关闭销毁过程
容器执行shutdown关闭操作后,bean就会开始一系列的销毁操作,相比较初始化操作,销毁步骤少了很多。
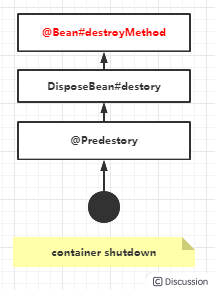
- bean销毁开始执行有注解
@Predestory的方法 - 然后是执行接口
DisposeBean#destory的实现 - 最后执行
@Bean#destroyMethod,至此,销毁完成
二、代码示例
下面通过简单的打印示例演示Spring bean的生命周期。
首先创建一个业务bean类,实现接口InitializingBean, DisposableBean, ApplicationContextAware, BeanNameAware。
``` public class TestBean implements InitializingBean, DisposableBean, ApplicationContextAware, BeanNameAware {
private String name;

public TestBean(String name) {
    System.out.println("-------------construct--------------");
    this.name = name;
}

public void setName(String name) {
    System.out.println("-------------set method--------------");
    this.name = name;
}

public String getName() {
    return name;
}

@Override
public void afterPropertiesSet() throws Exception {
    System.out.println("--------InitializingBean#afterPropertiesSet-----");
}

@Override
public void destroy() throws Exception {
    System.out.println("---------DisposableBean#destroy--------------");
}

@Override
public void setApplicationContext(ApplicationContext applicationContext) throws BeansException {
    System.out.println("---------BeanNameAware#setApplicationContext----");
}


@Override
public void setBeanName(String s) {
    System.out.println("----------ApplicationContextAware#setBeanName----");
}

public void initFromBean(){
    System.out.println("----------initFrom@Bean----------");
}

public void destroyFromBean(){
    System.out.println("----------destroyFrom@Bean---------------");
}

@PostConstruct
public void customInit()
{
    System.out.println("---------@PostConstruct----------");
}

@PreDestroy
public void customDestroy()
{
    System.out.println("---------@PreDestroy--------");
}
} ```
然后实现自定义的BeanPostProcessor
``` public class TestBeanProcessor implements BeanPostProcessor {
@Override
public Object postProcessAfterInitialization(Object bean, String beanName) throws BeansException {
    if(bean instanceof TestBean){
        System.out.println("------------BeanPostProcessor#postProcessAfterInitialization :" + beanName);
    }
    return bean;
}

@Override
public Object postProcessBeforeInitialization(Object bean, String beanName) throws BeansException {
    if(bean instanceof TestBean){
        System.out.println("------------BeanPostProcessor#postProcessBeforeInitialization :" + beanName);
    }
    return bean;
}
} ```
最后实现一个Spring启动类
``` @SpringBootApplication @Import({ TestBeanProcessor.class }) public class SpringsApplication {
public static void main(String[] args) {
    final ConfigurableApplicationContext ctx = SpringApplication.run(SpringsApplication.class, args);
    ctx.close();
}

@ConditionalOnMissingBean
@Bean(initMethod = "initFromBean",destroyMethod = "destroyFromBean")
public TestBean testBean(){
    return new TestBean("testBean"){{
        setName("testName");
    }};
}
} ```
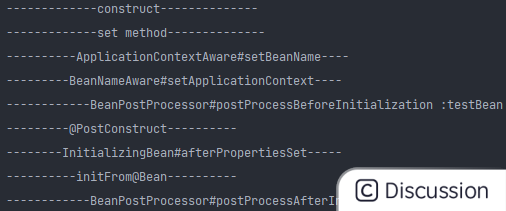
启动应用程序,打印结果如下
启动初始化过程
关闭容器销毁过程

三、总结
InitializingBean 和 DisposableBean不是初始化 和销毁bean 的首选方法,因为它将 bean 类与 spring 容器紧密耦合。更好的方法是在bean 定义中使用init-method,destroyMethod属性。
从 Spring 2.5开始,还可以使用注释来指定使用@postconstruct和@predestroy 介入bean生命周期。
预告下一篇将会讲到BeanPostProcessor,以及*Aware。


 被折叠的 条评论
为什么被折叠?
被折叠的 条评论
为什么被折叠?
 到【灌水乐园】发言


