


简单认识go/analysis
Go/analysis为 linter 提供统一的接口。它简化了它们与 IDE、metalinter、代码审查工具等的集成。
一个简单的go/analysis代码结构如下:
package main

import (
	"go/ast"
	"golang.org/x/tools/go/analysis"
	"golang.org/x/tools/go/analysis/singlechecker"
)

var Analyzer = &analysis.Analyzer{
	Name: "analyzer‘s name",
	Doc:  "describe this analyzer",
	Run:  run,
}

func run(pass *analysis.Pass) (interface{}, error) {
	for _, file := range pass.Files {   //迭代pass.Files以获取改包的语法书
		ast.Inspect(file, func(n ast.Node) bool {
			//扫描逻辑
      //···
		})
	}
	return nil, nil
}

func main() {
	singlechecker.Main(Analyzer)
}
运行:
go run ./main.go -- ./path/to/testdata/test.go添加私有的linter到golangci-lint中
Module Plugin System
Error: build linters: plugin(analyzer): plugin "analyzer" not found
Failed executing command with error: build linters: plugin(analyzer): plugin "analyzer" not found
尚未找到问题原因
Go Plugin System
使用官方给出的例子:https://github.com/golangci/example-plugin-linter
使用步骤
1.创建go文件
我们只需要新增一个go文件,该go文件必须以main为包名,并且必须重写New借口
// This must be package main
package main

import (
	"fmt"

	linters "github.com/golangci/example-linter"
	"golang.org/x/tools/go/analysis"
)

// TODO: This must be implemented
func New(conf any) ([]*analysis.Analyzer, error) {

  //将定义的golang.org/x/tools/go/analysis.Analyzer结构体添加到该切片中,例如我们之前定义的  Analyzer
	return []*analysis.Analyzer{linters.TodoAnalyzer}, nil
}
2. 生成`.so`文件
go build -buildmode=plugin plugin/example.go3. 将插件添加到`.golangci.yml`
linters-settings:
  custom:
    example:
      path: example.so
      description: The description of the linter
      settings: # Settings are optional.
4. 运行golangci-lint扫描代码文件
golangci-lint run testdata/src/testlintdata/todo/todo.go-
按照官方步骤执行之后报错:
Error: build linters: unable to load custom analyzer "funcnameplugin": ./funcNamePlugin.so, plugin.Open("/Users/dusong/GolandProjects/myLinter/funcNamePlugin"): plugin was built with a different version of package internal/goarch
为什么:golangci-lint 的插件基于Go 插件,Go插件有限制:除非程序的所有部分(应用程序及其所有插件)都使用完全相同版本的工具链、相同的构建标签以及某些标志和环境变量的相同值进行编译,否则很可能会发生运行时崩溃。
解决步骤
-
查看golangci-lint版本,查看go版本


两者插件与golangci-lint的系统架构、构建版本以及使用的包版本需要一致,此时我们可以安装与golangci-lint一致的go版本然后构建插件
2. 卸载并安装go
3. 构建golangci-lint
git clone https://github.com/golangci/golangci-lint

make build
4. 创建插件
在我们的自定义linter的总目录下运行:
go build -buildmode=plugin plugin/example.go5. run
将之前构建的golangci-lint移至我们的自定义linter目录下,此时目录结构大致如下: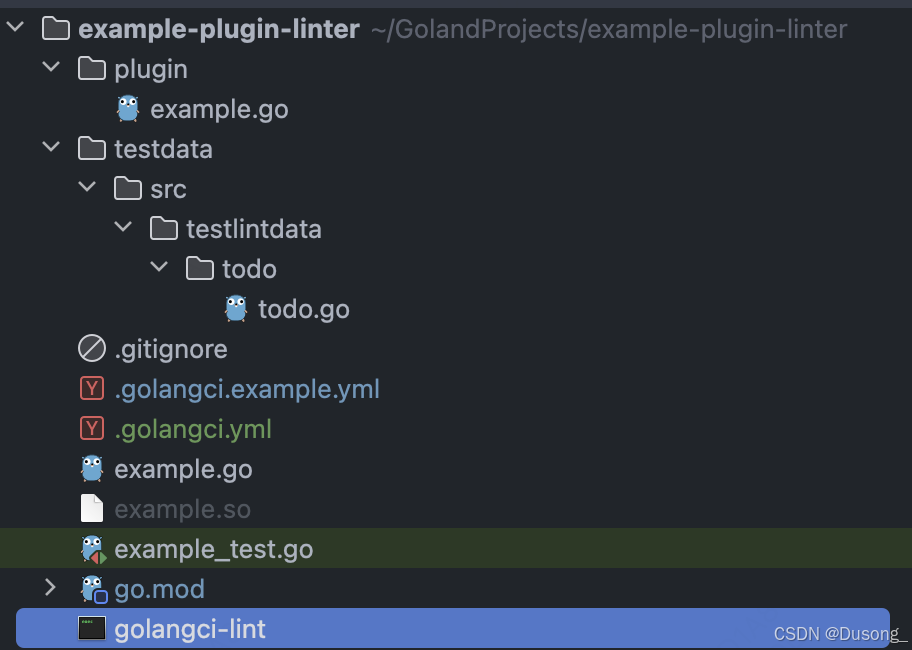
最后执行:
./golangci-lint run testdata/src/testlintdata/todo/todo.go
#执行  golangci-lint run testdata/src/testlintdata/todo/todo.go  依旧报错
#因为执行golangci-lint运行的是bin目录下的,而./golangci-lint执行的是之前用我们的环境构建的
#你也用其将bin目录下的golangci-lint
which golangci-lint    #查看golangci-lint的路径
执行结果:


 9224
9224


 到【灌水乐园】发言


