


 本文详细介绍了Maven的各种命令,包括clean、compile、test、package、install等,及其在生命周期中的顺序。此外,还展示了如何创建Maven Web项目,配置Servlet和插件,以及手动添加Tomcat7插件和依赖。最后,讨论了Maven 3.5与Tomcat 8.5的热部署过程,包括解决404错误、配置tomcat-user.xml以及手动部署和重新部署项目的步骤。
一、Maven命令。
1.命令:mvn tomcat:run
优点是不用eclipse\tomcat就能启动项目,因为Maven里有自带插件。
编译成功之后就会见到一个target文件夹,此文件夹存放的是编译过后的文件,如图。

2.命令:mvn clean
清除掉了target这个文件夹;
3.命令:mvn compile
编译,只编译main目录,不编译test中的代码;
4.命令:mvn test-compile
编译,并且编译test目录中的代码;
5.命令:mvn test
运行test里边的代码;
6.命令:mvn package
打包 java项目==》打成jar包;web项目==》打成war包;
7.命令:mvn install
发布项目到本地仓库,用在打jar包上,打成jar包可以被其他项目使用;
二、Maven命令的生命周期
1.clean 生命周期:clean;
2.default 生命周期:compile, test-compile,test,package,install
3.site 生命周期:site命令,生成项目描述文档静态页
4.不同的生命周期可以一起执行,例如先clean再compile
三、Maven命令的执行顺序
1、在相同生命周期中的命令才会受执行顺序的影响;
2、default生命周期中的命令执行顺序:
compile < test-compile < test < package < install
四、入门Maven程序
1、创建maven程序,不采用原型模板,记得改为生成war包

2、pom.xml中加入编译器插件,以及相关的servlet包
<dependencies><!-- 依赖标签 配置项目中依赖的jar包坐标 -->

		<dependency>
			<groupId>junit</groupId>
			<artifactId>junit</artifactId>
			<version>4.9</version>
			<scope>test</scope>
		</dependency>

		<dependency>
			<groupId>javax.servlet</groupId>
			<artifactId>servlet-api</artifactId>
			<version>2.5</version>
			<scope>provided</scope>
		</dependency>

		<dependency>
			<groupId>javax.servlet</groupId>
			<artifactId>jsp-api</artifactId>
			<version>2.0</version>
			<scope>provided</scope>
		</dependency>

	</dependencies>
  <build>
		<plugins><!-- 插件列表 -->
			<plugin><!-- 通过坐标获取插件 -->
				<groupId>org.apache.maven.plugins</groupId>
				<artifactId>maven-compiler-plugin</artifactId>
				<version>3.8.0</version>
				<configuration>
					<source>1.8</source>
					<target>1.8</target>
					<encoding>UTF-8</encoding>
				</configuration>
			</plugin>
		</plugins>
	</build>
3、创建测试文件
public class testMavenV2 extends HttpServlet {
	private static final long serialVersionUID = 1L;

    /**
     * @see HttpServlet#HttpServlet()
     */
    public testMavenV2() {
        super();
        // TODO Auto-generated constructor stub
    }

	/**
	 * @see HttpServlet#doGet(HttpServletRequest request, HttpServletResponse response)
	 */
	protected void doGet(HttpServletRequest request, HttpServletResponse response) throws ServletException, IOException {
		// TODO Auto-generated method stub
		response.getWriter().append("HelloMaven");
	}

	/**
	 * @see HttpServlet#doPost(HttpServletRequest request, HttpServletResponse response)
	 */
	protected void doPost(HttpServletRequest request, HttpServletResponse response) throws ServletException, IOException {
		// TODO Auto-generated method stub
		doGet(request, response);
	}

}
4、由于maven自带的servlet的版本太低,加不了路径注解,所以在web.xml中加入
<servlet>
    <servlet-name>testMaven</servlet-name>
    <servlet-class>com.dunka.web.testMavenV2</servlet-class>
  </servlet>
  <servlet-mapping>
    <servlet-name>testMaven</servlet-name>
    <url-pattern>/test</url-pattern>
  </servlet-mapping>
  <welcome-file-list>
5、eclipse ->run as -> build..->goals:tomcat:run;
跑起来运行即可。
四、手动添加插件和依赖 配置Tomcat7插件
1、创建web项目,添加web.xml,与上一步相同,不赘述。
2、pom.xml文件,这里利用eclipse的show view->Maven dependencies->local-> rebuild index更新完索引之后
就可以直接在pom.xml文件中添加本地的插件或者依赖
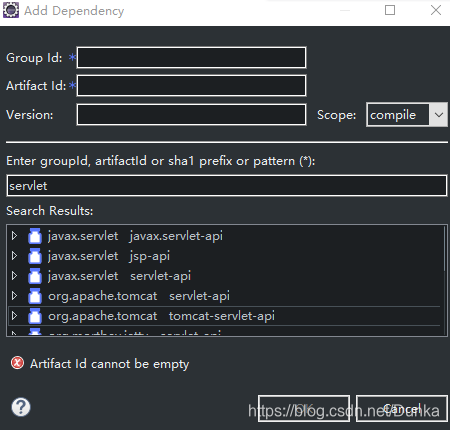
在搜寻结果中找到自己需要的版本就好了,这里为了要写servlet,所以添加了 compile插件、servlet依赖、jsp依赖、junit依赖,添加结果如下
<dependencies>
  	<dependency>
  		<groupId>repository.org.apache.tomcat</groupId>
  		<artifactId>tomcat-servlet-api</artifactId>
  		<version>7.0.47</version>
  		<scope>provided</scope>
  	</dependency>
  	<dependency>
  		<groupId>repository.org.apache.tomcat</groupId>
  		<artifactId>tomcat-jsp-api</artifactId>
  		<version>7.0.47</version>
  		<scope>provided</scope>
  	</dependency>
  	<dependency>
  		<groupId>junit</groupId>
  		<artifactId>junit</artifactId>
  		<version>4.9</version>
  	</dependency>
  </dependencies>
  <build>
  	<plugins>
  		<plugin>
  			<groupId>org.apache.maven.plugins</groupId>
  			<artifactId>maven-compiler-plugin</artifactId>
  			<version>3.8.0</version>
  			<configuration>
  				<source>1.8</source>
  				<target>1.8</target>
  			</configuration>
  		</plugin>
  	</plugins>
  </build>
其中,servlet\jsp的scope标签必须有,
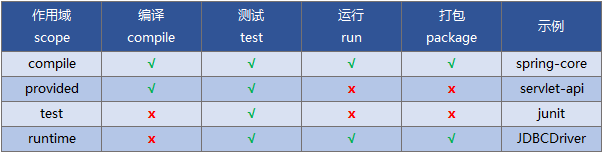
- Scope依赖作用域也可称作依赖范围:maven中的依赖,会根据程序所处的阶段和场景发生变化,所以maven用scope属性来做限制;
- compile(默认值):在编译、运行、测试、打包都有效;
- provided:编译、测试时有效,运行、打包无效;
- test:仅在测试时有效;
- runtime:测试、运行、打包时有效;
- system:不推荐使用,使用system作用域不会去本地仓库寻找依赖,要指定本地路径;
3、添加一个servlet
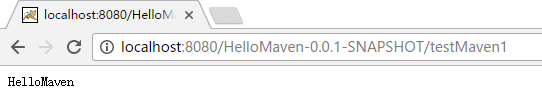
@WebServlet(name = "testMaven1", urlPatterns = { "/testMaven1" })
public class testMaven extends HttpServlet {
	private static final long serialVersionUID = 1L;
	protected void doGet(HttpServletRequest request, HttpServletResponse response) throws ServletException, IOException {
		response.getWriter().append("HelloMaven");
	}
}
4、由于我们在pom.xml依赖中添加了tomcat7的依赖,但其实我们本地并没有tomcat7,所以可以到tomcat官网上找一下tomcat7的插件信息。
地址:http://tomcat.apache.org/maven-plugin-2.2/
        <plugin>
          <groupId>org.apache.tomcat.maven</groupId>
          <artifactId>tomcat7-maven-plugin</artifactId>
          <version>2.2</version>
        </plugin>
当然可以在其中配置自己的tomcat7信息:
<configuration>
<port>8081</port>
<path>/</path>
</configuration>
5、mvn tomcat7:run 跑起来就行。
四、Maven3.5和Tomcat8.5的热部署
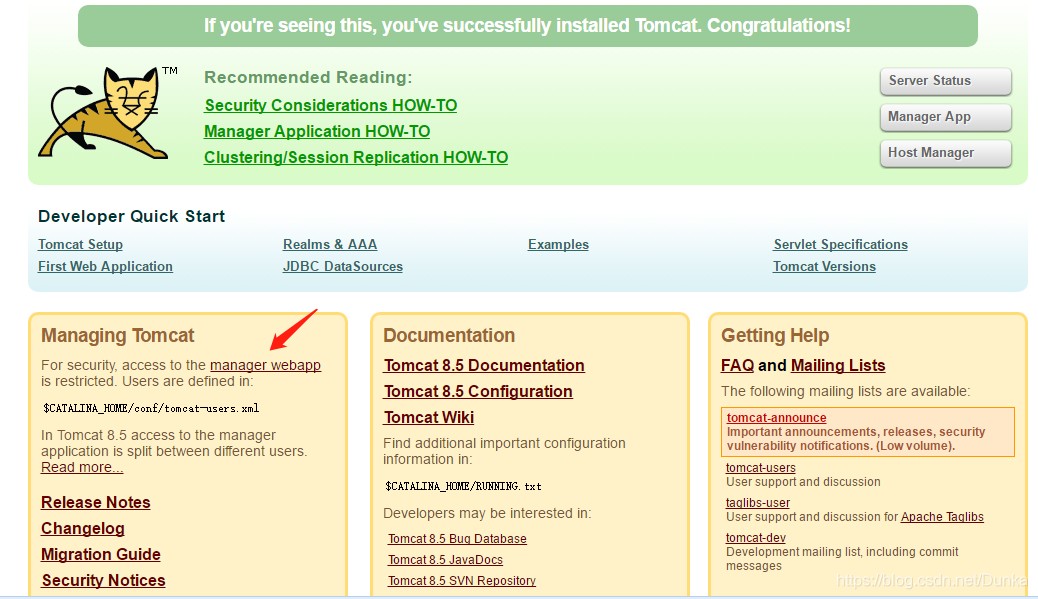
一开始,Tomcat就给我出了个题目,startup.bat正常启动,但是访问localhost:8080总是报404错误。找了两个小时,最终猜测可能是因为那个Tomcat下webapps中的例子被我不小心改过,所以我重下了一个,复制黏贴再重新启动就好了。真是头疼啊啊啊。
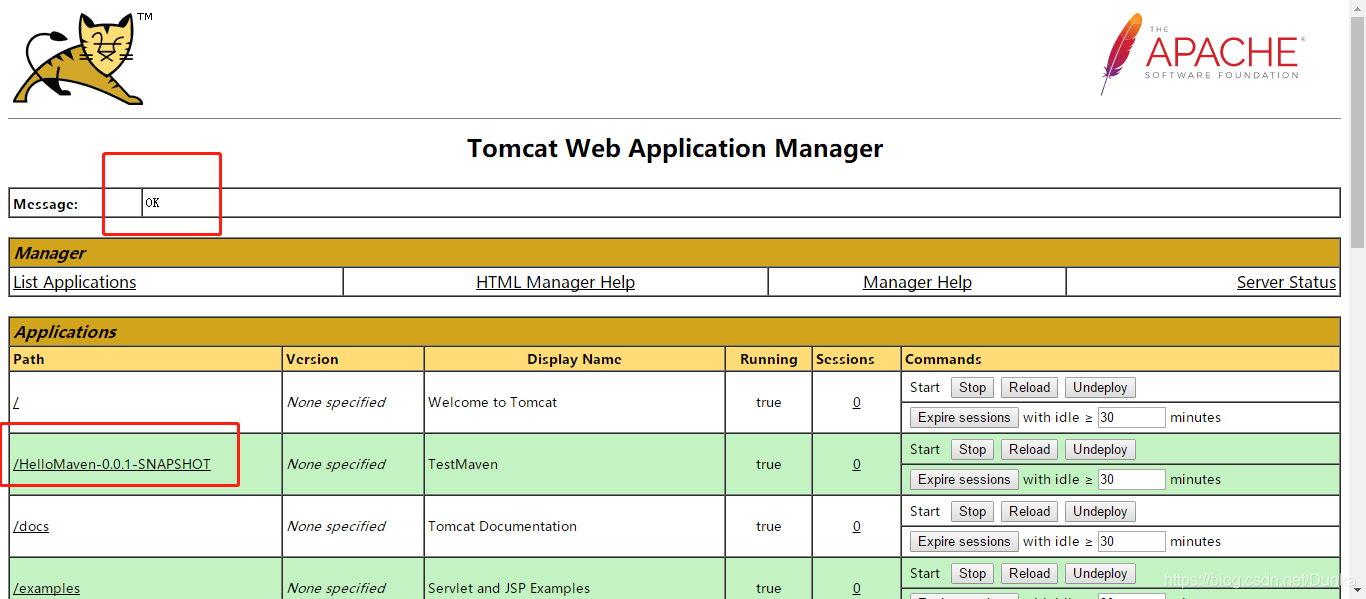
1、点击manager webapp,发现需要登录才能使用此功能,否则报401授权错误。
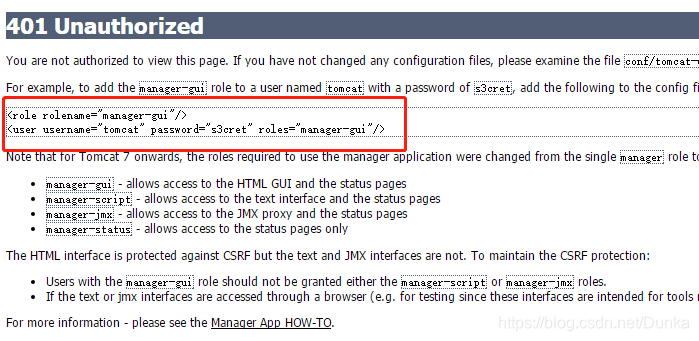
可以看到是conf/tomcat-user.xml文件中缺少这一部分的配置,按自己想法配置就好。
2、成功之后进入页面,并找到手动添加war包

3、成功之后,点击路径加上servlet路径就可以访问了。
4、把项目改为tomcat8.5依赖,tomcat7插件不改只是多加了几行配置。
 <dependencies>
  	<dependency>
  		<groupId>junit</groupId>
  		<artifactId>junit</artifactId>
  		<version>4.9</version>
  		<scope>test</scope>
  	</dependency>
  	<dependency>
  		<groupId>repository.org.apache.tomcat</groupId>
  		<artifactId>tomcat-servlet-api</artifactId>
  		<version>8.5.32</version>
  		<scope>provided</scope>
  	</dependency>
  	<dependency>
  		<groupId>repository.org.apache.tomcat</groupId>
  		<artifactId>tomcat-jsp-api</artifactId>
  		<version>8.5.32</version>
  		<scope>provided</scope>
  	</dependency>
  </dependencies>
  <build>
  	<plugins>
  		<plugin>
  			<groupId>org.apache.maven.plugins</groupId>
  			<artifactId>maven-compiler-plugin</artifactId>
  			<version>3.8.0</version>
  			<configuration>
  				<source>1.8</source>
  				<target>1.8</target>
  			</configuration>
  		</plugin>
  		 <plugin>
          <groupId>org.apache.tomcat.maven</groupId>
          <artifactId>tomcat7-maven-plugin</artifactId>
          <version>2.2</version>
          <configuration>
          	<url>http://localhost:8080/manager/text</url>
          	<username>tomcat</username>
          	<password>dunka</password>
          </configuration>
        </plugin>
  	</plugins>
  </build>
5、run as -> maven build .. ->tomcat7:deploy
后面有修改要重新部署项目,就是tomcat7:redeploy.
用到这里我在想热部署的意义是不是为了在远程服务器上的部署吖~迷惑,不过至少会用了哒哒哒!!!


 3081
3081

 被折叠的 条评论
为什么被折叠?
被折叠的 条评论
为什么被折叠?
 到【灌水乐园】发言


