


 本文介绍了在使用Gradle 7.1.0及以上版本时,如何配置AndServer框架。由于版本更新,`buildscript`和`allprojects`闭包移至`settings.gradle`,但依然可以在`Project`的`build.gradle`中进行配置。只需将`classpath 'com.yanzhenjie.andserver:plugin:2.1.10'`写入`buildscript`块,并确保其位于`plugins`块之前。同时,在模块的`build.gradle`中应用插件并添加相关依赖。
前言
最近想使用一个开源框架AndServer,根据文档说明,首先需要在Project下的build.gradle做如下配置:
buildscript {
    repositories {
        google()
        mavenCentral()
    }

    dependencies {
        classpath 'com.yanzhenjie.andserver:plugin:2.1.10'
        ...
    }
}

allprojects {
    repositories {
        google()
        mavenCentral()
    }
}
...
但是我的项目下的build.gradle长得是这样子的:
plugins {
    id 'com.android.application' version '7.1.2' apply false
    id 'com.android.library' version '7.1.2' apply false
}

task clean(type: Delete) {
    delete rootProject.buildDir
}
纳尼?怎么buildscript和allprojects闭包都不见了?那我还怎么配置?
查阅了一下官方文档,原来是2022年1月的Gradle7.1.0版本做的更新导致的,如下图:
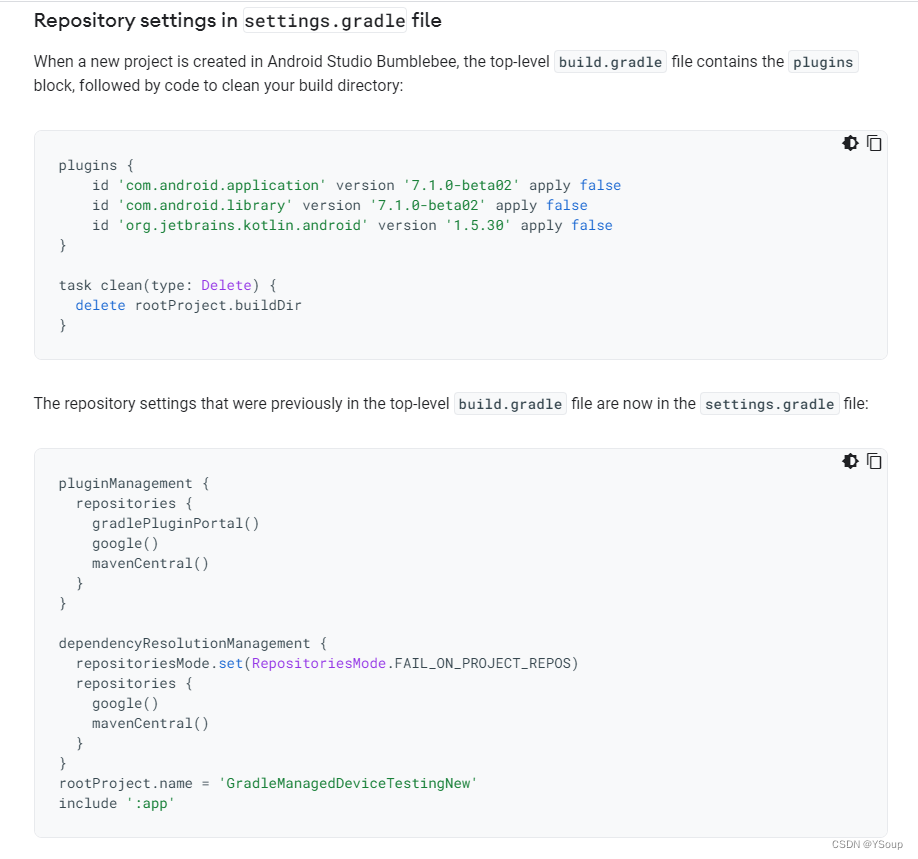
如果你用的是小蜜蜂版本的Android Studio,创建的的项目,默认就是没有buildscript和allprojects的,之前的仓库配置被挪到Project下的setting.gradle里面了。
解决办法
说了那么多,好像也没提到我所要关心的内容:要怎么配置“classpath ‘com.yanzhenjie.andserver:plugin:2.1.10’”?
其实依旧可以放在Project下的build.gradle里面,完整的配置如下:
buildscript {
    dependencies {
        classpath 'com.yanzhenjie.andserver:plugin:2.1.10'
    }
}

plugins {
    id 'com.android.application' version '7.1.2' apply false
    id 'com.android.library' version '7.1.2' apply false
}

task clean(type: Delete) {
    delete rootProject.buildDir
}
注意buildscript闭包需要放在plugins闭包前面,不然会报错。好了,这下已经达成了我的目的。
补充
我的module下的build.gradle如下:
plugins {
    id 'com.android.application'
}
apply plugin: 'com.yanzhenjie.andserver'
android {
    compileSdk 31

    defaultConfig {
        applicationId "com.example.lyyserverdemo"
        minSdk 21
        targetSdk 31
        versionCode 1
        versionName "1.0"

        testInstrumentationRunner "androidx.test.runner.AndroidJUnitRunner"
    }

    buildTypes {
        release {
            minifyEnabled false
            proguardFiles getDefaultProguardFile('proguard-android-optimize.txt'), 'proguard-rules.pro'
        }
    }
    compileOptions {
        sourceCompatibility JavaVersion.VERSION_1_8
        targetCompatibility JavaVersion.VERSION_1_8
    }
}

dependencies {

    implementation 'androidx.appcompat:appcompat:1.3.0'
    implementation 'com.google.android.material:material:1.4.0'
    implementation 'androidx.constraintlayout:constraintlayout:2.0.4'
    implementation 'com.yanzhenjie.andserver:api:2.1.10'
    annotationProcessor 'com.yanzhenjie.andserver:processor:2.1.10'
    testImplementation 'junit:junit:4.13.2'
    androidTestImplementation 'androidx.test.ext:junit:1.1.3'
    androidTestImplementation 'androidx.test.espresso:espresso-core:3.4.0'
}
就是在顶部加了apply plugin: ‘com.yanzhenjie.andserver’,以及在底部的依赖里加了
implementation ‘com.yanzhenjie.andserver:api:2.1.10’
annotationProcessor ‘com.yanzhenjie.andserver:processor:2.1.10’
这是根据AndServer文档配置的,接下来就可以使用这个框架了。


 2175
2175

 被折叠的 条评论
为什么被折叠?
被折叠的 条评论
为什么被折叠?
 到【灌水乐园】发言


