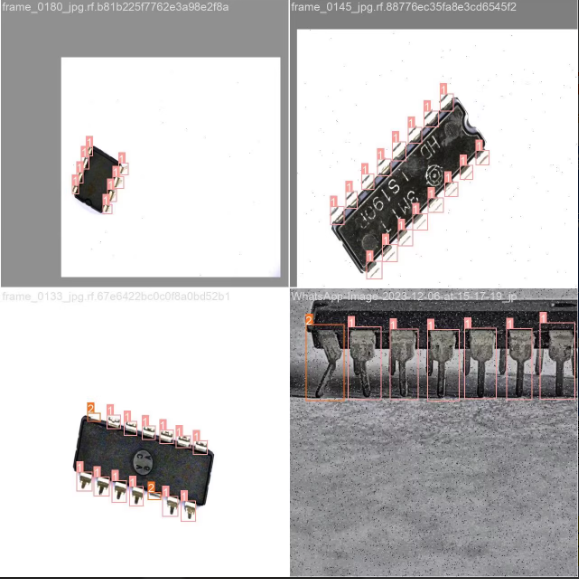
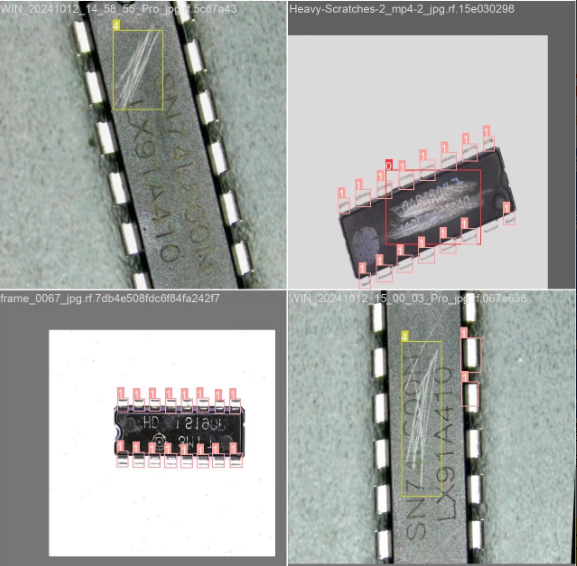
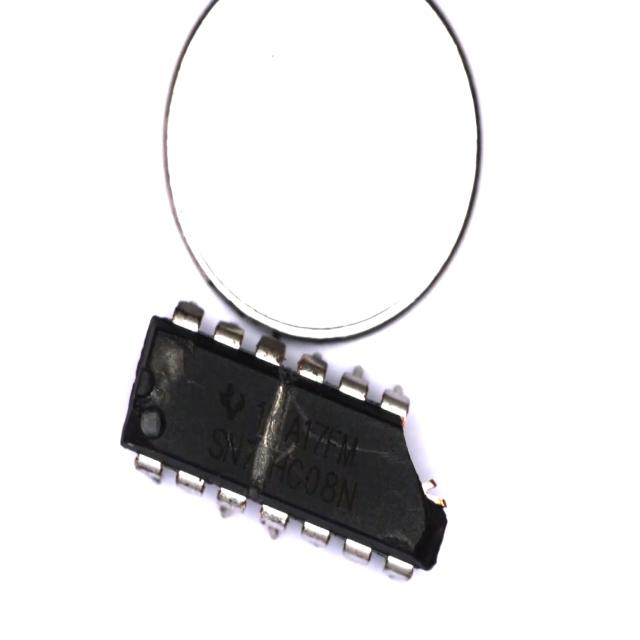
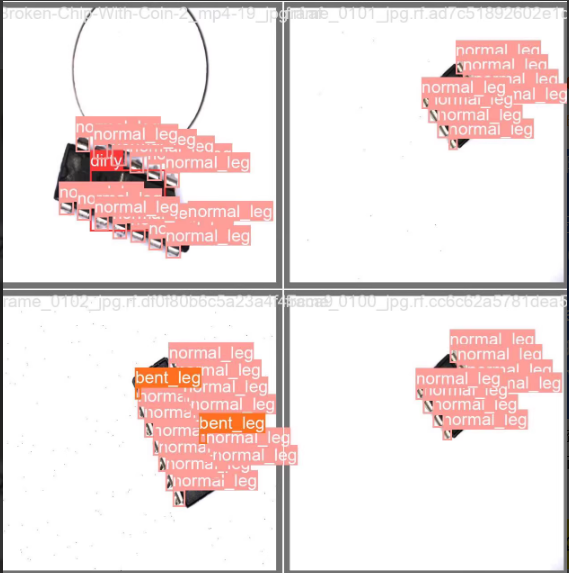
工业视觉检测算法和系统 实时检测芯片引脚的缺陷 使用计算机视觉YOLOV8模型训练芯片缺陷检测数据集 识别检测芯片中的污染引脚 损坏引脚 划痕 自动识别引脚缺陷

半导体芯片缺陷检测数据集与应用指南 目标检测是计算机视觉中的核心技术,通过边界框定位和分类实现物体识别。在工业质检领域,半导体芯片缺陷检测面临小目标、样本不平衡等挑战。本文解析的专用数据集包含1776张高分辨率图像,涵盖破损、引脚断裂等四类缺陷,采用Pascal VOC和YOLO双格式标注。数据集通过旋转增强、亮度调整等策略提升模型鲁棒性,特别针对产线环境优化。实际部署验证显示,基于该数据训练的模型在SMT产线中精确率达95%以上,其中旋转增强使倾斜拍摄场景的mAP提升27.6%,为工业AI质检提供了可靠数据基础和实践方案。 阅读详情

工业视觉检测算法和系统 实时检测芯片引脚的缺陷 使用计算机视觉YOLOV8模型训练芯片缺陷检测数据集 识别检测芯片中的污染引脚 损坏引脚 划痕 自动识别引脚缺陷

芯片缺陷检测数据集 2100张 引脚缺陷划痕 带标voc yolo
数据集描述:

芯片引脚缺陷数据集信息表

数据集概述
项目内容
数据集名称芯片引脚缺陷数据集
总图像数量2,150 张
总标注个数27,344 个
目标类别数5 类
应用场景半导体制造质量控制、自动化检测系统、工业视觉检测
标注格式未指定(可根据需求转换为YOLO、VOC等格式)

类别标签及样本分布统计表

类别编号英文名称中文名称图片张数标注个数
0dirty污染313313
1normal_leg正常引脚2,11825,047
2bent_leg弯曲引脚7421,511
3damaged_leg损坏引脚7091
4scratches划痕236382
总计————2,15027,344

数据集特点总结

  • ✅ 多类别标注:包含5种常见的芯片引脚缺陷类型,覆盖了从正常到多种缺陷状态。
  • ✅ 高标注密度:平均每个图像有约12.7个标注框,适合细粒度缺陷检测任务。
  • ✅ 丰富样本量:提供2,150张图像和27,344个标注,适用于训练深度学习模型。
在这里插入图片描述


#### `data.yaml` 示例内容

```yaml
train: ./chip-pin-defect-dataset/images/train
val: ./chip-pin-defect-dataset/images/val
test: ./chip-pin-defect-dataset/images/test

nc: 5  # 类别数量
names: ['dirty', 'normal_leg', 'bent_leg', 'damaged_leg', 'scratches']  # 类别名称

该数据集非常适合用于开发和评估基于深度学习的芯片引脚缺陷检测系统。如果您有更多需求或需要进一步的帮助,请随时告知!
在这里插入图片描述
在这里插入图片描述
1
在这里插入图片描述
1


✅ 一、环境搭建(从零开始)

1. 确认 CUDA 驱动(GPU 加速)

nvidia-smi

确保输出中显示 CUDA 版本 ≥ 11.8(推荐 12.1)


2. 安装 Anaconda

前往 https://www.anaconda.com/products/distribution 下载并安装。


3. 创建 Python 虚拟环境

# 创建名为 chip_defect 的环境
conda create -n chip_defect python=3.9

# 激活环境
conda activate chip_defect

4. 安装必要依赖

# 安装 PyTorch(以 CUDA 11.8 为例)
pip install torch torchvision torchaudio --index-url https://download.pytorch.org/whl/cu118

# 安装 YOLOv8 官方库
pip install ultralytics opencv-python numpy matplotlib tqdm scikit-learn pandas pillow

# 可选:TensorBoard 可视化
pip install tensorboard

# 验证 GPU 是否可用
python -c "import torch; print(torch.cuda.is_available())"
# 应输出 True

✅ 二、数据集结构与 data.yaml 配置

目录结构

chip-pin-defect-dataset/
├── images/
│   ├── train/
│   ├── val/
│   └── test/
├── labels/
│   ├── train/
│   ├── val/
│   └── test/
└── data.yaml

data.yaml 文件内容

# data.yaml
train: ./chip-pin-defect-dataset/images/train
val: ./chip-pin-defect-dataset/images/val
test: ./chip-pin-defect-dataset/images/test

nc: 5  # 类别数量
names: 
  - dirty          # 污染
  - normal_leg     # 正常引脚
  - bent_leg       # 弯曲引脚
  - damaged_leg    # 损坏引脚
  - scratches      # 划痕

# 中文名称(用于可视化)
names_zh:
  - 污染
  - 正常引脚
  - 弯曲引脚
  - 损坏引脚
  - 划痕

⚠️ 注意:确保标注文件为 YOLO 格式(归一化坐标),每行:class_id x_center y_center width height


✅ 三、调用 YOLOv8 官方预训练模型进行训练

由于引脚目标小且密集,建议使用 YOLOv8m 或 YOLOv8l 以获得更好性能。

from ultralytics import YOLO

# 加载官方预训练模型
model = YOLO('yolov8m.pt')  # 推荐使用中等模型

# 开始训练
results = model.train(
    data='data.yaml',           # 数据配置文件路径
    epochs=200,                 # 训练轮数(工业数据建议多训)
    batch=32,                   # 根据显存调整(RTX 3090 可用 64)
    imgsz=640,                  # 图像尺寸
    optimizer='AdamW',          # 更稳定优化器
    lr0=0.001,                  # 初始学习率
    weight_decay=0.0005,
    momentum=0.937,

    # 数据增强(关键!提升泛化)
    augment=True,
    hsv_h=0.015,
    hsv_s=0.7,
    hsv_v=0.4,
    degrees=10.0,
    translate=0.1,
    scale=0.5,
    shear=0.0,
    flipud=0.0,
    fliplr=0.5,
    mosaic=1.0,
    mixup=0.1,
    copy_paste=0.1,             # 对小目标特别有效

    # 正则化
    dropout=0.2,
    label_smoothing=0.05,

    # 学习率调度
    cos_lr=True,                # 余弦退火

    # 保存与日志
    project='runs/train',
    name='chip_defect_yolov8m',
    save=True,
    save_period=10,
    exist_ok=False,

    # 缓存(内存充足时开启)
    cache=True
)

✅ 提示:

  • 若显存不足,改用 yolov8s.pt 或降低 batch=16
  • copy_paste 和 mosaic 对小目标检测至关重要
  • 可开启 close_mosaic 在最后 10 轮关闭 Mosaic 增强

✅ 四、推理代码(单图 / 批量 / 视频)

1. 单张图像推理

from ultralytics import YOLO
from PIL import Image

# 加载最佳模型
model = YOLO('runs/train/chip_defect_yolov8m/weights/best.pt')

# 推理
results = model('test_chip.jpg', conf=0.3)

# 显示结果
for r in results:
    im_array = r.plot()  # 绘制边界框和标签
    im = Image.fromarray(im_array[..., ::-1])  # BGR to RGB
    im.show()

2. 批量图像推理

results = model.predict(
    source='chip-pin-defect-dataset/images/test',
    save=True,
    project='runs/detect',
    name='chip_test_results',
    conf=0.3,
    imgsz=640
)
print("批量推理完成")

3. 实时摄像头检测(OpenCV)

import cv2

cap = cv2.VideoCapture(0)

while cap.isOpened():
    ret, frame = cap.read()
    if not ret:
        break

    results = model(frame, conf=0.3)
    annotated_frame = results[0].plot()

    cv2.imshow('Chip Pin Defect Detection', annotated_frame)
    if cv2.waitKey(1) & 0xFF == ord('q'):
        break

cap.release()
cv2.destroyAllWindows()

✅ 五、模型评估(验证集 + 测试集)

1. 在验证集上评估

metrics = model.val(
    data='data.yaml',
    split='val',
    batch=32,
    imgsz=640,
    save_json=False,
    project='runs/val',
    name='chip_eval'
)

print(f"mAP@0.5: {metrics.box.map50:.4f}")
print(f"mAP@0.5:0.95: {metrics.box.map:.4f}")
print(f"Precision: {metrics.box.p:.4f}")
print(f"Recall: {metrics.box.r:.4f}")

# 每类 AP
for i, name in enumerate(model.names):
    print(f"{name} (AP@0.5): {metrics.box.ap[i]:.4f}")

2. 在测试集上独立评估(最终性能)

# 使用 test split 进行最终性能评估
test_metrics = model.val(
    data='data.yaml',
    split='test',
    save_json=True,
    name='test_final'
)

print(f"Test mAP@0.5: {test_metrics.box.map50:.4f}")
print(f"Test mAP@0.5:0.95: {test_metrics.box.map:.4f}")

✅ 六、可视化与分析

1. 使用中文标签显示

# 修改模型类名显示为中文
model.names = ['污染', '正常引脚', '弯曲引脚', '损坏引脚', '划痕']

results = model('test_chip.jpg')
results[0].plot()  # 显示中文标签

2. 查看训练曲线

tensorboard --logdir runs/train/chip_defect_yolov8m

✅ 七、模型导出(ONNX / TensorRT / TFLite)

# 导出为 ONNX(通用部署)
model.export(format='onnx', dynamic=True, opset=13, imgsz=640)

# 导出为 TensorRT(NVIDIA GPU 加速)
model.export(format='engine', half=True, dynamic=True)

# 导出为 TFLite(移动端)
model.export(format='tflite', int8=True)

# 导出为 CoreML(iOS)
model.export(format='coreml')

【芯片缺陷检测】DIP芯片缺陷检测系统【含GUI Matlab源码 2423期】 DIP芯片缺陷检测系统 完整的代码,方可运行;可提供运行操作视频!适合小白! 阅读详情

相关推荐

集成电路芯片缺陷检测——Matlab实现

接下来,我们可以使用机器学习算法来训练一个分类器,以区分正常芯片和有缺陷芯片。然后,我们可以应用一些图像增强技术,如直方图均衡化或滤波器,以提高图像的质量和对比度。首先,我们需要准备一个数据集,该数据集包含了正常芯片和有缺陷芯片的图像样本。对于每个样本,我们需要提供一个标签,表示该样本是正常芯片还是有缺陷的芯片。在本文中,我们将介绍如何使用Matlab实现集成电路芯片缺陷检测,并提供相应的源代码。当然,这只是一个简单的示例,实际应用中可能需要更复杂的特征提取和分类算法来达到更好的性能。

pytorchCode的博客 832

如何使用YOLOv8训练芯片缺陷数据集 包括数据准备、模型训练、评估和结果可视化等多个步骤 558张,标签为yolo格式 4类 缺陷类型(自定义):划痕、污渍、封装破裂、引脚

如何使用YOLOv8训练芯片缺陷数据集 包括数据准备、模型训练、评估和结果可视化等多个步骤 558张,标签为yolo格式 4类 缺陷类型(自定义):划痕、污渍、封装破裂、引脚

QQ_1309399183的博客 845

基于计算机视觉的芯片缺陷检测——附带MATLAB代码

在这篇文章中,我们将介绍如何使用计算机视觉实现芯片缺陷检测,并提供相应的MATLAB代码。首先,我们需要准备一个用于训练的数据集,其中包含正常芯片和有缺陷芯片的图像。通过以上代码,我们建立了一个基于Faster R-CNN架构的目标检测器,并使用提供的数据集进行训练和评估。然后,我们可以应用该模型来检测输入图像中的芯片缺陷,并可视化检测结果。计算机视觉技术在芯片缺陷检测中具有广阔的应用前景。通过使用深度学习模型和合适的训练数据,我们可以实现高效准确的芯片缺陷检测,从而提高产品质量和生产效率。

loop_network381的博客 634

如何使用yolov8深度学习目标检测模型训练——芯片缺陷数据集_芯片表面缺陷数据集 1600张 6类

如何使用yolov8深度学习目标检测模型训练——芯片缺陷数据集/芯片表面缺陷数据集 1600张 6类

2401_88441190的博客 1205

<数据集>咖啡叶片病害识别<目标检测>

YOLO与VOC格式的咖啡叶片病害识别数据集,适用于YOLO系列、Faster Rcnn、SSD等模型训练,类别:Cercospora、Miner、Phoma、Rust,图片数量1744。文件中包含图片、txt标签、指定类别信息的yaml文件、xml标签,已将图片和txt标签划分为训练集、验证集和测试集,可直接用于YOLOv5、YOLOv6、YOLOv7、YOLOv8、YOLOv9、YOLOv10、YOLOv11、YOLOv12、YOLOv13、YOLOv26等YOLO系列算法的训练。

qq_53332949的博客 321

各种芯片的引脚

附 录 三 EDA系统结构图信号名与芯片引脚对照表 硬件 资源 元件引脚 EP2C5 引脚 序 号 EPM 1K30 引脚序号 EPM 10K10 引脚序号 XC 95108 引脚序号 IspLSI 1032 引脚序号 EPM 7128 引脚序号 电路使用说明 LED 数码显示 A 3 71 5 1 3 4 该部分电路为固定电路。 使用LED数码显示时请按照器件引脚分配表进行引脚分配后再下载到芯片中。 B 5 73 6 2 4 5 C 6 74 7 3 5 6 D 8 75 8 4 6 8 E 10 76 9 5 7 9 F 11 77 10 6 8 10 G 12 78 11 7 9 11 Dp 144 81 83 83 68 74LS138 S1 141 35 78 80 80 64 S2 142 36 79 81 81 65 S3 143 37 80 82 82 67

【芯片缺陷检测】 DIP芯片缺陷检测系统【含GUI Matlab源码 2423期】

DIP芯片缺陷检测系统 完整代码,直接运行,适合小白!可提供运行操作视频!

Matlab912100926的博客 829

同花顺【红绿趋势】幅图指标 源码分析

a10:IF(差值<=0 ,0 ,差值*0.2 ,4 ,0),STICK,linethick5,colorred;a7:IF(差值<=0 ,0 ,差值*0.8 ,4 ,0),STICK,linethick5,colorred;a8:IF(差值<=0 ,0 ,差值*0.6 ,4 ,0),STICK,linethick5,colorred;a6:IF(差值<=0 ,0 ,差值*1 ,4 , 0),STICK,linethick5,colorred;DRAWICON(先锋<0,-25,1);

zhibiaogong的博客 4056

芯片引脚缺陷检测数据集VOC+YOLO格式203张2类别

数据集格式:Pascal VOC格式+YOLO格式(不包含分割路径的txt文件,仅仅包含jpg图片以及对应的VOC格式xml文件和yolo格式txt文件)特别声明:本数据集不对训练的模型或者权重文件精度作任何保证,数据集只提供准确且合理标注。标注类别名称:["crack","normal"]图片数量(jpg文件个数):203。标注数量(xml文件个数):203。标注数量(txt文件个数):203。normal 框数 = 3010。使用标注工具:labelImg。标注规则:对类别进行画矩形框。

FL1623863129的博客 425

Metal 一、初识 Metal 及其语言规范

游戏开发者的新的技术平台,该技术能够为3D图像提高 10 倍的渲染性能。苹果2018年推出 Metal,在此之前一直使用OpenGL ES。1图形渲染;2高并发计算。苹果文档给出的 Metal 优化:CPU 低消耗、GPU 高利用、连续处理器并行、有效的资源利用Metal 官方文档。

irainsa的博客 1219

R语言实战:5分钟搞定相加交互效应分析(逻辑回归/Cox回归/GLMM/GEE全支持)

本文详细介绍了如何利用R语言中的`scitable`包快速实现相加交互效应分析,支持逻辑回归、Cox回归、GLMM和GEE等多种模型。通过自动化计算RERI、AP和SI等指标,大幅提升临床研究和流行病学分析的效率与准确性,特别适合处理多因素联合作用的复杂场景。

fanta的博客 669

芯片引脚类型检测数据集VOC+YOLO格式582张5类别

数据集格式:Pascal VOC格式+YOLO格式(不包含分割路径的txt文件,仅仅包含jpg图片以及对应的VOC格式xml文件和yolo格式txt文件)标注类别名称:["8 Pin Chip","14 Pin Chip","16 Pin Chip","20 Pin Chip","Chips"]特别声明:本数据集不对训练的模型或者权重文件精度作任何保证,数据集只提供准确且合理标注。图片数量(jpg文件个数):582。标注数量(xml文件个数):582。标注数量(txt文件个数):582。

FL1623863129的博客 355

基于simulink的车道保持辅助系统(LKA)的仿真与实现

本文介绍了如何利用Simulink实现车道保持辅助系统(LKA)的仿真与建模。首先对比了车道偏离预警(LDW)和LKA的功能差异,强调LKA的主动干预特性。接着详细阐述了LKA系统架构,包括环境感知、决策控制等核心组件,并基于自行车模型建立车辆横向动力学方程。 文章重点演示了Simulink建模步骤:搭建车辆动力学模型、设计LKA控制器(采用LQR算法)、实现执行器接口和驾驶员干预检测。通过四个典型场景的仿真测试,验证了系统在直道行驶、弯道跟踪等工况下的控制性能,并给出了关键评价指标。最后展望了MPC控制、

amy_mhd的博客 227

基于YOLO格式的服装分类目标检测数据集

图片数量: 总计:5557 张。训练集 3889 张, 验证集 1112 张, 测试集 556 张 标注文件格式: YOLO的txt格式可以直接用于模型训练。

ZSW1218的博客 1079

OSError We couldn‘t connect to https://huggingface.co to load file, couldn‘t find it chatglm3-6b解决方案

本文主要介绍了OSError: We couldn’t connect to https://huggingface.co to load this file, couldn’t find it in the cached files and it looks like THUDM/chatglm3-6b is not the path to a directory containing a file named config.json.解决方案,希望能对学习python的同学们有所帮助。

weixin_43178406的博客 5万+

Windows Docker + RK3588 部署 YOLO26-Pose 人体姿态检测

YOLO26-Pose 在 RK3588 上的部署流程是 Windows Docker 容器内 ONNX 导出 → RKNN 转换(INT8 量化)→ ADB 推送 → 板端 C++ 推理。YOLO26n-Pose 在 640 输入下全链路约 55 FPS,可以覆盖实时姿态检测需求。先在板端用单张图片验证关键点输出正确性,确认 C++ 后处理的解析逻辑无误后,再切换到摄像头实时推理。

m0_64661770的博客 98

半导体晶圆缺陷图谱分类数据集25519张8类别

类别名称:["center","donut","edge-loc","edge-ring","loc","near-full","random","scratch"]数据集格式:仅仅包含jpg图片,每个类别文件夹下面存放着对应图片。edge-ring 图片数:9680。edge-loc 图片数:5189。near-full 图片数:149。scratch 图片数:1193。center 图片数:4294。random 图片数:866。donut 图片数:555。loc 图片数:3593。

futureflsl的博客 1036

RK3568适配MIPI屏幕触摸,触摸延时很大

我用的是系统,接了一个,设备树已经正确配置,evtest测试坐标值和触摸位置都是准确的。但是出现了一个:我在屏幕上点一下,要等大约 2 秒才能在evtest里看到坐标事件打印。这种现象在 Goodix 系列触摸驱动里比较少见,一般意味着。

小灰灰的博客 1363

芯片检测实战_yolo11-C3k2-MambaOut-FDConv实现芯片引脚识别与分类

摘要: 本文提出基于改进YOLO11的芯片引脚检测系统,创新性引入C3k2、MambaOut和FDConv模块提升检测性能。C3k2通过自适应通道重组优化特征提取,MambaOut增强长距离特征建模能力,FDConv在频域动态调整卷积核参数。实验采用10,000张多类型芯片图像,结合专业数据增强策略,最终模型达到94.8%的mAP,较基线YOLOv5提升10.6个百分点。该系统解决了传统方法对高密度芯片检测精度不足的问题,在定位精度和分类准确率上分别提升6.7%和5.2%,为工业自动化质检提供了高效解决方案

qunshankeji的博客 1200

深度学习中常用的几种卷积(下篇):膨胀卷积、可分离卷积(深度可分离、空间可分离)、分组卷积(附Pytorch测试代码)

膨胀卷积也称为扩张卷积或空洞卷积,一般可通过对标准二维卷积的卷积核设置合适的膨胀率(具体地指卷积核元素之间的距离)实现。合理利用膨胀卷积可在不引入其他参数的同时,扩大输出中元素的感受野,提高特征的全局表示能力。下面通过展示几个不同膨胀率下的卷积核大小以及感受野变化情况,可以更直观的理解:图中灰色为输入,蓝色为卷积核,黄色为输出。1)dilation=1:表示卷积核元素之间距离为1,使用0进行大小为dilation-1=0的填充(这是默认情况),因此。

NorthSmile的博客 9013

深度学习工具包 DeepLearningToolbox

深度学习工具包Deprecation notice.-----This toolbox is outdated and no longer maintained.There are much better tools available for deep learning than this toolbox, e.g. [Theano](http://deeplearning.net/software/theano/), [torch](http://torch.ch/) or [tensorflow](http://www.tensorflow.org/)I would suggest you use one of the tools mentioned above rather than use this toolbox.Best, Rasmus.DeepLearnToolbox================A Matlab toolbox for Deep Learning.Deep Learning is a new subfield of machine learning that focuses on learning deep hierarchical models of data.It is inspired by the human brain's apparent deep (layered, hierarchical) architecture.A good overview of the theory of Deep Learning theory is[Learning Deep Architectures for AI](http://www.iro.umontreal.ca/~bengioy/papers/ftml_book.pdf)For a more informal introduction, see the following videos by Geoffrey Hinton and Andrew Ng.* [The Next Generation of Neural Networks](http://www.youtube.com/watch?v=AyzOUbkUf3M) (Hinton, 2007)* [Recent Developments in Deep Learning](http://www.youtube.com/watch?v=VdIURAu1-aU) (Hinton, 2010)* [Unsupervised Feature Learning and Deep Learning](http://www.youtube.com/watch?v=ZmNOAtZIgIk) (Ng, 2011)If you use this toolbox in your research please cite [Prediction as a candidate for learning deep hierarchical models of data](http://www2.imm.dtu.dk/pubdb/views/publication_details.php?id=6284)```@MASTERSTHESIS\{IMM2012-06284, author = "R. B. Palm", title = "Prediction as a candidate for learning deep hierarchical models of data", year = "2012",}```Contact: rasmusbergpalm at gmail dot comDirectories included in the toolbox-----------------------------------`NN/` - A library for Feedforward Backpropagation Neural Networks`CNN/` - A library for Convolutional Neural Networks`DBN/` - A library for Deep Belief Networks`SAE/` - A library for Stacked Auto-Encoders`CAE/` - A library for Convolutional Auto-Encoders`util/` - Utility functions used by the libraries`data/` - Data used by the examples`tests/` - unit tests to verify toolbox is workingFor references on each library check REFS.mdSetup-----1. Download.2. addpath(genpath('DeepLearnToolbox'));Example: Deep Belief Network---------------------```matlabfunction test_example_DBNload mnist_uint8;train_x = double(train_x) / 255;test_x = double(test_x) / 255;train_y = double(train_y);test_y = double(test_y);%% ex1 train a 100 hidden unit RBM and visualize its weightsrand('state',0)dbn.sizes = [100];opts.numepochs = 1;opts.batchsize = 100;opts.momentum = 0;opts.alpha = 1;dbn = dbnsetup(dbn, train_x, opts);dbn = dbntrain(dbn, train_x, opts);figure; visualize(dbn.rbm{1}.W'); % Visualize the RBM weights%% ex2 train a 100-100 hidden unit DBN and use its weights to initialize a NNrand('state',0)%train dbndbn.sizes = [100 100];opts.numepochs = 1;opts.batchsize = 100;opts.momentum = 0;opts.alpha = 1;dbn = dbnsetup(dbn, train_x, opts);dbn = dbntrain(dbn, train_x, opts);%unfold dbn to nnnn = dbnunfoldtonn(dbn, 10);nn.activation_function = 'sigm';%train nnopts.numepochs = 1;opts.batchsize = 100;nn = nntrain(nn, train_x, train_y, opts);[er, bad] = nntest(nn, test_x, test_y);assert(er < 0.10, 'Too big error');```Example: Stacked Auto-Encoders---------------------```matlabfunction test_example_SAEload mnist_uint8;train_x = double(train_x)/255;test_x = double(test_x)/255;train_y = double(train_y);test_y = double(test_y);%% ex1 train a 100 hidden unit SDAE and use it to initialize a FFNN% Setup and train a stacked denoising autoencoder (SDAE)rand('state',0)sae = saesetup([784 100]);sae.ae{1}.activation_function = 'sigm';sae.ae{1}.learningRate = 1;sae.ae{1}.inputZeroMaskedFraction = 0.5;opts.numepochs = 1;opts.batchsize = 100;sae = saetrain(sae, train_x, opts);visualize(sae.ae{1}.W{1}(:,2:end)')% Use the SDAE to initialize a FFNNnn = nnsetup([784 100 10]);nn.activation_function = 'sigm';nn.learningRate = 1;nn.W{1} = sae.ae{1}.W{1};% Train the FFNNopts.numepochs = 1;opts.batchsize = 100;nn = nntrain(nn, train_x, train_y, opts);[er, bad] = nntest(nn, test_x, test_y);assert(er < 0.16, 'Too big error');```Example: Convolutional Neural Nets---------------------```matlabfunction test_example_CNNload mnist_uint8;train_x = double(reshape(train_x',28,28,60000))/255;test_x = double(reshape(test_x',28,28,10000))/255;train_y = double(train_y');test_y = double(test_y');%% ex1 Train a 6c-2s-12c-2s Convolutional neural network %will run 1 epoch in about 200 second and get around 11% error. %With 100 epochs you'll get around 1.2% errorrand('state',0)cnn.layers = { struct('type', 'i') %input layer struct('type', 'c', 'outputmaps', 6, 'kernelsize', 5) %convolution layer struct('type', 's', 'scale', 2) %sub sampling layer struct('type', 'c', 'outputmaps', 12, 'kernelsize', 5) %convolution layer struct('type', 's', 'scale', 2) %subsampling layer};cnn = cnnsetup(cnn, train_x, train_y);opts.alpha = 1;opts.batchsize = 50;opts.numepochs = 1;cnn = cnntrain(cnn, train_x, train_y, opts);[er, bad] = cnntest(cnn, test_x, test_y);%plot mean squared errorfigure; plot(cnn.rL);assert(er<0.12, 'Too big error');```Example: Neural Networks---------------------```matlabfunction test_example_NNload mnist_uint8;train_x = double(train_x) / 255;test_x = double(test_x) / 255;train_y = double(train_y);test_y = double(test_y);% normalize[train_x, mu, sigma] = zscore(train_x);test_x = normalize(test_x, mu, sigma);%% ex1 vanilla neural netrand('state',0)nn = nnsetup([784 100 10]);opts.numepochs = 1; % Number of full sweeps through dataopts.batchsize = 100; % Take a mean gradient step over this many samples[nn, L] = nntrain(nn, train_x, train_y, opts);[er, bad] = nntest(nn, test_x, test_y);assert(er < 0.08, 'Too big error');%% ex2 neural net with L2 weight decayrand('state',0)nn = nnsetup([784 100 10]);nn.weightPenaltyL2 = 1e-4; % L2 weight decayopts.numepochs = 1; % Number of full sweeps through dataopts.batchsize = 100; % Take a mean gradient step over this many samplesnn = nntrain(nn, train_x, train_y, opts);[er, bad] = nntest(nn, test_x, test_y);assert(er < 0.1, 'Too big error');%% ex3 neural net with dropoutrand('state',0)nn = nnsetup([784 100 10]);nn.dropoutFraction = 0.5; % Dropout fraction opts.numepochs = 1; % Number of full sweeps through dataopts.batchsize = 100; % Take a mean gradient step over this many samplesnn = nntrain(nn, train_x, train_y, opts);[er, bad] = nntest(nn, test_x, test_y);assert(er < 0.1, 'Too big error');%% ex4 neural net with sigmoid activation functionrand('state',0)nn = nnsetup([784 100 10]);nn.activation_function = 'sigm'; % Sigmoid activation functionnn.learningRate = 1; % Sigm require a lower learning rateopts.numepochs = 1; % Number of full sweeps through dataopts.batchsize = 100; % Take a mean gradient step over this many samplesnn = nntrain(nn, train_x, train_y, opts);[er, bad] = nntest(nn, test_x, test_y);assert(er < 0.1, 'Too big error');%% ex5 plotting functionalityrand('state',0)nn = nnsetup([784 20 10]);opts.numepochs = 5; % Number of full sweeps through datann.output = 'softmax'; % use softmax outputopts.batchsize = 1000; % Take a mean gradient step over this many samplesopts.plot = 1; % enable plottingnn = nntrain(nn, train_x, train_y, opts);[er, bad] = nntest(nn, test_x, test_y);assert(er < 0.1, 'Too big error');%% ex6 neural net with sigmoid activation and plotting of validation and training error% split training data into training and validation datavx = train_x(1:10000,:);tx = train_x(10001:end,:);vy = train_y(1:10000,:);ty = train_y(10001:end,:);rand('state',0)nn = nnsetup([784 20 10]); nn.output = 'softmax'; % use softmax outputopts.numepochs = 5; % Number of full sweeps through dataopts.batchsize = 1000; % Take a mean gradient step over this many samplesopts.plot = 1; % enable plottingnn = nntrain(nn, tx, ty, opts, vx, vy); % nntrain takes validation set as last two arguments (optionally)[er, bad] = nntest(nn, test_x, test_y);assert(er < 0.1, 'Too big error');```[![Bitdeli Badge](https://d2weczhvl823v0.cloudfront.net/rasmusbergpalm/deeplearntoolbox/trend.png)](https://bitdeli.com/free "Bitdeli Badge")

yolov5训练flash芯片引脚

1、yolov5训练 2、从芯片的datasheet提取引脚图

无痕的博客 808

华为的C语言编程规范.pdf

华为技术有限公司内部技术规范。本规范制定了编写C语言程序的基本原则、规则和建议。从代码的清晰、简洁、可测试、安全、程序效率、可移植各个方面对C语言编程作出了具体指导。

表面缺陷检测数据集汇总及其相关项目推荐

点击上方“AI算法修炼营”,选择“星标”公众号精选作品,第一时间送达最近,有许多朋友都在关注缺陷检测领域,今天来看看缺陷检测。目前, 基于机器视觉的表面 缺陷装备已经在各工业领域广泛替代...

AI算法修炼营的博客 7775

霍尼韦尔SoftMaster使用说明

霍尼韦尔SoftMaster使用说明

VC中sqlite的使用

在VC中对sqlite的使用,实现数据库大批数据的快速插入,读取数据库中的数据在ListCtrl中显示

高效目标检测利器:X-AnyLabeling 加载自定义 YOLO 模型自动标注实操指南

要让模型输出正确的标签,必须告诉软件你的类别是什么。这是自动标注不报错、标签不乱的核心步骤!在 X-AnyLabeling 安装目录下,找到文件夹。找到一个与你模型架构匹配的 YAML 模板(比如或复制一份并重命名(例如),用记事本打开修改关键信息:type: yolov8 # 根据你的模型填 yolov5 或 yolov8display_name: yolov8n # 你的检测模型。

Smoothly_Lu的AI博客空间 335

OpenCV 缩放 与 位移

【代码】OpenCV 缩放 与 位移。

ahccqw的博客 386
上一篇: 工业安全监控识别 智慧工业工地安全防护检测数据集的训练及应用 通过训练出的个人安全防护装备检测数据集的权重 推理检测识别人 头 脸部 眼镜 口罩 面罩 马甲 安全帽安全服的检测与识别 穿戴检测数据集
下一篇: YOLOv8 室内行人跌倒数据集信息表
DeepLearningYolo
博客等级 码龄1年 94粉丝 261原创
评论
成就一亿技术人!
拼手气红包6.0元
还能输入1000个字符
 
 条评论被折叠 查看
添加红包

请填写红包祝福语或标题

个

红包个数最小为10个

元

红包金额最低5元

当前余额3.43元 前往充值 >
需支付:10.00元
成就一亿技术人!
领取后你会自动成为博主和红包主的粉丝 规则
hope_wisdom
发出的红包
实付元
使用余额支付
点击重新获取
扫码支付
钱包余额 0

抵扣说明:

1.余额是钱包充值的虚拟货币,按照1:1的比例进行支付金额的抵扣。
2.余额无法直接购买下载,可以购买VIP、付费专栏及课程。

余额充值