


 这篇博客介绍了如何使用osg库在OpenSceneGraph中创建并渲染一个带有透明效果的3D正方形。首先,申请顶点数组定义四边形的四个顶点,然后设置颜色数组为半透明颜色,接着指定法向量。接着,创建几何对象Geometry,并设置顶点、颜色和法向量数组。最后,在Geode中添加这个几何对象,并开启透明模式和设置线宽,以呈现线条轮廓。
创建简单矢量图
基础:
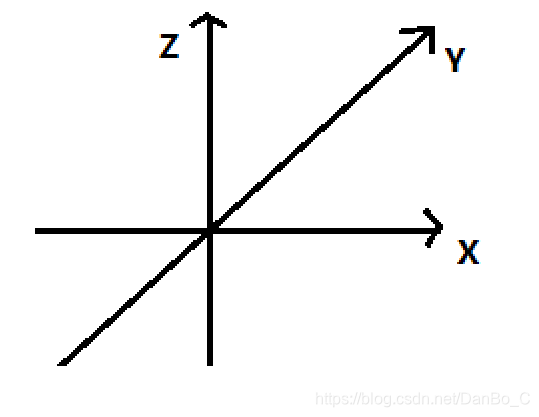
OSG坐标系,与笛卡尔三维坐标系方向相同
步骤:
-
申请顶点数组,设置垂直xoy面的正方形的四个顶点
osg::ref_ptr<osg::Vec3Array> coords = new osg::Vec3Array; coords->push_back(osg::Vec3(-10.0, 5.0, -10.0)); coords->push_back(osg::Vec3(10.0, 5.0, -10.0)); coords->push_back(osg::Vec3(10.0, 5.0, 10.0)); coords->push_back(osg::Vec3(-10.0, 5.0, 10.0)); -
申请颜色数组,设置半透明的颜色组
osg::ref_ptr<osg::Vec4Array> colors = new osg::Vec4Array; colors->push_back(osg::Vec4f(1.0, 0.0, 0.0, 0.5)); colors->push_back(osg::Vec4f(0.0, 1.0, 0.0, 0.5)); colors->push_back(osg::Vec4f(0.0, 0.0, 1.0, 0.5)); colors->push_back(osg::Vec4f(1.0, 1.0, 0.0, 0.5)); -
申请法向量,令光源在正方形的一侧,压入一个法向量
osg::ref_ptr<osg::Vec3Array> norms = new osg::Vec3Array; norms->push_back(osg::Vec3(0.0, -1.0, 0.0)); -
申请一个几何
Geometryosg::ref_ptr<osg::Geometry> geom = new osg::Geometry; -
设置顶点和顶点的关联方式
geom->setVertexArray(coords.get()); geom->addPrimitiveSet(new osg::DrawArrays(osg::PrimitiveSet::Mode::QUADS, 0, 4)); -
设置顶点颜色
geom->setColorArray(colors.get()); geom->setColorBinding(osg::Geometry::AttributeBinding::BIND_PER_VERTEX); -
设置法向量
geom->setNormalArray(norms.get()); geom->setNormalBinding(osg::Geometry::AttributeBinding::BIND_OVERALL); -
申请一个
Geodeosg::ref_ptr<osg::Geode> geode = new osg::Geode; -
在Geode中绘制几何,打开透明
geode->addDrawable(geom.get()); geode->getOrCreateStateSet()->setMode(GL_BLEND, osg::StateAttribute::ON); -
将上一节中
main函数中的CreateBox()改为CreateSimple(),运行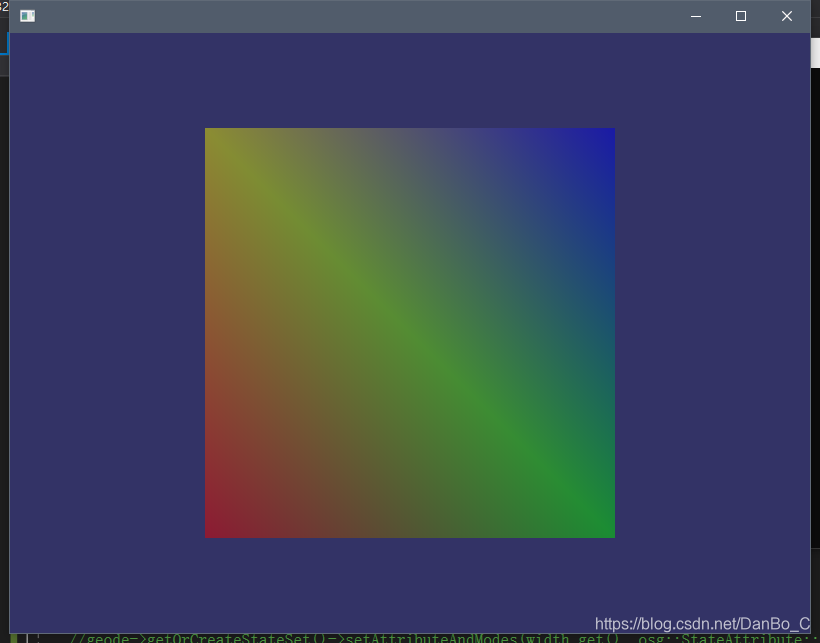
-
申请一个限制线宽
osg::ref_ptr<osg::LineWidth> width = new osg::LineWidth; -
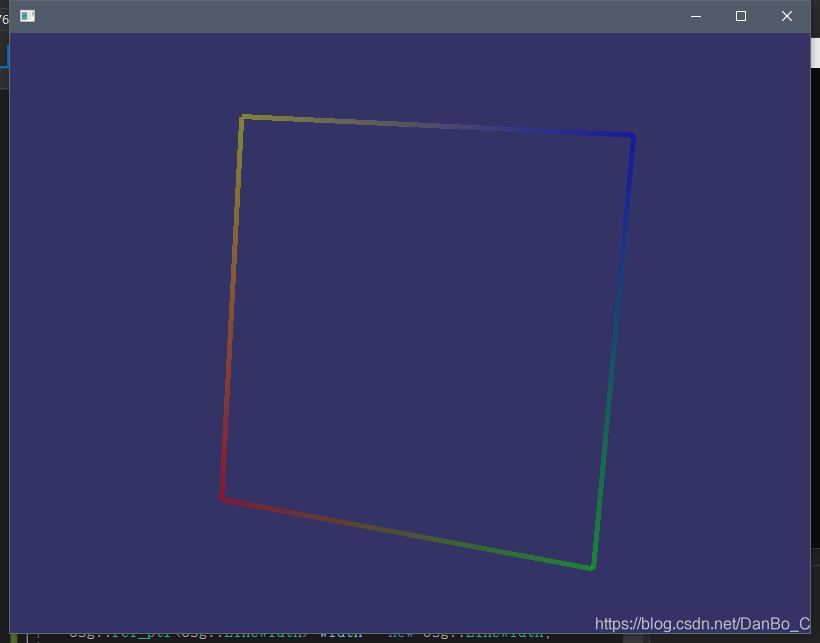
将顶点关联方式改为
LINE_LOOPgeom->addPrimitiveSet(new osg::DrawArrays(osg::PrimitiveSet::Mode::LINE_LOOP, 0, 4)); -
设置线宽
width->setWidth(5.0); -
运行,查看结果
完整代码
#include <osgViewer/Viewer>
#include <osgDB/ReadFile>
#include <osgGA/GUIEventAdapter>
#include <osgViewer/ViewerEventHandlers>
#include <osg/Geode>
#include <osg/ShapeDrawable>
#include <osg/Material>
#include <osg/StateSet>
#include <osg/Image>
#include <osg/Texture2D>
#include <osg/LineWidth>
#include <iostream>
using namespace std;

osg::ref_ptr<osg::Geode> CreateSimple() {
	osg::ref_ptr<osg::Geode> geode = new osg::Geode;
	osg::ref_ptr<osg::Geometry> geom = new osg::Geometry;
	osg::ref_ptr<osg::Vec3Array> coords = new osg::Vec3Array;
	osg::ref_ptr<osg::Vec4Array> colors = new osg::Vec4Array;
	osg::ref_ptr<osg::Vec3Array> norms = new osg::Vec3Array;
	osg::ref_ptr<osg::LineWidth> width = new osg::LineWidth;

    geode->addDrawable(geom.get());
	geode->getOrCreateStateSet()->setMode(GL_BLEND, osg::StateAttribute::ON);
	geom->setVertexArray(coords.get());
	geom->addPrimitiveSet(new osg::DrawArrays(osg::PrimitiveSet::Mode::LINE_LOOP, 0, 4));
	geom->setColorArray(colors.get());
	geom->setColorBinding(osg::Geometry::AttributeBinding::BIND_PER_VERTEX);
	geom->setNormalArray(norms.get());
	geom->setNormalBinding(osg::Geometry::AttributeBinding::BIND_OVERALL);
	width->setWidth(5.0);
	geode->getOrCreateStateSet()->setAttributeAndModes(width.get(), osg::StateAttribute::ON);

	coords->push_back(osg::Vec3(-10.0, 5.0, -10.0));
	coords->push_back(osg::Vec3(10.0, 5.0, -10.0));
	coords->push_back(osg::Vec3(10.0, 5.0, 10.0));
	coords->push_back(osg::Vec3(-10.0, 5.0, 10.0));

	colors->push_back(osg::Vec4f(1.0, 0.0, 0.0, 0.5));
	colors->push_back(osg::Vec4f(0.0, 1.0, 0.0, 0.5));
	colors->push_back(osg::Vec4f(0.0, 0.0, 1.0, 0.5));
	colors->push_back(osg::Vec4f(1.0, 1.0, 0.0, 0.5));

	norms->push_back(osg::Vec3(0.0, -1.0, 0.0));

	return geode;
}

int main() {

	osg::ref_ptr<osgViewer::Viewer> viewer = new osgViewer::Viewer;
	osg::ref_ptr<osg::Group> group = new osg::Group;

	group->addChild(CreateSimple());
	viewer->setSceneData(group.get());

	return viewer->run();
}


 2777
2777

 被折叠的 条评论
为什么被折叠?
被折叠的 条评论
为什么被折叠?
 到【灌水乐园】发言


