


1.相关概念介绍
RabbitMQ是一款消息中间件,通过生产者发送消息,通过交换机–>路由–>队列 中去,然后消费者通过监听队列里面的消息消费.
消息中间件作用:
解耦,冗余,扩展性,削峰,可恢复性,顺序保证性(前100名有效之类的活动),缓冲,异步通信(比如手机验证码发送).
相关概念:
生产者:Productor,消息制造者
消费者:Customer,消息消费者
交换机:Exchange,交换机
路由:RoutingKey,路由键
队列:Queue,消息真正存放的位置
连接:Connection,一个或多个tcp连接,通常只一个连接,根据情况会选择多个连接
信道:建立在Connection连接上的一个或多个信道,实现一个连接下的多路复用,RabbitMQ使用NIO.
RabbitMQ 采用类似 NIO’ (Non-blocking 1/0) 的做法,选择 TCP 连接复用,不仅可以减少性能开销,同时也便于管理
4种交换机类型:
#.1 fanout – n.输出(端数);展(散)开;扇出;分列账户
他会把所有发送到该交换机的消息路由到所有与该交换机绑定的队列中去.
#.2 direct 直接的
把消息路由到BindingKey和RoutingKey 完全匹配到队列中去.
#.3 topic 主题模式
topic 类型的交换器在匹配规则上进行了扩展,它与 direct 类型的交换器相似,
也是将消息路由到 BindingKey RoutingKey 相匹配的队列中,但这里的匹配规则有些不同.
#.4 headers (极少被使用)
headers 类型的交换器不依赖于路由键的匹配规则来路由消息,而是根据发送的消息内容中headers 属性进行匹配。
2.Maven
	<!--父依赖管理-->
	<parent>
        <groupId>org.springframework.boot</groupId>
        <artifactId>spring-boot-starter-parent</artifactId>
        <version>2.1.8.RELEASE</version>
        <relativePath/> <!-- lookup parent from repository -->
    </parent>

    <!--消息队列依赖 -->
	<dependencies>
        <dependency>
            <groupId>org.springframework.boot</groupId>
            <artifactId>spring-boot-starter-amqp</artifactId>
        </dependency>
    </dependencies>
3.application.yml
spring: # spring
  rabbitmq: # rabbitmq
    host: ${rabbit_url:"你安装好rabbitmq的ip地址/域名"}
    port: ${rabbit_port:5672}
    username: ${rabbit_username:guest}
    password: ${rabbit_password:guest}
    virtual-host: /
    # 设置消息的确认模式为auto
    listener:
      simple:
        retry:
          ## 开启消费者重试
          enabled: true
          ##最大重试次数(默认无数次)
          max-attempts: 5
          ##重试间隔次数
          initial-interval: 3000
==${rabbit_username:guest}==这种方式表示是可以替换的
4.相关参数作为配置类定义
package cn.lanca.rabbitmq.config;

import org.springframework.amqp.core.Binding;
import org.springframework.amqp.core.BindingBuilder;
import org.springframework.amqp.core.Queue;
import org.springframework.amqp.core.TopicExchange;
import org.springframework.context.annotation.Bean;
import org.springframework.context.annotation.Configuration;

@Configuration //声明该类为一个配置类
public class RabbitConfig {
    //声明交换机
    public static final String EXCHANGE_NAME = "ExchangeA";
    //声明队列
    public static final String SINGLE_QUEUE = "singleQueue";
    //声明路由
    public static final String ROUTING_KEY = "routingKey";

    /**
     * 声明主题为topic类型的交换机
     *
     * @return TopicExchange
     */
    @Bean //通过方法上加@Bean注解的方法将返回值注解spring容器中去
    public TopicExchange getExchange() {
        return new TopicExchange(EXCHANGE_NAME);
    }

    /**
     * 声明某某作用的队列
     */
    @Bean
    public Queue getXXXQueue() {
        return new Queue(SINGLE_QUEUE);
    }

    /**
     * 绑定交换机到队列上去,并指定某个确定的路由
     *
     * @param queue         队列
     * @param topicExchange 交换机
     * @return Binding
     */
    @Bean
    public Binding bindingQueueFromTopcExchange(Queue queue, TopicExchange topicExchange) {
        return BindingBuilder.bind(queue).to(topicExchange).with(ROUTING_KEY);
    }
}
5.监听队列并做处理
package cn.lanca.rabbitmq;
import cn.lanca.rabbitmq.config.RabbitConfig;
import org.springframework.amqp.rabbit.annotation.RabbitHandler;
import org.springframework.amqp.rabbit.annotation.RabbitListener;
import org.springframework.stereotype.Component;
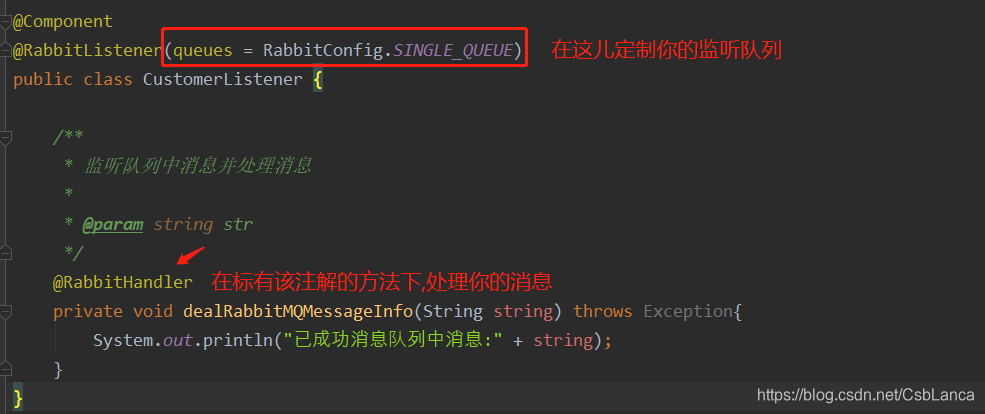
@Component //该类作为一个组件存在
@RabbitListener(queues = RabbitConfig.SINGLE_QUEUE) //监听某个具体队列RabbitConfig.SINGLE_QUEUE
public class CustomerListener {
/**
* 监听队列中消息并处理消息
*
* @param string str
*/
@RabbitHandler //该注解标识在方法上,表示该方法作为消费者处理消息的逻辑/方式
private void dealRabbitMQMessageInfo(String string) throws Exception{
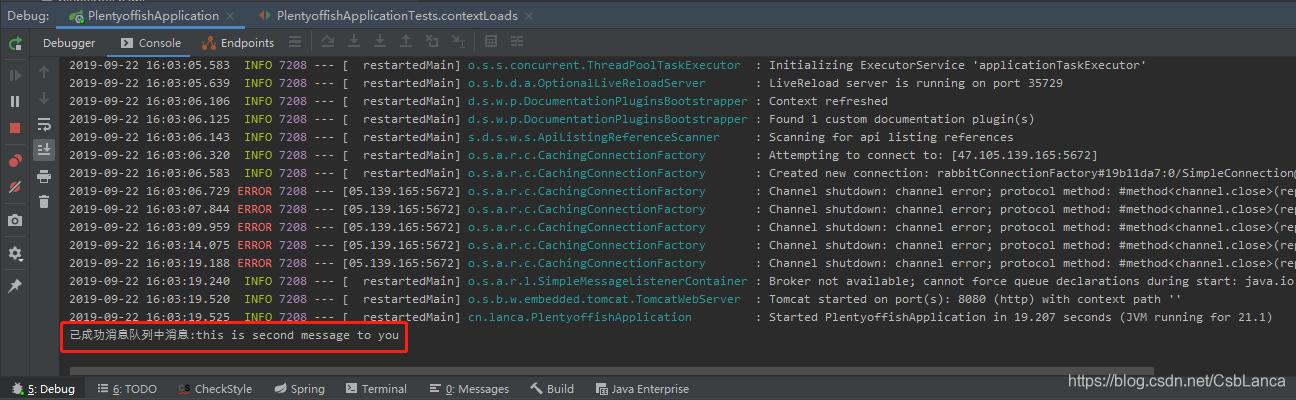
System.out.println("已成功消息队列中消息:" + string);
}
}
6.实操
package cn.lanca;
import cn.lanca.rabbitmq.config.RabbitConfig;
import org.junit.Test;
import org.junit.runner.RunWith;
import org.springframework.amqp.rabbit.core.RabbitTemplate;
import org.springframework.beans.factory.annotation.Autowired;
import org.springframework.boot.test.context.SpringBootTest;
import org.springframework.test.context.junit4.SpringRunner;
@RunWith(SpringRunner.class)
@SpringBootTest
public class PlentyoffishApplicationTests {//springboot的测试类下
@Autowired
private RabbitTemplate rabbitTemplate;// 注入rabbitTemplate这个对象
@Test
public void contextLoads() {
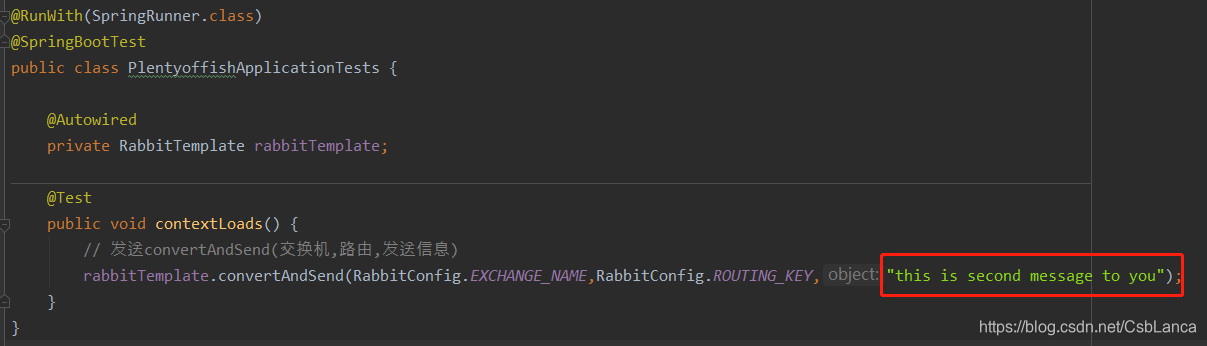
// 发送convertAndSend(交换机,路由,发送的信息)
rabbitTemplate.convertAndSend(RabbitConfig.EXCHANGE_NAME,RabbitConfig.ROUTING_KEY,"this is second message to you");
}
}
注意–>发送消息的内容
消息处理方式–>

运行–>
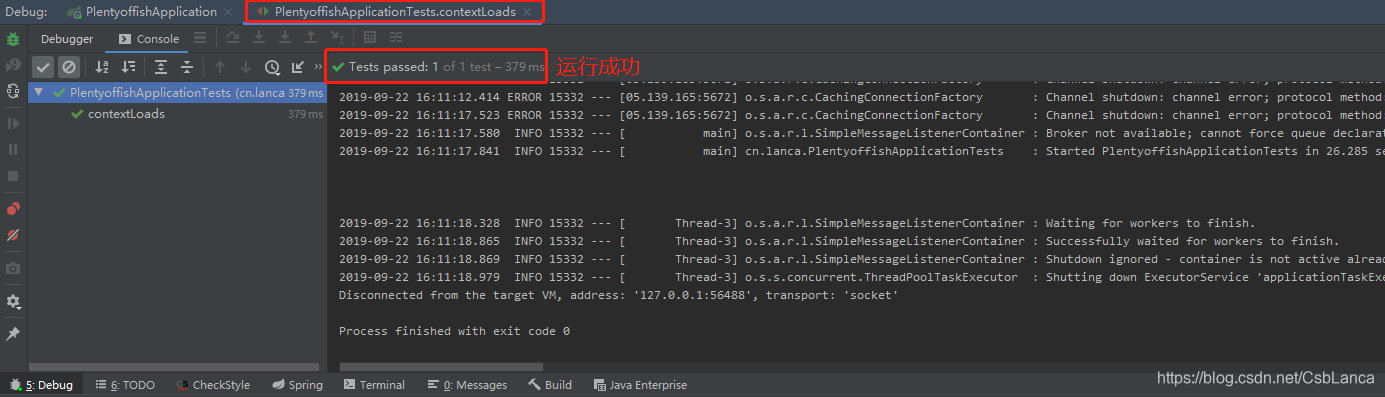
结果–>
7.关于RabbitTemplate
如果你比较熟悉SpringBoot的系列产品,你就不会对这个东西感到陌生!
	@Autowired
    private RabbitTemplate rabbitTemplate;
RedisTemplate,MongoTemplate这是SpringBoot整合的相关产品而抽取的一个简单/快捷的操作对象,你将这个对象注入,然后使用这个对象完成其相应的功能,所以,上面代码中有使用rabbitTemplate发送消息,就是下面这一句
rabbitTemplate.convertAndSend(RabbitConfig.EXCHANGE_NAME,RabbitConfig.ROUTING_KEY,"this is second message to you");
8.如何在项目中使用
在你自己的项目中,你只需要在你的业务逻辑合适且合理的位置,调用rabbitTemplate.convertAndSend(交换机,路由,发送的信息),发送你的消息至你定制的队列中去,然后在你的监听类中编写你的消息处理逻辑,当然你可以有多个处理逻辑.


 21万+
21万+

 被折叠的 条评论
为什么被折叠?
被折叠的 条评论
为什么被折叠?
 到【灌水乐园】发言


