


 这篇博客介绍了如何在vue-tree-color组件中新增多个class,修复了相关问题,并详细讲解了实现过程。通过设置`judge`和`NodeClass`参数,实现了自定义节点样式的需求。

最近有兄台提交了一个
issue,开始因为公司太忙时间实在转不过来,当然时间是挤出来的(好啦好啦,我就是为偷懒找借口而已)然后自己看了看修复了一下,大家可以去看看
install
npm install vue-tree-color
注意:以前使用老版本的兄弟们更新一下
Import Plugins
import Vue from 'vue'
import Vue2OrgTree from 'vue-tree-color'

Vue.use(Vue2OrgTree)
简单的一些起步工作我就不再讲了,可以看之前的文章
https://mp.weixin.qq.com/s/QLzXPxloTJh1fVAY77sZzg
修复
本次改动,主要是新增了一个参数NodeClass , 并且修改了judge的作用
judge
首先来看看 judge 变成什么样了吧
judge: {
    swtich: true
}
judge 是一个Object格式 里面存在着一个值 {swtich:true || false}
不传或者传入false 都默认为不需要自定义class
NodeClass
新增NodeClass 参数 NodeClass 是一个Array格式 类似于Echarts的 color 参数,
如果有放入你需要的class 如果没有则采取默认格式
 NodeClass:[
     "myred",
     "myger",
     "myblue"
 ]
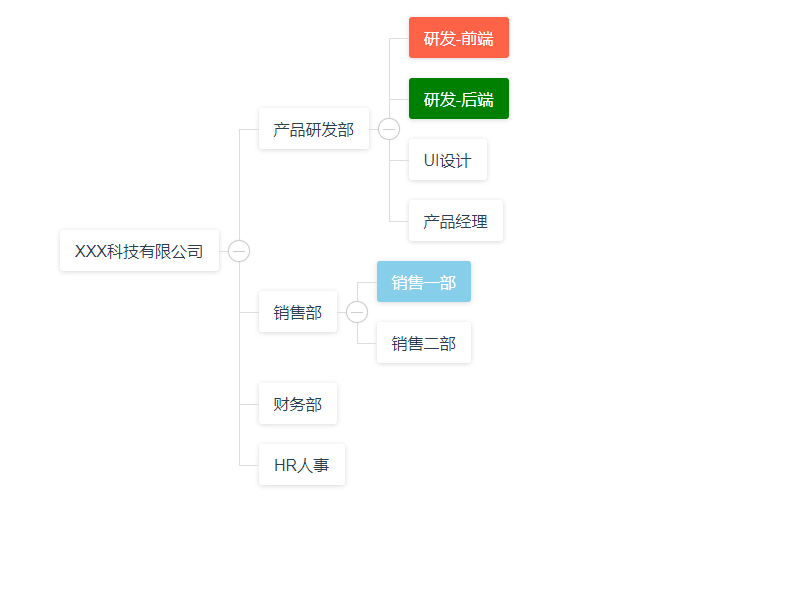
在data数据中需要的项中添加 你就需要这样做
{
   id: 0,
   label: "XXX科技有限公司",
   children: [
       {
           id: 2,
           label: "产品研发部",
   		   children: [
   		   {
   		      id: 5,
   		      label: "研发-前端",
   		      swtich: "myred"
   	           },
   	           {
   	              id: 6,
   	              label: "研发-后端",
                      swtich: "myger"
                },
                {
                  id: 9,
                  label: "UI设计",
                },
                {
                   id: 10,
                   label: "产品经理"
                }
             ]
      	},
        {
            id: 3,
            label: "销售部",
            children: [
            	{
                    id: 7,
                    label: "销售一部",
                    swtich: "myblue"
                 },
                 {
                    id: 8,
                    label: "销售二部",

                 }
             ]
          },
          {
          	id: 4,
           	label: "财务部"
           },
           {
            	id: 9,
                label: "HR人事"
           }
      ]
}
效果
继续深究
怎么实现的呢?爱钻研的童鞋们,问题又来了
在轮子中设定两个参数等待接收
judge: {
      type:Object,
      required:false
},
NodeClass:{
      type:Array,
      required:false
},
然后在js中接收这两个参数进行改造
在DOM创建增加class的时候调用一个ChangeTheColor方法
domProps: {
	className:ChangeTheColor(data,judge,NodeClass)
},
执行ChangeTheColor方法
function ChangeTheColor(e,judge,NodeClass){
  // 随便判断一番
  if(judge!==""&&judge!==undefined&&judge!==null&&judge.swtich!==false){
    for(var k in judge) {
      // 获取这一项中的 swtich 值
      var a = (eval("e."+k))
      // 如果 NodeClass 存在
      if(NodeClass){
        // 循环判断
        for(let c =0 ;c<NodeClass.length;c++){
          // 如果当前项的 swtich 值等于 NodeClass 中某一项
          if( a === NodeClass[c])
            // 则添加改项 class
            return NodeClass[c]
          // 当到了最后一次循环 跳出
          else  if(NodeClass.length-1==c)
            return ""
        }
      }else{
        return ""
      }
    }
  }else{
    return ""
  }
}
最清晰的讲解,由最菜的严老湿来描绘
好啦!今天的严老湿小课堂就到这里了
有啥问题,疑问,或者更好的方式去实现 可以在 issue 提交噢
地址:https://github.com/CrazyMrYan/vue-tree-color


 8040
8040

 被折叠的 条评论
为什么被折叠?
被折叠的 条评论
为什么被折叠?
 到【灌水乐园】发言


