


本篇我们介绍了六大布局* Linear Layout(线性布局)、Frame Layout(帧布局)、Relative Layout(相对布局)、Absolute Layout(绝对布局)、Table Layout(表格布局)、Absolute Layout(绝对布局) *的常用属性,然后结合实际开发中遇到的各种场景给出了相应的解决方案和示例用法,并且结合不同布局的各自特点给出了自身特有的属性(重复的属性不会列出),方便大家在后续学习UI排布的课程中进行查阅。最后,给出了 Android 中布局优化的一些建议。
什么是布局?
布局是一种可用于放置很多控件的容器,它可以按照一定的规律调整内部控件的位置,从而编写出精美的界面。当然了,布局的内部除了放置控件外, 也可以放置布局,通过多层布局的嵌套,我们就能够完成一些比较复杂的界面实现。

为了更好地管理Android应用的用户界面里的个组件,Android提供了布局管理器,通过布局管理器,Android应用的图形用户界面就具有了良好的平台无关性。这就让各个控件都可以有条不紊地摆放在界面上,而不是乱糟糟的。
一、线性布局 Linear Layout
LinearLayout是一种非常常用的布局,正如它名字所描述的一样,这个布局会将它所包含的控件在线性方向上依次排列,当然肯定就不仅只有一个方向,我们可以通过 android:orientation 这个属性指定排列方向是 vertical 还是 horizontal,控件就会在竖直方向上或者水平方向上进行排列。
下面我们通过实例来体会一下:
<?xml version="1.0" encoding="utf-8"?>
<LinearLayout xmlns:android="http://schemas.android.com/apk/res/android"
android:orientation="vertical"
android:layout_width="match_parent"
android:layout_height="match_parent"
android:gravity= "right|center_vertical">
<Button
    android:id="@+id/bn1"
    android:layout_width="wrap_content"
    android:layout_height="wrap_content"
    android:text="@string/bn1"/>
<Button
    android:id="@+id/bn2"
    android:layout_width="wrap_content"
    android:layout_height="wrap_content"
    android:text="@string/bn2"/>
<Button
    android:id="@+id/bn3"
    android:layout_width="wrap_content"
    android:layout_height="wrap_content"
    android:text="@string/bn3"/>
<Button
    android:id="@+id/bn4"
    android:layout_width="wrap_content"
    android:layout_height="wrap_content"
    android:text="@string/bn4"/>
<Button
    android:id="@+id/bn5"
    android:layout_width="wrap_content"
    android:layout_height="wrap_content"
    android:text="@string/bn5"/>
</LinearLayout>上面的布局界面很简单,只是很简单的定义了一个线性布局,在布局中定义了五个按钮并制定了属性“android:gravity = “right | center_vertical””,实际运行效果如下:

如果将上面的属性改为“android:gravity = “bottom | center_horizontal””,那么实际运行效果为:

也就是说在垂直布局的前提下底部居中、水平居中,就变成了这个样子,可以看到属性对局部的影响是很大的。
下面列出LinearLayout常用的属性:
android:layout_gravity: 本元素相对于父元素的重力方向
android:layout_weight:子元素对未占用空间水平或垂直分配权重值
android:gravity[setGravity(int)] :本元素所有子元素的重力方向
android:orientation[setOrientation(int)]:线性布局以列或行来显示内部子元素
android:divider[setDividerDrawable(Drawable)]:设置垂直布局时两个控件之间的分隔条
android:baselineAligned[setBaselineAligned(boolean)]:该属性为false,将会阻止该布局管理器与它的子元素的基线对齐
android:measureWithLargestChild[setMeasureWithLargestChildEnabled(boolean)]当该属性设置为true时,所有带权重的子元素都会具有最大子元素的最小尺寸
问1:android:layout_gravity 和 android:gravity 有什么区别?
- android:gravity:对元素本身起作用-本身元素显示在什么位置
- android:layout_gravity:相对与它的父元素-元素显示在父元素的什么位置
* 如:Button控件 *
- android:layout_gravity 表示button在界面上的位置
- android:gravity 表示button上的字在button上的位置
问2:受控子元素如何设置?
LinearLayout的所有子元素都受 LinearLayout.LayoutParams 的控制,因此 Linear Layout 包含的子元素可以额外指定以下属性:
- android:layout_gravity 子元素在LinearLayout中的对齐方式
- android:layout_weight 子元素在LinearLayout中所占的权重
所以我们要实现第一个的 1:2 的效果,只需要分别把两个 Linear Layout 的 weight 分别设置成1和2就可以了。
比如将上述布局代码改为如下方式:
<LinearLayout xmlns:android="http://schemas.android.com/apk/res/android"
    android:id="@+id/LinearLayout1"
    android:layout_width="match_parent"
    android:layout_height="match_parent"
    android:orientation="horizontal">
    <LinearLayout
        android:layout_width="0dp"
        android:layout_height="fill_parent"
        android:background="#2fc1ff"
        android:layout_weight="1"/>
    <LinearLayout
        android:layout_width="0dp"
        android:layout_height="fill_parent"
        android:background="#f7242b"
        android:layout_weight="2"/>
</LinearLayout>
那么实际的运行效果为:

用法归纳:
按比例划分水平方向,将涉及到的 View 的 android:width 属性设置为 0dp,然后设置为 android weight 属性设置比例即可;类推竖直方向,只需设 android:height 为 0dp,然后设 weight 属性即可!
二、相对布局 Relative Layout
RelativeLayout 也是一种非常常用的布局,和 LinearLayout 的排列规则不同的是, RelativeLayout 显得更加随意一些,它总是通过相对定位的方式让控件出现在布局的任何位置,比如说相对容器内兄弟组件、父容器的位置决定了它自身的位置。也正因为如此, RelativeLayout 中的属性非常多,不过这些属性都是有规律可循的。
实现一个梅花布局效果:
<?xml version="1.0" encoding="utf-8"?>
<RelativeLayout xmlns:android="http://schemas.android.com/apk/res/android"
                android:layout_width="match_parent"
                android:layout_height="match_parent">
    <!-- 定义该组件位于父容器中间 -->
    <TextView
        android:id="@+id/view01"
        android:layout_width="wrap_content"
        android:layout_height="wrap_content"
        android:background="@drawable/leaf"
        android:layout_centerInParent="true"/>
    <!-- 定义该组件位于view01组件的上方 -->
    <TextView
        android:id="@+id/view02"
        android:layout_width="wrap_content"
        android:layout_height="wrap_content"
        android:background="@drawable/leaf"
        android:layout_above="@id/view01"
        android:layout_alignLeft="@id/view01"/>
    <!-- 定义该组件位于view01组件的下方 -->
    <TextView
        android:id="@+id/view03"
        android:layout_width="wrap_content"
        android:layout_height="wrap_content"
        android:background="@drawable/leaf"
        android:layout_below="@id/view01"
        android:layout_alignLeft="@id/view01"/>
    <!-- 定义该组件位于view01组件的左边 -->
    <TextView
        android:id="@+id/view04"
        android:layout_width="wrap_content"
        android:layout_height="wrap_content"
        android:background="@drawable/leaf"
        android:layout_toLeftOf="@id/view01"
        android:layout_alignTop="@id/view01"/>
    <!-- 定义该组件位于view01组件的右边 -->
    <TextView
        android:id="@+id/view05"
        android:layout_width="wrap_content"
        android:layout_height="wrap_content"
        android:background="@drawable/leaf"
        android:layout_toRightOf="@id/view01"
        android:layout_alignTop="@id/view01"/>
</RelativeLayout>
运行效果如下:
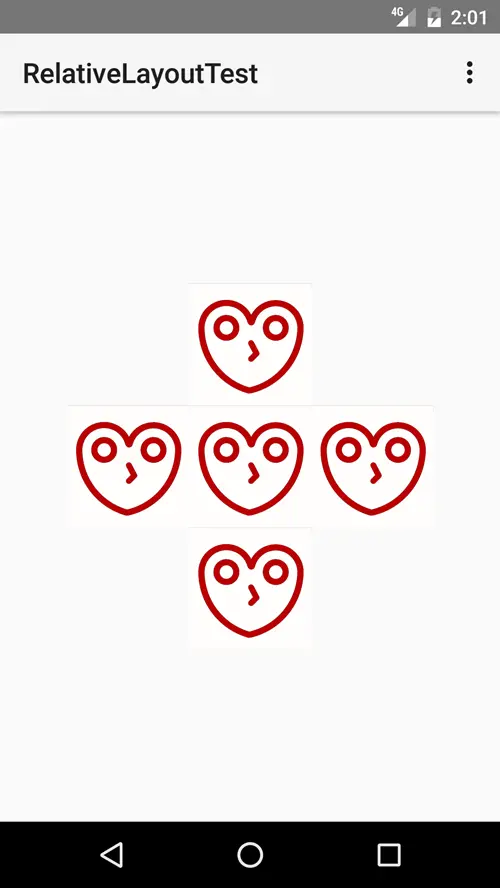
代码稍微复杂一点,不过难以理解的也就两个属性,一个是 android:layout_toxxxOf,这个是一个控件位于另一个控件上下左右的相对位置,另一个是android:layout_alignxxx,表示一个控件与另一个控件对齐,这里我们列出更详细的属性规则:
相对位置规则:
android:layout_above 将该控件的底部至于给定ID的控件之上
android:layout_below 将该控件的顶部至于给定ID的控件之下
android:layout_toLeftOf 将该控件的右边缘和给定ID的控件的左边缘对齐
android:layout_toRightOf 将该控件的左边缘和给定ID的控件的右边缘对齐
兄弟控件对齐规则:
android:layout_alignBaseline 将该控件的baseline和给定ID的控件的baseline对齐
android:layout_alignBottom 将该控件的底部边缘与给定ID控件的底部边缘对其
android:layout_alignTop 将给定控件的顶部边缘与给定ID控件的顶部对齐
android:layout_alignLeft 将该控件的左边缘与给定ID控件的左边缘对齐
android:layout_alignRight 将该控件的右边缘与给定ID控件的右边缘对齐
父控件对齐规则:
android:alignParentBottom 如果该值为true,则将该控件的底部和父控件的底部对齐
android:layout_alignParentLeft 如果该值为true,则将该控件的左边与父控件的左边对齐
android:layout_alignParentRight 如果该值为true,则将该控件的右边与父控件的右边对齐
android:layout_alignParentTop 如果该值为true,则将空间的顶部与父控件的顶部对齐
中央位置规则:
android:layout_centerVertical 如果值为真,该控件将被至于垂直方向的中央
android:layout_centerHorizontal 如果值为真,该控件将被至于水平方向的中央
android:layout_centerInParent 如果值为真,该控件将被至于父控件水平方向和垂直方向的中央
重力规则:
android:gravity[setGravity(int)]设置容器内各个子组件的重力方向
android:ignoreGravity[setIgnoreGravity(int)]设置容器哪个子组件的不受重力方向影响
三、帧布局 Frame Layout
Frame Layout 相比于前面两种布局就简单多了,你可能因此就觉得它的应用场景会少很多,不过也要看情况,如果是应用在比较复杂的自定义布局的时候,那么帧布局还是很受欢迎的,因为这种布局没有任何的定位方式,所有的控件都会摆放在布局的左上角,不像其它布局那样充满了各种各样的规则。当你翻开帧布局的源码的时候也会惊奇的发现相比于其它布局它的代码量要少很多,这就导致了在复杂的自定义布局控件中选用帧布局作为父类的话就会一定程度上提升UI的渲染的性能。
实现一个叠加效果:
<?xml version="1.0" encoding="utf-8"?>
<FrameLayout xmlns:android="http://schemas.android.com/apk/res/android"
             android:layout_width="match_parent"
             android:layout_height="match_parent">
    <!-- 依次定义6个TextView,先定义的TextView位于底层,后定义的TextView位于上层 -->
    <TextView
        android:id="@+id/view01"
        android:layout_width="wrap_content"
        android:layout_height="wrap_content"
        android:layout_gravity="center"
        android:width="160pt"
        android:height="160pt"
        android:background="#f00"/>
    <TextView
        android:id="@+id/view02"
        android:layout_width="wrap_content"
        android:layout_height="wrap_content"
        android:layout_gravity="center"
        android:width="140pt"
        android:height="140pt"
        android:background="#0f0"/>
    <TextView
        android:id="@+id/view03"
        android:layout_width="wrap_content"
        android:layout_height="wrap_content"
        android:layout_gravity="center"
        android:width="120pt"
        android:height="120pt"
        android:background="#00f"/>
    <TextView
        android:id="@+id/view04"
        android:layout_width="wrap_content"
        android:layout_height="wrap_content"
        android:layout_gravity="center"
        android:width="100pt"
        android:height="100pt"
        android:background="#ff0"/>
    <TextView
        android:id="@+id/view05"
        android:layout_width="wrap_content"
        android:layout_height="wrap_content"
        android:layout_gravity="center"
        android:width="80pt"
        android:height="80pt"
        android:background="#f0f"/>
    <TextView
        android:id="@+id/view06"
        android:layout_width="wrap_content"
        android:layout_height="wrap_content"
        android:layout_gravity="center"
        android:width="60pt"
        android:height="60pt"
        android:background="#0ff"/>
</FrameLayout>
运行起来的效果是:
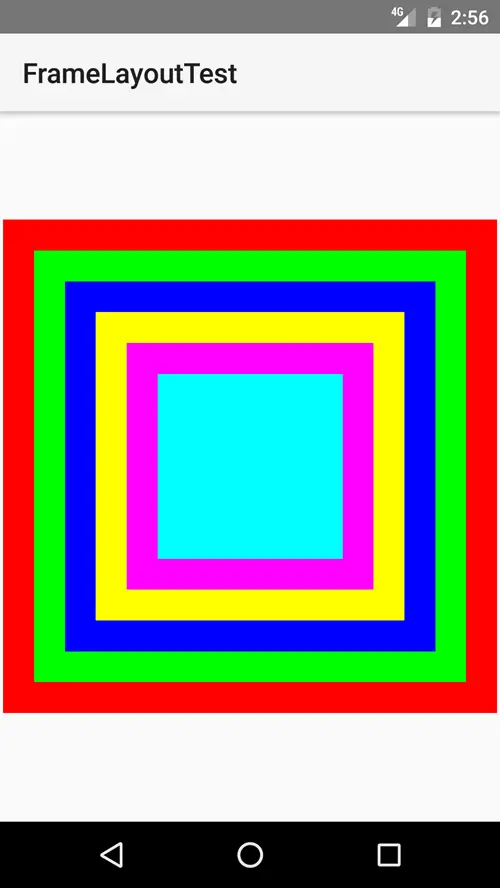
帧布局容器为每个加入其中的组件创建一个空白的区域(即一帧),每个子组件占据一帧,这些帧都会根据gracity属性自动对齐并按照添加的顺序先后叠加在一起。
FrameLayout的一些属性:
android:foreground[setForeground(Drawable)] 定义帧布局容器的绘图前景图像
android:foregroundGravity[setForegroundGravity(int)] 定义绘图前景图像的重力属性
四、表格布局 Table Layout
Table Layout 允许我们使用表格的方式来排列控件。既然是表格,那就一定会有行和列,在设计表格时我们尽量应该让每一行都拥有相同的列数,这样的表格也是最简单的。不过有时候事情并非总会顺从我们的心意,当表格的某行一定要有不相等的列数时, 就需要通过合并单元格的方式来应对。
下面的例子示范了如何用 Table Layout 来管理布局:
<?xml version="1.0" encoding="utf-8"?>
<LinearLayout xmlns:android="http://schemas.android.com/apk/res/android"
    android:orientation="vertical"
    android:layout_width="match_parent"
    android:layout_height="match_parent">

    <TextView
        android:layout_width="match_parent"
        android:layout_height="2dp"
        android:background="#3354fc"/>

    <!-- 定义第一个表格布局,指定第2列允许收缩,第3列允许拉伸 -->
    <TableLayout android:id="@+id/TableLayout01"
        android:layout_width="match_parent"
        android:layout_height="wrap_content"
        android:shrinkColumns="1"
        android:stretchColumns="2">
        <!-- 直接添加按钮,它自己会占一行 -->
        <Button android:id="@+id/ok1"
            android:layout_width="wrap_content"
            android:layout_height="wrap_content"
            android:text="独自一行的按钮"/>
        <!-- 添加一个表格行 -->
        <TableRow>
            <!-- 为该表格行添加三个按钮 -->
            <Button android:id="@+id/ok2"
                android:layout_width="wrap_content"
                android:layout_height="wrap_content"
                android:text="普通的一个按钮"/>
            <Button android:id="@+id/ok3"
                android:layout_width="wrap_content"
                android:layout_height="wrap_content"
                android:text="收缩按钮"/>
            <Button android:id="@+id/ok4"
                android:layout_width="wrap_content"
                android:layout_height="wrap_content"
                android:text="拉伸按钮"/>
        </TableRow>
    </TableLayout>

    <TextView
        android:layout_width="match_parent"
        android:layout_height="2dp"
        android:background="#3354fc"/>

    <!-- 定义第2个表格布局 ,指定第2列隐藏-->
    <TableLayout android:id="@+id/TableLayout02"
        android:layout_width="match_parent"
        android:layout_height="wrap_content"
        android:collapseColumns="1">
        <!-- 直接添加按钮,它自己会占一行 -->
        <Button android:id="@+id/ok5"
                android:layout_width="wrap_content"
                android:layout_height="wrap_content"
                android:text="独自一行的按钮"/>
        <!-- 添加一个表格行 -->
        <TableRow>
            <!-- 为该表格行添加三个按钮 -->
            <Button android:id="@+id/ok6"
                    android:layout_width="wrap_content"
                    android:layout_height="wrap_content"
                    android:text="普通按钮1"/>
            <Button android:id="@+id/ok7"
                    android:layout_width="wrap_content"
                    android:layout_height="wrap_content"
                    android:text="普通按钮2"/>
            <Button android:id="@+id/ok8"
                    android:layout_width="wrap_content"
                    android:layout_height="wrap_content"
                    android:text="普通按钮3"/>
        </TableRow>
    </TableLayout>

    <TextView
        android:layout_width="match_parent"
        android:layout_height="2dp"
        android:background="#3354fc"/>

    <!-- 定义第3个表格布局,指定第2列和第3列可以被拉伸-->
    <TableLayout
        android:id="@+id/TableLayout03"
        android:layout_width="match_parent"
        android:layout_height="wrap_content"
        android:stretchColumns="1,2">
        <!-- 直接添加按钮,它自己会占一行 -->
        <Button
            android:id="@+id/ok9"
            android:layout_width="wrap_content"
            android:layout_height="wrap_content"
            android:text="独自一行的按钮"
            />
        <!--定义一个表格行-->
        <TableRow>
        <!-- 为该表格行添加三个按钮 -->
        <Button
            android:id="@+id/ok10"
            android:layout_width="wrap_content"
            android:layout_height="wrap_content"
            android:text="普通按钮"
            />
        <Button
            android:id="@+id/ok11"
            android:layout_width="wrap_content"
            android:layout_height="wrap_content"
            android:text="拉伸的按钮"
            />
        <Button
            android:id="@+id/ok12"
            android:layout_width="wrap_content"
            android:layout_height="wrap_content"
            android:text="拉伸的按钮"
            />
        </TableRow>
        <!--定义一个表格行-->
        <TableRow>
            <!-- 为该表格行添加两个按钮 -->
            <Button
                android:id="@+id/ok13"
                android:layout_width="wrap_content"
                android:layout_height="wrap_content"
                android:text="普通按钮"
                />
            <Button
                android:id="@+id/ok14"
                android:layout_width="wrap_content"
                android:layout_height="wrap_content"
                android:text="拉伸的按钮"
                />
        </TableRow>
    </TableLayout>

    <TextView
        android:layout_width="match_parent"
        android:layout_height="2dp"
        android:background="#3354fc"/>
</LinearLayout>
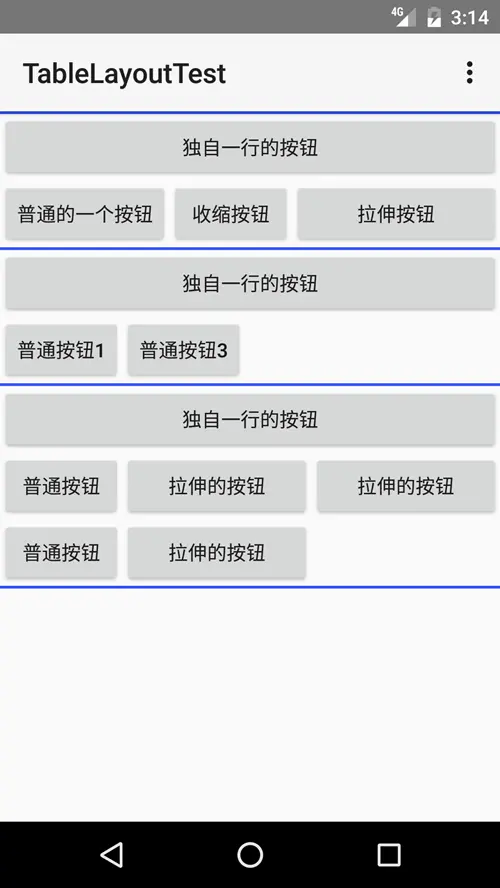
上面定义了三个 Table Layout ,通过 TextView 分割开来并通过代码指定了它们对各自列的控制行为:
- 第一个TableLayout :指定第2列允许收缩,第3列允许拉伸
- 第二个TableLayout :指定第2列隐藏
- 第三个TableLayout :指定第2列和第3列可以被拉伸
并且上面的每个按钮宽度所用的属性都是 android:layout_width=”wrap_content” ,正常来讲按钮只要包裹住美容即可,但是因为我们指定了相应列的属性,那么可以看到运行的效果如下:
相关的属性:
android:collapseColumns[setColumnCollapsed(int,boolean)] 设置需要被藏的列的列号,多个列号之间用逗号隔开
android:shrinkColumns[setShrinkAllColumns(boolean)] 设置允许被收缩的列的列号,多个列号之间用逗号隔开
android:stretchColumns[setStretchAllColumns(boolean)] 设置允许被拉伸的列的列号,多个列号之间用逗号隔开
五、网格布局 Grid Layout
GridLayout是Android4.0之后新增的布局管理器,因此正常情况下需要在 Android 4.0 之后的版本中才能使用,如果希望在更早的版本中使用的话,需要导入相应的支撑库(v7包的gridlayout包)。
Grid Layout 和前面所讲的 Table Layout(表格布局) 有点类似,不过他有很多前者没有的东西,因此也更加好用:
- 可以自己设置布局中组件的排列方式
- 可以自定义网格布局有多少行、列
- 可以直接设置组件位于某行某列
- 可以设置组件横跨几行或者几列
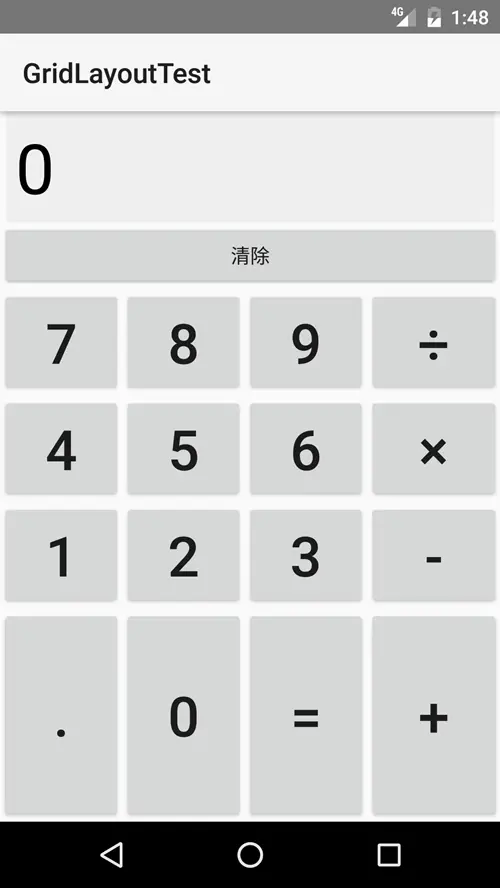
实现一个计算器界面:
<?xml version="1.0" encoding="utf-8" ?>
<GridLayout xmlns:android="http://schemas.android.com/apk/res/android"
            android:layout_width="match_parent"
            android:layout_height="match_parent"
            android:rowCount="6"
            android:columnCount="4"
            android:id="@+id/root">
    <!-- 定义一个横跨4列的文本框,并设置该文本框的前景色、背景色等属性  -->
    <TextView
        android:layout_width="match_parent"
        android:layout_height="wrap_content"
        android:layout_columnSpan="4"
        android:textSize="50sp"
        android:layout_marginLeft="2pt"
        android:layout_marginRight="2pt"
        android:padding="3pt"
        android:layout_gravity="right"
        android:background="#eee"
        android:textColor="#000"
        android:text="0"/>
    <!-- 定义一个横跨4列的按钮 -->
    <Button
        android:layout_width="match_parent"
        android:layout_height="wrap_content"
        android:layout_columnSpan="4"
        android:text="清除"/>
</GridLayout>
首先在布局文件中定义了一个 6*4 的 Grid Layout,然后在该布局中添加两个组件并且每个组件均横跨4列,接下来在Java中动态添加16个按钮:
public class MainActivity extends Activity
{
    GridLayout gridLayout;
    // 定义16个按钮的文本
    String[] chars = new String[] {
                    "7" , "8" , "9" , "÷",
                    "4" , "5" , "6" , "×",
                    "1" , "2" , "3" , "-",
                    "." , "0" , "=" , "+"
            };
    @Override
    public void onCreate(Bundle savedInstanceState)
    {
        super.onCreate(savedInstanceState);
        setContentView(R.layout.main);
        gridLayout = (GridLayout) findViewById(R.id.root);
        for(int i = 0 ; i < chars.length ; i++)
        {
            Button bn = new Button(this);
            bn.setText(chars[i]);
            // 设置该按钮的字号大小
            bn.setTextSize(40);
            // 设置按钮四周的空白区域
            bn.setPadding(5 , 35 , 5 , 35);
            // 指定该组件所在的行
            GridLayout.Spec rowSpec = GridLayout.spec(i / 4 + 2);
            // 指定该组件所在的列
            GridLayout.Spec columnSpec = GridLayout.spec(i % 4);
            GridLayout.LayoutParams params = new GridLayout.LayoutParams(
                    rowSpec , columnSpec);
            // 指定该组件占满父容器
            params.setGravity(Gravity.FILL);
            gridLayout.addView(bn , params);
        }
    }
}
Java类中采用循环的方式向 Grid Layout 中添加了16个按钮,指定了每个按钮所在的行号和列号,并指定这些按钮会自动填充单元格的所有空间——避免了单元格中的大量空白,运行效果如下:
以下为GridLayout常用属性:
排列对齐:
- 设置组件的排列方式: android:orientation=”” vertical(竖直,默认)或者horizontal(水平)
- 设置组件的对齐方式: android:layout_gravity=”“[setGravity(int)] center,left,right,buttom,如果想同时用两种的话:buttom|left
设置布局为几行几列:
- 设置有多少行:android:rowCount=”4”[setrowCount(int)] //设置网格布局有4行
- 设置有多少列:android:columnCount=”4”[setColumnCount(int)] //设置网格布局有4列设置某个组件位于几行几列:
- 组件在第几行:android:layout_row = “1” //设置组件位于第二行
- 组件在第几列:android:layout_column = “2” //设置该组件位于第三列
设置某个组件横跨几行几列:
- 横跨几行:android:layout_rowSpan = “2” //纵向横跨2行
- 横跨几列:android:layout_columnSpan = “3” //横向横跨2列其他设置:
- 布局管理器采用的对齐方式:android:alignmentMode[setAlignmentMode(int)]
- 布局管理器是否保留列序号:android:columnOrderPreserved[setColumnOrderPreserved(boolean)]
- 布局管理器是否保留行序号:android:rowOrderPreserved[setRowOrderPreserved(boolean)]
- 布局管理器是否使用默认的页边距:android:useDefaultMargins[setUseDefaultMargins(boolean)]
六、绝对布局 Absolute Layout
Absolute Layout 就像它名字所展现的那样,它不提供任何布局控制,而是由开发人员自己通过X、Y坐标来控制组件的位置。所以绝大多数情况下我们是不采用绝对布局这种布局方式的,因为运行Android应用的手机往往千差万别,屏幕大小、分别率、屏幕密度等都可能存在较大的差异,使用绝对布局的话很难做机型适配,因此我们了解这种布局方式即可。
先了解下代码:
<?xml version="1.0" encoding="utf-8"?>
<AbsoluteLayout xmlns:android="http://schemas.android.com/apk/res/android"
    android:layout_width="match_parent"
    android:layout_height="match_parent">
    <!-- 定义一个文本框,使用绝对定位 -->
    <TextView
        android:layout_x="20dp"
        android:layout_y="20dp"
        android:layout_width="wrap_content"
        android:layout_height="wrap_content"
        android:text="用户名:"/>
    <!-- 定义一个文本编辑框,使用绝对定位 -->
    <EditText
        android:layout_x="80dp"
        android:layout_y="15dp"
        android:layout_width="wrap_content"
        android:width="250dp"
        android:layout_height="wrap_content" />
    <!-- 定义一个文本框,使用绝对定位 -->
    <TextView
        android:layout_x="20dp"
        android:layout_y="80dp"
        android:layout_width="wrap_content"
        android:layout_height="wrap_content"
        android:text="密  码:"/>
    <!-- 定义一个文本编辑框,使用绝对定位 -->
    <EditText
        android:layout_x="80dp"
        android:layout_y="75dp"
        android:layout_width="wrap_content"
        android:width="250dp"
        android:layout_height="wrap_content"
        android:password="true"/>
    <!-- 定义一个按钮,使用绝对定位 -->
    <Button
        android:layout_x="130dp"
        android:layout_y="135dp"
        android:layout_width="wrap_content"
        android:layout_height="wrap_content"
        android:text="登   录"/>
</AbsoluteLayout>
使用绝对布局需要像上面这样给每个子组件都指定 android:layout_x、android:layout_y 两个定位属性,这样才控制得了每个子组件在容器中出现的位置,运行得到的效果如下:

实际上想要通过绝对布局达到以上的效果需要反复多次运行比对,很显然这样的编程方式要繁琐的多,而且在不同屏幕上的显示效果差异巨大,这里给出Android中常用的距离单位:
px(像素):每个对应屏幕上的一个点
dip或dp(device independent pixels,设备独立像素):一种基于屏幕密度的抽象单位,在每英寸160点的显示器上,1dip=1px
sp(scaled pixels,比例像素):主要处理字体的大小,可以根据字体大小首选项进行缩放
in(英寸):标准长度单位
Android 中布局的优化常用措施介绍
1、尽可能减少布局的嵌套层级
可以使用 sdk 提供的 hierarchyviewer 工具分析视图树,帮助我们发现没有用到的布局。
2、不用设置不必要的背景,避免过度绘制
比如父控件设置了背景色,子控件完全将父控件给覆盖的情况下,那么父控件就没有必要设置背景。
3、使用标签复用相同的布局代码
4、使用标签减少视图层次结构
该标签主要有两种用法:
1) 因 为 所 有 的 Activity 视 图 的 根 节 点 都 是 Frame Layout , 因 此 如 果 我 们 的 自 定 义 的 布 局 也 是 Fragmen Layout 的时候那么可以使用 merge 替换。
2) 当应用 Include 或者 View Stub 标签从外部导入 xml 结构时,可以将被导入的 xml 用 merge 作为根节点表示,这样当被嵌入父级结构中后可以很好的将它所包含的子集融合到父级结构中,而不会出现冗余的节点。
只能作为 xml 布局的根元素。
5、通过实现 View 的延迟加载
布局如下:
<ViewStub
android:id="@+id/vs"
android:layout_width="match_parent"
android:layout_height="0dp"
android:layout_weight="1"
android:inflatedId="@+id/my_view"
android:layout="@layout/my_layout" />
Java核心代码:
public void loadVS(View view){
ViewStub vs = (ViewStub) findViewById(R.id.vs);
View inflate = vs.inflate();
int inflatedId = vs.getInflatedId();
int id = inflate.getId();
Toast.makeText(this, "inflatedId="+inflatedId+"***"+"id="+id,
Toast.LENGTH_SHORT).show();
点击关注,第一时间获得后续文章。
联系方式:


 1487


 扫一扫


 被折叠的 条评论
为什么被折叠?
 到【灌水乐园】发言


