


简介
Spring Cloud Security 为构建安全的SpringBoot应用提供了一系列解决方案,结合Oauth2可以实现单点登录、令牌中继、令牌交换等功能,OAuth 2.0是用于授权的行业标准协议。OAuth 2.0为简化客户端开发提供了特定的授权流,包括Web应用、桌面应用、移动端应用等。
OAuth2 相关名词解释
Resource owner(资源拥有者):拥有该资源的最终用户,他有访问资源的账号密码;
Resource server(资源服务器):拥有受保护资源的服务器,如果请求包含正确的访问令牌,可以访问资源;
Client(客户端):访问资源的客户端,会使用访问令牌去获取资源服务器的资源,可以是浏览器、移动设备或者服务器;
Authorization server(认证服务器):用于认证用户的服务器,如果客户端认证通过,发放访问资源服务器的令牌。
四种授权模式
Authorization Code(授权码模式):正宗的OAuth2的授权模式,客户端先将用户导向认证服务器,登录后获取授权码,然后进行授权,最后根据授权码获取访问令牌;
Implicit(简化模式):和授权码模式相比,取消了获取授权码的过程,直接获取访问令牌;
Resource Owner Password Credentials(密码模式):客户端直接向用户获取用户名和密码,之后向认证服务器获取访问令牌;
Client Credentials(客户端模式):客户端直接通过客户端认证(比如client_id和client_secret)从认证服务器获取访问令牌。
Oauth2的使用
源码地址(案例使用授权码模式)
oauth2-server创建
1、引入依赖
		<dependency>
            <groupId>org.springframework.cloud</groupId>
            <artifactId>spring-cloud-starter-oauth2</artifactId>
        </dependency>
        <dependency>
            <groupId>org.springframework.cloud</groupId>
            <artifactId>spring-cloud-starter-security</artifactId>
        </dependency>
        <dependency>
            <groupId>org.springframework.boot</groupId>
            <artifactId>spring-boot-starter-web</artifactId>
        </dependency>
2、修改配置
server:
  port: 9401
spring:
  application:
    name: oauth2-service
3、添加UserService实现UserDetailsService接口,用于加载用户信息:
@Service
public class UserService implements UserDetailsService {
    private List<User> userList;
    @Autowired
    private PasswordEncoder passwordEncoder;

    @PostConstruct
    public void initData() {
        String password = passwordEncoder.encode("123456");
        userList = new ArrayList<>();
        userList.add(new User("macro", password, AuthorityUtils.commaSeparatedStringToAuthorityList("admin")));
        userList.add(new User("andy", password, AuthorityUtils.commaSeparatedStringToAuthorityList("client")));
        userList.add(new User("mark", password, AuthorityUtils.commaSeparatedStringToAuthorityList("client")));
    }

    @Override
    public UserDetails loadUserByUsername(String username) throws UsernameNotFoundException {
        List<User> findUserList = userList.stream().filter(user -> user.getUsername().equals(username)).collect(Collectors.toList());
        if (!CollectionUtils.isEmpty(findUserList)) {
            return findUserList.get(0);
        } else {
            throw new UsernameNotFoundException("用户名或密码错误");
        }
    }
}
4、添加认证服务器配置,使用@EnableAuthorizationServer注解开启
@Configuration
@EnableAuthorizationServer
public class AuthorizationServerConfig extends AuthorizationServerConfigurerAdapter {

    @Autowired
    private PasswordEncoder passwordEncoder;

    @Autowired
    private AuthenticationManager authenticationManager;

    @Autowired
    private UserService userService;

    /**
     * 使用密码模式需要配置
     */
    @Override
    public void configure(AuthorizationServerEndpointsConfigurer endpoints) {
        endpoints.authenticationManager(authenticationManager)
                .userDetailsService(userService);
    }

    @Override
    public void configure(ClientDetailsServiceConfigurer clients) throws Exception {
        clients.inMemory()
                .withClient("admin")//配置client_id
                .secret(passwordEncoder.encode("admin123456"))//配置client_secret
                .accessTokenValiditySeconds(3600)//配置访问token的有效期
                .refreshTokenValiditySeconds(864000)//配置刷新token的有效期
                .redirectUris("http://www.baidu.com")//配置redirect_uri,用于授权成功后跳转
                .scopes("all")//配置申请的权限范围
                .authorizedGrantTypes("authorization_code","password");//配置grant_type,表示授权类型
    }
}
5、添加资源服务器配置,使用@EnableResourceServer注解开启:
@Configuration
@EnableResourceServer
public class ResourceServerConfig extends ResourceServerConfigurerAdapter {

    @Override
    public void configure(HttpSecurity http) throws Exception {
        http.authorizeRequests()
                .anyRequest()
                .authenticated()
                .and()
                .requestMatchers()
                .antMatchers("/user/**");//配置需要保护的资源路径
    }
}
6、添加SpringSecurity配置,允许认证相关路径的访问及表单登录:
@Configuration
@EnableWebSecurity
public class SecurityConfig extends WebSecurityConfigurerAdapter {

    @Bean
    public PasswordEncoder passwordEncoder() {
        return new BCryptPasswordEncoder();
    }

    @Bean
    @Override
    public AuthenticationManager authenticationManagerBean() throws Exception {
        return super.authenticationManagerBean();
    }

    @Override
    public void configure(HttpSecurity http) throws Exception {
        http.csrf()
                .disable()
                .authorizeRequests()
                .antMatchers("/oauth/**", "/login/**", "/logout/**")
                .permitAll()
                .anyRequest()
                .authenticated()
                .and()
                .formLogin()
                .permitAll();
    }
}
7、添加controller需要登录的接口用于测试:
@RestController
@RequestMapping("/user")
public class UserController {
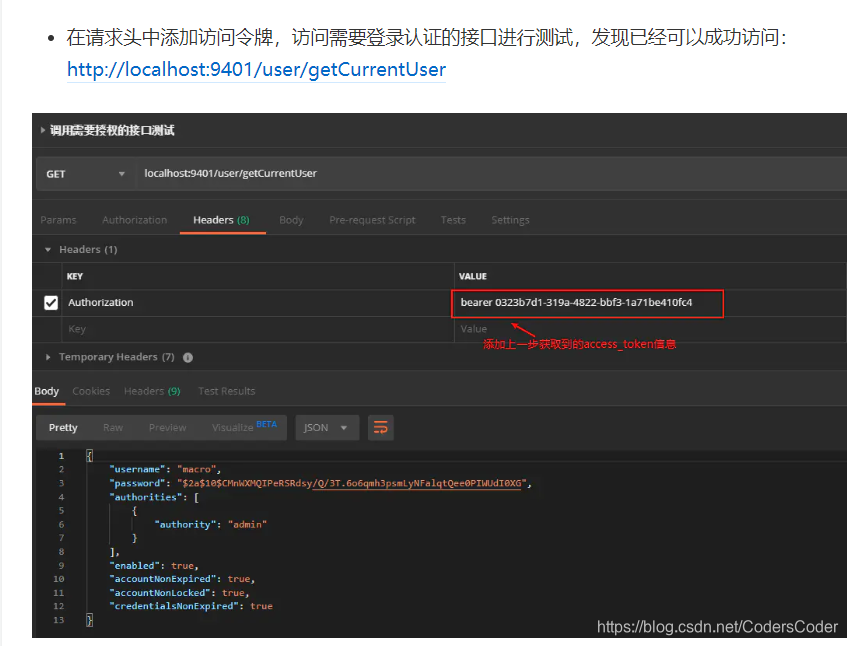
@GetMapping("/getCurrentUser")
public Object getCurrentUser(Authentication authentication) {
return authentication.getPrincipal();
}
}
验证:
使用授权码模式
启动oauth2-server服务;
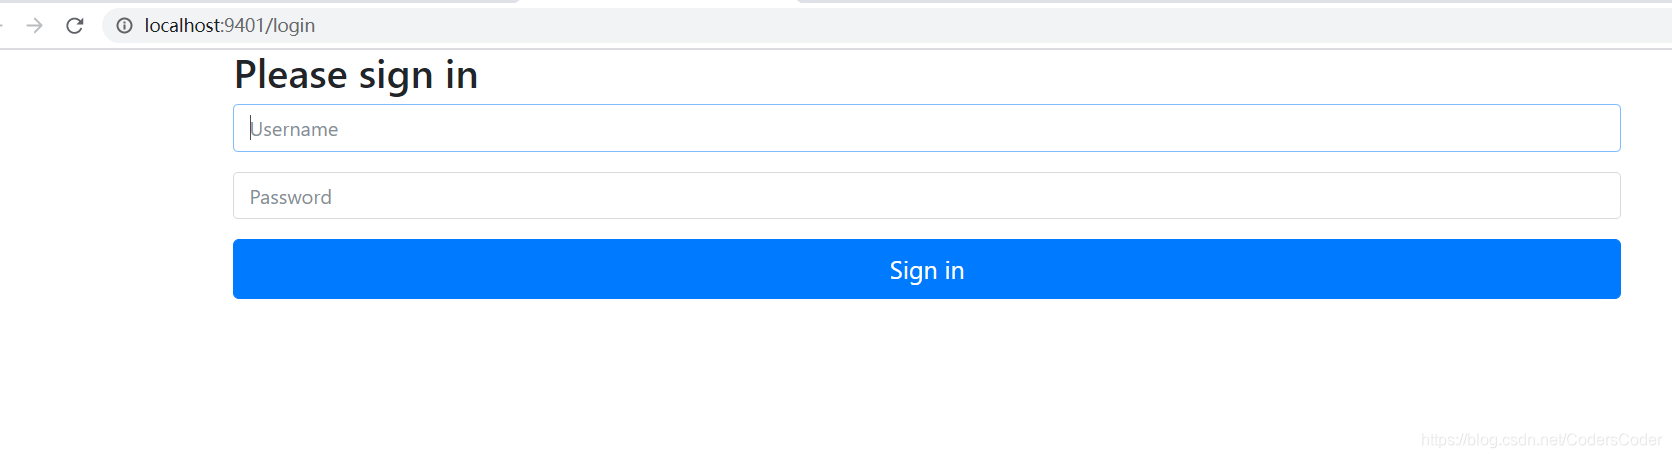
在浏览器访问该地址进行登录授权:http://localhost:9401/oauth/authorize?response_type=code&client_id=admin&redirect_uri=http://www.baidu.com&scope=all&state=normal
输入账号密码进行登录操作:
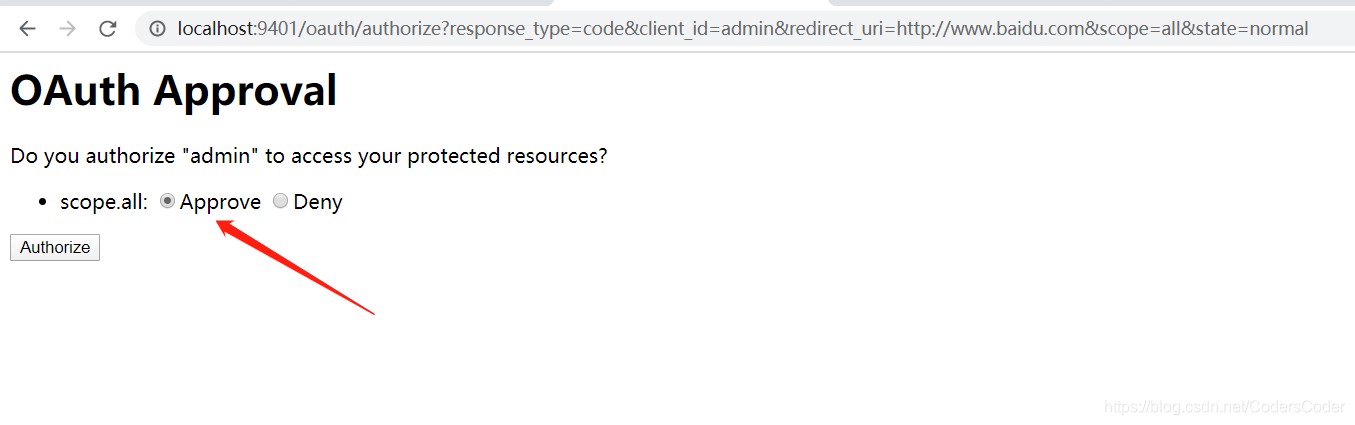
授权同意后即可跳转到指定网页并获得授权码
https://www.baidu.com/?code=CHE5wl&state=normal
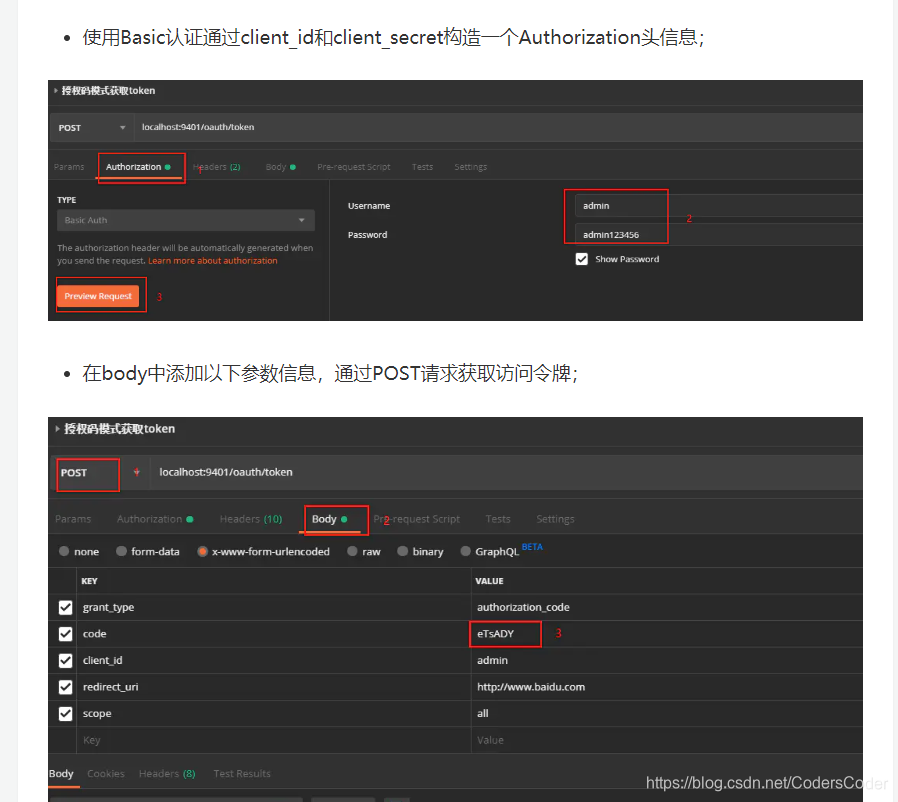
使用授权码请求该地址获取访问令牌:http://localhost:9401/oauth/token
接下来使用postman进行测试验证:
项目参考:https://juejin.im/post/5dc013bae51d456e817cec30


 1096
1096

 被折叠的 条评论
为什么被折叠?
被折叠的 条评论
为什么被折叠?
 到【灌水乐园】发言


