


 本文介绍SpringSecurity框架,演示其基本用法,包括Maven工程搭建、依赖配置、安全过滤器链设置、用户认证与授权,及前后端实现。
Spring Security 简介
Spring Security是一个能够为基于Spring的企业应用系统提供声明式的安全访问控制解决方案的安全框架。
一个能够为基于Spring的企业应用系统提供声明式的安全訪问控制解决方式的安全框架(简单说是对访问权限进行控制),应用的安全性包括用户认证(Authentication)和用户授权(Authorization)两个部分。用户认证指的是验证某个用户是否为系统中的合法主体,也就是说用户能否访问该系统。用户认证一般要求用户提供用户名和密码。系统通过校验用户名和密码来完成认证过程。用户授权指的是验证某个用户是否有权限执行某个操作。在一个系统中,不同用户所具有的权限是不同的。比如对一个文件来说,有的用户只能进行读取,而有的用户可以进行修改。一般来说,系统会为不同的用户分配不同的角色,而每个角色则对应一系列的权限。 spring security的主要核心功能为 认证和授权,框架也是基于这两个核心功能去实现的。
本文演示了Spring Security的最最基本用法
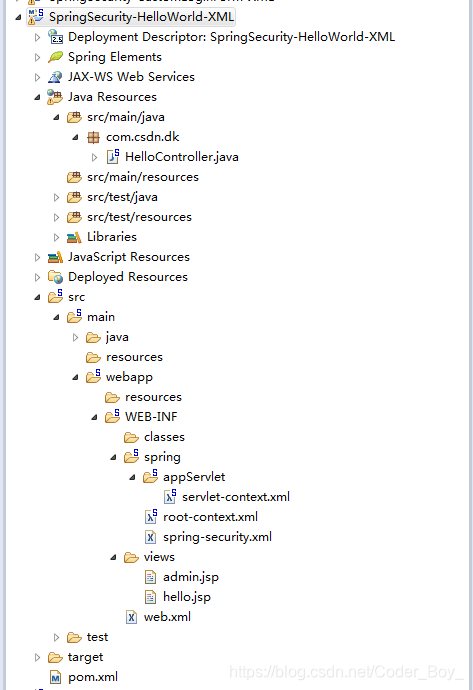
步骤1: 工程目录结构
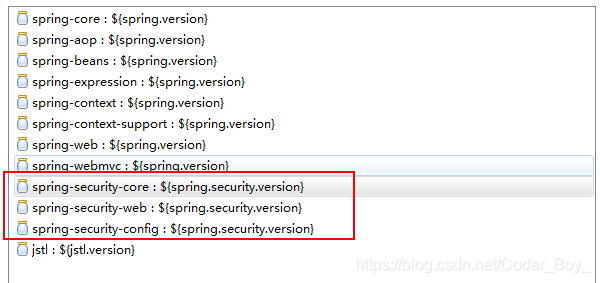
第2步:创建Maven工程更新pom.xml,添加所需依懒
<?xml version="1.0" encoding="UTF-8"?>
<project xmlns="http://maven.apache.org/POM/4.0.0" xmlns:xsi="http://www.w3.org/2001/XMLSchema-instance"
	xsi:schemaLocation="http://maven.apache.org/POM/4.0.0 http://maven.apache.org/maven-v4_0_0.xsd">
	<modelVersion>4.0.0</modelVersion>
	<groupId>com.study</groupId>
	<artifactId>SpringSecurity-HelloWorld-XML</artifactId>
	<name>SpringSecurity-HelloWorld-XML</name>
	<packaging>war</packaging>
	<version>1.0</version>
	<properties>
		<jdk.version>1.6</jdk.version>
		<spring.version>3.2.8.RELEASE</spring.version>
		<spring.security.version>3.2.3.RELEASE</spring.security.version>
		<jstl.version>1.2</jstl.version>
	</properties>

	<dependencies>
		<!-- Spring dependencies -->
		<dependency>
			<groupId>org.springframework</groupId>
			<artifactId>spring-core</artifactId>
			<version>${spring.version}</version>
		</dependency>
		<dependency>
			<groupId>org.springframework</groupId>
			<artifactId>spring-aop</artifactId>
			<version>${spring.version}</version>
		</dependency>
		<dependency>
			<groupId>org.springframework</groupId>
			<artifactId>spring-beans</artifactId>
			<version>${spring.version}</version>
		</dependency>
		<dependency>
			<groupId>org.springframework</groupId>
			<artifactId>spring-expression</artifactId>
			<version>${spring.version}</version>
		</dependency>
		<dependency>
			<groupId>org.springframework</groupId>
			<artifactId>spring-context</artifactId>
			<version>${spring.version}</version>
		</dependency>
		<dependency>
			<groupId>org.springframework</groupId>
			<artifactId>spring-context-support</artifactId>
			<version>${spring.version}</version>
		</dependency>
		<dependency>
			<groupId>org.springframework</groupId>
			<artifactId>spring-web</artifactId>
			<version>${spring.version}</version>
		</dependency>

		<dependency>
			<groupId>org.springframework</groupId>
			<artifactId>spring-webmvc</artifactId>
			<version>${spring.version}</version>
		</dependency>

		<!-- Spring Security -->
		<dependency>
			<groupId>org.springframework.security</groupId>
			<artifactId>spring-security-core</artifactId>
			<version>${spring.security.version}</version>
		</dependency>

		<dependency>
			<groupId>org.springframework.security</groupId>
			<artifactId>spring-security-web</artifactId>
			<version>${spring.security.version}</version>
		</dependency>

		<dependency>
			<groupId>org.springframework.security</groupId>
			<artifactId>spring-security-config</artifactId>
			<version>${spring.security.version}</version>
		</dependency>

		<!-- jstl for jsp page -->
		<dependency>
			<groupId>jstl</groupId>
			<artifactId>jstl</artifactId>
			<version>${jstl.version}</version>
		</dependency>

	</dependencies>
	<build>
		<plugins>
			<plugin>
				<artifactId>maven-eclipse-plugin</artifactId>
				<version>2.9</version>
				<configuration>
					<additionalProjectnatures>
						<projectnature>org.springframework.ide.eclipse.core.springnature</projectnature>
					</additionalProjectnatures>
					<additionalBuildcommands>
						<buildcommand>org.springframework.ide.eclipse.core.springbuilder</buildcommand>
					</additionalBuildcommands>
					<downloadSources>true</downloadSources>
					<downloadJavadocs>true</downloadJavadocs>
				</configuration>
			</plugin>
			<plugin>
				<groupId>org.apache.maven.plugins</groupId>
				<artifactId>maven-compiler-plugin</artifactId>
				<version>2.5.1</version>
				<configuration>
					<source>1.6</source>
					<target>1.6</target>
					<compilerArgument>-Xlint:all</compilerArgument>
					<showWarnings>true</showWarnings>
					<showDeprecation>true</showDeprecation>
				</configuration>
			</plugin>
			<plugin>
				<groupId>org.codehaus.mojo</groupId>
				<artifactId>exec-maven-plugin</artifactId>
				<version>1.2.1</version>
				<configuration>
					<mainClass>org.test.int1.Main</mainClass>
				</configuration>
			</plugin>
		</plugins>
	</build>
</project>
主要还是在springweb开发所需jar上添加三个Spring Security所需jar:
相关配置文件:
web.xml
<?xml version="1.0" encoding="UTF-8"?>
<web-app version="2.5" xmlns="http://java.sun.com/xml/ns/javaee"
	xmlns:xsi="http://www.w3.org/2001/XMLSchema-instance"
	xsi:schemaLocation="http://java.sun.com/xml/ns/javaee http://java.sun.com/xml/ns/javaee/web-app_2_5.xsd">

	<!-- The definition of the Root Spring Container shared by all Servlets
		and Filters -->
	<context-param>
		<param-name>contextConfigLocation</param-name>
		<param-value>/WEB-INF/spring/root-context.xml</param-value>
	</context-param>

	<!-- Creates the Spring Container shared by all Servlets and Filters -->
	<listener>
		<listener-class>org.springframework.web.context.ContextLoaderListener</listener-class>
	</listener>

	<!-- Processes application requests -->
	<servlet>
		<servlet-name>appServlet</servlet-name>
		<servlet-class>org.springframework.web.servlet.DispatcherServlet</servlet-class>
		<init-param>
			<param-name>contextConfigLocation</param-name>
			<param-value>/WEB-INF/spring/appServlet/servlet-context.xml</param-value>
		</init-param>
		<load-on-startup>1</load-on-startup>
	</servlet>

	<servlet-mapping>
		<servlet-name>appServlet</servlet-name>
		<url-pattern>/</url-pattern>
	</servlet-mapping>

	<!-- Spring Security -->
	<filter>
		<filter-name>springSecurityFilterChain</filter-name>
		<filter-class>org.springframework.web.filter.DelegatingFilterProxy</filter-class>
	</filter>

	<filter-mapping>
		<filter-name>springSecurityFilterChain</filter-name>
		<url-pattern>/*</url-pattern>
	</filter-mapping>

</web-app>
root-context.xml
<?xml version="1.0" encoding="UTF-8"?>
<beans xmlns="http://www.springframework.org/schema/beans"
	xmlns:xsi="http://www.w3.org/2001/XMLSchema-instance"
	xsi:schemaLocation="http://www.springframework.org/schema/beans http://www.springframework.org/schema/beans/spring-beans.xsd">

	<!-- Root Context: defines shared resources visible to all other web components -->

	<import resource="spring-security.xml" />
</beans>
此配置其实包含了“配置模块化”的思想,通过import,把跟Security相关的配置,单独放在另一个xml文件中,然后import进来,配置文件特别多的时候,这样可以使Spring的配置看上去更有条理
spring-security.xml
<beans:beans xmlns="http://www.springframework.org/schema/security"
	xmlns:beans="http://www.springframework.org/schema/beans" xmlns:xsi="http://www.w3.org/2001/XMLSchema-instance"
	xsi:schemaLocation="http://www.springframework.org/schema/beans
	http://www.springframework.org/schema/beans/spring-beans-3.0.xsd
	http://www.springframework.org/schema/security
	http://www.springframework.org/schema/security/spring-security-3.2.xsd">

	<http auto-config="true">
		<intercept-url pattern="/admin" access="ROLE_USER" />
		<!--  <http-basic /> -->
	</http>

	<authentication-manager>
		<authentication-provider>
			<user-service>
				<user name="dk" password="123456" authorities="ROLE_USER" />
			</user-service>
		</authentication-provider>
	</authentication-manager>

</beans:beans>
这才是Security的精华所在,8-11行,表示“/admin”请求需要ROLE_USER角色的用户才能访问,13-19行配置了一个用户dk以及密码123456,并将该用户授于ROLE_USER角色(当然:这里只是演示,实际应用中,更常见的做法是将用户名、密码放到数据库中)
servlet-context.xml
<?xml version="1.0" encoding="UTF-8"?>
<beans:beans xmlns="http://www.springframework.org/schema/mvc"
	xmlns:xsi="http://www.w3.org/2001/XMLSchema-instance"
	xmlns:beans="http://www.springframework.org/schema/beans"
	xmlns:context="http://www.springframework.org/schema/context"
	xsi:schemaLocation="http://www.springframework.org/schema/mvc http://www.springframework.org/schema/mvc/spring-mvc.xsd
		http://www.springframework.org/schema/beans http://www.springframework.org/schema/beans/spring-beans.xsd
		http://www.springframework.org/schema/context http://www.springframework.org/schema/context/spring-context.xsd">

	<!-- DispatcherServlet Context: defines this servlet's request-processing infrastructure -->

	<!-- Enables the Spring MVC @Controller programming model -->
	<annotation-driven />

	<!-- Handles HTTP GET requests for /resources/** by efficiently serving up static resources in the ${webappRoot}/resources directory -->
	<resources mapping="/resources/**" location="/resources/" />

	<!-- Resolves views selected for rendering by @Controllers to .jsp resources in the /WEB-INF/views directory -->
	<beans:bean class="org.springframework.web.servlet.view.InternalResourceViewResolver">
		<beans:property name="prefix" value="/WEB-INF/views/" />
		<beans:property name="suffix" value=".jsp" />
	</beans:bean>

	<context:component-scan base-package="com.csdn.dk" />


</beans:beans>
主要用来处理Spring-MVC的相关内容,跟Security其实没啥关系
第3步:前端视图页面部分
通用页面(所以角色都可以访问)
hello.jsp
<%@ page language="java" contentType="text/html; charset=UTF-8"
	pageEncoding="UTF-8" session="false"%>

<!DOCTYPE html PUBLIC "-//W3C//DTD HTML 4.01 Transitional//EN" "http://www.w3.org/TR/html4/loose.dtd">
<html>
<head>
<meta http-equiv="Content-Type" content="text/html; charset=UTF-8">
<title>${title}</title>
</head>
<body>
	<h1>Title:${title}</h1>
	<h1>Message:${message}</h1>
</body>
</html>
特定页面(不是所以角色都可以访问)
admin.jsp
<%@ page language="java" contentType="text/html; charset=UTF-8"
pageEncoding="UTF-8" session="true"%>
<%@taglib prefix="c" uri="http://java.sun.com/jsp/jstl/core"%>
<!DOCTYPE html PUBLIC "-//W3C//DTD HTML 4.01 Transitional//EN" "http://www.w3.org/TR/html4/loose.dtd">
<html>
<head>
<meta http-equiv="Content-Type" content="text/html; charset=UTF-8">
<title>${title}</title>
</head>
<body>
<h1>Title : ${title}</h1>
<h1>Message : ${message}</h1>
<c:if test="${pageContext.request.userPrincipal.name != null}">
<h2>
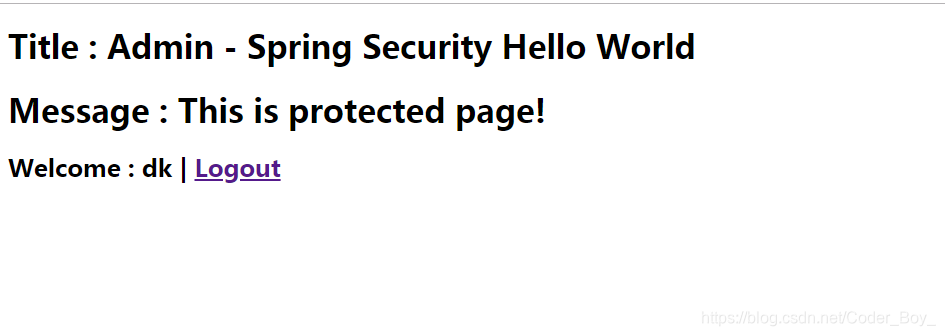
Welcome : ${pageContext.request.userPrincipal.name} | <a
href="<c:url value="/j_spring_security_logout" />"> Logout</a>
</h2>
</c:if>
</body>
</html>
第4步 :后端JAVA部分
HelloController.java
对应前端两个页面的请求控制
package com.csdn.dk;

import org.springframework.stereotype.Controller;
import org.springframework.web.bind.annotation.RequestMapping;
import org.springframework.web.bind.annotation.RequestMethod;
import org.springframework.web.servlet.ModelAndView;

@Controller
public class HelloController {

	@RequestMapping(value = { "/", "/welcome" }, method = RequestMethod.GET)
	public ModelAndView welcome() {

		ModelAndView model = new ModelAndView();
		model.addObject("title", "Welcome - Spring Security Hello World");
		model.addObject("message", "This is welcome page!");
		model.setViewName("hello");
		return model;

	}

	@RequestMapping(value = "/admin", method = RequestMethod.GET)
	public ModelAndView admin() {

		ModelAndView model = new ModelAndView();
		model.addObject("title", "Admin - Spring Security Hello World");
		model.addObject("message", "This is protected page!");
		model.setViewName("admin");

		return model;

	}

}
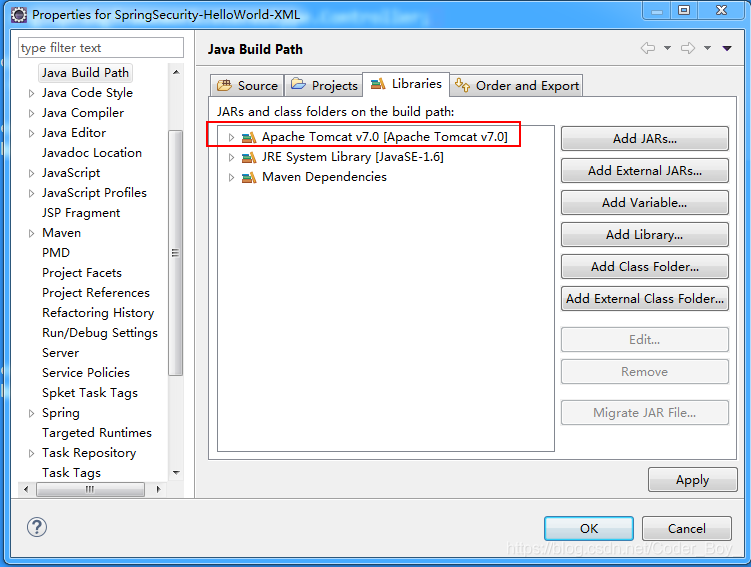
第5步 :添加javaee支持(也可以单独添加javaee.jar支持)
加载项目到Tomcat后运行起来,录入登录用户名与密码进行测试
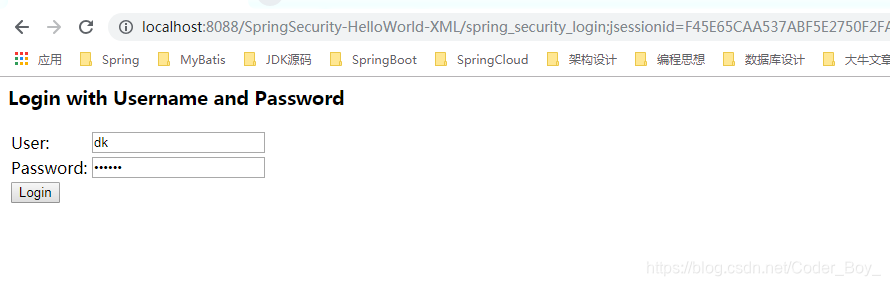
登录成功页面的截图:
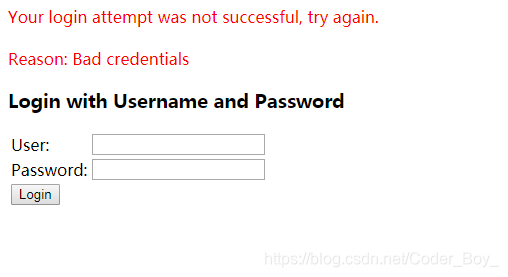
登录失败页面的截图:
在上面的案例中,有一些框架默认的配置:
- admin.jsp中退出的a链接: j_spring_security_logout,是Spring Security默认生成的logout地址,除非开发人员有其它设置,否则默认退出地址就是它
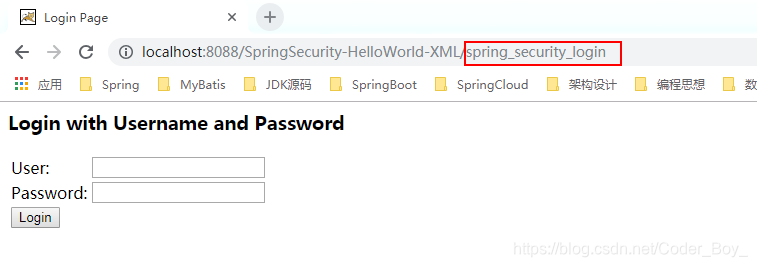
- 还有就是我们访问/admin时,会重定向到Spring Security自动生成的login页面 spring_security_login,也就是没有编写登录表单form,系统提示一个默认的登录表单。
这种默认约定配置,在springBoot中体现的最明显,也就是现在流行的“约定大于配置”的思想。


 2137
2137

 被折叠的 条评论
为什么被折叠?
被折叠的 条评论
为什么被折叠?
 到【灌水乐园】发言


