


0.前言 Preface
学习基础:有一定的JAVA编程语言基础,计算机基础。
学习目标:学习多线程,夯实基础。
- 学习多线程相关概念。
- 学习JAVA中的多线程操作。
- 线程池。
为了尽可能贴近实际工作与养成代码规范的习惯,本文部分例子我们用一个Maven工程,以打印日志的形式作为示例,以下我们创建工程、添加依赖的准备工作,供读者参考:
创建工程

工程名称随意,组名一般是公司、个人的域名,此处以maven工程为例
引入依赖
工程创建完毕后,pom.xml引入lombok
        <!--    Lombok    -->
        <dependency>
            <groupId>org.projectlombok</groupId>
            <artifactId>lombok</artifactId>
        </dependency>
测试打印日志
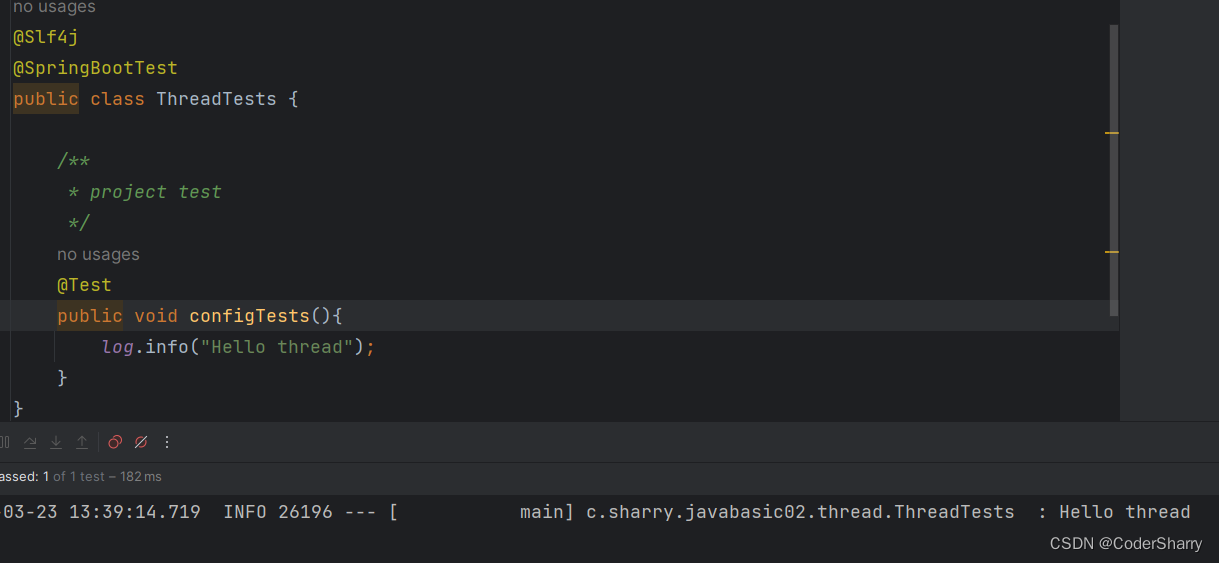
至此,项目准备完毕,接下来我们就以此项目的测试类来进行多线程的学习。
1.线程 Thread
学习线程需要了解的概念。
本节涉及的详细知识与原理,请参考《计算机组成原理》、《操作系统》。
1.1 进程与线程
当前,市面上绝大部分的计算机的组成原理类似,处理程序的方式类似:宏观上都是一个个进程,微观上则是线程。处理顺序也类似:并行、并发、串行。
下面我们略微详细介绍一下。
1.1.1 进程与线程
进程
进程是我们可见的最直观的程序运行过程。例如,我们在电脑打开了微信客户端,在上面和朋友聊天。这时候,整个微信客户端的运行就是一个进程,从我们打开微信客户端开始,直到我们退出了微信客户端,这个进程就结束了。其他软件同理。
线程
线程则是组成进程的基本单位。进程是由一个以上的线程组成的。在一个进程中,不同的线程可以处理相同的任务,也可以处理相同的任务。
这里借用码农架构的一张图来帮助大家理解:
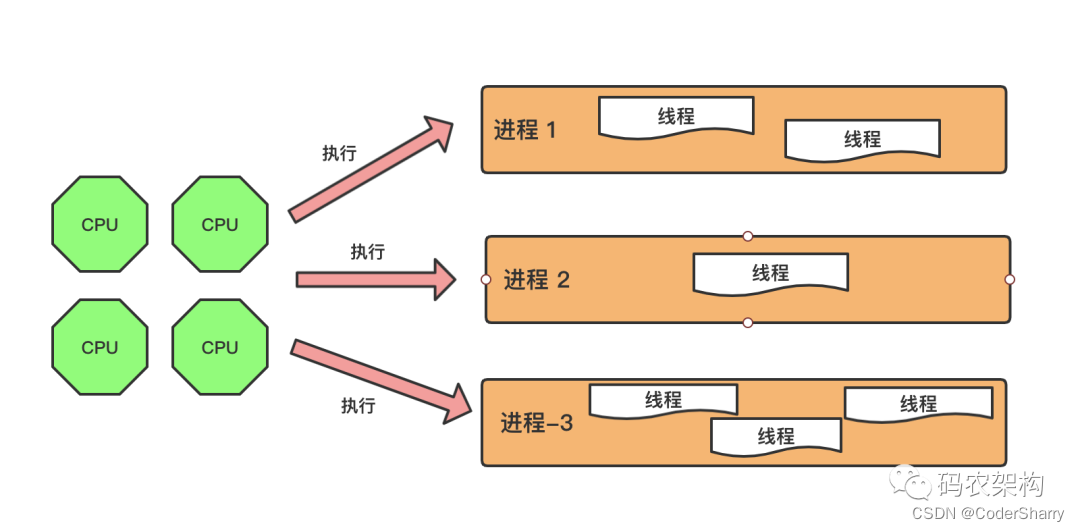
程序的运行为什么要这样设计呢?这是因为计算机的资源是有限的,计算机内部通过线程处理程序任务,线程组成进程来实现一个相对宏观的程序目标,有利于对有限的资源进行高效率的调度。
1.1.2 并发、并行与串行
实际工作与生活中,我们总是一次性开启多个软件,即开启了多个进程。同时,操作系统内部也帮我们随时随地启动了很多程序,只是我们没有主动去查看这些程序。换句话说,只要我们的计算机是启动状态,正常情况下都是多个进程在同时运行。多个进程是怎么同时运行的呢?这就涉及到我们本小节要介绍的概念:并发、并行与串行。
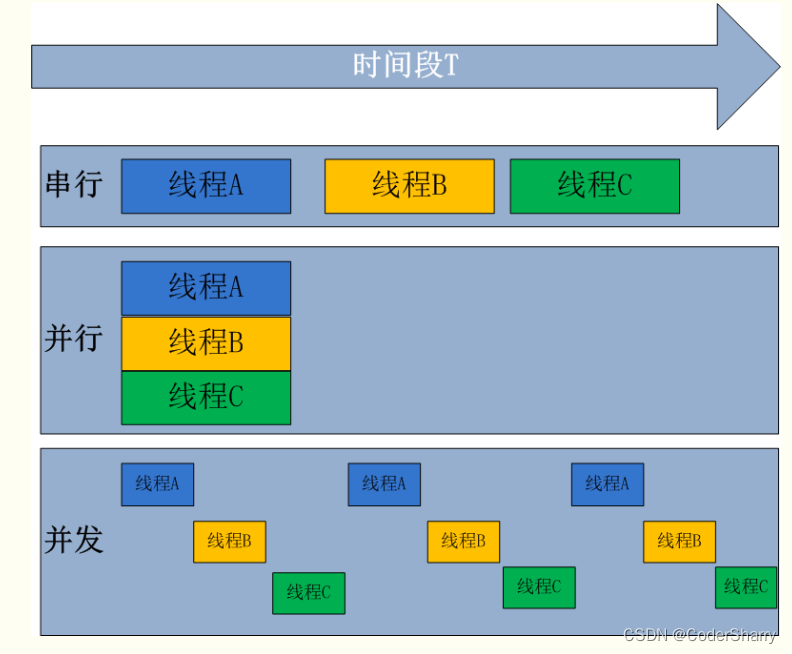
并发是指多个线程在单个处理器(CPU)内,同一时间段内,通过一定的规则(例如抢占时间片等方式)来回执行。由于CPU的效率很高,在我们眼中就像是这些线程所组成的进程在同时执行一样。并发在单核计算机里体现尤为明显,例如在21世纪初的老式单核或核比较少的计算机里,我们在使用QQ的同时打开了浏览器,QQ和浏览器就有可能是在并发执行。
并行是指多个处理器的情况下,同一时间段内,不同的线程或进程同时执行。
串行是指在单个处理器内,同一时间段内,线程或进程串成一串,排队逐个执行。
这里也借用来自百度的图片帮助理解:
1.2 创建线程
本小节我们创建一个动物类来进行线程的创建与测试:
@Slf4j
public class Animal {

    /**
     * attributes, getter and setter
     */
    private String name;

    private Integer age;

    private String color;

    private String sex;

    public String getName() {
        return name;
    }

    public void setName(String name) {
        this.name = name;
    }

    public Integer getAge() {
        return age;
    }

    public void setAge(Integer age) {
        this.age = age;
    }

    public String getColor() {
        return color;
    }

    public void setColor(String color) {
        this.color = color;
    }

    public String getSex() {
        return sex;
    }

    public void setSex(String sex) {
        this.sex = sex;
    }

    /**
     * Constructor
     */
    public Animal(String name, Integer age, String color, String sex) {
        this.name = name;
        this.age = age;
        this.color = color;
        this.sex = sex;
    }

    /**
     * mock this animal's action
     */
    public void eat(){
        log.info("{} is eating",this.getName());
    }

    /**
     * play with another animal
     * @param animal Animal object
     */
    public void play(Animal animal){
        log.info("{} is playing with {}",this.getName(), animal.getName());
    }

}
然后我们介绍常见的几种创建线程方式并写一些小demo进行模拟
1.2.1 继承Thread类
@Slf4j
public class AnimalPlayThread extends Thread {

    private Animal wantToPlay;
    private Animal playWith;

    private Integer playTime;

    public Integer getPlayTime() {
        return playTime;
    }

    public void setPlayTime(Integer playTime) {
        this.playTime = playTime;
    }

    public AnimalPlayThread(Animal wantToPlay, Animal playWith, Integer playTime) {
        this.wantToPlay = wantToPlay;
        this.playWith = playWith;
        this.playTime = playTime;
    }

    @Override
    public void run() {
        Integer playTimes = this.getPlayTime();
        while (0 <= playTimes) {
            log.info("{} is playing with {}", this.wantToPlay.getName(), this.playWith.getName());
            playTimes -- ;
        }
    }
}
继承了 Thread 类之后,我们一般需要重写run()方法,不重写的话默认调用父类Thread的run()方法。
测试
我们在测试类,调用strat()方法,输出日志进行模拟。
	/**
     * new test objects
     */
    Animal wantToPlay = new Animal("dog",11,"red","male");
    Animal planWith = new Animal("cat",12,"black","female");

    /**
     * test extends thread
     */
    @Test
    public void testExtendsThread(){
        AnimalPlayThread thread = new AnimalPlayThread(wantToPlay,planWith,100);
        //reserve
        AnimalPlayThread reserve = new AnimalPlayThread(planWith,wantToPlay,50);
        thread.start();
        reserve.start();
    }
观察输出结果:
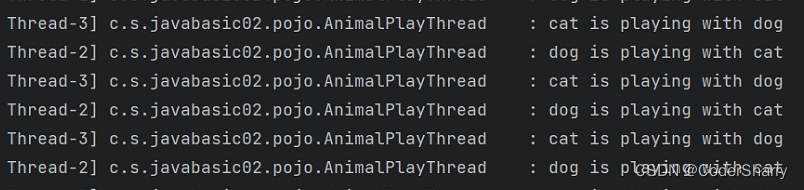
存在交替执行,这就是多线程的效果,也说明了我们的线程是创建成功的。
1.2.2 实现Runnable接口
我们可以尝试点进 Thread.class 查看源码,不难发现 Thread 实现了Runnable 接口。
public class Thread implements java.lang.Runnable
那么我们直接实现 Runnable 接口也是可以创建线程的:
@Slf4j
@Data
public class AnimalEatThread implements Runnable {
    private Integer eatTime;

    private Animal animal;

    @Override
    public void run() {
        while (0 <= eatTime){
            animal.eat();
        }
    }
}
测试
    /**
     * test implements Runnable
     */
    Animal dog = new Animal("dog",10,"yellow","male");
    Animal cat = new Animal("cat", 20,"blue","male");
    @Test
    public void testImplementsRunnable(){
        AnimalEatThread dogThread = new AnimalEatThread();
        dogThread.setEatTime(100);
        dogThread.setAnimal(dog);

        AnimalEatThread catThread = new AnimalEatThread();
        catThread.setEatTime(70);
        catThread.setAnimal(cat);

        new Thread(catThread).start();
        new Thread(dogThread).start();
    }
1.2.3 实现Callable接口
@Data
@Slf4j
public class AnimalCallable implements Callable<String> {

    private Animal animal;

    @Override
    public String call() throws Exception {
         animal.eat();
         return animal.getName();
    }
}
测试
	/**
     * test implements Callable
     */
    @Test
    public void testImplementsCallable(){
        // Create futureTask
        Animal animal = new Animal("pig",5,"pink","female");
        AnimalCallable animalCallable = new AnimalCallable();
        animalCallable.setAnimal(animal);
        FutureTask<String> futureTask = new FutureTask<>(animalCallable);

        // Call start
        new Thread(futureTask).start();

    }
Runnable 与 Callable 异同
- Runnable 的方法是run() ,Callable 的方法是call()
- Runnable 没有返回值, Callable 有返回值。即Callable能返回执行结果
- 实现Runnable的类能直接作为参数创建Thread,实现Callable的类需要通过FutureTask对象作为参数创建Thread
- Runnable需要在重写的run()方法内处理异常,Callable允许在call()方法中抛出异常
另外,实现Callable这种方式创建线程,所需要的FutureTask内部实现了RunnableFuture接口,RunnableFuture接口又继承了Runnable与Future,这说明FutureTask本质上也是对Runnable的加强,使用起来相对比直接实现Runnable复杂一些,但同时功能更强大一些。
1.2.4 匿名内部类
我们也可以直接以匿名内部类的方式重写 run() 或 call() 方法,这种方法的本质就是实现Runnable 或 Callable,但是采用匿名内部类则可以省去创建实现类的功夫。具体示例如下:
 		// runnable
        Thread tOne = new Thread(() -> {
            Thread t = Thread.currentThread();
            log.info(t.getName()+"is running");
        });
        tOne.start();

        // callable
        FutureTask<String> f = new FutureTask<>(() -> {
            log.info(Thread.currentThread().getName());
            return Thread.currentThread().getName();
        });
        new Thread(f).start();
1.3 线程常用方法
1.3.1 sleep 当前线程暂停
由于在Test的方法中,并不是直接加入主线程运行(下面的小节会提到),因此本部分示例代码我们在main方法里运行:
public static void main(String[] args) {
        Thread t1= new Thread(){
            public void run(){
                int seconds =15;
                while(true){
                    try {
                        Thread.sleep(1000);
                        System.out.println("正在运行");
                    } catch (InterruptedException e) {
                        e.printStackTrace();
                        seconds--;
                    }
                }
            }
        };
        t1.start();
}
1.3.2 join 加入到当前线程
进程由线程组成,一般情况下,我们在进行线程的创建、休眠等操作时,也是由一个主线程来完成的。如果主线程与我们创建的线程是并行运行,我们又没有对线程做阻塞操作,那么很可能导致主线程的运行速度比我们创建的线程运行速度快,当主线程结束时,整个进程就终止了。
举个例子:
@Test
    public void testCallableSleep() {
        Thread t = new Thread(new FutureTask<>((Callable<String>) () -> {
            Thread current = Thread.currentThread();
            Integer times = 30;
            while (times > 0){
                try {
                    log.info("{}", current.getName());
                    Thread.sleep(1000);
                    times--;
                } catch (InterruptedException e){
                    e.printStackTrace();
                }
            }

            log.info("{}", current.getName());
            return null;
        }));
        t.start();
    }
在上述代码中,我们创建了一个新线程 t 并启动,该线程中的代码会在一个新的线程中执行。但是在主线程中,由于没有对 t 线程进行阻塞或等待,因此主线程会立即继续执行下面的代码,而不会等待 t 线程执行完成。
由于主线程继续执行,此时可能会导致 t 线程还没有来得及执行完毕就被主线程中止了。因此,虽然在 t 线程中打印了两次线程名称,但是主线程只输出了一次线程名称。
如果我们想要在主线程中等待 t 线程执行完毕再继续执行,可以在主线程中使用 t.join() 方法,这样主线程会等待 t 线程执行完毕再继续执行下面的代码。
因此解决方案为:
    @Test
    public void testCallableSleep() {
        Thread t = new Thread(new FutureTask<>((Callable<String>) () -> {
            Thread current = Thread.currentThread();
            Integer times = 30;
            while (times > 0){
                try {
                    log.info("{}", current.getName());
                    Thread.sleep(1000);
                    times--;
                } catch (InterruptedException e){
                    e.printStackTrace();
                }
            }

            log.info("{}", current.getName());
            return null;
        }));
        t.start();
        try {
            t.join();
        } catch (InterruptedException e) {
            e.printStackTrace();
        }
    }
1.3.3 setPriority 线程优先级
当我们没有对多线程做限制的时候,线程抢占cpu资源就单纯依靠操作系统的默认规则,随缘进行运行了。举个例子,我们复用上面小节做过的动物线程demo:
    /**
     * test set priority
     */
    @Test
    public void testPriority(){
        //using animal thread
        AnimalPlayThread thread = new AnimalPlayThread(wantToPlay, planWith, 100);
        //reserve
        AnimalPlayThread reserve = new AnimalPlayThread(planWith, wantToPlay, 100);
        thread.start();
        reserve.start();
    }
输出观察效果,我们发现两个线程的执行顺序几乎五五开。如果我们使用setPriority方法规定线程的优先级,那么优先级高的线程会优先抢占更多的cpu资源:
	@Test
    public void testPriority(){
        //using animal thread
        AnimalPlayThread thread = new AnimalPlayThread(wantToPlay, planWith, 100);
        //reserve
        AnimalPlayThread reserve = new AnimalPlayThread(planWith, wantToPlay, 100);
        thread.setPriority(Thread.MAX_PRIORITY);
        reserve.setPriority(Thread.MIN_PRIORITY);
        thread.start();
        reserve.start();
    }
观察输出结果,我们发现优先级高的线程并不意味着一定先执行完毕后再执行优先级较低的线程,而是在一个时间段内,优先级高的线程占的时间片较多,因此比优先级较低的线程早一些执行完任务。
1.3.4 yield 临时暂停
与sleep暂停指定时间不同, yield 临时暂停是将资源让给其它线程执行。
	/**
     * test yield
     */
    @Test
    public void testYield(){
        Thread tOne = new Thread(new FutureTask<>((Callable<String>) () -> {
            Thread current = Thread.currentThread();
            Integer times = 100;
            while (times > 0){
                    log.info(Thread.currentThread().getName());
                    times--;
            }
            log.info(current.getName());
            return null;
        }));

        Thread tTwo = new Thread(new FutureTask<>((Callable<String>) () -> {
            Thread current = Thread.currentThread();
            Integer times = 100;
            while (times > 0){
                Thread.yield();
                log.info(Thread.currentThread().getName());
                times--;
            }
            log.info(current.getName());
            return null;
        }));

        tOne.setPriority(Thread.NORM_PRIORITY);
        tTwo.setPriority(Thread.NORM_PRIORITY);
        tTwo.start();
        tOne.start();
    }
观察输出结果,发现临时暂停的线程会在靠后的位置完成,因为临时暂停,将更多的资源留给了其他线程。
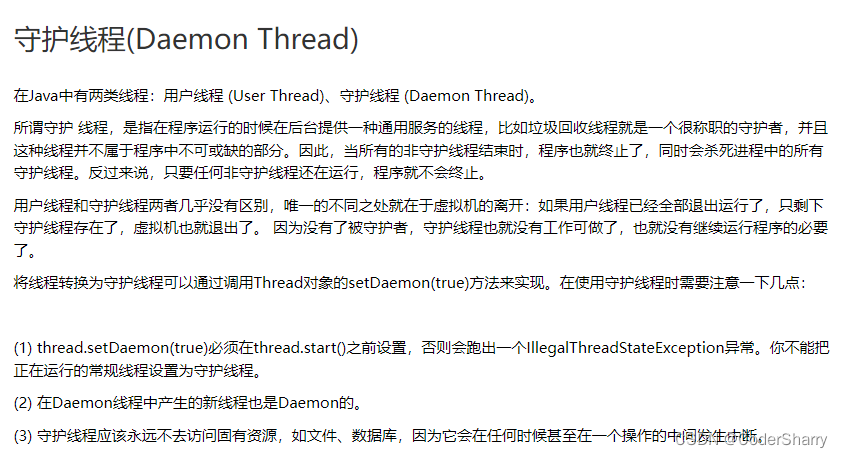
1.3.5 setDaemon 设置为守护线程
守护线程通常被用作日志、性能统计等工作。守护线程就像是一个进程里的支援进程,当一个进程里就剩守护线程时,当前进程就结束了。
举个可能不太恰当的例子,一个单位里有食堂,当这个单位解散时,就没有食堂继续经营的必要了,除非转行做餐饮,一般都是随着单位的解散一起解散。守护线程就类似于这个食堂。
设置守护线程,就相当于结束了这个线程。
此处借用来自博客园优秀博客的截图来解释一下:
以下是示例代码,观察效果:
    /**
     * test daemon thread
     */
    @Test
    public void testDaemonThread(){
        Thread t= new Thread(() -> {
            while(true){
                try {
                    Thread.sleep(1000);
                } catch (InterruptedException e) {
                    e.printStackTrace();
                }
                log.info("never stop until thread is done");
            }
        });
        t.setDaemon(true);
        t.start();
    }
注意,此处千万不要将这个守护线程join进主线程,因为这个示例代码里写了一个死循环,不然程序就会认为这个守护线程有需要守护的东西,无限制执行下去。
1.4 线程生命周期
一个进程有生命周期,最简单的表示就是 进程启动->进程运行->进程运行结束,释放资源。
线程也是如此,以下是来自度娘的线程生命周期简图,涉及的一些概念在下文会介绍。

2.多线程 Multithreading
从上面的章节,我们已经对线程及多线程有了一定的了解。这里我们主要学习多线程的情况下,常见问题的处理。
由于在默认情况下,单元测试使用的是Tomcat的线程池,容易造成当线程阻塞或睡眠时,主线程中断,导致整个进程中断,因此从此章节开始,我们下面的例子多用普通的类方法来测试。
2.1 线程同步
线程同步问题是指,当多个线程同时操作同一个资源时,如果没有指定线程执行顺序的规则,就会存在脏数据的问题。
问题演示
在演示之前,我们先给上面提到的Animal动物类加上体重这一属性,便于演示
	/**
     * animal weight mock
     */
    private Integer weight;

    public Animal(String name, Integer age, String color, String sex, Integer weight) {
        this.name = name;
        this.age = age;
        this.color = color;
        this.sex = sex;
        this.weight = weight;
    }
	/**
     * mock concurrency, animal be fatter
     */
    public void toBeFatter(Animal animal){
        if(animal.getWeight() != null){
            animal.setWeight((int) (animal.getWeight()+1));
            log.info("This animal becomes fatter:{} !", animal.getWeight());
        }
    }

    /**
     * mock concurrency, this animal becomes thin
     */
    public void toBeThin(Animal animal){
        if(animal.getWeight() != null){
            animal.setWeight((int) (animal.getWeight()-1));
            log.info("This animal becomes thin:{} !", animal.getWeight());
        }
    }
测试:
public static void main(String [] args) {
        //创建演示动物
        Animal pig = new Animal("Jack",3,"pink","male",0);

        //若干给线程给pig做体重增加与减少操作
        for (int i = 0; i < 1000; i++) {
            Thread tOne = new Thread(() -> pig.toBeFatter(pig));
            tOne.start();
        }

        for (int i = 0; i < 1000; i++) {
            Thread tTwo = new Thread(() -> pig.toBeThin(pig));
            tTwo.start();
        }

        log.info(pig.getWeight().toString());

    }
正常情况下,给猪各做1000的体重增加和1000的体重减少,正确结果应该为不变,即为原本的值。此处我给测试数据做了极端的值:0。实际执行结果可能存在异常的情况,例如我如下截图:
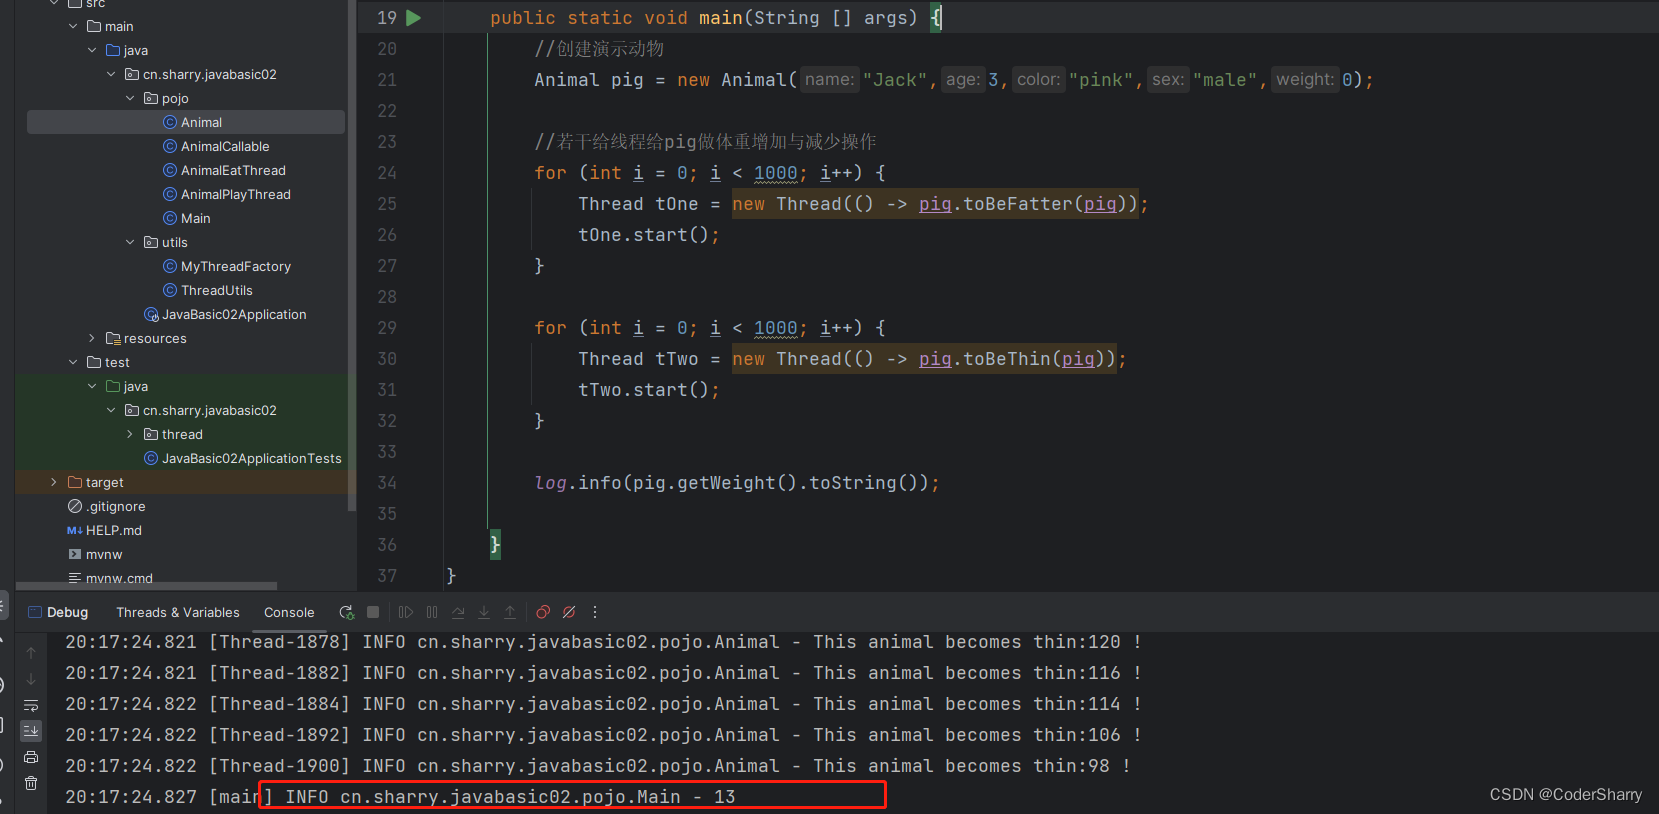
出现了负数的值。这非常不合理。这就是脏数据产生的结果。
问题分析
多线程的同步问题,脏数据通常是多个线程争抢同一个资源时产生的。例如,上述负数的产生,有可能是某个线程对猪的体重增加1之后,增加后的值还没存入这个对象,其他线程就拿了还没修改的值执行了操作,这就产生了数据的紊乱。这种紊乱的数据称为脏数据。
2.2 线程锁
上面小节我们介绍了线程同步问题,为了解决这个问题,一般的思路就是当公共资源被某个线程占用时,其他线程就不能再去占用这个资源。举个有味道的例子,就像是厕所坑位,给每个坑位安个门…嗯,就是这个意思。
参照这个思路,我们常用线程锁来解决线程同步问题。
synchronized关键字
synchronized 关键字修饰的代码块或方法,表示当前线程独占被锁的对象。当其他线程试图将被锁的对象占有时,只能等待当前占有的线程将资源释放。一般情况下,当synchronized块自然结束,或者有异常抛出时,同步对象资源释放。
Lock接口
Lock是一个接口,通过代码层面解决同步问题。与synchronized 略有不同,它需要手动释放资源。但目标基本一致,使用类似。
2.2.1 synchronized 锁公共对象
在上一小节提到的同步问题所举的例子,新增一个公共对象,使用synchronized将其作为对象锁锁住:
public static void main(String[] args) throws InterruptedException {
        //创建演示动物
        Animal pig = new Animal("Jack", 3, "pink", "male", 0);

        //创建将要锁的对象
        final Object lock = new Object();

        //若干给线程给pig做体重增加与减少操作
        for (int i = 0; i < 1000; i++) {
            Thread tOne = new Thread(() -> {
                synchronized (lock) {
                    pig.toBeFatter(pig);
                }
            });
            tOne.start();
        }

        for (int i = 0; i < 1000; i++) {
            Thread tTwo = new Thread(() -> {
                synchronized (lock) {
                    pig.toBeThin(pig);
                }
            });
            tTwo.start();
        }

        Thread.sleep(2000);
        log.info(pig.getWeight().toString());
    }
观察输出结果,此时结果应正常。
2.2.2 synchronized 锁当前对象
上面小节的代码,我们新创建了一个专门用于锁的公共对象。为了让代码更简洁,我们可以使用当前公共资源作为锁的对象:
public static void main(String[] args) throws InterruptedException {
        //创建演示动物
        Animal pig = new Animal("Jack", 3, "pink", "male", 0);

        //若干给线程给pig做体重增加与减少操作
        for (int i = 0; i < 1000; i++) {
            Thread tOne = new Thread(() -> {
                synchronized (pig) {
                    pig.toBeFatter(pig);
                }
            });
            tOne.start();
        }

        for (int i = 0; i < 1000; i++) {
            Thread tTwo = new Thread(() -> {
                synchronized (pig) {
                    pig.toBeThin(pig);
                }
            });
            tTwo.start();
        }

        Thread.sleep(2000);
        log.info(pig.getWeight().toString());
    }
2.2.3 synchronized 锁方法
我们也可以直接在类对象的方法上,对当前对象进行上锁,达到相同的效果。
举例:
	/**
     * mock concurrency, animal be fatter
     */
    public void toBeFatter(Animal animal) {
        synchronized (this) {
            if (animal.getWeight() != null) {
                animal.setWeight((int) (animal.getWeight() + 1));
                log.info("This animal becomes fatter:{} !", animal.getWeight());
            }
        }
    }

    /**
     * mock concurrency, this animal becomes thin
     */
    public synchronized void toBeThin(Animal animal) {
        if (animal.getWeight() != null) {
            animal.setWeight((int) (animal.getWeight() - 1));
            log.info("This animal becomes thin:{} !", animal.getWeight());
        }
    }
测试方法:
	public static void main(String[] args) throws InterruptedException {
        //创建演示动物
        Animal pig = new Animal("Jack", 3, "pink", "male", 0);

        //若干给线程给pig做体重增加与减少操作
        for (int i = 0; i < 1000; i++) {
            Thread tOne = new Thread(() -> pig.toBeFatter(pig));
            tOne.start();
        }

        for (int i = 0; i < 1000; i++) {
            Thread tTwo = new Thread(() -> {
                    pig.toBeThin(pig);
            });
            tTwo.start();
        }

        Thread.sleep(2000);
        log.info(pig.getWeight().toString());
    }
2.2.4 Lock 线程锁解决方案
本小节我们采用 Lock 的方式进行线程锁。注意要使用unlock方法手动释放资源。
我们依然以本章节设计的动物类和猪对象为例:
	 public static void main(String[] args) throws InterruptedException {
        //创建演示动物
        Animal pig = new Animal("Jack", 3, "pink", "male", 0);

        // 创建 Lock 实现类对象
        Lock lock = new ReentrantLock();

        //若干给线程给pig做体重增加与减少操作
        for (int i = 0; i < 1000; i++) {

            Thread tOne = new Thread(() -> {
                lock.lock();
                pig.toBeFatter(pig);
                lock.unlock();
            });
            tOne.start();
        }

        for (int i = 0; i < 1000; i++) {
            Thread tTwo = new Thread(() -> {
                lock.lock();
                pig.toBeThin(pig);
                lock.unlock();
            });
            tTwo.start();
        }

        Thread.sleep(2000);
        log.info(pig.getWeight().toString());
    }
注意,以上仅是入门案例,实际开发中,建议在finally中做资源释放的操作。
例如,上述代码改为:
	 //若干给线程给pig做体重增加与减少操作
        for (int i = 0; i < 1000; i++) {
            //紧跟 try 代码块
            Thread tOne = new Thread(() -> {
                try{
                    lock.lock();
                    pig.toBeFatter(pig);
                }
                catch (InterruptedException e) {
                    e.printStackTrace();
                } finally {
                    lock.unlock();
                }
            });
            tOne.start();
        }
2.3 线程安全
线程安全是指,通过同步机制保证各个线程都可以正常且正确地执行,不会出现数据污染、死锁等情况。本小节就围绕上面小节提到过的线程同步(即线程冲突)以及线程锁可能产生的死锁问题进行稍微更深的学习。是对上面小节的补充。
2.3.1 死锁
问题复现
先用文字描述一下死锁产生的原因:线程A正在占用线程锁对象a,此时线程B正在等待线程A释放资源。A执行的过程中,又需要占用锁对象b,此时线程B已经占用锁对象b,此时A只能等待B释放资源。而B在等待A释放a呀,于是又只能等A释放资源,A又在等B…这时候就有可能出现无限等待下去的局面。相当于线程之间死循环了,有点像我们的循环依赖。这就是死锁问题。
当业务复杂的时候,当我们没有提前做十分细致的观察与设计时,就有可能导致死锁。
代码复现:
Animal 类加上模拟死锁的方法
	/**
     * mock death lock, method exercise,
     * this animal is doing exercise with another animal
     */
    public void exercise(Animal exercise, Animal with){
        synchronized (exercise){
            log.info(exercise.getName() + "is going to do exercise");
            synchronized (with){
                log.info("{} is doing exercise with {}", exercise.getName(),with.getName());
            }
        }
    }
执行:
public static void main(String[] args) {
        //创建演示动物
        Animal pig = new Animal("Jack", 3, "pink", "male", 10);
        Animal monkey = new Animal("Kris",1,"yellow","male", 3);

        Thread pigThread = new Thread(() -> pig.exercise(pig,monkey));
        Thread monkeyThread = new Thread(() -> monkey.exercise(monkey,pig));
        pigThread.start();
        monkeyThread.start();

    }
以上代码的预期结果是各自只输出第一句,然后一直相互等待下去。
解决方案
- 在设计层面尽量避免死锁问题,在业务实现时尽量细心、耐心,如果发现存在可能死锁的情况,将逻辑修改成线程安全的模式。
- 使用线程安全的类,例如,在要考虑线程安全的业务上,能使用HashTable就尽量使用HashTable,因为HashMap线程不安全。或者,在我们创建对象时,采用线程安全创建方法,例如:
    List<Integer> list1 = new ArrayList<>();
    List<Integer> list2 = Collections.synchronizedList(list1);
- 使用Lock的方式获取锁,这是因为Lock可以选择性地获取锁,但要注意,Lock一定要记得unlock,否则也会造成死锁。
2.3.2 线程阻塞
有时我们在保证了线程安全之后,就要考虑效率。当业务复杂时,对某一线程的调用频繁导致其占用某一锁时间相对较长,其他线程可能出现无效的等待,此时可能会出现效率问题。
问题模拟
我们沿用上面提到的Animal类以及pig对象举例。
相关方法加上synchronized
	/**
     * mock concurrency, animal be fatter
     */
    public synchronized void toBeFatter(Animal animal) {
        if (animal.getWeight() != null) {
            animal.setWeight((int) (animal.getWeight() + 1));
            log.info("This animal becomes fatter:{} !", animal.getWeight());
        }
    }

    /**
     * mock concurrency, this animal becomes thin
     */
    public synchronized void toBeThin(Animal animal) {
        if (animal.getWeight() != null) {
            animal.setWeight((int) (animal.getWeight() - 1));
            log.info("This animal becomes thin:{} !", animal.getWeight());
        }
    }
测试主方法:
        //创建实验对象
        Animal pig = new Animal("pig",2,"pink","male",200);

        // 模拟养猪场对这个猪一直在给猪增重
        Thread tOne = new Thread(() -> {
            while (true){
                pig.toBeFatter(pig);
                log.info("This pig is fatter:{}",pig.getWeight());
                // 0.1秒增一次
                try {
                    Thread.sleep(100);
                } catch (InterruptedException e) {
                    throw new RuntimeException(e);
                }
            }
        });
        // 但是这个猪一直在运动,每0.01秒减一次
        Thread tTwo = new Thread(() -> {
            while (true){
                while (150 == pig.getWeight()){
                    log.info("This pig is more thin:{}",pig.getWeight());
                }
                pig.toBeThin(pig);
                try {
                    Thread.sleep(10);
                } catch (InterruptedException e) {
                    throw new RuntimeException(e);
                }
            }
        });

        tOne.start();
        tTwo.start();
可以通过修改上述例子的参数,观察性能变化。
这里举的是一个极端的例子,模拟的是当某一线程的任务执行到达目标结果之后,依然占用公共资源,但是又不能立马完全释放该资源,以后还有可能用到,此时的占用可能会导致资源浪费。
解决方案
使用wait() , notify() 方法进行线程资源的短暂释放与通知。即线程的阻塞与唤醒。
wait() 方法 :临时释放当前资源的占用,一定要写在synchronized块里。
notify() 方法:通知一个等待同步对象上的线程,可以来占用当前对象。
测试方法如下修改:
    /**
     * mock concurrency, animal be fatter
     */
    public synchronized void toBeFatter(Animal animal) {
        if (animal.getWeight() != null) {
            animal.setWeight((int) (animal.getWeight() + 1));
            log.info("This animal becomes fatter:{} !", animal.getWeight());
            this.notify();
        }
    }

    /**
     * mock concurrency, this animal becomes thin
     */
    public synchronized void toBeThin(Animal animal) {
        if (animal.getWeight() != null) {
            if(animal.getWeight() == 150){
                try {
                    this.wait();
                } catch (InterruptedException e) {
                    throw new RuntimeException(e);
                }
            }
            animal.setWeight((int) (animal.getWeight() - 1));
            log.info("This animal becomes thin:{} !", animal.getWeight());
        }
    }
测试方法:
	   // 创建实验对象
        Animal pig = new Animal("pig",2,"pink","male",200);

        // 模拟养猪场对这个猪一直在给猪增重
        Thread tOne = new Thread(() -> {
            while (true){
                pig.toBeFatter(pig);
                log.info("This pig is fatter:{}",pig.getWeight());
                // 0.1秒增一次
                try {
                    Thread.sleep(100);
                } catch (InterruptedException e) {
                    throw new RuntimeException(e);
                }
            }
        });
        // 但是这个猪一直在运动,每0.01秒减一次
        Thread tTwo = new Thread(() -> {
            while (true){
                pig.toBeThin(pig);
                log.info("This pig is more thin:{}",pig.getWeight());
                try {
                    Thread.sleep(10);
                } catch (InterruptedException e) {
                    throw new RuntimeException(e);
                }
            }
        });

        tOne.start();
        tTwo.start();
2.3.3 原子操作
原子操作(atomic operation)是不需要synchronized,这是多线程编程的老生常谈了。所谓原子操作是指不会被线程调度]机制打断的操作;这种操作一旦开始,就一直运行到结束,中间不会有任何 context switch —— 《百度百科》
原子操作不可分割,不可中断的特点保证了原子操作是线程安全的。
但是需要注意,多个原子操作组成的操作就不算是原子操作了,例如
//原子操作
int a = 1;

//并不是原子操作
a++;
这里的赋值语句是原子操作,但是a++就不是原子操作了,它的内部执行的原子操作有: 取 a的值、a+1、将新值赋回给a。
要将线程不安全的类或方法改造,原子操作是可选方案之一。下面我们举个小例子做原子操作同步测试:
/**
 * Class main for test
 *
 * @author Sharry
 * @since 2023/3/27
 */
@Slf4j
public class Main {
    /**
     * 实验变量
     */
    public static Integer val = 0;
    public static void main(String[] args) {

        // 实验次数
        Integer times = 10000;
        AtomicInteger atomicInteger = new AtomicInteger();

        List<Thread> tList = new ArrayList<>();

        // 对照组: 普通线程
        for(int i = 0 ; i < times ; i ++){
            Thread t = new Thread(() -> val ++);
            t.start();
            tList.add(t);
        }

        // 保证不会被主线程中断
        tList.forEach(t ->{
            try {
                t.join();
            } catch (InterruptedException e) {
                throw new RuntimeException(e);
            }
        });

        log.info("非原子操作所得结果{}",val);

        List<Thread> rList = new ArrayList<>();

        // 实验组,原子操作
        for (int i = 0; i < times; i++) {
            Thread r = new Thread(() -> atomicInteger.incrementAndGet());
            r.start();
            rList.add(r);
        }
        // 保证不会被主线程中断
        rList.forEach(r -> {
            try {
                r.join();
            } catch (InterruptedException e) {
                throw new RuntimeException(e);
            }
        });

        log.info("原子操作所得结果{}",atomicInteger.intValue());

    }
}
多执行几次,观察上述代码的结果,应该有很明显的对比。
3.线程池 Thread Pool
本章节主要介绍:常用线程池的创建与使用、线程池常用设置、线程池的任务拒绝策略。
本章节我们写一些Demo作测试。
3.1 创建线程池
在开发服务器端软件项目时,软件经常需要处一些 理执行时间很短而数目巨大的请求,如果为每一个请求创建一个新的线程,则会导致JVM需要频繁地处理线程对象的创建和销毁,如果请求的执行时间很短,则有可能花在创建和销毁线程对象上的时间 大于真正执行任务的时间,系统性能会大幅降低。JDK 5及以上版本提供了对线程池的支持,主要用于支持高并发的访问处理 和 复用线程对象。
线程池核心原理是创建一个 “线程池”(ThreadPool),在池中对线程对象进行管理,包括创建与销毁,使用池时只需要执行具体的任务即可,线程对象的处理都在池中被封装了。
本小节我们基于现有接口创建线程池。
3.1.1 创建无界线程池
	public static void main(String [] args) {
        // thread numbers
        Integer nums = 5;

        // create thread pool
        ExecutorService threadPool = Executors.newCachedThreadPool();

        for (int i = 0; i < nums; i++) {
            Runnable r = () -> {
                log.info(Thread.currentThread().getId() + "is running");
                try {
                    Thread.sleep(1000);
                } catch (InterruptedException e) {
                    throw new RuntimeException(e);
                }
                log.info(Thread.currentThread().getId() + "is going to finish");
            };

            threadPool.execute(r);
        }
    }
使用Executors类的newCachedThreadPool()方法创建无界线程池,所谓"无界"线程池就是池中存放线程个数是理论上的最大值,查看源码可以发现其最大容量是Integer.MAX_VALUE,即2147483647。
线程池接到一个任务后,会随机从池中取出一个空闲的线程来处理任务,该线程完成任务后不是关闭,而是继续回到线程池,等待新的任务。
运行上面代码,可以看到5条线程在执行任务,你有多少任务,我就有多少线程。且执行行完后可以看到红色方块还亮着,说明线程还是存活状态。
为了避免资源浪费,同时为了将存活状态的线程关闭,建议在当前线程池的使用完毕后,关闭线程池:
	public static void main(String [] args) {
        // thread numbers
        Integer nums = 5;

        // create thread pool
        ExecutorService threadPool = Executors.newCachedThreadPool();

        for (int i = 0; i < nums; i++) {
            Runnable r = () -> {
                log.info(Thread.currentThread().getId() + "is running");
                try {
                    Thread.sleep(1000);
                } catch (InterruptedException e) {
                    throw new RuntimeException(e);
                }
                log.info(Thread.currentThread().getId() + "is going to finish");
            };

            threadPool.execute(r);
        }
        // 关闭线程池
        threadPool.shutdown();
    }
我们还可以再写一个循环验证当前线程池的方法是否复用:
public static void main(String [] args) {
        // thread numbers
        Integer nums = 5;

        // create thread pool
        ExecutorService threadPool = Executors.newCachedThreadPool();

        for (int i = 0; i < nums; i++) {
            Runnable r = () -> {
                log.info(Thread.currentThread().getId() + "is running");
                try {
                    Thread.sleep(1000);
                } catch (InterruptedException e) {
                    throw new RuntimeException(e);
                }
                log.info(Thread.currentThread().getId() + "is going to finish");
            };

            threadPool.execute(r);
        }

        try {
            Thread.sleep(2000L);
        } catch (InterruptedException e) {
            throw new RuntimeException(e);
        }

        // 观察输出的线程id,验证是否复用
        for(int j = 0 ; j < 3 ; j ++){
            FutureTask<String> f = new FutureTask(() -> {
                log.info(Thread.currentThread().getId() + "is running");
                return null;
            });
            Thread t = new Thread(f);
            threadPool.execute(t);
        }

        threadPool.shutdown();
    }
3.1.2 线程工厂
我们写一个线程工厂类,实现 ThreadFactory 接口,可以使用工厂模式进行自定义线程创建,再将这些线程交给线程工厂管理:
/**
 * Thread factory
 * @author Sharry
 * @since 2023/3/27
 */
public class MyThreadFactory implements ThreadFactory {
    @Override
    public Thread newThread(Runnable runnable) {
        Thread t = new Thread(runnable);
        t.setName("Thread" + Math.random()*10);
        t.setPriority(Thread.NORM_PRIORITY);
        return t;
    }
}
根据线程工厂创建线程,交给线程池管理,并观察输出结果:
	public static void main(String [] args) {
        // put factory into executors
        ExecutorService threadPool = Executors.newCachedThreadPool(new MyThreadFactory());

        //创建3个任务交给线程池执行
        for (int i = 0; i < 3; i++) {
            //创建任务r
            Runnable r = new Runnable() {
                @Override
                public void run() {
                    Thread th = Thread.currentThread();
                    System.out.println("【线程" + th.getName() + "】正在执行任务...");
                    ThreadUtils.sleepThread(1000L);
                    System.out.println("【线程" + th.getName() + "】任务执行完毕");
                }
            };
            //把任务r交给线程池执行
            threadPool.execute(r);
        }
         threadPool.shutdown();

    }
自定义线程异常处理:
@Slf4j
public class MyThreadFactory implements ThreadFactory {
    @Override
    public Thread newThread(Runnable runnable) {
        Thread t = new Thread(runnable);
        t.setName("Thread" + Math.random()*10);
        t.setPriority(Thread.NORM_PRIORITY);
        //异常处理
        t.setUncaughtExceptionHandler((thread, throwable) -> log.warn(t.getName() + throwable.getMessage()));
        return t;
    }
}
3.1.3 有界线程池
使用newCachedThreadPool()方法创建无界线程池的缺点是,如果在高并发的情况下,无界线程池极易造成内存占用率大幅升高,导致内存溢出或者系统运行效率严重下降。
创建有界线程池可以一定程度弥补无界线程池的缺陷,但缺点就是当任务数量大于有界线程池的线程数时,有的任务需要等待。
有了上面小节线程工厂、无界线程池创建的铺垫,有界线程池的创建就相对简单很多:
public static void main(String [] args) {
       final Integer THREAD_NUMS = 3;

       // 构造方法不唯一,可以只用线程数量这一参数,按需选用
       ExecutorService threadPool = Executors.newFixedThreadPool(THREAD_NUMS, new MyThreadFactory());

       // 模拟 8 个任务
        for (int i = 0; i < 8; i++) {
            Runnable r = () -> {
                log.info(Thread.currentThread().getId() + "is running");
                try {
                    Thread.sleep(1000);
                } catch (InterruptedException e) {
                    throw new RuntimeException(e);
                }
                log.info(Thread.currentThread().getId() + "is finished");
            };

            threadPool.execute(r);
        }
        threadPool.shutdown();
    }
3.1.4 单一线程池
有时候我们不需要用到很多线程,但需要1条线程进行复用,这时候,就可以创建单一线程池:
		final Integer THREAD_NUMS = 3;

       // 单一线程池
        ExecutorService threadPool = Executors.newSingleThreadExecutor();

        // 模拟 8 个任务
        for (int i = 0; i < THREAD_NUMS; i++) {
            Runnable r = () -> {
                log.info(Thread.currentThread().getId() + "is running");
                try {
                    Thread.sleep(1000);
                } catch (InterruptedException e) {
                    throw new RuntimeException(e);
                }
                log.info(Thread.currentThread().getId() + "is finished");
            };

            threadPool.execute(r);
        }
        threadPool.shutdown();
3.1.5 定时线程池
定时线程池指可以进行定时任务调度执行的线程池。
直接举例:
public static void main(String [] args) {
        //创建延时线程池
        ScheduledExecutorService threadPool = Executors.newScheduledThreadPool(3);

        //线程工厂创建线程
        MyThreadFactory myThreadFactory = new MyThreadFactory();
        Thread t = myThreadFactory.newThread(() -> {
            log.info(Thread.currentThread().getName() + "is going to run");
            try {
                Thread.sleep(3000);
            } catch (InterruptedException e) {
                throw new RuntimeException(e);
            }
            log.info(Thread.currentThread().getName() + "is going to finish");
        });

        //延时线程池执行
        threadPool.execute(t);
        threadPool.shutdown();
    }
上面的例子是直接将定时线程池当作有界线程池执行,下面我们举个定时器执行的例子:
public static void main(String [] args) {
        //创建延时线程池
        ScheduledExecutorService threadPool = Executors.newScheduledThreadPool(3);

        //线程工厂创建线程
        MyThreadFactory myThreadFactory = new MyThreadFactory();
        Thread t = myThreadFactory.newThread(() -> {
            log.info(Thread.currentThread().getName() + "is going to run");
            try {
                Thread.sleep(3000);
            } catch (InterruptedException e) {
                throw new RuntimeException(e);
            }
            log.info(Thread.currentThread().getName() + "is going to finish");
        });

        //延时线程池执行
        //延迟指定时间执行
        threadPool.schedule(t,10,TimeUnit.SECONDS);
        threadPool.shutdown();
    }
关于定时线程池的深入学习,这里有一篇优秀的参考博文:
参考文章链接:https://blog.youkuaiyun.com/qq_33522097/article/details/126893998
3.2 线程策略
上一小节我们介绍了基于现有的接口创建各种线程池。这种创建线程池的方式优点是不需要考虑过多的参数,通过向上造型直接创建,十分便捷。
本小节在介绍线程任务拒接策略之前,先补充介绍一种创建灵活线程池的方式,而又在创建灵活线程池之前,先介绍涉及到的概念:阻塞队列。
阻塞队列
在上一小节我们提到过线程阻塞的相关概念。阻塞队列首先是一个队列,遵循FIFO原则,其次是它内部已经帮我们做了阻塞。多线程环境下,我们用线程操作阻塞队列,就不再需要关心何时阻塞线程,何时唤醒线程。
阻塞队列核心方法
| 方法类型 | 抛出异常 | 特殊值 | 阻塞 | 超时 |
|---|---|---|---|---|
| 插入 | add(e) | offer(e) | put(e) | offer(e,time,unit) |
| 移除 | remove | poll() | take() | poll(time,unit) |
| 检查 | element() | peek() | 无 | 无 |
常见阻塞队列
-
ArrayBlockingQueue
基于数组结构的阻塞队列
1,该队列在实例化时必须传入初始容量,且不可扩容,超出初始容量就出现异常。
2,使用boolean b = q.add(obj)添加元素,添加元素超过指定容量时会报错.。
3,使用Object o = q.poll();移除(取出)元素,取出后队列中的元素会变少。/** * test blocking queue */ @Test public void testBlockingQueue(){ ArrayBlockingQueue<Integer> arrayBlockingQueue = new ArrayBlockingQueue<>(3); arrayBlockingQueue.add(1); arrayBlockingQueue.add(2); arrayBlockingQueue.add(3); log.info("{}",arrayBlockingQueue.poll()); log.info("{}",arrayBlockingQueue.poll()); log.info("{}",arrayBlockingQueue.poll()); log.info("{}",arrayBlockingQueue.size()); } -
LinkedBlockingQueue
基于链表结构的阻塞队列,吞吐量高于ArrayBlockingQueue,因为不需要整片地方
1,此队列创建时可以不指定容量,可以无限添加元素
此队列创建时也可以指定容量,添加元素超过指定容量时会报错
LinkedBlockingQueue q = new LinkedBlockingQueue();
LinkedBlockingQueue q = new LinkedBlockingQueue(int n);
2,使用boolean b = q.add(obj)添加元素。
3,使用int n = q.size();获取队列中的元素个数(不是容量)。
4,使用Object o = q.poll();移除(取出)元素,取出后队列中的元素会变少。LinkedBlockingQueue<String> linkedBlockingQueue = new LinkedBlockingQueue<>(); linkedBlockingQueue.add("香港"); linkedBlockingQueue.add("台湾"); linkedBlockingQueue.add("澳门"); log.info("{},{}",linkedBlockingQueue.poll(),linkedBlockingQueue.size()); log.info("{},{}",linkedBlockingQueue.poll(),linkedBlockingQueue.size()); log.info("{},{}",linkedBlockingQueue.poll(),linkedBlockingQueue.size()); log.info("{},{}",linkedBlockingQueue.poll(),linkedBlockingQueue.size()); -
SynchronousQueue
1,该队列并不存储任何的数据,没有容量的概念,它可以在2个线程之间直接传送数据。
2,使用q.put(Object o);发送数据。
3,使用Object o = q.take();接收数据。
	SynchronousQueue<String> queue = new SynchronousQueue<>();
        Thread t1 = new Thread(() -> {
            try {
                queue.put(Thread.currentThread().getName());
            } catch (InterruptedException e) {
                throw new RuntimeException(e);
            }
        });

        Thread t2 = new Thread(() -> {
            try {
                log.info("{}",queue.take());
            } catch (InterruptedException e) {
                throw new RuntimeException(e);
            }
        });
        t1.start();
        t2.start();
3.2.1 线程池常见设置
(1)创建灵活线程池
public static void main(String[] args) {
      //创建灵活线程池
      ThreadPoolExecutor threadPoolExecutor = new ThreadPoolExecutor(3,6,1, TimeUnit.SECONDS,new LinkedBlockingQueue<>(2));
      //创建任务对象
      Runnable r = () -> {
          log.info(Thread.currentThread().getName() + " is running " + LocalTime.now());
          try {
              Thread.sleep(3000);
          } catch (InterruptedException e) {
              throw new RuntimeException(e);
          }
      };
      //执行测试,根据数量参数观察结果
      threadPoolExecutor.execute(r);
      threadPoolExecutor.execute(r);
      threadPoolExecutor.execute(r);
      threadPoolExecutor.execute(r);
      threadPoolExecutor.execute(r);
      threadPoolExecutor.execute(r);
      threadPoolExecutor.execute(r);
      threadPoolExecutor.execute(r);
  }
(2) 参数详解
1,int corePoolSize-----核心线程数
2,int maximumPoolSize–最大线程数,它包含核心池中的线程数。
3,long keepAliveTime—非核心线程 的空闲生存时长。超时会被销毁
4,TimeUnit unit--------时长单位(秒、分、时、天…)
5,BlockingQueue workQueue任务被执行前用存放在此队列
注意,线程池一次能接收的任务为 最大线程数 + 阻塞队列长度,否则会抛出异常。通常,我们如果确定了最大线程数与阻塞队列长度,但是需要线程池处理的任务数大于最大线程数与阻塞队列长度的和时,我们可以采取分批处理任务的策略,等一定数量的任务处理完成,再把新任务交给线程池执行。
(3)自定义核心线程
使用ThreadPoolExecutor创建的线程池,默认初始化后,没有任务分配时,核心线程数为0。做个测试:
public static void main(String[] args) {
        //创建灵活线程池
        ThreadPoolExecutor threadPoolExecutor = new ThreadPoolExecutor(3,6,1, TimeUnit.SECONDS,new LinkedBlockingQueue<>(2));
        //创建任务对象
        Runnable r = () -> {
            log.info(Thread.currentThread().getName() + " is running " + LocalTime.now());
            try {
                Thread.sleep(3000);
            } catch (InterruptedException e) {
                throw new RuntimeException(e);
            }
        };
        //执行测试,观察分配任务前后的结果
        //当前线程数
        int poolSize = threadPoolExecutor.getPoolSize();
        log.info("{}",poolSize);

        //执行
        threadPoolExecutor.execute(r);
        int afterExecute = threadPoolExecutor.getPoolSize();
        log.info("{}",afterExecute);

    }
当我们需要更敏捷地在分配任务之前,创建线程池,可以用prestartCoreThread()方法。
public static void main(String[] args) {
        //创建灵活线程池
        ThreadPoolExecutor threadPoolExecutor = new ThreadPoolExecutor(3,6,1, TimeUnit.SECONDS,new LinkedBlockingQueue<>(2));
        //创建任务对象
        Runnable r = () -> {
            log.info(Thread.currentThread().getName() + " is running " + LocalTime.now());
            try {
                Thread.sleep(3000);
            } catch (InterruptedException e) {
                throw new RuntimeException(e);
            }
        };

        //按需注释进行使用

        //分配任务前创建一条核心线程
        threadPoolExecutor.prestartCoreThread();

        //分配任务前立马创建满额核心线程
        threadPoolExecutor.prestartAllCoreThreads();
        //当前线程数
        int poolSize = threadPoolExecutor.getPoolSize();
        log.info("{}",poolSize);

    }
(4)通过线程工厂定制线程
使用 ThreadPoolExecutor 定制线程时,我们还可以指定线程工厂,让线程池里的线程都是我们通过线程工厂生产出来的线程。
public static void main(String[] args) {
        //创建灵活线程池
        ThreadPoolExecutor threadPoolExecutor = new ThreadPoolExecutor(
                3,
                6,
                1,
                TimeUnit.SECONDS,new LinkedBlockingQueue<>(2),
                new MyThreadFactory());

    	//或者使用set方法set线程工厂
        //threadPoolExecutor.setThreadFactory(new MyThreadFactory());

        //创建任务对象
        Runnable r = () -> {
            log.info(Thread.currentThread().getName() + " is running " + LocalTime.now());
            try {
                Thread.sleep(3000);
            } catch (InterruptedException e) {
                throw new RuntimeException(e);
            }
        };

        //执行
        threadPoolExecutor.execute(r);
    }
3.2.2 任务拒绝策略
当我们交给线程池的任务超出线程池接收任务范围,或者需要进行筛选的时候,就需要用到任务拒绝策略。
默认情况下ThreadPoolExecutor类有以下4种处理策略。
1,ThreadPoolExecutor.AbortPolicy-----------丢弃任务并抛出RejectedException【默认】
2,ThreadPoolExecutor.CallerRunsPolicy------交给调用线程处理该任务,谁调用谁处理
3,ThreadPoolExecutor.DiscardOldestPolicy—丢弃队列最旧的任务,将新任务加进队列
4,ThreadPoolExecutor.DiscardPolicy---------丢弃任务但不抛出异常
下面我们详细介绍。
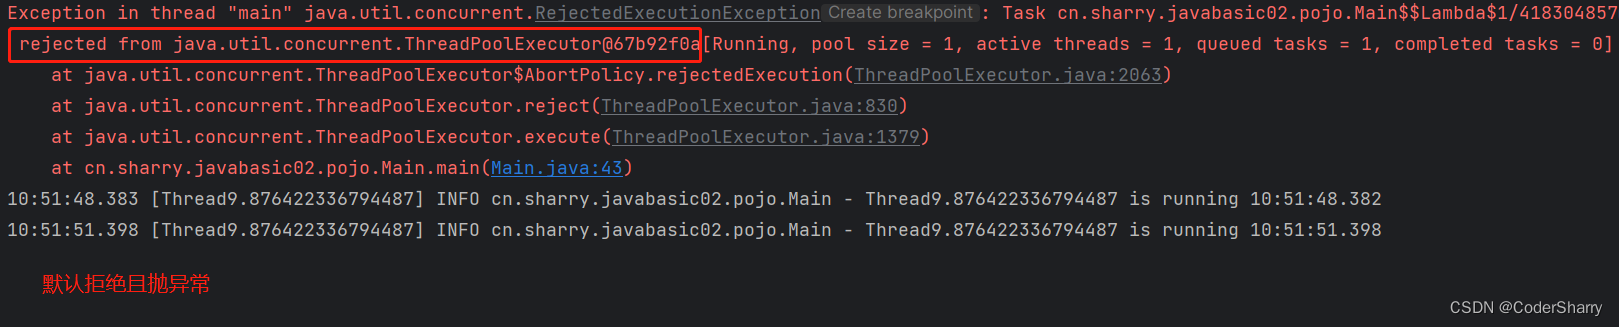
(1)默认AbortPolicy策略
1,此策略是当任务添加到线程池被拒绝时,将抛出RejectedExecutionException异常,这是线程池默认使用的拒绝策略,无需任何额外设置。
2,我们可以查看5个参数的构造方法的源码,发现它除了常规的5个参数外,还有
第6个参数:默认线程工厂 Executors.defaultThreadFactory(),第7个参数:默认异常处理 defaultHandler,其中默认异常处理defaultHandler继续往下追溯可以追到RejectedExecutionHandler defaultHandler = new AbortPolicy();由此可见,AbortPolicy策略是我们默认策略。
3,可以继续追溯new AbortPolicy()源码:
public void rejectedExecution(Runnable r, ThreadPoolExecutor e) {
	throw new RejectedExecutionException("Task " + r.toString() +
	 " rejected from " + e.toString());
}
也即是单纯的抛一个异常,并会不做任何处理。
4,此策略是真正的拒绝,会导致任务丢失,但保全了整体性能。
举个例子:
public static void main(String[] args) {
        //创建线程池,将参数设置得小一些
        ThreadPoolExecutor threadPoolExecutor = new ThreadPoolExecutor(
                1,
                1,
                1,
                TimeUnit.SECONDS,new LinkedBlockingQueue<>(1)
        );

        threadPoolExecutor.setThreadFactory(new MyThreadFactory());

        //创建任务对象
        Runnable r = () -> {
            log.info(Thread.currentThread().getName() + " is running " + LocalTime.now());
            try {
                Thread.sleep(3000);
            } catch (InterruptedException e) {
                throw new RuntimeException(e);
            }
        };

        //执行
        threadPoolExecutor.execute(r);
        threadPoolExecutor.execute(r);

        //测试超额执行
        threadPoolExecutor.execute(r);
    }
测试结果:
(2)CallerRunsPolicy策略
1,此策略是当任务添加到线程池被拒绝时,会指派 “调用者线程” 来处理被拒绝的任务。
2,此策略需要为线程池的构造方法多添加一个参数new ThreadPoolExecutor.CallerRunsPolicy();
3,此策略可以确保任务不会丢失,但执行的顺序是随机的,有可能有个别任务等很久的现象(任务饥饿)。
4,此策略最大的问题在于,任务超标时指派的是"调用者线程"来处理(例如本例中的main线程),由于main处理任务去了,所以本身该做的事没有做,会导致整体性能极速下降。通过时间戳可以看到t1到t2花了1000ms左右,如果main不执行这个任务(例如把线程池容量调大)则只需要0ms。
5,当然,我们可以改进结构,优化这个策略。
6,可以追溯CallerRunsPolicy()的源码:
public void rejectedExecution(Runnable r, ThreadPoolExecutor e) {
	if (!e.isShutdown()) {
		r.run();
    }
}
可以发现,本策略就是:如果线程池没有关闭,即没有调用过shutdown()或shutdownNow(),就直接调用任务的run()方法。也即是所谓的谁添加的任务、谁来执行任务。
测试例子:
public static void main(String[] args) {
        //创建线程池,将参数设置得小一些,添加new ThreadPoolExecutor.CallerRunsPolicy()参数
        ThreadPoolExecutor threadPoolExecutor = new ThreadPoolExecutor(
                1,
                1,
                1,
                TimeUnit.SECONDS,new LinkedBlockingQueue<>(1),
                new ThreadPoolExecutor.CallerRunsPolicy()
        );

        threadPoolExecutor.setThreadFactory(new MyThreadFactory());

        //创建任务对象
        Runnable r = new Runnable() {
            @Override
            public void run() {
                //【1000W次的随机数相加】
                int sum = 0;
                for (int i = 0; i < 10000000; i++) {
                    int ran = (int)(Math.random()*10);
                    sum += ran;
                }
                String tName = Thread.currentThread().getName();
                log.info(tName + "计算结果是:" + sum);
            }
        };

        //执行
        threadPoolExecutor.execute(r);
        threadPoolExecutor.execute(r);

        //测试超额执行
        threadPoolExecutor.execute(r);

        threadPoolExecutor.shutdown();
    }
通过测试例子的输出结果,我们可以清晰地观察到结果:超额的任务没有被真正拒绝,而是交给创建任务的线程,即主线程执行。但是这样又会衍生出一个问题:调用者线程很多情况都是主线程,当任务数量非常多时,都交给主线程处理,这时可能会导致主线程该做的其他任务延时处理,整体变慢。
应对上述问题,我们可以将提交任务这个动作交给其他线程进行,减轻主线程负担:
创建用于实验的线程类:
/**
 * CallRunner test thread
 * @author Sharry
 * @since 2023/3/30
 */
@Slf4j
public class CallRunnerThread extends Thread {
    /**
     * 模拟任务并在此类就提交执行
     */
    Runnable r = () -> log.info("who is running:" + Thread.currentThread().getName());

    @Override
    public void run(){
        ThreadPoolExecutor threadPoolExecutor = new ThreadPoolExecutor(
                1,
                1,
                1,
                TimeUnit.SECONDS,
                new LinkedBlockingQueue<>(1),
                new MyThreadFactory(),
                new ThreadPoolExecutor.CallerRunsPolicy()
        );

        // 提交3次,观察结果
        threadPoolExecutor.execute(r);
        threadPoolExecutor.execute(r);
        threadPoolExecutor.execute(r);
    }
}
测试代码:
@Slf4j
public class Main {
    public static void main(String[] args) {
        new CallRunnerThread().start();
    }
}
(3)DiscardOldestPolicy策略
1,此策略是当任务添加到线程池被拒绝时,线程池会放弃 “最早进入等待队列” 的未处理任务,然后将被拒绝的任务添加到等待队列中。
2,此策略需要为线程池的构造方法多添加一个参数new ThreadPoolExecutor.DiscardOldestPolicy();
3,可以尝试看源码:
public void rejectedExecution(Runnable r, ThreadPoolExecutor e) {
          if (!e.isShutdown()) {
             e.getQueue().poll();
             e.execute(r);
          }
       }
可以现发本策略是:如果线程池没有关闭,即没有调用过shutdown()或shutdownNow(),就调用队列的queue.poll()方法取出一个任务,因其先进先出的特点,所以取的是"先进"的任务。
测试例子:
为了方便统计,新增测试任务类
/**
 * For test
 * @author Sharry
 * @since 2023/3/30
 */
@Slf4j
public class DiscardOldestMissionDemo implements Runnable {
    private String name;

    DiscardOldestMissionDemo(String name){
        this.name = name;
    }

    /**
     * 模拟任务
     */
    @Override
    public void run() {
        //【500W次的随机数相加】
        int sum = 0;
        for (int i = 0; i < 50000000; i++) {
            int ran = (int)(Math.random()*10);
            sum += ran;
        }
        log.info( this.name + "求和结果:"+sum);
    }

    public String getName() {
        return name;
    }
}
测试代码:
  BlockingDeque queue = new LinkedBlockingDeque(3);
        // 创建线程池
        ThreadPoolExecutor threadPoolExecutor = new ThreadPoolExecutor(
                1,
                1,
                1,
                TimeUnit.SECONDS,
                queue,
                new MyThreadFactory(),
                new ThreadPoolExecutor.DiscardOldestPolicy()
        );

        // 超额执行任务并执行,观察结果
        threadPoolExecutor.execute(new DiscardOldestMissionDemo("m1"));

        //该任务会进入阻塞队列
        threadPoolExecutor.execute(new DiscardOldestMissionDemo("m2"));
        threadPoolExecutor.execute(new DiscardOldestMissionDemo("m3"));
        threadPoolExecutor.execute(new DiscardOldestMissionDemo("m4"));

        // 遍历队列,查看队列
        Iterator<Object> iterator = queue.iterator();
        while (iterator.hasNext()){
            Object next = iterator.next();
            log.info("阻塞的任务有:{}",((DiscardOldestMissionDemo) next).getName());
        }

        // 分割线
        log.info("------------------");

        //该任务会进入阻塞队列,阻塞队列会将最早进入的删除
        threadPoolExecutor.execute(new DiscardOldestMissionDemo("m5"));

        // 再次遍历
        iterator = queue.iterator();
        while (iterator.hasNext()){
            Object next = iterator.next();
            log.info("阻塞的任务有:{}",((DiscardOldestMissionDemo) next).getName());
        }
(4)DiscardPolicy策略
1,此策略是当任务添加到线程池被拒绝时,只是不抛异常而已。
2,此策略需要为线程池的构造方法多添加一个参数new ThreadPoolExecutor.DiscardPolicy();
3,可以尝试看源码:
public void rejectedExecution(Runnable r, ThreadPoolExecutor e) {

       }
是一个空方法,也就是任务超标之后我只是单纯的拒绝然后啥都不干。
我们沿用上一小节的例子进行测试举例:
 BlockingDeque queue = new LinkedBlockingDeque(3);
        // 创建线程池
        ThreadPoolExecutor threadPoolExecutor = new ThreadPoolExecutor(
                1,
                1,
                1,
                TimeUnit.SECONDS,
                queue,
                new MyThreadFactory(),
                new ThreadPoolExecutor.DiscardPolicy()
        );

        // 超额执行任务并执行,观察结果
        threadPoolExecutor.execute(new DiscardOldestMissionDemo("m1"));

        //该任务会进入阻塞队列
        threadPoolExecutor.execute(new DiscardOldestMissionDemo("m2"));
        threadPoolExecutor.execute(new DiscardOldestMissionDemo("m3"));
        threadPoolExecutor.execute(new DiscardOldestMissionDemo("m4"));

        // 遍历队列,查看队列
        Iterator<Object> iterator = queue.iterator();
        while (iterator.hasNext()){
            Object next = iterator.next();
            log.info("阻塞的任务有:{}",((DiscardOldestMissionDemo) next).getName());
        }

        // 分割线
        log.info("------------------");

        //该任务会直接被拒绝
        threadPoolExecutor.execute(new DiscardOldestMissionDemo("m5"));

        // 再次遍历
        iterator = queue.iterator();
        while (iterator.hasNext()){
            Object next = iterator.next();
            log.info("阻塞的任务有:{}",((DiscardOldestMissionDemo) next).getName());
        }

        threadPoolExecutor.shutdown();
(5)自定义策略
通过上面小节的学习,我们已经了解了 ThreadPoolExecutor 线程池给我们默认的任务拒绝策略。实际业务中,我们仅用提供的策略可能不能完全支持我们的需求,这时候就需要我们自定义策略。
我们只需要模仿实现了RejectedExecutionHandler接口的类, 自己实现并重写相关方法即可。
例如,当我们在任务被拒绝时输出自定义日志:
/**
 * For test
 * @author Sharry
 * @since 03.23.2023
 */
@Slf4j
public class MyPolicy implements RejectedExecutionHandler {

    @Override
    public void rejectedExecution(Runnable runnable, ThreadPoolExecutor threadPoolExecutor) {
        // 将 runnable 强转为 自定义runnable
        CallRunnerThread r = (CallRunnerThread) runnable;
        log.info("自定义拒绝:{}",r.getName());
    }
}
测试代码:
public static void main(String[] args) {

        BlockingDeque queue = new LinkedBlockingDeque(3);
        // 创建线程池
        ThreadPoolExecutor threadPoolExecutor = new ThreadPoolExecutor(
                1,
                1,
                1,
                TimeUnit.SECONDS,
                queue,
                new MyThreadFactory()
        );

        threadPoolExecutor.setRejectedExecutionHandler(new MyPolicy());

        // 超额执行任务并执行,观察结果
        threadPoolExecutor.execute(new DiscardOldestMissionDemo("m1"));

        //该任务会进入阻塞队列
        threadPoolExecutor.execute(new DiscardOldestMissionDemo("m2"));
        threadPoolExecutor.execute(new DiscardOldestMissionDemo("m3"));
        threadPoolExecutor.execute(new DiscardOldestMissionDemo("m4"));

        // 遍历队列,查看队列
        Iterator<Object> iterator = queue.iterator();
        while (iterator.hasNext()){
            Object next = iterator.next();
            log.info("阻塞的任务有:{}",((DiscardOldestMissionDemo) next).getName());
        }

        // 分割线
        log.info("------------------");

        //测试自定义拒绝
        threadPoolExecutor.execute(new DiscardOldestMissionDemo("m5"));

        // 再次遍历
        iterator = queue.iterator();
        while (iterator.hasNext()){
            Object next = iterator.next();
            log.info("阻塞的任务有:{}",((DiscardOldestMissionDemo) next).getName());
        }

        threadPoolExecutor.shutdown();

    }
4.总结 Summary
本文通过一些理论与例子,介绍了JAVA中的线程、多线程、线程池概念。
下面做一个简单的总结:
线程与进程
- 进程:表示计算机中整个程序的运行
- 线程:程序的组成基本单位
JAVA常见线程操作
- 创建线程:继承Thread类,实现Runnable、Callable接口
- 常见操作:线程休眠、加入当前线程、设置优先级、设置守护线程、临时暂停、线程阻塞与唤醒
- 线程安全:线程同步问题、避免死锁
- 线程池:作线程的统一管理与复用、任务拒绝策略


 191
191

 被折叠的 条评论
为什么被折叠?
被折叠的 条评论
为什么被折叠?
 到【灌水乐园】发言


