


butterknife源码详解
作为Android开发者,大家肯定都知道大名鼎鼎的butterknife。它大大的提高了开发效率,虽然在很早之前就开始使用它了,但是只知道是通过注解的方式实现的,却一直没有仔细的学习下大牛的代码。最近在学习运行时注解,决定今天来系统的分析下butterknife的实现原理。
如果你之前不了解Annotation,那强烈建议你先看注解使用.
废多看图:
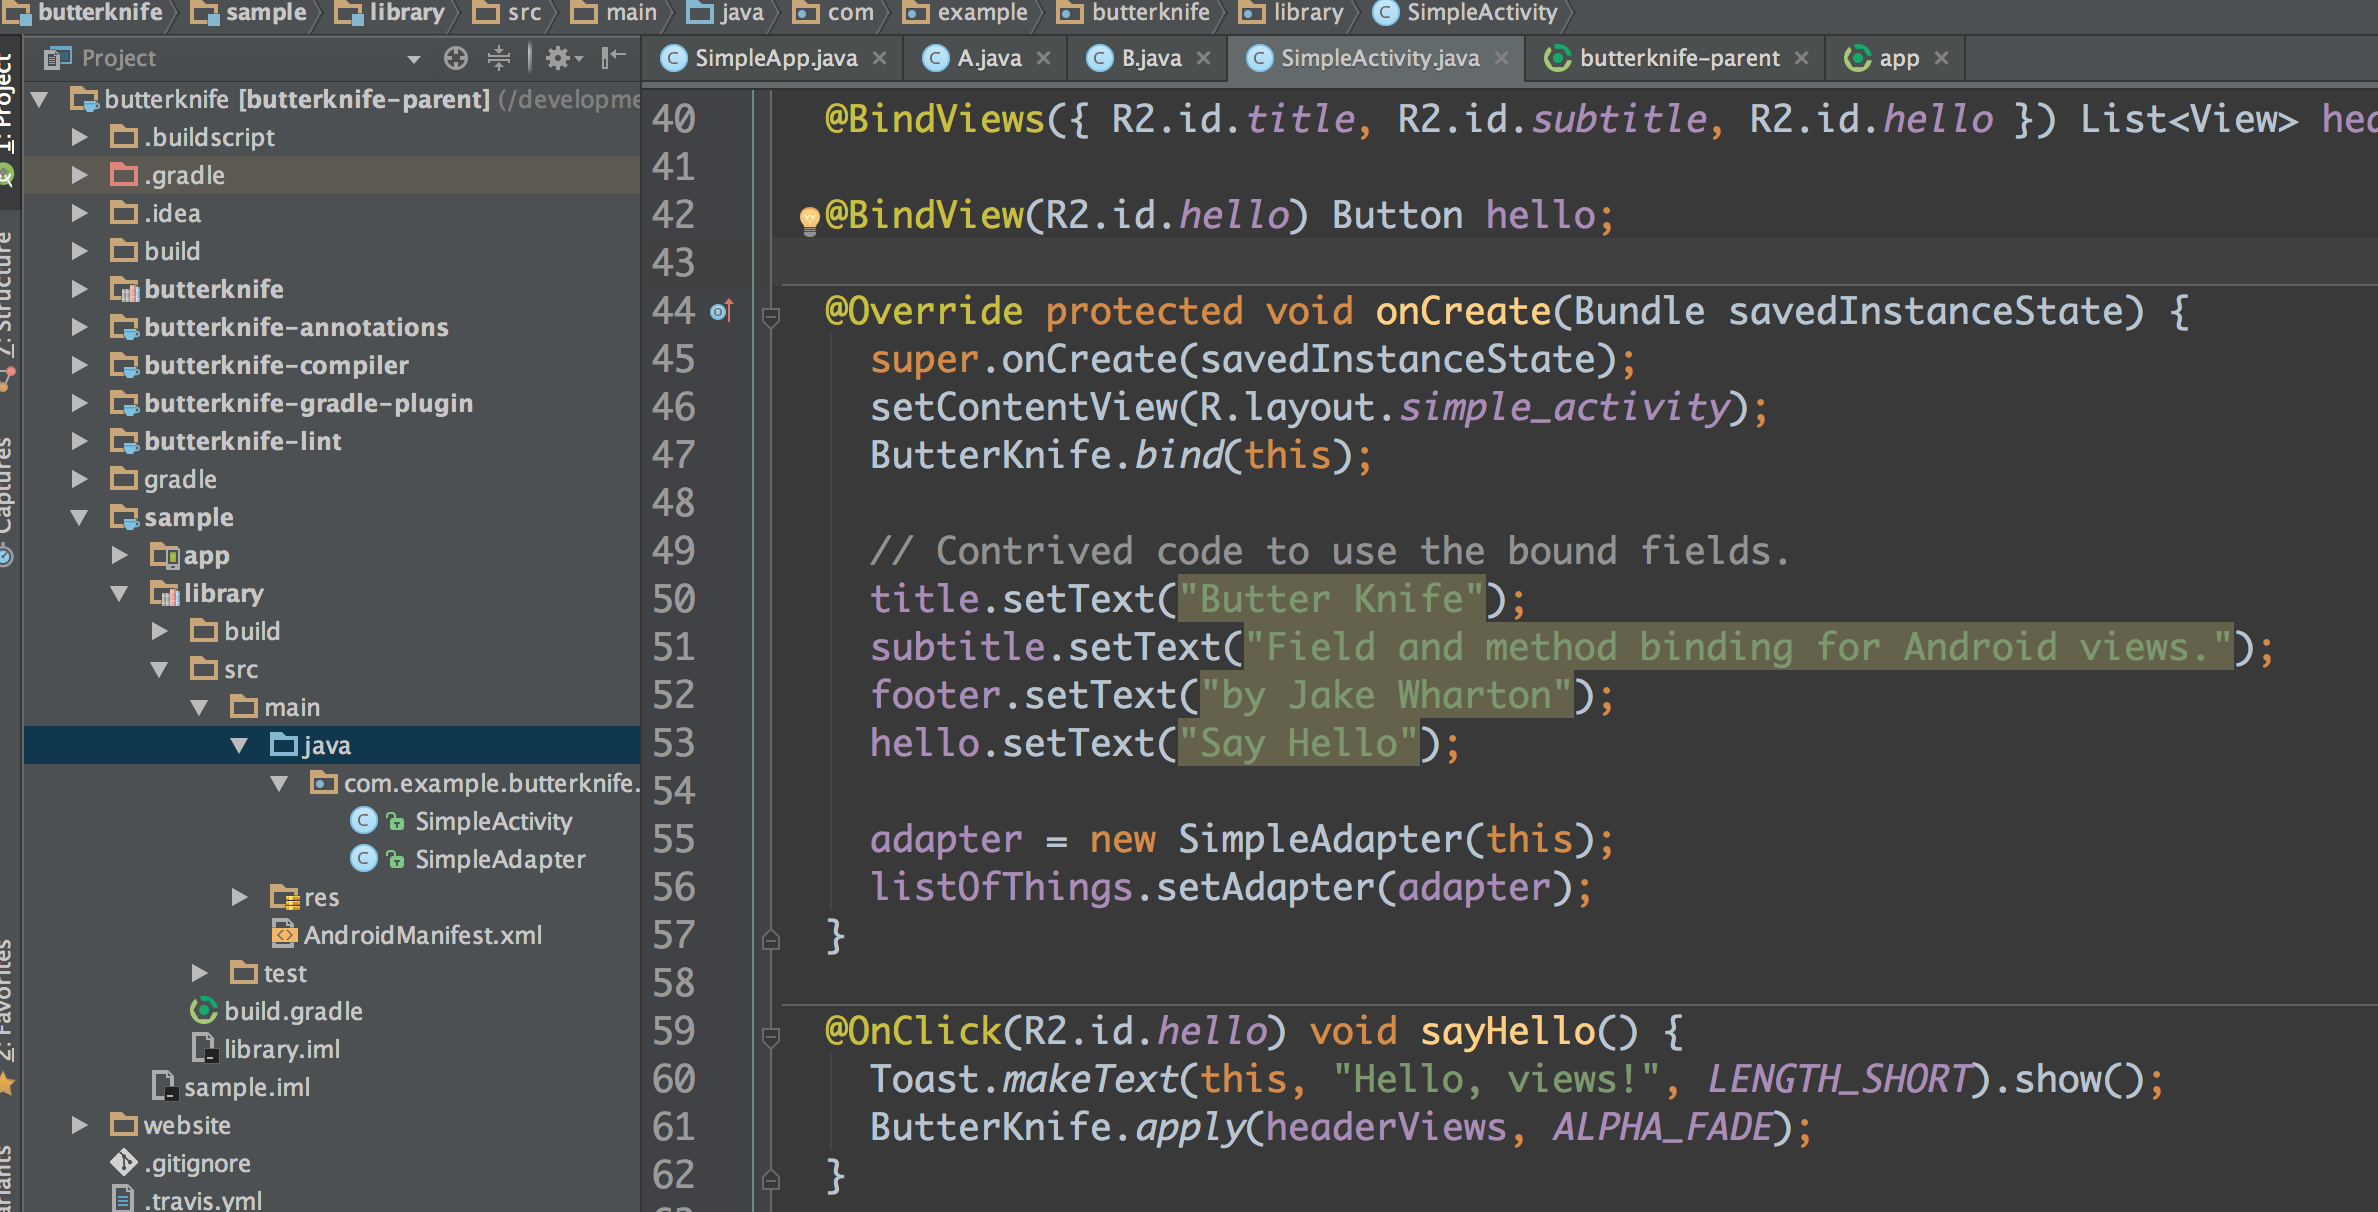
从图中可以很直观的看出它的module结构,以及使用示例代码。
它的目录和我们在注解使用这篇文章中介绍的一样,大体也是分为三个部分:
- app : butterknife
- api : butterknife-annotations
- compiler : butterknife-compiler
通过示例代码我们大体能预料到对应的功能实现:
@BindView(R2.id.hello) Button hello;
BindView注解的作用就是通过value指定的值然后去调用findViewById()来找到对应的控件,然后将该控件赋值给使用该注解的变量。@OnClick(R2.id.hello) void sayHello() {...}
OnClick注解也是通过指定的id来找到对应控件后,然后对其设置onClickListener并调用使用该注解的方法。最后不要忘了
ButterKnife.bind(this);该方法也是后面我们要分析的突破点。
当然Butterknife的功能是非常强大的,我们在这里只是用这两个简单的例子来进行分析说明。
那我们就来查看BindView和Onclik注解的源码:
@Retention(CLASS) @Target(FIELD)
public @interface BindView {
  /** View ID to which the field will be bound. */
  @IdRes int value();
}作用在变量上的编译时注解。对该注解的值value()使用android.support.annotation中的IdRes注解,来表明该值只能是资源类型的id。
@Target(METHOD)
@Retention(CLASS)
@ListenerClass(
    targetType = "android.view.View",
    setter = "setOnClickListener",
    type = "butterknife.internal.DebouncingOnClickListener",
    method = @ListenerMethod(
        name = "doClick",
        parameters = "android.view.View"
    )
)
public @interface OnClick {
  /** View IDs to which the method will be bound. */
  @IdRes int[] value() default { View.NO_ID };
}作用到方法上的编译时注解。我们发现该注解还使用了ListenerClass注解,当然从上面的声明中可以很容易看出它的作用。 ListenerClass`注解的实现:
那我们就继续简单的看一下
@Retention(RUNTIME) @Target(ANNOTATION_TYPE)
public @interface ListenerClass {
  String targetType();

  /** Name of the setter method on the {@linkplain #targetType() target type} for the listener. */
  String setter();

  /**
   * Name of the method on the {@linkplain #targetType() target type} to remove the listener. If
   * empty {@link #setter()} will be used by default.
   */
  String remover() default "";

  /** Fully-qualified class name of the listener type. */
  String type();

  /** Enum which declares the listener callback methods. Mutually exclusive to {@link #method()}. */
  Class<? extends Enum<?>> callbacks() default NONE.class;

  /**
   * Method data for single-method listener callbacks. Mutually exclusive with {@link #callbacks()}
   * and an error to specify more than one value.
   */
  ListenerMethod[] method() default { };

  /** Default value for {@link #callbacks()}. */
  enum NONE { }
}
作用到注解类型的运行时注解。
有了之前注解使用这篇文章的基础,我们知道对于编译时注解肯定是要通过自定义AbstractProcessor来解析的,所以接下来我们要去butterknife-compiler module中找一下对应的类。通过名字我们就能很简单的找到:
package butterknife.compiler;

@AutoService(Processor.class)
public final class ButterKnifeProcessor extends AbstractProcessor {
   ...
}通过AutoService注解我们很容易看出来Butterknife也使用了Google Auto。当然它肯定也都用了javaopet和android-apt,这里我们就不去分析了。
其他的一些方法我们就不继续看了,我们接下来看一下具体的核心处理方法,也就是ButterKnifeProcessor.process()方法:
@Override public boolean process(Set<? extends TypeElement> elements, RoundEnvironment env) {
    // 查找、解析出所有的注解
    Map<TypeElement, BindingClass> targetClassMap = findAndParseTargets(env);
    // 将注解后要生成的相关代码信息保存到BindingClass类中
    for (Map.Entry<TypeElement, BindingClass> entry : targetClassMap.entrySet()) {
      TypeElement typeElement = entry.getKey();
      BindingClass bindingClass = entry.getValue();
      // 输出生成的类
      for (JavaFile javaFile : bindingClass.brewJava()) {
        try {
          javaFile.writeTo(filer);
        } catch (IOException e) {
          error(typeElement, "Unable to write view binder for type %s: %s", typeElement,
              e.getMessage());
        }
      }
    }

    return true;
}从process()方法来看,我们需要主要分析两个部分:
findAndParseTargets():查找、解析所有的注解bindingClass.brewJava():生成代码
第一步:findAndParseTargets()
先查看findAndParseTargets()方法的实现,里面解析的类型比较多,我们就以BindView为例进行说明:
private Map<TypeElement, BindingClass> findAndParseTargets(RoundEnvironment env) {
    Map<TypeElement, BindingClass> targetClassMap = new LinkedHashMap<>();
    Set<TypeElement> erasedTargetNames = new LinkedHashSet<>();

    scanForRClasses(env);

    // Process each @BindArray element.
    for (Element element : env.getElementsAnnotatedWith(BindArray.class)) {
      if (!SuperficialValidation.validateElement(element)) continue;
      try {
        parseResourceArray(element, targetClassMap, erasedTargetNames);
      } catch (Exception e) {
        logParsingError(element, BindArray.class, e);
      }
    }

    // Process each @BindBitmap element.
    for (Element element : env.getElementsAnnotatedWith(BindBitmap.class)) {
      if (!SuperficialValidation.validateElement(element)) continue;
      try {
        parseResourceBitmap(element, targetClassMap, erasedTargetNames);
      } catch (Exception e) {
        logParsingError(element, BindBitmap.class, e);
      }
    }

    // Process each @BindBool element.
    for (Element element : env.getElementsAnnotatedWith(BindBool.class)) {
      if (!SuperficialValidation.validateElement(element)) continue;
      try {
        parseResourceBool(element, targetClassMap, erasedTargetNames);
      } catch (Exception e) {
        logParsingError(element, BindBool.class, e);
      }
    }

    // Process each @BindColor element.
    for (Element element : env.getElementsAnnotatedWith(BindColor.class)) {
      if (!SuperficialValidation.validateElement(element)) continue;
      try {
        parseResourceColor(element, targetClassMap, erasedTargetNames);
      } catch (Exception e) {
        logParsingError(element, BindColor.class, e);
      }
    }

    // Process each @BindDimen element.
    for (Element element : env.getElementsAnnotatedWith(BindDimen.class)) {
      if (!SuperficialValidation.validateElement(element)) continue;
      try {
        parseResourceDimen(element, targetClassMap, erasedTargetNames);
      } catch (Exception e) {
        logParsingError(element, BindDimen.class, e);
      }
    }

    // Process each @BindDrawable element.
    for (Element element : env.getElementsAnnotatedWith(BindDrawable.class)) {
      if (!SuperficialValidation.validateElement(element)) continue;
      try {
        parseResourceDrawable(element, targetClassMap, erasedTargetNames);
      } catch (Exception e) {
        logParsingError(element, BindDrawable.class, e);
      }
    }

    // Process each @BindInt element.
    for (Element element : env.getElementsAnnotatedWith(BindInt.class)) {
      if (!SuperficialValidation.validateElement(element)) continue;
      try {
        parseResourceInt(element, targetClassMap, erasedTargetNames);
      } catch (Exception e) {
        logParsingError(element, BindInt.class, e);
      }
    }

    // Process each @BindString element.
    for (Element element : env.getElementsAnnotatedWith(BindString.class)) {
      if (!SuperficialValidation.validateElement(element)) continue;
      try {
        parseResourceString(element, targetClassMap, erasedTargetNames);
      } catch (Exception e) {
        logParsingError(element, BindString.class, e);
      }
    }

    // Process each @BindView element.
    for (Element element : env.getElementsAnnotatedWith(BindView.class)) {
      // 检查一下合法性
      if (!SuperficialValidation.validateElement(element)) continue;
      try {
        // 进行解析
        parseBindView(element, targetClassMap, erasedTargetNames);
      } catch (Exception e) {
        logParsingError(element, BindView.class, e);
      }
    }

    // Process each @BindViews element.
    for (Element element : env.getElementsAnnotatedWith(BindViews.class)) {
      if (!SuperficialValidation.validateElement(element)) continue;
      try {
        parseBindViews(element, targetClassMap, erasedTargetNames);
      } catch (Exception e) {
        logParsingError(element, BindViews.class, e);
      }
    }

    // Process each annotation that corresponds to a listener.
    for (Class<? extends Annotation> listener : LISTENERS) {
      findAndParseListener(env, listener, targetClassMap, erasedTargetNames);
    }

    // Try to find a parent binder for each.
    for (Map.Entry<TypeElement, BindingClass> entry : targetClassMap.entrySet()) {
      TypeElement parentType = findParentType(entry.getKey(), erasedTargetNames);
      if (parentType != null) {
        BindingClass bindingClass = entry.getValue();
        BindingClass parentBindingClass = targetClassMap.get(parentType);
        bindingClass.setParent(parentBindingClass);
      }
    }

    return targetClassMap;
}继续看一下parseBindView()方法:
private void parseBindView(Element element, Map<TypeElement, BindingClass> targetClassMap,
      Set<TypeElement> erasedTargetNames) {
    TypeElement enclosingElement = (TypeElement) element.getEnclosingElement();

    // Start by verifying common generated code restrictions.
    boolean hasError = isInaccessibleViaGeneratedCode(BindView.class, "fields", element)
        || isBindingInWrongPackage(BindView.class, element);

    // Verify that the target type extends from View.
    TypeMirror elementType = element.asType();
    if (elementType.getKind() == TypeKind.TYPEVAR) {
      TypeVariable typeVariable = (TypeVariable) elementType;
      elementType = typeVariable.getUpperBound();
    }
    // 必须是View类型或者接口
    if (!isSubtypeOfType(elementType, VIEW_TYPE) && !isInterface(elementType)) {
      error(element, "@%s fields must extend from View or be an interface. (%s.%s)",
          BindView.class.getSimpleName(), enclosingElement.getQualifiedName(),
          element.getSimpleName());
      hasError = true;
    }

    if (hasError) {
      return;
    }
    // 通过注解的value拿到id
    // Assemble information on the field.
    int id = element.getAnnotation(BindView.class).value();

    BindingClass bindingClass = targetClassMap.get(enclosingElement);
    if (bindingClass != null) {
      // 之前已经绑定过该id
      ViewBindings viewBindings = bindingClass.getViewBinding(getId(id));
      if (viewBindings != null && viewBindings.getFieldBinding() != null) {
        FieldViewBinding existingBinding = viewBindings.getFieldBinding();
        error(element, "Attempt to use @%s for an already bound ID %d on '%s'. (%s.%s)",
            BindView.class.getSimpleName(), id, existingBinding.getName(),
            enclosingElement.getQualifiedName(), element.getSimpleName());
        return;
      }
    } else {
      // 没有绑定过该id的话就去生成代码
      bindingClass = getOrCreateTargetClass(targetClassMap, enclosingElement);
    }

    String name = element.getSimpleName().toString();
    TypeName type = TypeName.get(elementType);
    boolean required = isFieldRequired(element);

    FieldViewBinding binding = new FieldViewBinding(name, type, required);
    // 用BindingClass添加代码
    bindingClass.addField(getId(id), binding);

    // Add the type-erased version to the valid binding targets set.
    erasedTargetNames.add(enclosingElement);
}终于进入生成代码的阶段了,继续看一下getOrCreateTargetClass()的实现:
private BindingClass getOrCreateTargetClass(Map<TypeElement, BindingClass> targetClassMap,
      TypeElement enclosingElement) {
    BindingClass bindingClass = targetClassMap.get(enclosingElement);
    if (bindingClass == null) {
      TypeName targetType = TypeName.get(enclosingElement.asType());
      if (targetType instanceof ParameterizedTypeName) {
        targetType = ((ParameterizedTypeName) targetType).rawType;
      }
      // 得到包名、类名
      String packageName = getPackageName(enclosingElement);
      String className = getClassName(enclosingElement, packageName);
      // 用包名、类名和_ViewBinder等拼接成要生成的类的全名,这里会有两个类:$$_ViewBinder和$$_ViewBinding
      ClassName binderClassName = ClassName.get(packageName, className + "_ViewBinder");
      ClassName unbinderClassName = ClassName.get(packageName, className + "_ViewBinding");

      boolean isFinal = enclosingElement.getModifiers().contains(Modifier.FINAL);
      // 将要生成的类名,$$_ViewBinder和$$_ViewBinding封装给BindingClass类
      bindingClass = new BindingClass(targetType, binderClassName, unbinderClassName, isFinal);
      targetClassMap.put(enclosingElement, bindingClass);
    }
    return bindingClass;
}继续看一下BindingClass.addField():
void addField(Id id, FieldViewBinding binding) {
    getOrCreateViewBindings(id).setFieldBinding(binding);
}继续看getOrCreateViewBindings()以及setFieldBinding()方法:
private ViewBindings getOrCreateViewBindings(Id id) {
    ViewBindings viewId = viewIdMap.get(id);
    if (viewId == null) {
      viewId = new ViewBindings(id);
      viewIdMap.put(id, viewId);
    }
    return viewId;
}然后看ViewBindings.setFieldBinding()方法:
public void setFieldBinding(FieldViewBinding fieldBinding) {
    if (this.fieldBinding != null) {
      throw new AssertionError();
    }
    this.fieldBinding = fieldBinding;
}看到这里就把findAndParseTargets()方法分析完了。大体总结一下就是把一些变量、参数等初始化到了BindingClass类中。
也就是说上面process()方法中的第一步已经分析完了,下面我们来继续看第二部分.
第二步:bindingClass.brewJava()
继续查看BindingClass.brewJava()方法的实现:
Collection<JavaFile> brewJava() {
    TypeSpec.Builder result = TypeSpec.classBuilder(binderClassName)
        .addModifiers(PUBLIC, FINAL)
        .addSuperinterface(ParameterizedTypeName.get(VIEW_BINDER, targetTypeName));

    result.addMethod(createBindMethod(targetTypeName));

    List<JavaFile> files = new ArrayList<>();
    if (isGeneratingUnbinder()) {
      // 生成$$_ViewBinding类
      files.add(JavaFile.builder(unbinderClassName.packageName(), createUnbinderClass())
          .addFileComment("Generated code from Butter Knife. Do not modify!")
          .build()
      );
    } else if (!isFinal) {
      result.addMethod(createBindToTargetMethod());
    }
    // 生成$$_ViewBinder类
    files.add(JavaFile.builder(binderClassName.packageName(), result.build())
        .addFileComment("Generated code from Butter Knife. Do not modify!")
        .build());

    return files;
}看到这里感觉不用再继续分析了,该方法就是使用javaopet来生成对应$$_ViewBinder.java类。
到这里我们已经知道在编译的过程中会去生成一个对应的$$_ViewBinder.java文件,该类实现了ViewBinder接口。它内部会去生成对应findViewByid()以及setOnClickListener()等方法的代码,它生成了该类后如何去调用呢?我们也没有发现new $$_ViewBinder的方法。不要忘了上面我们看到的ButterKnife.bind(this);。接下来我们看一下ButterKnife.bind(this);方法的实现:
/**
   * BindView annotated fields and methods in the specified {@link Activity}. The current content
   * view is used as the view root.
   *
   * @param target Target activity for view binding.
   */
  @NonNull @UiThread
  public static Unbinder bind(@NonNull Activity target) {
    return getViewBinder(target).bind(Finder.ACTIVITY, target, target);
  }

  /**
   * BindView annotated fields and methods in the specified {@link View}. The view and its children
   * are used as the view root.
   *
   * @param target Target view for view binding.
   */
  @NonNull @UiThread
  public static Unbinder bind(@NonNull View target) {
    return getViewBinder(target).bind(Finder.VIEW, target, target);
}调用了getViewBinder()的bind()方法,继续看getViewBinder()方法:
static final Map<Class<?>, ViewBinder<Object>> BINDERS = new LinkedHashMap<>();
...

@NonNull @CheckResult @UiThread
  static ViewBinder<Object> getViewBinder(@NonNull Object target) {
    Class<?> targetClass = target.getClass();
    if (debug) Log.d(TAG, "Looking up view binder for " + targetClass.getName());
    return findViewBinderForClass(targetClass);
  }

  @NonNull @CheckResult @UiThread
  private static ViewBinder<Object> findViewBinderForClass(Class<?> cls) {
     // BINDERS是一个Map集合。也就是说它内部使用Map缓存了一下,先去内存中取
     ViewBinder<Object> viewBinder = BINDERS.get(cls);
    if (viewBinder != null) {
      if (debug) Log.d(TAG, "HIT: Cached in view binder map.");
      return viewBinder;
    }
    // 内存中没有缓存该类
    String clsName = cls.getName();
    // 通过类名判断下是不是系统的组件
    if (clsName.startsWith("android.") || clsName.startsWith("java.")) {
      if (debug) Log.d(TAG, "MISS: Reached framework class. Abandoning search.");
      return NOP_VIEW_BINDER;
    }
    //noinspection TryWithIdenticalCatches Resolves to API 19+ only type.
    try {
      // 通过反射获取到对应通过编译时注解生成的$_ViewBinder类的实例
      Class<?> viewBindingClass = Class.forName(clsName + "_ViewBinder");
      //noinspection unchecked
      viewBinder = (ViewBinder<Object>) viewBindingClass.newInstance();
      if (debug) Log.d(TAG, "HIT: Loaded view binder class.");
    } catch (ClassNotFoundException e) {
      if (debug) Log.d(TAG, "Not found. Trying superclass " + cls.getSuperclass().getName());
      viewBinder = findViewBinderForClass(cls.getSuperclass());
    } catch (InstantiationException e) {
      throw new RuntimeException("Unable to create view binder for " + clsName, e);
    } catch (IllegalAccessException e) {
      throw new RuntimeException("Unable to create view binder for " + clsName, e);
    }
    // 通过反射来操作毕竟会影响性能,所以这里通过Map缓存的方式来进行优化
    BINDERS.put(cls, viewBinder);
    return viewBinder;
  }
到这里就彻底分析完了ButterKnife.bind(this);的实现,它其实就相当于new了一个$_ViewBinder类的实例。当然这样用起来是非常方便的,毕竟我们手动的去new类多不合理,虽然他里面用到了反射会影响一点点性能,但是他通过内存缓存的方式优化了,我感觉这种方式是利大于弊的。
那$_ViewBinder类里面都是什么内容呢? 我们去看一下该类的代码,但是它生成的代码在哪里呢?

开始看一下SimpleActivity_ViewBinder.bind()方法:
public final class SimpleActivity_ViewBinder implements ViewBinder<SimpleActivity> {
  @Override
  public Unbinder bind(Finder finder, SimpleActivity target, Object source) {
    return new SimpleActivity_ViewBinding<>(target, finder, source);
  }
}接着看SimpleActivity_ViewBinding类:
public class SimpleActivity_ViewBinding<T extends SimpleActivity> implements Unbinder {
  protected T target;

  private View view2130968578;

  private View view2130968579;

  public SimpleActivity_ViewBinding(final T target, Finder finder, Object source) {
    this.target = target;

    View view;
    target.title = finder.findRequiredViewAsType(source, R.id.title, "field 'title'", TextView.class);
    target.subtitle = finder.findRequiredViewAsType(source, R.id.subtitle, "field 'subtitle'", TextView.class);
    view = finder.findRequiredView(source, R.id.hello, "field 'hello', method 'sayHello', and method 'sayGetOffMe'");
    target.hello = finder.castView(view, R.id.hello, "field 'hello'", Button.class);
    view2130968578 = view;
    view.setOnClickListener(new DebouncingOnClickListener() {
      @Override
      public void doClick(View p0) {
        target.sayHello();
      }
    });
    view.setOnLongClickListener(new View.OnLongClickListener() {
      @Override
      public boolean onLongClick(View p0) {
        return target.sayGetOffMe();
      }
    });
    view = finder.findRequiredView(source, R.id.list_of_things, "field 'listOfThings' and method 'onItemClick'");
    target.listOfThings = finder.castView(view, R.id.list_of_things, "field 'listOfThings'", ListView.class);
    view2130968579 = view;
    ((AdapterView<?>) view).setOnItemClickListener(new AdapterView.OnItemClickListener() {
      @Override
      public void onItemClick(AdapterView<?> p0, View p1, int p2, long p3) {
        target.onItemClick(p2);
      }
    });
    target.footer = finder.findRequiredViewAsType(source, R.id.footer, "field 'footer'", TextView.class);
    target.headerViews = Utils.listOf(
        finder.findRequiredView(source, R.id.title, "field 'headerViews'"),
        finder.findRequiredView(source, R.id.subtitle, "field 'headerViews'"),
        finder.findRequiredView(source, R.id.hello, "field 'headerViews'"));
  }

  @Override
  public void unbind() {
    T target = this.target;
    if (target == null) throw new IllegalStateException("Bindings already cleared.");

    target.title = null;
    target.subtitle = null;
    target.hello = null;
    target.listOfThings = null;
    target.footer = null;
    target.headerViews = null;

    view2130968578.setOnClickListener(null);
    view2130968578.setOnLongClickListener(null);
    view2130968578 = null;
    ((AdapterView<?>) view2130968579).setOnItemClickListener(null);
    view2130968579 = null;

    this.target = null;
  }
}可以看到他内部会通过findViewByid()等来找到对应的View,然后将其赋值给target.xxxx,所以这样就相当于把所有的控件以及事件都给初始化了,以后就可以直接使用了,通过这里也可以看到我们在使用注解的时候不要把控件或者方法声明为private的。
总结一下:
ButterKnifeProcessor会生成$$_ViewBinder类并实现了ViewBinder接口。$$_ViewBinder类中包含了所有对应的代码,会通过注解去解析到id等,然后通过findViewById()等方法找到对应的控件,并且复制给调用该方法的来中的变量。这样就等同于我们直接
使用View v = findViewByid(R.id.xx)来进行初始化控件。上面虽然生成了
$$_ViewBinder类,但是如何去调用呢? 就是在调用ButterKnife.bind(this)时执行,该方法会通过反射去实例化对应的$$_ViewBinder类,并且调用该类的bind()方法。Butterknife除了在Butterknife.bind()方法中使用反射之外,其他注解的处理都是通过编译时注解使用,所以不会影响效率。- 使用
Butterknife是不要将变量声明为private类型,因为$$_ViewBinder类中会去直接调用变量赋值,如果声明为private将无法赋值。
java
 @BindView(R2.id.title) TextView title;

 210


 扫一扫


 被折叠的 条评论
为什么被折叠?
 到【灌水乐园】发言


