


AndroidStudio使用教程(第七弹)
本文讲解一下Gradle的应用,大家都知道Gradle使用起来非常方便,那他究竟方便在哪里?
- 很多时候我们在打印
Log日志的时候都是需要在Debug版本中进行打印,而在正式版本中关闭。
通常我们都是用一个Config文件来配置,不知道大家有没有遇到过正式版中忘记关闭Log日志的情况。 - 多渠道包非常让人头疼。现在国内市场这么多。一个个的打多麻烦,虽然我们会用友盟打包工具等。
怎么破?
先把项目中的build.gradle展现一下,然后慢慢分析。
apply plugin: 'com.android.application'

android {
    compileSdkVersion 22
    buildToolsVersion "22.0.1"

    defaultConfig {
        applicationId "com.charon.*"
        minSdkVersion 11
        targetSdkVersion 22
        versionCode 1
        versionName "1.0"

        multiDexEnabled true
        // default umeng channel name
        manifestPlaceholders = [UMENG_CHANNEL_VALUE: "umeng"]
    }

    signingConfigs {
        debug {
            storeFile file("debug.keystore")
        }

        release {
            storeFile file("keystore.keystore")
            storePassword "android"
            keyAlias "androiddebugkey"
            keyPassword "android"
        }
    }

    buildTypes {
        debug {
            versionNameSuffix "-debug"
            minifyEnabled false
            zipAlignEnabled false
            shrinkResources false
            signingConfig signingConfigs.debug
        }

        release {
            zipAlignEnabled true
            // remove unused resources
            shrinkResources true
            minifyEnabled true
            proguardFiles getDefaultProguardFile('proguard-android.txt'), 'proguard-rules.pro'
            signingConfig signingConfigs.release
        }
    }

    productFlavors {
        xiaomi {}
        _360 {}
        baidu {}
        qq {}
    }

    productFlavors.all {
            // change UMENG_CHANNEL_VALUE to the product channel name
        flavor -> flavor.manifestPlaceholders = [UMENG_CHANNEL_VALUE: name]
    }

    lintOptions {
        // if true, stop the gradle build if errors are found
        abortOnError false

        // set to true to turn off analysis progress reporting by lint
        // quiet true
        // if true, only report errors
//        ignoreWarnings true
        // if true, emit full/absolute paths to files with errors (true by default)
        //absolutePaths true
        // if true, check all issues, including those that are off by default
//        checkAllWarnings true
        // if true, treat all warnings as errors
//        warningsAsErrors true
        // turn off checking the given issue id's
//        disable 'TypographyFractions','TypographyQuotes'
        // turn on the given issue id's
//        enable 'RtlHardcoded','RtlCompat', 'RtlEnabled'
        // check *only* the given issue id's
//        check 'NewApi', 'InlinedApi'
        // if true, don't include source code lines in the error output
//        noLines true
        // if true, show all locations for an error, do not truncate lists, etc.
//        showAll true
        // Fallback lint configuration (default severities, etc.)
        lintConfig file("default-lint.xml")
        // if true, generate a text report of issues (false by default)
//        textReport true
        // location to write the output; can be a file or 'stdout'
//        textOutput 'stdout'
        // if true, generate an XML report for use by for example Jenkins
//        xmlReport false
        // file to write report to (if not specified, defaults to lint-results.xml)
//        xmlOutput file("lint-report.xml")
        // if true, generate an HTML report (with issue explanations, sourcecode, etc)
//        htmlReport true
        // optional path to report (default will be lint-results.html in the builddir)
//        htmlOutput file("lint-report.html")

        // set to true to have all release builds run lint on issues with severity=fatal
        // and abort the build (controlled by abortOnError above) if fatal issues are found
//        checkReleaseBuilds true
        // Set the severity of the given issues to fatal (which means they will be
        // checked during release builds (even if the lint target is not included)
//        fatal 'NewApi', 'InlineApi'
        // Set the severity of the given issues to error
//        error 'Wakelock', 'TextViewEdits'
        // Set the severity of the given issues to warning
//        warning 'ResourceAsColor'
        // Set the severity of the given issues to ignore (same as disabling the check)
//        ignore 'TypographyQuotes'
    }

    compileOptions {
        sourceCompatibility JavaVersion.VERSION_1_7
        targetCompatibility JavaVersion.VERSION_1_7
    }

    applicationVariants.all { variant ->
        variant.outputs.each { output ->
            def outputFile = output.outputFile
            if (outputFile != null && outputFile.name.endsWith('.apk')) {
                def fileName = outputFile.name.replace(".apk", "-${defaultConfig.versionName}.apk")
                output.outputFile = new File(outputFile.parent, fileName)
            }
        }
    }
}

dependencies {
    compile fileTree(dir: 'libs', include: ['*.jar'])
    compile project(':libraries:framework')
    // square leakcanary
    debugCompile 'com.squareup.leakcanary:leakcanary-android:1.3.1'
    releaseCompile 'com.squareup.leakcanary:leakcanary-android-no-op:1.3.1'
}

repositories {
    mavenCentral()
    maven{
        url "[maven reposity path]"
    }
}
下面来详细讲几个地方:
apply plugin: 'com.android.application'

android {
    ...
    defaultConfig {
        // 支持方法数超过65536后的处理
        multiDexEnabled true
        // 这里就是上面提到的替换友盟统计中channel的值,下面这句话的意思就是默认值为umeng
        manifestPlaceholders = [UMENG_CHANNEL_VALUE: "umeng"]
    }

    // 签名操作
    signingConfigs {
        debug {
             // debug签名文件配置
            storeFile file("debug.keystore")
        }

        release {
            // 正式版签名文件配置
            storeFile file("keystore.keystore")
            storePassword "android"
            keyAlias "androiddebugkey"
            keyPassword "android"
        }
    }

    buildTypes {
        debug {
            // debug的签名处理
            versionNameSuffix "-debug"
            minifyEnabled false
            zipAlignEnabled false
            shrinkResources false
            signingConfig signingConfigs.debug
        }

        release {
            // 正式版签名处理
            zipAlignEnabled true
            // remove unused resources
            shrinkResources true
            // proguard 混淆
            minifyEnabled true
            proguardFiles getDefaultProguardFile('proguard-android.txt'), 'proguard-rules.pro'
            signingConfig signingConfigs.release
        }
    }

    // 多渠道打包
    productFlavors {
        xiaomi {}
        _360 {}
        baidu {}
        qq {}
        free {
            // 当然这里还可以指定 applicationId 版本等这些内容,比如我们程序有一个收费版一个付费版,他俩的包名不同,这时候就可以通过这种方式来指定。
            applicationId = 'com.test.test'
            versionName = '1.0'
            versionCode = 1
        }
    }

    productFlavors.all {
        // 统一将manifest中的UMENG_CHANNEL_VALUE值替换为上面productFlavors中对应的渠道名
        flavor -> flavor.manifestPlaceholders = [UMENG_CHANNEL_VALUE: name]
    }

    lintOptions {
        // if true, stop the gradle build if errors are found
        abortOnError false

        // 下面是一些其他的选项,一般都用不到
        // set to true to turn off analysis progress reporting by lint
        // quiet true
        // if true, only report errors
//        ignoreWarnings true
        // if true, emit full/absolute paths to files with errors (true by default)
        //absolutePaths true
        // if true, check all issues, including those that are off by default
//        checkAllWarnings true
        // if true, treat all warnings as errors
//        warningsAsErrors true
        // turn off checking the given issue id's
//        disable 'TypographyFractions','TypographyQuotes'
        // turn on the given issue id's
//        enable 'RtlHardcoded','RtlCompat', 'RtlEnabled'
        // check *only* the given issue id's
//        check 'NewApi', 'InlinedApi'
        // if true, don't include source code lines in the error output
//        noLines true
        // if true, show all locations for an error, do not truncate lists, etc.
//        showAll true
        // Fallback lint configuration (default severities, etc.)
        lintConfig file("default-lint.xml")
        // if true, generate a text report of issues (false by default)
//        textReport true
        // location to write the output; can be a file or 'stdout'
//        textOutput 'stdout'
        // if true, generate an XML report for use by for example Jenkins
//        xmlReport false
        // file to write report to (if not specified, defaults to lint-results.xml)
//        xmlOutput file("lint-report.xml")
        // if true, generate an HTML report (with issue explanations, sourcecode, etc)
//        htmlReport true
        // optional path to report (default will be lint-results.html in the builddir)
//        htmlOutput file("lint-report.html")

        // set to true to have all release builds run lint on issues with severity=fatal
        // and abort the build (controlled by abortOnError above) if fatal issues are found
//        checkReleaseBuilds true
        // Set the severity of the given issues to fatal (which means they will be
        // checked during release builds (even if the lint target is not included)
//        fatal 'NewApi', 'InlineApi'
        // Set the severity of the given issues to error
//        error 'Wakelock', 'TextViewEdits'
        // Set the severity of the given issues to warning
//        warning 'ResourceAsColor'
        // Set the severity of the given issues to ignore (same as disabling the check)
//        ignore 'TypographyQuotes'
    }

    // 可以指定用具体哪个JDK版本来进行编译
    compileOptions {
        sourceCompatibility JavaVersion.VERSION_1_7
        targetCompatibility JavaVersion.VERSION_1_7
    }

    // 更改生成的apk文件名字,方便区分多渠道
    applicationVariants.all { variant ->
        variant.outputs.each { output ->
            def outputFile = output.outputFile
            if (outputFile != null && outputFile.name.endsWith('.apk')) {
                def fileName = outputFile.name.replace(".apk", "-${defaultConfig.versionName}.apk")
                output.outputFile = new File(outputFile.parent, fileName)
            }
        }
    }
}

dependencies {
    compile fileTree(dir: 'libs', include: ['*.jar'])
    compile project(':libraries:framework')
    // square leakcanary
    debugCompile 'com.squareup.leakcanary:leakcanary-android:1.3.1'
    releaseCompile 'com.squareup.leakcanary:leakcanary-android-no-op:1.3.1'
}

repositories {
    //从中央库里面获取依赖
    mavenCentral()
    //或者使用指定的本地maven 库
    maven{
        url "file://F:/githubrepo/releases"
    }
    //或者使用指定的远程maven库
    maven{
        url "远程库地址"
    }
}

上面`build.gradle`中的配置基本就是这些,那么`manifest`中的清单文件该如何对`umeng`渠道进行修改呢?
```xml
    <application
        android:allowBackup="true"
        android:name=".application.RetailApplication"
        android:icon="@mipmap/ic_launcher"
        android:theme="@android:style/Theme.Light.NoTitleBar.Fullscreen"
        android:label="@string/app_name">
        <activity
            android:name=".SplashActivity"
            android:screenOrientation="portrait"
            android:configChanges="keyboardHidden|orientation|screenSize"
            android:label="@string/app_name">
            <intent-filter>
                <action android:name="android.intent.action.MAIN" />

                <category android:name="android.intent.category.LAUNCHER" />
            </intent-filter>
        </activity>

        <!--支持Gradle中的渠道替换-->
        <meta-data
            android:name="UMENG_CHANNEL"
            android:value="${UMENG_CHANNEL_VALUE}" />
    </application>


<div class="se-preview-section-delimiter"></div>
上面讲解了如何进行多渠道打包。还剩下一个问题,就是Log开关的问题。这就要用到BuildConfig.DEBUG。 Gradle脚本默认有debug和release两种模式,对应的BuildCondig.DEBUG字段分别为true和false,而且不可更改。该字段编译后自动生成,在app/build/source/BuildConfig/Build Varients/package name/BuildConfig文件中。所以我们可以在LogUtil中这样配置。
public class LogUtil {
    /**
     * If print log here.
     */
    private static int LOG_LEVEL = BuildConfig.DEBUG ? 6 : 1;

    private static final int VERBOSE = 5;
    private static final int DEBUG = 4;
    private static final int INFO = 3;
    private static final int WARN = 2;
    private static final int ERROR = 1;

    ...
}


<div class="se-preview-section-delimiter"></div>
这里再多提一句,就是如果我们不想使用BuildConfig.DEBUG,想额外的使用一些其他的配置该如何操作呢?
可以在gradle文件中的buildTypes中进行添加。
buildTypes {
    debug {
        // 显示Log
        buildConfigField "boolean", "LOG_DEBUG", "true"
        versionNameSuffix "-debug"
        minifyEnabled false
        zipAlignEnabled false
        shrinkResources false
        signingConfig signingConfigs.debug
    }

    release {
        // 不显示Log
        buildConfigField "boolean", "LOG_DEBUG", "false"
        zipAlignEnabled true
        // remove unused resources
        shrinkResources true
        minifyEnabled true
        proguardFiles getDefaultProguardFile('proguard-android.txt'), 'proguard-rules.pro'
        signingConfig signingConfigs.release
    }
}在代码中使用BuildConfig.LOG_DEBUG就可以了。
更多内容请参考Gradle Plugin User Guide
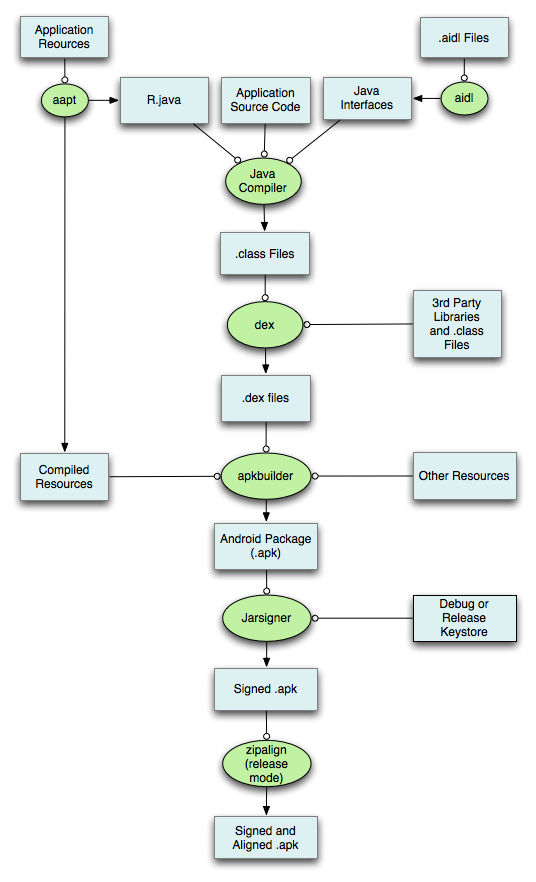
最后附上一张Build流程图:
- 邮箱 :charon.chui@gmail.com
- Good Luck!


 1158


 扫一扫


 被折叠的 条评论
为什么被折叠?
 到【灌水乐园】发言


