


 本文详细探讨了Spring事件监听器的工作原理,重点解析了@EventListener注解的处理流程。从初始化解析类,如EventListenerMethodProcessor和DefaultEventListenerFactory,到ApplicationListenerDetector的初始化,再到注解解析和事件监听器的保存与调用机制。文章通过源码分析,阐述了两种声明事件监听器方式(接口实现和注解修饰)的异同,以及它们在事件触发时如何被回调。
前面的笔记中,有写过,我们要在spring中声明一个事件监听器,有两种方式,一种是实现ApplicationListener接口,一种是通过@EventListener注解来修饰一个方法,并在该注解中,指定要监听的事件,那这个方法在事件发生的时候,会被回调
这两种机制,我们先说结论:
对于实现接口这种方式,是ApplicationListenerDetector这个类来完成解析的
对于注解这种方式,是EventListenerMethodProcessor和DefaultEventListenerFactory来完成解析的
事件监听器源码流程
其实对于两种实现方式,我们可以认为,在后期的处理过程中,很大一部分逻辑是相同的,只是实现监听器的方式不同而已
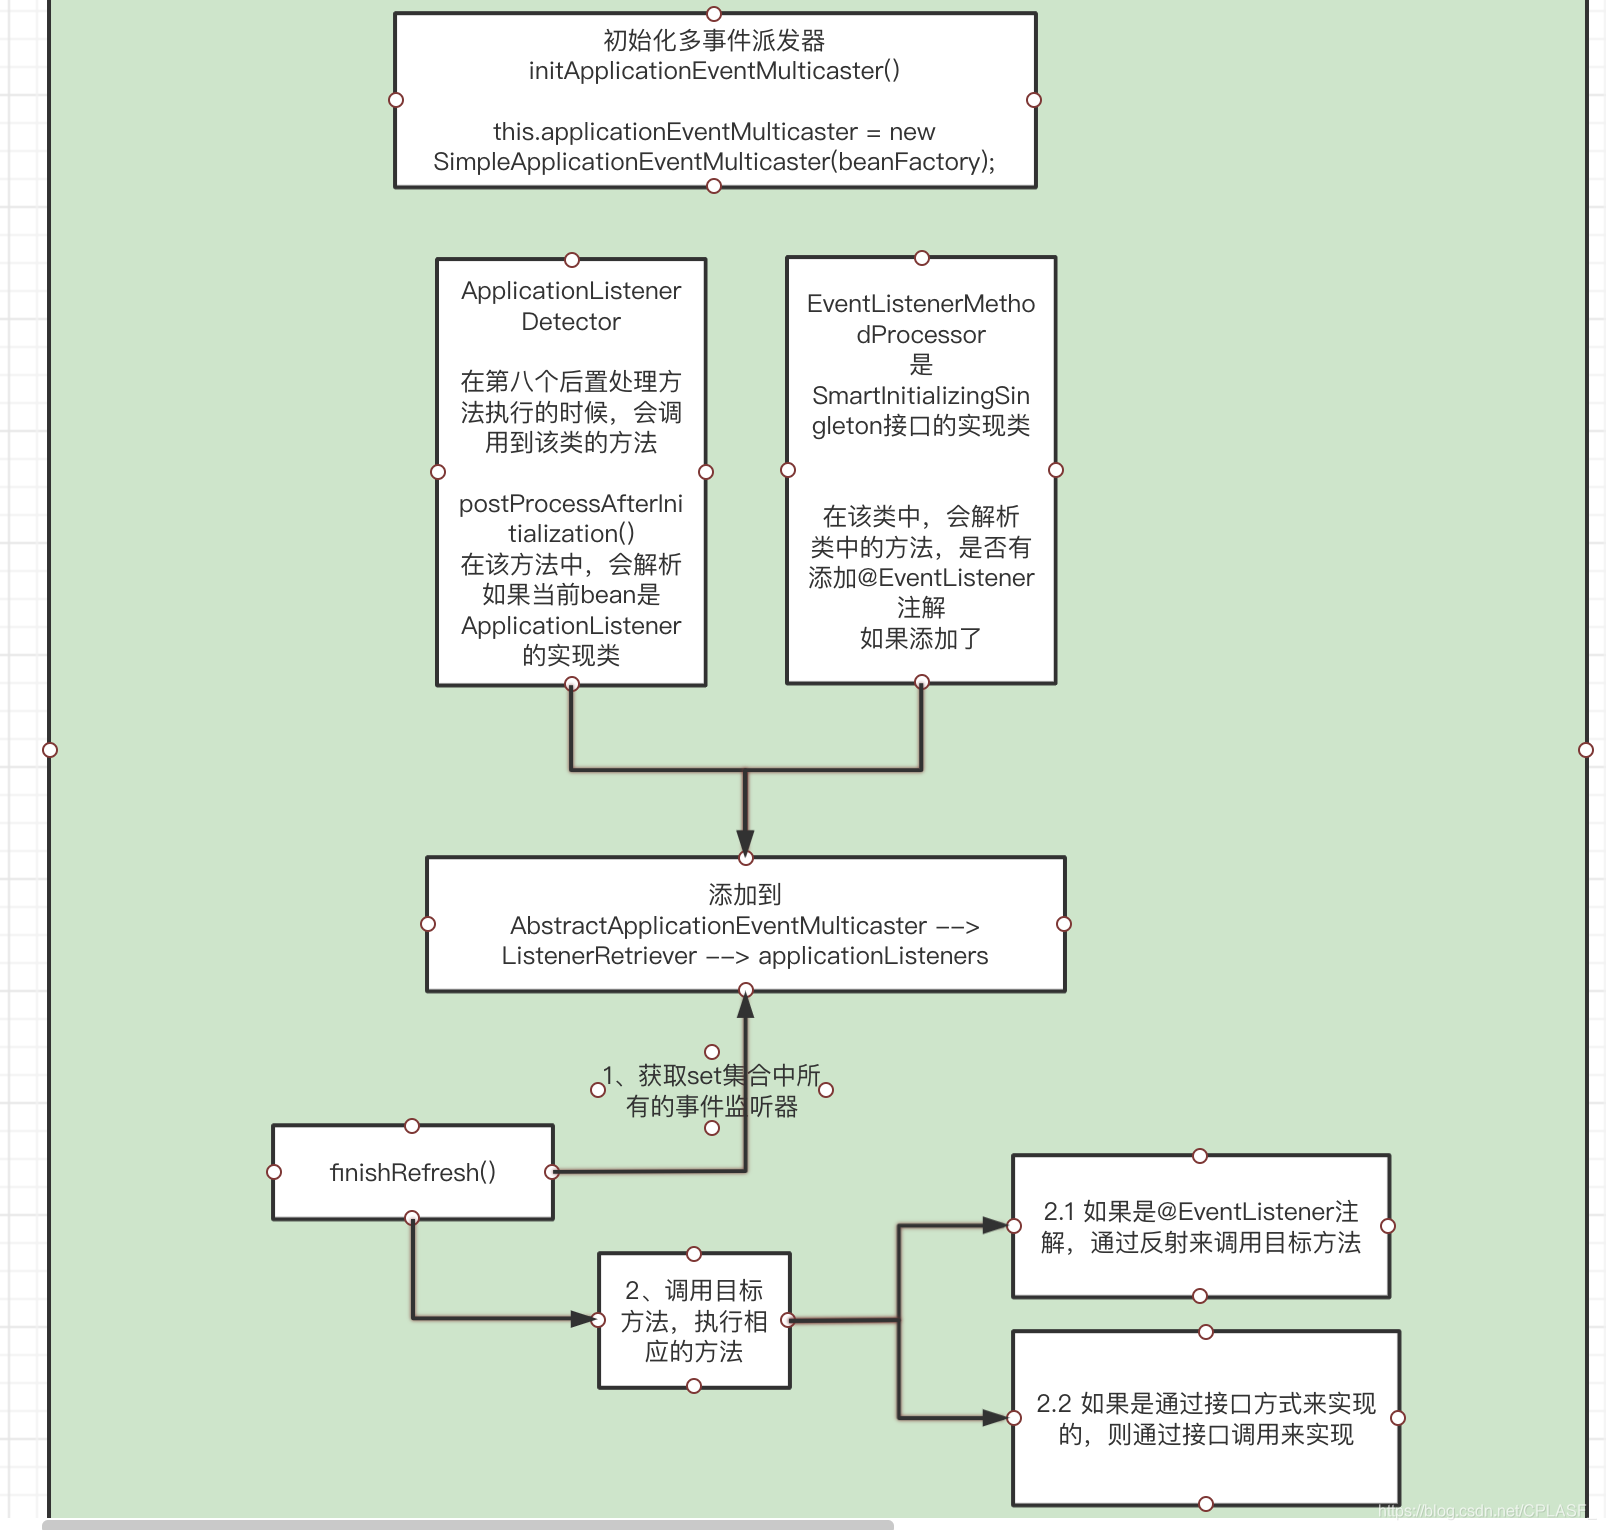
上面这个截图是我简单的画了一下对于监听器的处理流程,其实我们所谓的两种实现方式,只是中间的一个小环节而已,或者说只是解析的方式不同罢了,但是后续的处理流程都是一样的
初始化解析类
在前面我有说过,分别是三个类来完成解析的,那我们需要先说下,这三个解析类是在什么时候初始化的
初始化EventListenerMethodProcessor和DefaultEventListenerFactory
对于EventListenerMethodProcessor和DefaultEventListenerFactory这两个类,是在spring源码中,初始化内置后置处理器的时候,添加的
在spring源码:实例化bean的准备工作 这篇博客中,我有写到,在spring初始化的前期准备中,会初始化一些内置的后置处理器,其中,有两个bean,就是EventListenerMethodProcessor和DefaultEventListenerFactory,具体的代码是在:
org.springframework.context.annotation.AnnotationConfigApplicationContext#AnnotationConfigApplicationContext()
	org.springframework.context.annotation.AnnotatedBeanDefinitionReader#AnnotatedBeanDefinitionReader(org.springframework.beans.factory.support.BeanDefinitionRegistry)
		org.springframework.context.annotation.AnnotationConfigUtils#registerAnnotationConfigProcessors(org.springframework.beans.factory.support.BeanDefinitionRegistry)
			org.springframework.context.annotation.AnnotationConfigUtils#registerAnnotationConfigProcessors(org.springframework.beans.factory.support.BeanDefinitionRegistry, java.lang.Object)
初始化ApplicationListenerDetector
对于这个bean,是在prepareBeanFactory()方法中,添加了一个后置处理器,就是ApplicationListenerDetector
只是在spring源码中,有两处地方,会添加这个后置处理器,没太理解什么意思
在注册后置处理器的时候,也会添加一遍ApplicationListenerDetector;
org.springframework.context.support.PostProcessorRegistrationDelegate#registerBeanPostProcessors(org.springframework.beans.factory.config.ConfigurableListableBeanFactory, org.springframework.context.support.AbstractApplicationContext)
解析@EventListener注解
我们前面说过,对于注解的解析,是由EventListenerMethodProcessor和DefaultEventListenerFactory来完成解析的
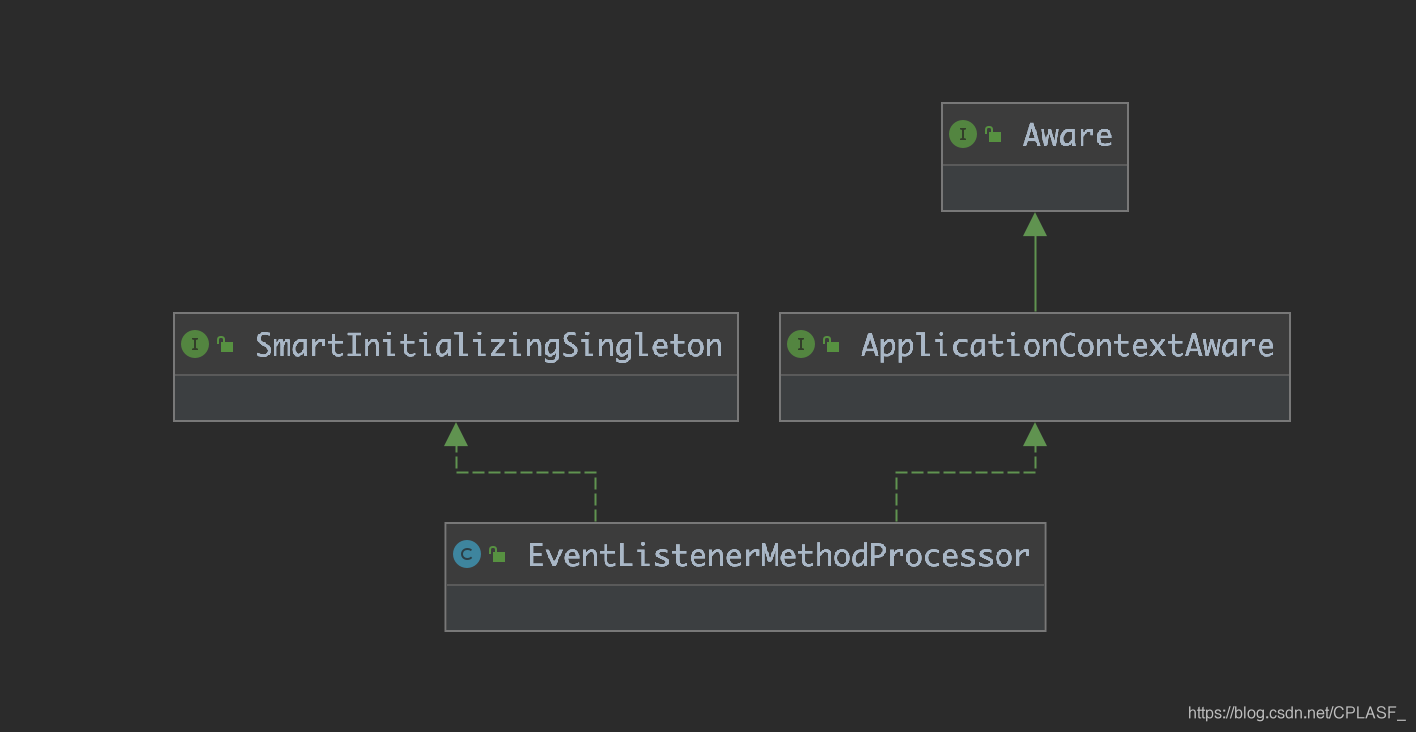
我们可以看到这个bean是SmartInitializingSingleton接口的实现类,那我们需要看下,这个接口的afterSingletonsInstantiated()是在什么时候被调用的
org.springframework.beans.factory.SmartInitializingSingleton#afterSingletonsInstantiated
这个接口也是spring的一个扩展点之一,是在spring容器中的bean初始化完成之后,被调用的,具体的地方是在:
org.springframework.beans.factory.support.DefaultListableBeanFactory#preInstantiateSingletons
这个方法,是完成spring容器中beanDefinitionMap转换为spring容器中的bean这步的关键方法,这个方法中,可以分为两部分
1.将beanDefinitionMap中的beanDefinition转换为bean,放入到spring容器中
2.在初始化完成之后,调用smartSingleton.afterSingletonsInstantiated();
所以,我们可以认为,对于@EventListener注解的解析,就是在这里被调用的
org.springframework.context.event.EventListenerMethodProcessor#afterSingletonsInstantiated

@Override
public void afterSingletonsInstantiated() {
  /**
   * 1.获取到所有的eventListenerFactory,理论上就是DefaultEventListenerFactory
   */
  List<EventListenerFactory> factories = getEventListenerFactories();
  ConfigurableApplicationContext context = getApplicationContext();
  /**
   * 2.获取到spring容器中,所有的beanName,依次遍历
   */
  String[] beanNames = context.getBeanNamesForType(Object.class);
  for (String beanName : beanNames) {
    if (!ScopedProxyUtils.isScopedTarget(beanName)) {
      Class<?> type = null;
      try {
        type = AutoProxyUtils.determineTargetClass(context.getBeanFactory(), beanName);
      }
      catch (Throwable ex) {
        // An unresolvable bean type, probably from a lazy bean - let's ignore it.
        if (logger.isDebugEnabled()) {
          logger.debug("Could not resolve target class for bean with name '" + beanName + "'", ex);
        }
      }
      if (type != null) {
        if (ScopedObject.class.isAssignableFrom(type)) {
          try {
            Class<?> targetClass = AutoProxyUtils.determineTargetClass(
                context.getBeanFactory(), ScopedProxyUtils.getTargetBeanName(beanName));
            if (targetClass != null) {
              type = targetClass;
            }
          }
          catch (Throwable ex) {
            // An invalid scoped proxy arrangement - let's ignore it.
            if (logger.isDebugEnabled()) {
              logger.debug("Could not resolve target bean for scoped proxy '" + beanName + "'", ex);
            }
          }
        }
        /**
         * 从for循环开始,到这里,代码的细节没有看的太懂,但是这段代码是为了获取到beanName对应的type
         * ,以便在下面使用
         */
        try {
          processBean(factories, beanName, type);
        }
        catch (Throwable ex) {
          throw new BeanInitializationException("Failed to process @EventListener " +
              "annotation on bean with name '" + beanName + "'", ex);
        }
      }
    }
  }
}
/**
 * 在这个方法中,会解析beanName对应的bean中所有的方法上,是否有添加@EventListener注解,如果有添加
 *  则根据beanName生成一个applicationListener,并添加到多事件派发器上
 * @param factories
 * @param beanName
 * @param targetType
 */
protected void processBean(
    final List<EventListenerFactory> factories, final String beanName, final Class<?> targetType) {

  /**
   * 1.nonAnnotatedClasses
   * 这个set集合,可以理解为是一个缓存,全局搜索了下,只有在下面,annotatedMethods为null的时候,才会写入到这个集合中
   * 所以,我认为,在第一次解析的时候,如果一个bean中的method没有条件@EventListener注解,就会把这个bean
   * 添加到nonAnnotatedClasses集合中
   */
  if (!this.nonAnnotatedClasses.contains(targetType)) {
    Map<Method, EventListener> annotatedMethods = null;
    try {
      /**
       * 2.解析targetType这个class,获取类中所有加了@EventListener注解的method
       */
      annotatedMethods = MethodIntrospector.selectMethods(targetType,
          (MethodIntrospector.MetadataLookup<EventListener>) method ->
              AnnotatedElementUtils.findMergedAnnotation(method, EventListener.class));
    }
    catch (Throwable ex) {
      // An unresolvable type in a method signature, probably from a lazy bean - let's ignore it.
      if (logger.isDebugEnabled()) {
        logger.debug("Could not resolve methods for bean with name '" + beanName + "'", ex);
      }
    }
    /**
     * 3.如果当前class的方法中,没有添加@EventListener注解,就添加到nonAnnotatedClasses中
     */
    if (CollectionUtils.isEmpty(annotatedMethods)) {
      this.nonAnnotatedClasses.add(targetType);
      if (logger.isTraceEnabled()) {
        logger.trace("No @EventListener annotations found on bean class: " + targetType.getName());
      }
    }
    else {
      // Non-empty set of methods
      /**
       * 4.如果当前targetClass中,有方法添加了@EventListener注解,那就根据beanName
       * 生成一个applicationListener
       * 方法,点进去看,会发现,就是ApplicationListenerMethodAdapter这个类
       *
       * 所以,我们可以认为:
       * 1、对于实现ApplicationListener接口这种方式声明的事件监听器,其applicationListener就是对应的实现类
       * 2、对于使用@EventListener注解这种方法,其applicationListener就是ApplicationListenerMethodAdapter
       */
      ConfigurableApplicationContext context = getApplicationContext();
      for (Method method : annotatedMethods.keySet()) {
        for (EventListenerFactory factory : factories) {
          if (factory.supportsMethod(method)) {
            Method methodToUse = AopUtils.selectInvocableMethod(method, context.getType(beanName));
            // 这里生成的applicationListener
            // 是ApplicationListenerMethodAdapter
            ApplicationListener<?> applicationListener =
                factory.createApplicationListener(beanName, targetType, methodToUse);
            if (applicationListener instanceof ApplicationListenerMethodAdapter) {
              ((ApplicationListenerMethodAdapter) applicationListener).init(context, this.evaluator);
            }
            /**
             * 5.最重要得一步:将applicationListener
             * 添加到多事件派发器中,在后面publishEvent的时候会用到
             */
            context.addApplicationListener(applicationListener);
            break;
          }
        }
      }
      if (logger.isDebugEnabled()) {
        logger.debug(annotatedMethods.size() + " @EventListener methods processed on bean '" +
            beanName + "': " + annotatedMethods);
      }
    }
  }
}
上面这两段源码,就是解析@EventListener注解的原理,其中,最为重要的一步,就是第5步,将@EventListener注解所在类,生成的applicationListener对象,放入到set集合中
保存事件监听器
context.addApplicationListener(applicationListener);
这一行代码,就是来保存事件监听器的
org.springframework.context.support.AbstractApplicationContext#addApplicationListener
@Override
public void addApplicationListener(ApplicationListener<?> listener) {
  Assert.notNull(listener, "ApplicationListener must not be null");
  if (this.applicationEventMulticaster != null) {
  	// 将事件监听器存入到多事件派发器的集合中
    this.applicationEventMulticaster.addApplicationListener(listener);
  }
  this.applicationListeners.add(listener);
}
在这个方法中,我们只需要关注一行代码
@Override
public void addApplicationListener(ApplicationListener<?> listener) {
  synchronized (this.retrievalMutex) {
    // Explicitly remove target for a proxy, if registered already,
    // in order to avoid double invocations of the same listener.
    Object singletonTarget = AopProxyUtils.getSingletonTarget(listener);
    if (singletonTarget instanceof ApplicationListener) {
      this.defaultRetriever.applicationListeners.remove(singletonTarget);
    }
    this.defaultRetriever.applicationListeners.add(listener);
    this.retrieverCache.clear();
  }
}
所以,我们可以看到,对于这里的逻辑,其实就是存到了内存中的一个set集合
public final Set<ApplicationListener<?>> applicationListeners = new LinkedHashSet<>();
调用事件监听器
在前面解析完了事件监听器之后,并且也存入到了set集合中,最后会在spring容器刷新完成之后,统一调用事件监听器的方法
org.springframework.context.support.AbstractApplicationContext#finishRefresh
	org.springframework.context.support.AbstractApplicationContext#publishEvent(org.springframework.context.ApplicationEvent)
		org.springframework.context.event.SimpleApplicationEventMulticaster#multicastEvent(org.springframework.context.ApplicationEvent, org.springframework.core.ResolvableType)
@Override
public void multicastEvent(final ApplicationEvent event, @Nullable ResolvableType eventType) {
  ResolvableType type = (eventType != null ? eventType : resolveDefaultEventType(event));
  /**
   * 获取所有的事件监听器,判断是否是异步执行
   * 但是下面这一步getApplicationListeners()是比较重要的一个方法,获取所有的listener
   * 我们可以暂时认为是从前面的set集合中获取到对应的事件监听器
   */
  for (final ApplicationListener<?> listener : getApplicationListeners(event, type)) {
    Executor executor = getTaskExecutor();
    if (executor != null) {
      executor.execute(() -> invokeListener(listener, event));
    }
    else {
      invokeListener(listener, event);
    }
  }
}
所以,在调用的时候,会从set集合中获取到所有的事件监听器,然后在遍历中,依次去调用
@EventListener注解方式的调用
org.springframework.context.event.ApplicationListenerMethodAdapter#processEvent
public void processEvent(ApplicationEvent event) {
  Object[] args = resolveArguments(event);
  if (shouldHandle(event, args)) {
    Object result = doInvoke(args);
    if (result != null) {
      handleResult(result);
    }
    else {
      logger.trace("No result object given - no result to handle");
    }
  }
}
在doInvoke()方法中,会通过method.invoke()来调用目标方法
这里要说明一下,为什么会调用到ApplicationListenerMethodAdapter方法,是因为
在前面会初始化一个ApplicationListenerMethodAdapter的类,作为ApplicationListener存入到集合中
org.springframework.context.event.DefaultEventListenerFactory#createApplicationListener
@Override
public ApplicationListener<?> createApplicationListener(String beanName, Class<?> type, Method method) {
	return new ApplicationListenerMethodAdapter(beanName, type, method);
}
这种方式就是通过@EventListener方式来声明一个事件监听器的源码
通过实现接口方式的调用
在invokeListener()方法中,会调用对应的实现类对应的onApplicationEvent()方法,和@EventListener的区别就是:
一种是调用ApplicationListenerMethodAdapter,一种是调用真正的目标方法


 2330
2330

 被折叠的 条评论
为什么被折叠?
被折叠的 条评论
为什么被折叠?
 到【灌水乐园】发言


