


文件上传实现步骤(开发中随用随取)
SpringMVC为文件上传提供了直接的支持,这种支持是用即插即用的MultipartResolver实现的
一、导入支持文件上传的依赖
<!--文件上传-->
<dependency>
    <groupId>commons-fileupload</groupId>
    <artifactId>commons-fileupload</artifactId>
    <version>1.3.3</version>
</dependency>
<!--servlet-api导入高版本的-->
<dependency>
    <groupId>javax.servlet</groupId>
    <artifactId>javax.servlet-api</artifactId>
    <version>4.0.1</version>
</dependency>
二、在spring-mvc.xml中配置MultipartResolver的Bean
注意:这里的id一定不能写错,因为在别的类中会通过这个id调用这个类
<!--文件上传配置-->
<bean id="multipartResolver"  class="org.springframework.web.multipart.commons.CommonsMultipartResolver">
    <!-- 请求的编码格式,必须和jSP的pageEncoding属性一致,以便正确读取表单的内容,默认为ISO-8859-1 -->
    <property name="defaultEncoding" value="utf-8"/>
    <!-- 上传文件大小上限,单位为字节(10485760=10M) -->
    <property name="maxUploadSize" value="10485760"/>
    <property name="maxInMemorySize" value="40960"/>
</bean>
三、编写前端页面
这里的enctype中的属性表示文件以二进制流的形式上传到服务器
对enctype的属性解释如下: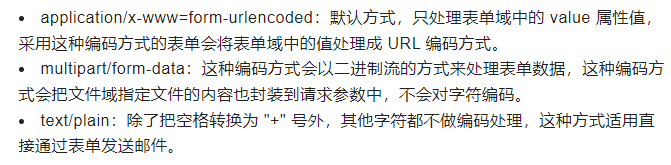
<form action="${pageContext.request.contextPath}/upload" enctype="multipart/form-data" method="post">
  <input type="file" name="file"/>
  <input type="submit" value="上传">
</form>
四、编写Controller控制类(含两种文件上传方法,随用随取)
import org.springframework.stereotype.Controller;
import org.springframework.web.bind.annotation.RequestMapping;
import org.springframework.web.bind.annotation.RequestParam;
import org.springframework.web.multipart.commons.CommonsMultipartFile;

import javax.servlet.http.HttpServletRequest;
import java.io.*;

@Controller
public class FileController {
    //@RequestParam("file") 将name=file控件得到的文件封装成CommonsMultipartFile 对象
    //批量上传CommonsMultipartFile则为数组即可
    @RequestMapping("/upload")
    public String fileUpload(@RequestParam("file") CommonsMultipartFile file , HttpServletRequest request) throws IOException {

        //获取文件名 : file.getOriginalFilename();
        String uploadFileName = file.getOriginalFilename();

        //如果文件名为空,直接回到首页!
        if ("".equals(uploadFileName)){
            return "redirect:/index.jsp";
        }
        System.out.println("上传文件名 : "+uploadFileName);

        //上传路径保存设置
        String path = request.getServletContext().getRealPath("/upload");
        //如果路径不存在,创建一个
        File realPath = new File(path);
        if (!realPath.exists()){
            realPath.mkdir();
        }
        System.out.println("上传文件保存地址:"+realPath);

        InputStream is = file.getInputStream(); //文件输入流
        OutputStream os = new FileOutputStream(new File(realPath,uploadFileName)); //文件输出流

        //读取写出
        int len=0;
        byte[] buffer = new byte[1024];
        while ((len=is.read(buffer))!=-1){
            os.write(buffer,0,len);
            os.flush();
        }
        os.close();
        is.close();
        return "redirect:/index.jsp";
    }


    /*
     * 采用file.Transto 来保存上传的文件
     */
    @RequestMapping("/upload2")
    public String  fileUpload2(@RequestParam("file") CommonsMultipartFile file, HttpServletRequest request) throws IOException {

        //上传路径保存设置
        String path = request.getServletContext().getRealPath("/upload");
        File realPath = new File(path);
        if (!realPath.exists()){
            realPath.mkdir();
        }
        //上传文件地址
        System.out.println("上传文件保存地址:"+realPath);

        //通过CommonsMultipartFile的方法直接写文件(注意这个时候)
        file.transferTo(new File(realPath +"/"+ file.getOriginalFilename()));

        return "redirect:/index.jsp";
    }

}
五、测试上传文件

文件下载实现步骤
一、文件下载的控制器方法(死代码,拿着直接用)
//文件下载
@RequestMapping(value = "/download")
public String downloads(HttpServletResponse response, HttpServletRequest request) throws Exception {
    //要下载的图片地址
    String path = request.getServletContext().getRealPath("/upload");
    String fileName = "基础语法.jpg";

    //下面的步骤都是死代码,将来直接用
    //1、设置response 响应头
    response.reset(); //设置页面不缓存,清空buffer
    response.setCharacterEncoding("UTF-8"); //字符编码
    response.setContentType("multipart/form-data"); //二进制传输数据
    //设置响应头
    response.setHeader("Content-Disposition",
            "attachment;fileName=" + URLEncoder.encode(fileName, "UTF-8"));

    File file = new File(path, fileName);
    //2、 读取文件--输入流
    InputStream input = new FileInputStream(file);
    //3、 写出文件--输出流
    OutputStream out = response.getOutputStream();

    byte[] buff = new byte[1024];
    int index = 0;
    //4、执行 写出操作
    while ((index = input.read(buff)) != -1) {
        out.write(buff, 0, index);
        out.flush();
    }
    out.close();
    input.close();
    return null;
}
至此,关于SpringMVC中的文件的上传和下载你已经掌握,后续还会继续更新,敬请期待!


 428
428

 被折叠的 条评论
为什么被折叠?
被折叠的 条评论
为什么被折叠?
 到【灌水乐园】发言


