


紫鸟\Adspower\比特\Hubstudio\站斧等指纹浏览器支持自有代理ip(自有设备),以下是购买云服器后服务器配置http代理的详细步骤
1. 安装 Squid (第一步)
更新软件包列表并安装 Squid:
sudo apt update
sudo apt install squid -y
2. 启动 Squid 服务
安装后,Squid 会自动启动。检查状态:
sudo systemctl status squid
sudo systemctl enable squid # 设置开机自启
如果未运行,手动启动:
sudo systemctl start squid3. 配置 Squid
编辑配置文件:
sudo vim /etc/squid/squid.conf直接复制以下内容到配置文件里
#	WELCOME TO SQUID 5.9

# should be allowed
acl localnet src 0.0.0.1-0.255.255.255	# RFC 1122 "this" network (LAN)
acl localnet src 10.0.0.0/8		# RFC 1918 local private network (LAN)
acl localnet src 100.64.0.0/10		# RFC 6598 shared address space (CGN)
acl localnet src 169.254.0.0/16 	# RFC 3927 link-local (directly plugged) machines
acl localnet src 172.16.0.0/12		# RFC 1918 local private network (LAN)
acl localnet src 192.168.0.0/16		# RFC 1918 local private network (LAN)
acl localnet src fc00::/7       	# RFC 4193 local private network range
acl localnet src fe80::/10      	# RFC 4291 link-local (directly plugged) machines

acl SSL_ports port 443
acl Safe_ports port 80		# http
acl Safe_ports port 21		# ftp
acl Safe_ports port 443		# https
acl Safe_ports port 70		# gopher
acl Safe_ports port 210		# wais
acl Safe_ports port 1025-65535	# unregistered ports
acl Safe_ports port 280		# http-mgmt
acl Safe_ports port 488		# gss-http
acl Safe_ports port 591		# filemaker
acl Safe_ports port 777		# multiling http

# Deny requests to certain unsafe ports
http_access deny !Safe_ports

# Deny CONNECT to other than secure SSL ports
# http_access deny CONNECT !SSL_ports

# Only allow cachemgr access from localhost
http_access allow localhost manager
http_access deny manager

# This default configuration only allows localhost requests because a more
# permissive Squid installation could introduce new attack vectors into the
# network by proxying external TCP connections to unprotected services.
http_access allow localhost

include /etc/squid/conf.d/*.conf

# For example, to allow access from your local networks, you may uncomment the
# following rule (and/or add rules that match your definition of "local"):
# http_access allow localnet

# And finally deny all other access to this proxy
#http_access deny all
#http_access allow all
auth_param basic program /usr/lib/squid/basic_ncsa_auth /etc/squid/passwords
auth_param basic realm proxy
acl authenticated proxy_auth REQUIRED
http_access allow authenticated


# Squid normally listens to port 3128
http_port 3128

cache_mem 512 MB

coredump_dir /var/spool/squid

#
# Add any of your own refresh_pattern entries above these.
#
refresh_pattern ^ftp:		1440	20%	10080
refresh_pattern ^gopher:	1440	0%	1440
refresh_pattern -i (/cgi-bin/|\?) 0	0%	0
refresh_pattern \/(Packages|Sources)(|\.bz2|\.gz|\.xz)$ 0 0% 0 refresh-ims
refresh_pattern \/Release(|\.gpg)$ 0 0% 0 refresh-ims
refresh_pattern \/InRelease$ 0 0% 0 refresh-ims
refresh_pattern \/(Translation-.*)(|\.bz2|\.gz|\.xz)$ 0 0% 0 refresh-ims
# example pattern for deb packages
#refresh_pattern (\.deb|\.udeb)$   129600 100% 129600
refresh_pattern .		0	20%	4320
保存配置文件
4. 验证配置并重启
安装 apache2-utils 生成密码文件:admin可以修改为你自己的,过程会提示输入密码,密码可随便填写
sudo apt install apache2-utils -y
sudo htpasswd -c /etc/squid/passwords admin
5. 验证配置并重启
检查配置语法:
sudo squid -k parse
若无错误,重启 Squid:
sudo systemctl restart squid5. 客户端使用代理
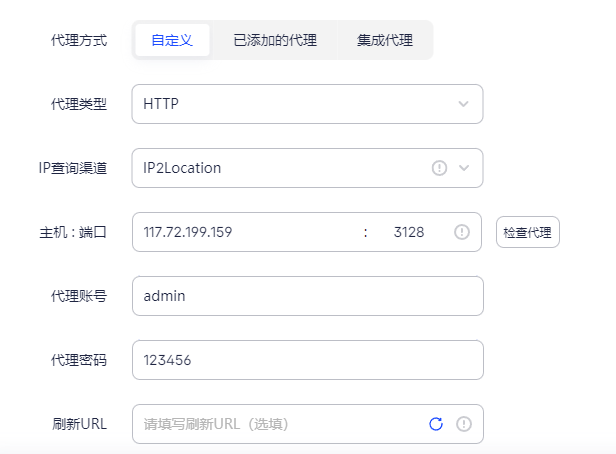
在指纹浏览器设置代理:
- **IP**: Ubuntu 服务器的 IP
- **端口**: 3128(或自定义端口)
相关文章:
2025年市面上主流指纹浏览器汇总(紫鸟\Adspower\比特\Hubstudio\战斧浏览器对比)-优快云博客
什么是指纹浏览器 紫鸟浏览器adspower云登下载比特跨境电商亚马逊tiktok小红书amazone抖音ozon多账号防关联-优快云博客


 4439
4439

 被折叠的 条评论
为什么被折叠?
被折叠的 条评论
为什么被折叠?
 到【灌水乐园】发言


