


 本文介绍如何使用MaixPy进行多线程编程来控制两个LED灯的闪烁,展示了线程函数的定义及启动过程。通过具体代码实现了两个LED灯以不同频率交替亮灭的效果。
目录
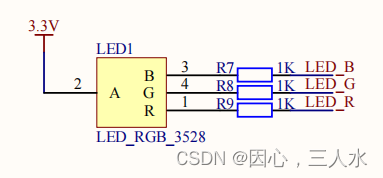
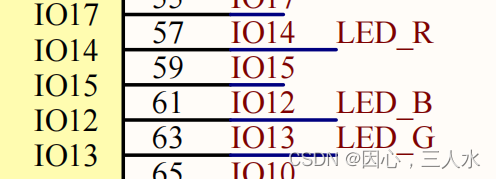
引脚图:
导包:
from Maix import GPIO #IO口
from fpioa_manager import fm #引脚
import utime #时间模块
import _thread #导入线程模块
import time
开启线程:
'''
启动新线程并返回其标识符。线程使用参数列表 args(必须是元组)执行函数函数。
可选的 kwargs 参数指定关键字参数的字典。当函数返回时,线程将静默退出。
当函数终止并出现未处理的异常时,将打印堆栈跟踪,然后线程退出(但其他线程继续运行)。
'''
_thread.start_new_thread(function, args[, kwargs])
_thread.start_new_thread(func1,("1",)) #开启线程1,参数必须是元组
_thread.start_new_thread(func2,("2",)) #开启线程2,参数必须是元组例程:
'''
main.py
说明:通过编程实现多线程。
'''
from Maix import GPIO #IO口
from fpioa_manager import fm #引脚
import utime #时间模块
import _thread #导入线程模块
import time
fm.register(12, fm.fpioa.GPIO0)
fm.register(13, fm.fpioa.GPIO1)
LED_B = GPIO(GPIO.GPIO0, GPIO.OUT,value=1)
LED_G = GPIO(GPIO.GPIO1, GPIO.OUT,value=1)
#线程函数
def func1(name):
while True:
print("线程 {}".format(name))
print("111")
print("111111")
LED_B.value(0)
time.sleep(1)
LED_B.value(1)
time.sleep(1)
def func2(name):
while True:
print("线程 {}".format(name))
print("222")
print("222222")
LED_G.value(0)
time.sleep(2)
LED_G.value(1)
time.sleep(2)
_thread.start_new_thread(func1,("1",)) #开启线程1,参数必须是元组
_thread.start_new_thread(func2,("2",)) #开启线程2,参数必须是元组
while True:
pass


 2431
2431

 被折叠的 条评论
为什么被折叠?
被折叠的 条评论
为什么被折叠?
 到【灌水乐园】发言


