


 文章介绍了在编程中实现定时任务的三种方式:Thread.Sleep(),awaitTask.Delay()以及使用Timer。强调Thread.Sleep()的效率问题,推荐使用Timer创建定时器,因为Timer基于回调机制,不会阻塞线程,更节省资源。同时,文章提醒在使用Timer时应注意声明为全局变量以防止被垃圾回收,并给出了Timer的实例代码。
时代在进步 我们的技术也要进步
你是否碰到需要过几秒执行一次的任务
你就开始使用Thread.sleep()
又或是await Task.Delay()
第一种是最不值得用的 直接中止掉当前线程
第二种可以用但不是最优解
先上代码
using System;
using System.Threading;
using System.Threading.Tasks;

namespace ActionStudy
{
    class Program
    {
        public static Action Print_Action;//声明事件
        static void Main(string[] args)
        {
            //使用多线程
            Thread t = new Thread(PrintThread);
            t.Start();

            //使用异步
            Task.Factory.StartNew(async()=>{
                while (true)
                {
                    PrintTask();
                    await Task.Delay(10000);

                }

            });
            //使用Action
            //创建定时器
            Timer timer = new Timer(new TimerCallback(Execute), null, 2000, 10000);
            //事件触发绑定的方法
            Print_Action += Print;


            Console.ReadKey();

        }
        /// <summary>
        /// 创建回调触发方法
        /// </summary>
        /// <param name="o"></param>
        public static void Execute(object o)
        {

            //Console.WriteLine("just run now");
            Print_Action?.Invoke();
        }
        /// <summary>
        /// 需要定时执行的方法
        /// </summary>
        public static void Print() {
            Console.WriteLine("Action我是狗子 希望你幸福!"+DateTime.Now.ToString());
        }
        public static void PrintTask()
        {
            Console.WriteLine("Task我是狗子 希望你幸福!" + DateTime.Now.ToString());
        }
        public static void PrintThread()
        {
            while (true)
            {
                Console.WriteLine("Thread我是狗子 希望你幸福!" + DateTime.Now.ToString());
                Thread.Sleep(10000);

            }

        }
    }
}
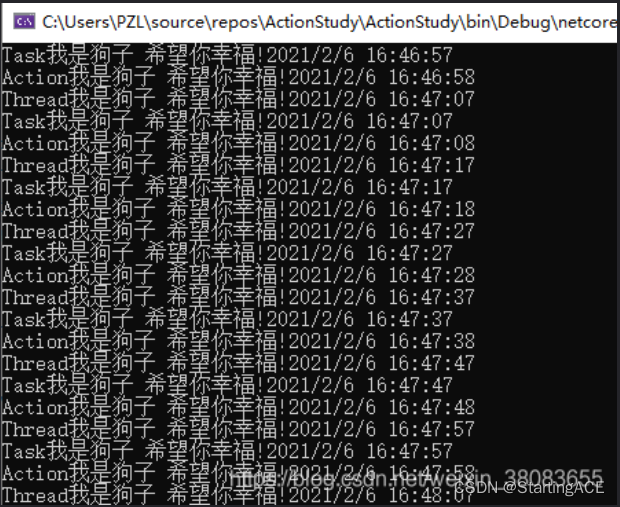
这里有三种实现形式
每十秒打印一次
前两种都是While(True)
程序开始后就进入了无线循环
第三种是定时器的触发方式
虽然实现的效果一样 但底层的实现方式已经不一样了
这涉及到了线程应用的问题
callback回调是线程主动告诉你这件事情该触发了
而主动去让他睡觉 去等待 无疑是在消耗资源
写程序的时候while(True)后面 再也不能写代码了 这是一件很糟糕的事情
所以要避免while(True)的使用
使用Timer做定时器的好处以后在讲
但建议使用这种方式
using System;
using System.Threading;
using System.Threading.Tasks;

namespace ActionStudy
{
    class Program
    {
        public static Action Print_Action;//声明事件
        static void Main(string[] args)
        {
            //创建定时器
            Timer timer = new Timer(new TimerCallback(Execute), null, 2000, 10000);
            //事件触发绑定的方法
            Print_Action += Print;


            Console.ReadKey();

        }
        /// <summary>
        /// 创建回调触发方法
        /// </summary>
        /// <param name="o"></param>
        public static void Execute(object o)
        {

            //Console.WriteLine("just run now");
            Print_Action?.Invoke();
        }
        /// <summary>
        /// 需要定时执行的方法
        /// </summary>
        public static void Print() {
            Console.WriteLine("Action我是狗子 希望你幸福!"+DateTime.Now.ToString());
        }

    }
}
注意事项:
(1)首先声明Timer变量:
//一定要声明成全局变量以保持对Timer的引用,不要声明成业务内的局部变量,否则会被垃圾收集器回收!–个人踩坑心得
private System.Threading.Timer timerClose;
(2)在上述自动执行代码后面添加如下Timer实例化代码:
// Create a timer thread and start it
timerClose = new System.Threading.Timer(new TimerCallback(timerCall), this, 5000, 0);
//Timer构造函数参数说明:
Callback:一个 TimerCallback 委托,表示要执行业务方法。
State:一个包含回调方法要使用的信息的对象,或者为空引用null(Visual Basic 中为 Nothing)。
dueTime:调用 callback 之前延迟的时间量(以毫秒为单位)。指定 Timeout.Infinite 以防止计时器开始计时。指定零 (0) 以立即启动计时器。
Period:调用 callback 的时间间隔(以毫秒为单位)。指定 Timeout.Infinite 可以禁用定期终止。
(3)定义TimerCallback委托要执行的方法:
private void timerCall(object obj)
{
timerClose.Dispose();
this.Close();
}
当然,除了使用上述System.Threading.Timer类的TimerCallback 委托机制外,应该还有很多其他的办法。
另外,这里只是demo了TimerCallback委托的简单应用。
实例如下:
using System;
using System.Collections.Generic;
using System.ComponentModel;
using System.Data;
using System.Drawing;
using System.Linq;
using System.Text;
using System.Windows.Forms;
using System.Threading;

namespace MYTimerTest
{
public partial class Form1 : Form
{
public Form1()
{
InitializeComponent();
}

private void Form1_Load(object sender, EventArgs e)
{

System.Threading.Timer timer = new System.Threading.Timer(new TimerCallback(timer_Elapsed), null, 0, 1000);
}

void timer_Elapsed(object sender)
{
for (int i = 0; i < 10; i++)
{
Console.Out.WriteLine(DateTime.Now + " " + DateTime.Now.Millisecond.ToString() + “timer in:”);
}

}
}
}
注意void timer_Elapsed(object sender)中的“object”对应new System.Threading.Timer(new TimerCallback(timer_Elapsed), null, 0, 1000)中的第二个参数。–也就是回调业务执行完的传输结果
文章参考:资料链接


 1399
1399

 被折叠的 条评论
为什么被折叠?
被折叠的 条评论
为什么被折叠?
 到【灌水乐园】发言


