


点亮LED灯
一开始想先通过简单的点亮一个灯的程序来试一下MCU,硬件上的原理图如下:
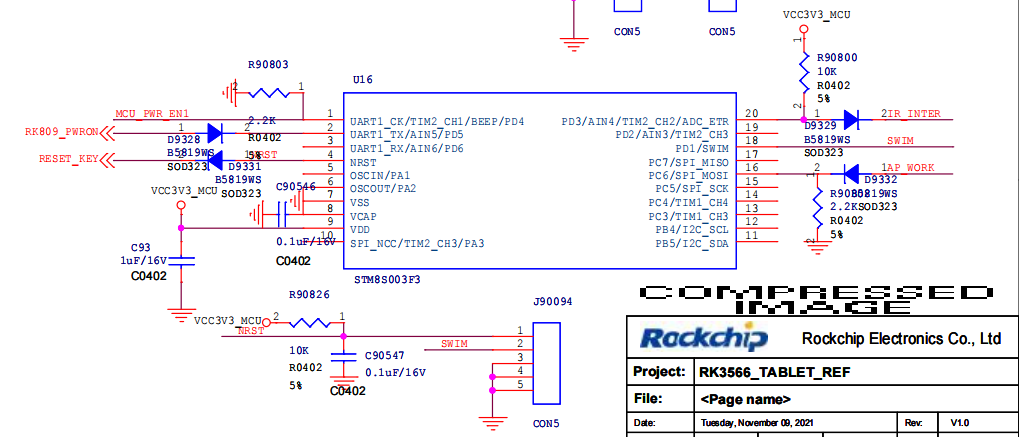
从这里看出PB4、PB5、PC3、PC4、PC5、PC7都能用,还没接外设,一开始我选择了 PB5 去外接一个LED来进行调试,但出现了问题(后面再说),所以最终我选择的是在 PC3 上外接一个LED灯:
代码如下:
/*stm8s.h中引用了stm8s_conf.h,而stm8s_conf.h中引用了所有库函数中的头文件*/
#include "stm8s.h"

void main(void)
{
    GPIO_DeInit(GPIOC);//恢复指定端口
    GPIO_Init(GPIOC, GPIO_PIN_3, GPIO_MODE_OUT_PP_HIGH_SLOW);//设置PC3为推挽输出高电平2MHz

    /* Infinite loop */
    while (1)
    {
        GPIO_WriteHigh(GPIOC, GPIO_PIN_3);/*PD0口输出高电平*/
    }
}

#ifdef USE_FULL_ASSERT
void assert_failed(u8* file, u32 line)
{
  /* 用户可以添加自己的实现来报告文件名和行号,
     ex: printf("Wrong parameters value: file %s on line %d\r\n", file, line) */
  /* Infinite loop */
    while (1)
    {

    }
}
#endif
调试中出现的问题
assert_failed问题
参考链接
没加下面代码时,会报以下错误:
Error[Li005]: no definition for "assert_failed" [referenced from E:\company\MCU_Project\LED_Test\User\Debug\Obj\stm8s_gpio.o]
意思是没有对assert_failed这个函数进行实现。
原因:
stm8s.h中有如下代码(我们引入头文件 stm8s.h 后,会自动引入stm8s_conf.h这个头文件):
#if !defined  USE_STDPERIPH_DRIVER
/* Comment the line below if you will not use the peripherals drivers.
   In this case, these drivers will not be included and the application code will be
   based on direct access to peripherals registers */
 #define USE_STDPERIPH_DRIVER
#endif

#ifdef USE_STDPERIPH_DRIVER
 #include "stm8s_conf.h"
#endif
stm8s_conf.h这个头文件中定义了宏#define USE_FULL_ASSERT 1,导致assert_failed的声明打开了,如下代码:
#define USE_FULL_ASSERT    (1)
#ifdef  USE_FULL_ASSERT

/**
  * @brief  The assert_param macro is used for function's parameters check.
  * @param expr:
  *   表达式expr的值为真,则assert_param(expr) 返回void 0;表达式expr的值为假,
  *   则assert_param(expr) 返回assert_failed((uint8_t *)__FILE__, __LINE__),
  * @retval : None
  */
#define assert_param(expr) ((expr) ? (void)0 : assert_failed((uint8_t *)__FILE__, __LINE__))
/* Exported functions ------------------------------------------------------- */
void assert_failed(uint8_t* file, uint32_t line);
#else
#define assert_param(expr) ((void)0)
#endif /* USE_FULL_ASSERT */

#endif /* __STM8S_CONF_H */
因此要在main.c中对assert_failed这个函数进行实现,所以在main.c中添加如下代码就能解决了:
void assert_failed(u8* file, u32 line)
{
  /* 用户可以添加自己的实现来报告文件名和行号,
     ex: printf("Wrong parameters value: file %s on line %d\r\n", file, line) */
  /* Infinite loop */
    while (1)
    {

    }
}
如果调试结束了,可以把stm8s_conf.h中的#define USE_FULL_ASSERT (1) 注释掉,之后就能把main.c中的以上函数删除或者注释掉就行了。
引脚选错问题
一开始选择PB5,烧录虽然成功了,但是输出不了高电平,能从两个方向解释这个原因:
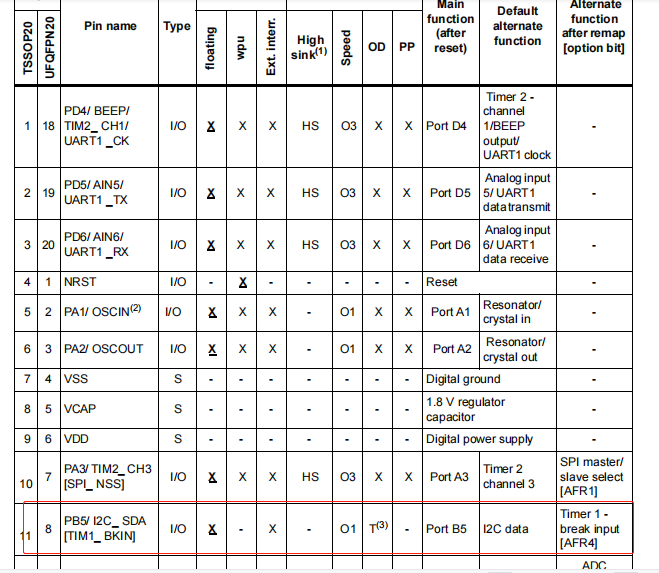
1.从datasheet中可以看到,PB5不支持PP输出(推挽输出)
X= 表示可以支持的配置模式,X下面有一杠表示默认模式T= true open drainHS= high sinkO3= fast/slow programmability with slow as default state after reset-= 不支持
2.I2C的真开漏引脚必须外接上拉电阻才可以输出高电平
芯片被锁问题
报错如下:Errors while setting configuration with MCU name STM8S003F3P: gdi-error [40301]: The Flash Memory Read-out protection option must be disabled for debug. Disabling this option will first erase the whole Flash Memory.
stvp解锁
stm8烧录失败
报错如下:Failed to initialize communcation with hardware: SWIM error [30200]: ST-Link connection error
解决方法
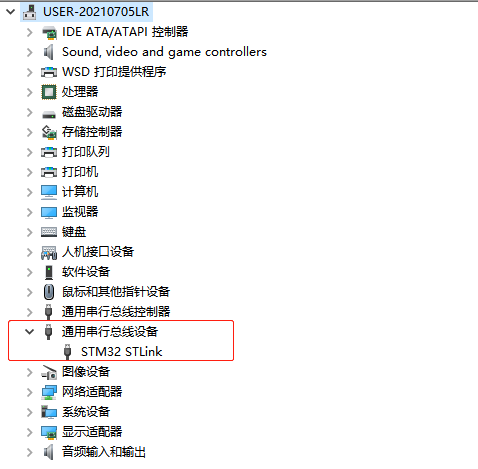
烧录时好时坏,怀疑是电脑的驱动有问题,以下是查看设备管理器中有没显示电脑已连接上ST-Link
while(1)的作用
不加 while(1) 的危害,在执行完程序后,pc指针(程序运行指针)即跳出了main 函数,此刻程序指针就进入了一个未知的非法地址,也就是通常所说的程序跑飞了。那么跑飞了后为什么还能正常运行,这个原因是有的芯片在设计时有所就是对PC指针出了 main 函数后,进行了复位保护。例如下面是我在用 IAR 不加 while(1) 调试时,产生的一个Disassembly window (反汇编窗口):
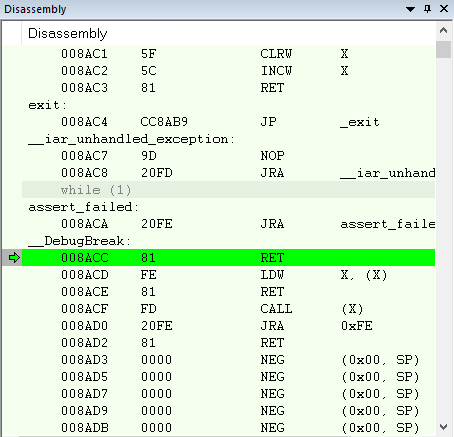
当 main 函数执行完后,会执行RET,即复位保护,所以我的程序没加while(1),那个灯仍是点亮状态


 1152
1152

 被折叠的 条评论
为什么被折叠?
被折叠的 条评论
为什么被折叠?
 到【灌水乐园】发言


