


 本文详细介绍了在Linux环境下安装Caffe深度学习框架的步骤,包括安装依赖包、配置环境、编译Caffe及PyCaffe接口等。适用于希望使用Caffe进行计算机视觉任务的研究者和开发者。
1 安装依赖包
| sudo apt-get install libprotobuf-dev libleveldb-dev libsnappy-dev libopencv-dev libhdf5-serial-dev protobuf-compiler sudo apt-get install --no-install-recommends libboost-all-dev sudo apt-get install libopenblas-dev liblapack-dev libatlas-base-dev sudo apt-get install libgflags-dev libgoogle-glog-dev liblmdb-dev |
2 安装caffe源码
| sudo git clone https://github.com/BVLC/caffe.git |
3 修改配置文件
3.1 复制Makefile.config.example并重命名
| cd caffe/ cp Makefile.config.example Makefile.config |
3.2 修改内容
| gedit Makefile.config |
(1) 去掉 CPU_ONLY := 1 前面的 '#'
(2) 添加hdf5路径
|
CPU_ONLY := 1
# Whatever else you find you need goes here. INCLUDE_DIRS := $(PYTHON_INCLUDE) /usr/local/include /usr/include/hdf5/serialLIBRARY_DIRS := $(PYTHON_LIB) /usr/local/lib /usr/lib /usr/lib/x86_64-linux-gnu/hdf5/serial |
修改好后保存即可
4 安装OpenCV
gihut上有写好的脚本来安装OpenCV
|
回到家目录下: cd ~ 运行下面的命令,或者自己去这个网站down源码git clone https://github.com/jayrambhia/Install-OpenCV |
建议安装opencv2,否则会出现别的错误。进入其中的Ubuntu目录下:
| cd Ubuntu/2.4 chmod +x * sudo sh opencv2_4_10.sh |
5 编译caffe
| cd caffe make all -j8 (-j8为可选参数,目的是为了加快编译过程,根据自己的cpu情况,可以选择-j4 -j2 或者不加) make test -j8 make runtest -j8 |
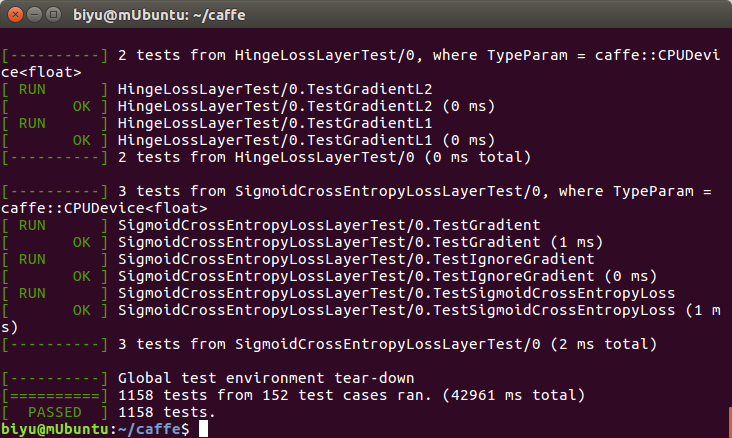
至此,出现以下结果,说明caffe安装成功
6 编译pycaffe接口
6.1 安装Anaconda2-5.1.0-Linux-x86_64.sh
安装过程注意:
| Do you accept the license terms? [yes|no] [no] >>> yes |
| Do you wish the installer to prepend the Anaconda2 install location to PATH in your /home/xxx/,bashrc ? [yes|no] [no] >>> yes |
| Do you wish to proceed with the installation of Microsoft VSCode? [yes|no] >>> no |
安装完成后需要重启终端
6.2 添加caffe/python至环境变量
| sudo gedit ~/.bashrc 在文件末尾添加如下内容: # add caffe python path export PYTHONPATH=/home/xxx/caffe/python:$PYTHONPATH (加底纹部分换成自己的caffe/python路径) |
6.3 修改配置文件,并编译
| cd caffe
sudo gedit Makefile.config |
|
①修改python路径为anaconda的python路径 # PYTHON_INCLUDE := /usr/include/python2.7 \ # /usr/lib/python2.7/dist-packages/numpy/core/include # Anaconda Python distribution is quite popular. Include path: # Verify anaconda location, sometimes it's in root. ANACONDA_HOME := $(HOME)/anaconda2 PYTHON_INCLUDE := $(ANACONDA_HOME)/include \ $(ANACONDA_HOME)/include/python2.7 \ $(ANACONDA_HOME)/lib/python2.7/site-packages/numpy/core/include # PYTHON_LIB := /usr/lib PYTHON_LIB := $(ANACONDA_HOME)/lib
②去掉这一行的注释 WITH_PYTHON_LAYER := 1 |
| make pycaffe -j8 |
下面打开ipython测试一下:
| ipython import caffe |
此时报错:
| ImportError: No module named google.protobuf.internal |
安装protobuf即可,打开终端,输入以下命令:
| conda install protobuf |
重新import caffe,成功

7 参考
|
https://www.cnblogs.com/denny402/p/5088399.html https://blog.youkuaiyun.com/zt_1995/article/details/56283249 https://blog.youkuaiyun.com/u014696921/article/details/52156552 |


 1306
1306

 被折叠的 条评论
为什么被折叠?
被折叠的 条评论
为什么被折叠?
 到【灌水乐园】发言


