从零开始OpenCart3:Module Development 模块开发 (5)

本文介绍如何使用MVC架构在OpenCart中创建自定义模块。通过创建一个“Hello World”模块,详细讲解了从控制器、语言文件到视图的实现过程,展示了如何扩展OpenCart功能而不修改核心文件。

摘要生成于 C知道 ,由 DeepSeek-R1 满血版支持, 前往体验 >

This post is part of a series called From Beginner To Advanced in OpenCart.

From Beginner To Advanced in OpenCart: Understanding MVC

From Beginner to Advanced in OpenCart: More Module Development

In the previous articles, we examined the MVC architecture and created our first controller, model, and view in the OpenCart application. We did this in order to help gain a better understanding of the core application. 

To take things a step further, we're going to look at creating a custom module for OpenCart.

What Are OpenCart Modules?

OpenCart modules are analogous to add-ons, plugins, or extensions in other content management systems. It's through modules that OpenCart gives us the ability to extend its functionality without having to edit the application's files.

As with many other content management systems, it's generally considered to be a best practice to extend functionality of the core application through the provided APIs and OpenCart is no different. Modules allow us to introduce, remove, or modify functionality of the core application that's done in a compartmentalized and maintainable way.

OpenCart has its own Extension Market where a large number of extensions are already available. Or you can check out the wide range of OpenCart modules and extensions on Envato Market.


Our First Module

In order to get acclimated with OpenCart's module system, we can write the obligatory "Hello World" module. This will take input from the dashboard and display it on the front-end of the site.

Note that OpenCart has a number of pre-build modules. As such, we'll try to leverage those when possible when working on our own. To get started, perform the following:

  1. Create an Controller to Admin Path: admin/controller/module/helloworld.php .
  2. Create a Language File to Admin Path: admin/language/english/module/helloworld.php .
  3. Create a View to Admin Path: admin/view/template/module/helloworld.twig.

1. The Language File

As discussed in our previous articles, the language file contains the static text what should be displayed in our view file. For the helloworld.php language file, the following variables contain the possible text fields what we require to display in our module:

01

02

03

04

05

06

07

08

09

10

11

12

13

14

15

16

17

18

19

20

21

22

23

<?php

// Heading

$_['heading_title']       = 'Hello World';


// Text

$_['text_module']         = 'Modules';

$_['text_success']        = 'Success: You have modified module Hello World!';

$_['text_content_top']    = 'Content Top';

$_['text_content_bottom'] = 'Content Bottom';

$_['text_column_left']    = 'Column Left';

$_['text_column_right']   = 'Column Right';


// Entry

$_['entry_code']          = 'Hello World Code:';

$_['entry_layout']        = 'Layout:';

$_['entry_position']      = 'Position:';

$_['entry_status']        = 'Status:';

$_['entry_sort_order']    = 'Sort Order:';


// Error

$_['error_permission']    = 'Warning: You do not have permission to modify module Hello World!';

$_['error_code']          = 'Code Required';

?>

1. The Controller

Open the "Hello World" controller file that we just created and add the class class ControllerModuleHelloworld extends Controller {} following the Class Naming Convention. Next, place the following code inside the class.

Step 1: The Default Function 

001

002

003

004

005

006

007

008

009

010

011

012

013

014

015

016

017

018

019

020

021

022

023

024

025

026

027

028

029

030

031

032

033

034

035

036

037

038

039

040

041

042

043

044

045

046

047

048

049

050

051

052

053

054

055

056

057

058

059

060

061

062

063

064

065

066

067

068

069

070

071

072

073

074

075

076

077

078

079

080

081

082

083

084

085

086

087

088

089

090

091

092

093

094

095

096

097

098

099

100

101

102

103

104

105

106

107

108

109

110

111

112

113

114

115

116

117

<?php
class ControllerExtensionModuleHelloworld extends Controller
{
      
         private $error = array();// This is used to set the errors, if any.
 
         public function index() {   // Default function 
             
             
    $this->language->load('extension/module/helloworld'); // Loading the language file of helloworld 
    
    $this->document->setTitle($this->language->get('heading_title')); // Set the title of the page to the heading title in the Language file i.e., Hello World
    //$this->document->addScript('view/javascript/ckeditor/ckeditor.js');
    $this->load->model('setting/module'); // Load the Setting Model  (All of the OpenCart Module & General Settings are saved using this Model )
 
    if (($this->request->server['REQUEST_METHOD'] == 'POST') && $this->validate()) { // Start If: Validates and check if data is coming by save (POST) method
        if (!isset($this->request->get['module_id'])) {
                $this->model_setting_module->addModule('helloworld', $this->request->post); // Parse all the coming data to Setting Model to save it in database.
            } else {
                $this->model_setting_module->editModule($this->request->get['module_id'], $this->request->post);
            }
        
                      $this->session->data['success'] = $this->language->get('text_success'); // To display the success text on data save

                  $this->response->redirect($this->url->link('marketplace/extension', 'user_token=' . $this->session->data['user_token'] . '&type=module'));

     } // End If
     
      /*This Block returns the warning if any */
     if (isset($this->error['warning'])) {
        $data['error_warning'] = $this->error['warning'];
    } else {
        $data['error_warning'] = '';
    }
   /* End Block*/
 
    /*This Block returns the error code if any */
    if (isset($this->error['code'])) {
        $data['error_code'] = $this->error['code'];
    } else {
        $data['error_code'] = '';
    }
    /*End Block*/
    
    /* Making of Breadcrumbs to be displayed on site*/
    $data['breadcrumbs'] = array();
 
    $data['breadcrumbs'][] = array(
        'text'      => $this->language->get('text_home'),
        'href'      => $this->url->link('common/dashboard', 'user_token=' . $this->session->data['user_token']),
    );
    
     $data['breadcrumbs'][] = array(
        'text'      => $this->language->get('text_extension'),
        'href'      => $this->url->link('marketplace/extension', 'user_token=' . $this->session->data['user_token'] . '&type=module'),
     //   'separator' => ' :: '
    );
     
    //extension/module/helloworld
    /* End Breadcrumb Block*/
   
    // URL to be directed when the save button is pressed 
     
    if (!isset($this->request->get['module_id'])) {
            $data['breadcrumbs'][] = array(
                'text' => $this->language->get('heading_title'),
                'href' => $this->url->link('extension/module/helloworld', 'user_token=' . $this->session->data['user_token'])
            );
        } else {
            $data['breadcrumbs'][] = array(
                'text' => $this->language->get('heading_title'),
                'href' => $this->url->link('extension/module/helloworld', 'user_token=' . $this->session->data['user_token'] . '&module_id=' . $this->request->get['module_id'])
            );
        }

        if (!isset($this->request->get['module_id'])) {
            $data['action'] = $this->url->link('extension/module/helloworld', 'user_token=' . $this->session->data['user_token']);
        } else {
            $data['action'] = $this->url->link('extension/module/helloworld', 'user_token=' . $this->session->data['user_token'] . '&module_id=' . $this->request->get['module_id']);
        }

        $data['cancel'] = $this->url->link('marketplace/extension', 'user_token=' . $this->session->data['user_token'] . '&type=module');

        if (isset($this->request->get['module_id']) && ($this->request->server['REQUEST_METHOD'] != 'POST')) {
            $module_info = $this->model_setting_module->getModule($this->request->get['module_id']);
        }

    
                if (isset($this->request->post['name'])) {
            $data['name'] = $this->request->post['name'];
        } elseif (!empty($module_info)) {
            $data['name'] = $module_info['name'];
        } else {
            $data['name'] = '';
        }

        if (isset($this->request->post['module_description'])) {
            $data['module_description'] = $this->request->post['module_description'];
        } elseif (!empty($module_info)) {
            $data['module_description'] = $module_info['module_description'];
        } else {
            $data['module_description'] = array();
        }
                
        $this->load->model('localisation/language');

        $data['languages'] = $this->model_localisation_language->getLanguages();

        if (isset($this->request->post['status'])) {
            $data['status'] = $this->request->post['status'];
        } elseif (!empty($module_info)) {
            $data['status'] = $module_info['status'];
        } else {
            $data['status'] = '';
        }

        $data['header'] = $this->load->controller('common/header');
        $data['column_left'] = $this->load->controller('common/column_left');
        $data['footer'] = $this->load->controller('common/footer');


     $this->response->setOutput($this->load->view('extension/module/helloworld', $data));


}
     

Step 2: Validation Method

As we tried to validate data on save in default function. So here comes the validation method.

01

02

03

04

05

06

07

08

09

10

11

12

13

14

15

16

17

18

19

20

21

22

23

24

/* Function that validates the data when Save Button is pressed */
    protected function validate() {
 
        /* Block to check the user permission to manipulate the module*/
        if (!$this->user->hasPermission('modify', 'extension/module/helloworld')) {
            $this->error['warning'] = $this->language->get('error_permission');
        }
        /* End Block*/
 
        /* Block to check if the helloworld_text_field is properly set to save into database, otherwise the error is returned*/
        if (!$this->request->post['helloworld_text_field']) {
            $this->error['code'] = $this->language->get('error_code');
        }
        /* End Block*/
 
        /*Block returns true if no error is found, else false if any error detected*/
        if (!$this->error) {
            return true;
        } else {
            return false;
        }   
        /* End Block*/
    }
    /* End Validation Function*/


//change

/* Function that validates the data when Save Button is pressed */
    protected function validate() {
 
        /* Block to check the user permission to manipulate the module*/
        if (!$this->user->hasPermission('modify', 'extension/module/helloworld')) {
            $this->error['warning'] = $this->language->get('error_permission');
        }
        /* End Block*/
 
        /* Block to check if the helloworld_text_field is properly set to save into database, otherwise the error is returned*/
       // if (!$this->request->post['helloworld_text_field']) {
      //      $this->error['code'] = $this->language->get('error_code');
      //  }
        /* End Block*/
        if ((utf8_strlen($this->request->post['name']) < 3) || (utf8_strlen($this->request->post['name']) > 64)) {
            $this->error['name'] = $this->language->get('error_name');
        }
        return !$this->error;
        /*Block returns true if no error is found, else false if any error detected*/
      //  if (!$this->error) {
      //      return true;
      //  } else {
      //      return false;
      //  }   
        /* End Block*/
    }
    /* End Validation Function*/  
    
}
    

Now save the file and you're done with the Admin Controller of our Hello World Module!

3. View File

As previously done in controller, you have to create some HTML for the view. For that, we'll do the following:

Step 1: Build Some Basic Controls

A form is an element that will contain elements like an text input element, a textarea, and buttons for saving or canceling input.

To create a form like this, review the code below:

01

02

03

04

05

06

07

08

09

10

11

12

13

14

15

16

17

18

19

20

21

22

23

24

25

26

{{ header }}
<div id="content">
  <div class="breadcrumb">
    {% for breadcrumb in breadcrumbs %}
    {{ breadcrumb.separator }}<a href="{{ breadcrumb.href }}">{{ breadcrumb.text }}</a>
    {% endfor %}
  </div>
  {% if error_warning %}
  <div class="warning">{{ error_warning }}</div>
  {% endif %}
  <div class="box">
    <div class="heading">
      <h1><img src="view/image/module.png" alt="" /> {{ heading_title }}</h1>
      <div class="buttons"><a οnclick="$('#form').submit();" class="button">{{ button_save }}</a><a href="{{ cancel }}" class="button">{{ button_cancel }}</a></div>
    </div>
    <div class="content">
      <form action="{{ action }}" method="post" enctype="multipart/form-data" id="form">
        <table class="form">
          <tr>
            <td><span class="required">*</span> {{ entry_code }}</td>
            <td><textarea name="helloworld_text_field" cols="40" rows="5">{{ helloworld_text_field }}</textarea>
              {% if error_code %}
              <span class="error">{{ error_code }}</span>
              {% endif %}</td>
          </tr>
        </table>

Step 2: Adding a Table List

Under the form, a table list will appear where we can settle the module position and the page where the module to be displayed.

01

02

03

04

05

06

07

08

09

10

11

12

13

14

15

16

17

18

19

20

21

22

23

24

25

26

27

28

29

30

31

32

33

34

35

36

37

38

39

40

41

42

43

44

45

46

47

48

49

50

51

52

53

54

55

56

57

58

59

60

61

62

63

64

65

66

67

68

69

70

71

<table id="module" class="list">
          <thead>
            <tr>
              <td class="left">{{ entry_layout }}</td>
              <td class="left">{{ entry_position }}</td>
              <td class="left">{{ entry_status }}</td>
              <td class="right">{{ entry_sort_order }}</td>
              <td></td>
            </tr>
          </thead>
          module_row  0
          {% for module in modules %}
          <tbody id="module-row{{ module_row }}">
            <tr>
              <td class="left"><select name="helloworld_module[{{ module_row }}][layout_id]">
                  {% for layout in layouts %}
                  {% if layout.layout_id  is  module.layout_id %}
                  <option value="{{ layout.layout_id }}" selected="selected">{{ layout.name }}</option>
                  {% endfor %}{% endif %} {% else %}
                  <option value="{{ layout.layout_id }}">{{ layout.name }}</option>
                  {% endfor %}

                </select></td>
              <td class="left"><select name="helloworld_module[{{ module_row }}][position]">
                  {% if module.position  is  'content_top' %}
                  <option value="content_top" selected="selected">{{ text_content_top }}</option>
                  {% endif %} {% else %}
                  <option value="content_top">{{ text_content_top }}</option>

                  {% if module.position  is  'content_bottom' %}
                  <option value="content_bottom" selected="selected">{{ text_content_bottom }}</option>
                  {% endif %} {% else %}
                  <option value="content_bottom">{{ text_content_bottom }}</option>

                  {% if module.position  is  'column_left' %}
                  <option value="column_left" selected="selected">{{ text_column_left }}</option>
                  {% endif %} {% else %}
                  <option value="column_left">{{ text_column_left }}</option>

                  {% if module.position  is  'column_right' %}
                  <option value="column_right" selected="selected">{{ text_column_right }}</option>
                  {% endif %} {% else %}
                  <option value="column_right">{{ text_column_right }}</option>

                </select></td>
              <td class="left"><select name="helloworld_module[{{ module_row }}][status]">
                  {% if module.status %}
                  <option value="1" selected="selected">{{ text_enabled }}</option>
                  <option value="0">{{ text_disabled }}</option>
                  {% endif %} {% else %}
                  <option value="1">{{ text_enabled }}</option>
                  <option value="0" selected="selected">{{ text_disabled }}</option>

                </select></td>
              <td class="right"><input type="text" name="helloworld_module[{{ module_row }}][sort_order]" value="{{ module.sort_order }}" size="3" /></td>
              <td class="left"><a οnclick="$('#module-row{{ module_row }}').remove();" class="button">{{ button_remove }}</a></td>
            </tr>
          </tbody>
          {% $module_row = $module_row + 1 %}

          <tfoot>
            <tr>
              <td colspan="4"></td>
              <td class="left"><a οnclick="addModule();" class="button">{{ button_add_module }}</a></td>
            </tr>
          </tfoot>
        </table>
      </form>
    </div>
  </div>
</div>

Step 3: Adding Some JavaScript

As you can see in the previous step, there is an "Add Module" button. Specifically, we have:  <a onclick="addModule();" class="button"><?php echo $button_add_module; ?></a> where user can add multiple rows to display the output of the module in different layouts on different positions. 

For that, we need to write some JavaScript that will append a row to the table list. This will improve the user interface for those using our module:

01

02

03

04

05

06

07

08

09

10

11

12

13

14

15

16

17

18

19

20

21

22

23

24

25

26

27

28

29

30

31

<script type="text/javascript"><!--
var module_row = {{ module_row }};
 
function addModule() {    
    html  = '<tbody id="module-row' + module_row + '">';
    html += '  <tr>';
    html += '    <td class="left"><select name="helloworld_module[' + module_row + '][layout_id]">';
    {% for layout in layouts %}
    html += '      <option value="{{ layout.layout_id }}">{{ addslashes(layout.name) }}</option>';
    {% endfor %}
    html += '    </select></td>';
    html += '    <td class="left"><select name="helloworld_module[' + module_row + '][position]">';
    html += '      <option value="content_top">{{ text_content_top }}</option>';
    html += '      <option value="content_bottom">{{ text_content_bottom }}</option>';
    html += '      <option value="column_left">{{ text_column_left }}</option>';
    html += '      <option value="column_right">{{ text_column_right }}</option>';
    html += '    </select></td>';
    html += '    <td class="left"><select name="helloworld_module[' + module_row + '][status]">';
    html += '      <option value="1" selected="selected">{{ text_enabled }}</option>';
    html += '      <option value="0">{{ text_disabled }}</option>';
    html += '    </select></td>';
    html += '    <td class="right"><input type="text" name="helloworld_module[' + module_row + '][sort_order]" value="" size="3" /></td>';
    html += '    <td class="left"><a οnclick="$(\'#module-row' + module_row + '\').remove();" class="button">{{ button_remove }}</a></td>';
    html += '  </tr>';
    html += '</tbody>';
     
    $('#module tfoot').before(html);
     
    module_row++;
}
//--></script>

Step 4: Adding a Footer

The last thing, we need to add a child footer in the end of the view:

1

{{ footer }}

At this point, we're done preparing our first Hello World module. At this point, it's time to check whether our module is working or not. 

To do that, login to dashboard and go to the Extensions > Modules page where you'll see a list of modules of OpenCart System. There will also be "Hello World" listed with an "Uninstalled" State, click on "Install" and try editing the module and you'll see a screen something like this:

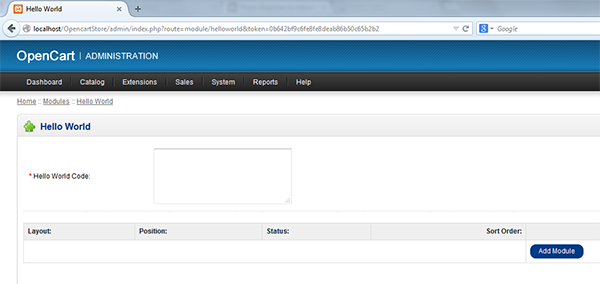
You can input some random value and try saving it, Now try editing the module again and you'll see you input entered as default.

Conclusion

In this article, we tried to build a basic OpenCart Module using MVC. It's easy to manipulate OpenCart Modules if you're familiar with the core concepts of MVC. This article gives just a basic idea how to develop a simple module following some simple steps.

In our next article, we're going to work with the frontend and will try to extend it for a store frontend. Please provide us with your feedback in the comments below!

评论
添加红包

请填写红包祝福语或标题

红包个数最小为10个

红包金额最低5元

当前余额3.43前往充值 >
需支付:10.00
成就一亿技术人!
领取后你会自动成为博主和红包主的粉丝 规则
hope_wisdom
发出的红包
实付
使用余额支付
点击重新获取
扫码支付
钱包余额 0

抵扣说明:

1.余额是钱包充值的虚拟货币,按照1:1的比例进行支付金额的抵扣。
2.余额无法直接购买下载,可以购买VIP、付费专栏及课程。

余额充值