


一、Pytset介绍
pytest 是一个用于 Python 的开源测试框架,支持简单、灵活且功能强大的单元测试、功能测试和集成测试。它是目前最流行的 Python 测试工具之一,具有易用性和丰富的功能
pytest 使用简单的命名规则,测试函数的名称必须以 test_ 开头,便于框架自动识别和执行
pytest 可以编写参数化测试,一次编写,使用不同的数据集运行
他的兼容性也非常好,与其他测试框架(如 unittest)完全兼容,因此可以轻松迁移已有的测试
二、如何使用Pytset
这里我们用pip来安装
跟之前一样,打开你的项目的终端,输入“pip install pytest” 回车等待下载完毕
pip install pytest安装完成以后我们可以开始用了,接下来是一个例子:
import pytest

# 定义一个简单的函数,用于测试
def add(x, y):
    return x + y

# 使用 pytest 进行简单的单元测试
def test_add():
    assert add(1, 2) == 3
    assert add(-1, 1) == 0
    assert add(0, 0) == 0

# 使用 fixture 来提供测试数据
@pytest.fixture
def sample_data():
    return 5, 10

# 使用 fixture 的测试函数
def test_add_with_fixture(sample_data):
    x, y = sample_data
    assert add(x, y) == 15
这里我们只要看“def”后面的命名就行,我们可以看到测试对象都是以“test”开头的,关于里面的这个@pytest.fixture后面会说
接下来我们来运行这段代码,如何运行,有三种运行的方法
1. 命令行直接运行
在终端或命令提示符中,直接运行 pytest 命令。这将自动查找当前目录中所有以 test_ 开头或结尾的文件并运行其中的测试
2.脚本运行
直接在我们要执行的代码最后加上直接右键运行即可:
if __name__ == '__main__':
 pytest.main()
3.ini运行
首先在项目的根目录下创建一个 pytest.ini 文件,用于配置 pytest 的运行参数
然后在 pytest.ini 文件中指定各种 pytest 的选项。这里写一个典型的 pytest.ini 文件
[pytest]
addopts = -vs --alluredir=reports/temp --clean-alluredir
testpaths = testcase/
python_files = test_*.py
python_classes = Test*
python_functions = test_*
接下来我解释一下这里面的内容
[pytest]:这是配置文件的头部,表示接下来的是 pytest 的相关配置
addopts = -vs --alluredir=reports/temp --clean-alluredir-v: 表示使用详细模式(verbose),输出更详细的测试结果。
-s: 使得测试过程中打印输出不会被捕获,允许输出到控制台。
--alluredir=reports/temp: 指定生成 Allure 报告的文件存储路径为 reports/temp。Allure 是一种测试报告工具,它生成可视化的测试报告。
--clean-alluredir: 运行测试前,清理 Allure 报告目录
testpaths = testcase/指定 pytest 查找测试用例的目录为 testcase/,即 pytest 会在这个文件夹下查找并执行测试文件
python_files = test_*.py告诉 pytest 只会识别名称以 test_ 开头的 Python 文件作为测试文件,其他文件将被忽略。例如,test_example.py 会被识别,而 example_test.py 不会
python_classes = Test*pytest 会寻找以 Test 开头的类作为测试类。即使类中没有方法以 test_ 开头,只要类名符合这个规则,类中的测试函数会被执行
python_functions = test_*pytest 会查找并执行以 test_ 开头的函数作为测试函数。例如,test_example 会被执行,而 example_test 不会
这里我们要注意一下这三种运行方式
如果执行pytest.main()然后自己带参数的话,我们就切换到unittests执行
如果执行pytest.main()不带参数,使用pytest.ini时候,我们就切换到pytest
如果用命令行,什么都不做操作
切换unittests和pytest的教程如下:

打开设置找到这个选项就可以切换pytest和unittests了
ini配置这里其实东西很多,不太好弄,这里我直接给一个比较全面且包容性最好的 pytest.ini 配置文件
[pytest]

# 通用配置
addopts = -ra -q --maxfail=5 --strict-markers --disable-warnings
          --alluredir=reports/allure --clean-alluredir
          --html=reports/report.html --self-contained-html
          --junitxml=reports/results.xml
          --cov=project --cov-report=html:reports/cov_html --cov-report=xml:reports/cov.xml
          --tb=short

# 测试文件、类、函数匹配规则
testpaths = tests/
python_files = test_*.py *_test.py
python_classes = Test* *Tests
python_functions = test_* check_*

# 自定义标记(可用于选择特定测试)
markers =
    smoke: 标记为冒烟测试
    regression: 标记为回归测试
    slow: 运行时间较长的测试
    performance: 性能测试

# 忽略特定的警告
filterwarnings =
    ignore::DeprecationWarning
    ignore::UserWarning

# 日志配置
log_cli = true
log_cli_level = INFO
log_file = reports/test.log
log_file_level = DEBUG

# 重试机制(安装 pytest-rerunfailures 插件后)
reruns = 3
reruns_delay = 5

# 配置 allure 报告插件(如果使用 Allure)
allure_report_dir = reports/allure

# 配置 cov 代码覆盖率插件
[coverage:run]
branch = True
source = project

[coverage:report]
show_missing = True
skip_covered = True
然后花点篇幅来解释一下这些东西
addopts:
-ra: 输出所有测试的结果摘要,包括通过、跳过、失败的测试。
-q: 减少输出的冗余信息,静默模式。
--maxfail=5: 在失败的测试数量达到 5 个时停止测试。
--strict-markers: 严格的标记检查,防止使用未注册的标记。
--disable-warnings: 禁止输出警告。
--alluredir: 生成 Allure 报告的目录。
--html 和 --self-contained-html: 生成 HTML 报告,并将资源嵌入其中。
--junitxml: 生成符合 JUnit 标准的 XML 报告。
--cov: 代码覆盖率分析的相关选项。
--tb=short: 控制显示回溯的长度(短回溯)
testpaths:
指定要执行的测试目录为 tests/python_files, python_classes, python_functions:
python_files: 匹配以 test_ 开头或 _test.py 结尾的文件
python_classes: 匹配以 Test 开头或以 Tests 结尾的类
python_functions: 匹配以 test_ 或 check_ 开头的函数markers:
定义了一些自定义的标记,如 smoke、regression、slow、performance,可以在测试函数中使用 @pytest.mark.<marker>
filterwarnings:
忽略 DeprecationWarning 和 UserWarning。
日志配置:
log_cli: 在控制台输出日志
log_cli_level: 设置控制台日志输出级别为 INFO
log_file: 将日志记录到文件 test.log 中
log_file_level: 文件日志记录级别为 DEBUG
reruns:
配置失败测试的重试机制,将失败的测试重试 3 次,每次延迟 5 秒。
allure_report_dir:
指定 Allure 报告生成的目录。
coverage:
coverage:run: 配置分支覆盖率和覆盖的代码范围。
coverage:report: 显示未覆盖的代码并跳过已经完全覆盖的部分
这个 pytest.ini 文件涵盖了常见的测试需求,提供了灵活的日志控制、测试报告生成、自定义标记、代码覆盖率分析等功能
吐槽一下运行这个玩意好麻烦啊
三、allure的使用
pytest是可以跟allure搭配使用的,allure能够以HTML页面的形式来输出测试报告,这样我们就能够非常直观的看到测试结果
安装allure
这是allure的下载地址:
Central Repository: io/qameta/allure/allure-commandline
进来以后我们选择这个版本

点进去在最下面下载这个zip

下载就行了,下载完解压放着就行了(记住你的放的地址,我们要给allure进行环境变量的配置),到时候直接在pyChram中用
注意allure是JAVA开发的所以用allure我们需要配置JDK,关于JDK下载配置网上的教程很多,这里不在细说,一切环境都准被好以后,我们在Pchram中你的项目终端里输入进行安装
pip install allure-pytest接下来我们开始对allure进行环境变量的配置,我们先打开你下载的allure文件找到bin

然后打开环境变量,在系统变量中找到Path
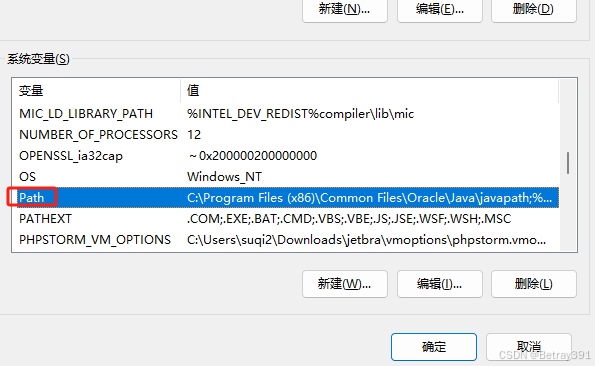
人后我们编辑它,我们添加
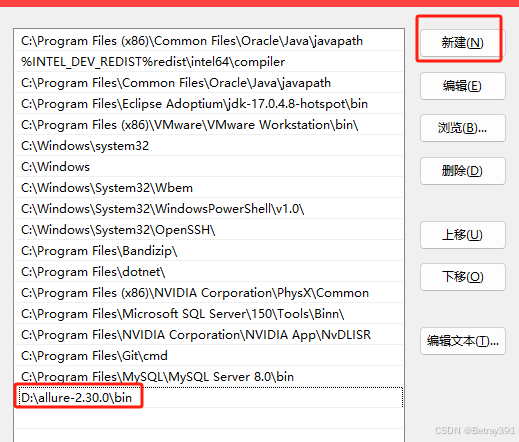
路径是你放allure的路径,一定要正确配置,不然会无法使用,配置完成我们就来验证一下
打开 win+r 打开命令提示符,输入 allure --version

只要显示版本号就是配置成功了
一切安装完毕就可以使用了
接下来是使用方法:
pytest 模块名 -vs --alluredir=reports/temp --clean-alluredir
allure generate reports/temp -o reports/allure --clean
这两条是在终端内执行,分开输入
这里解释一下
1. pytest 模块名 -vs --alluredir=reports/temp --clean-alluredir
pytest 模块名: 这是执行 pytest 的命令,其中 模块名 是你想要运行的测试模块或文件名,它指定了你要运行的测试
-vs:
-v: 代表 verbose 模式,显示更详细的测试过程信息
-s: 允许输出标准输入输出,例如 print() 函数输出
--alluredir=reports/temp: 将生成的 Allure 报告数据保存到 reports/temp 目录中。
--clean-alluredir: 运行测试前会清理 --alluredir 指定目录中的旧报告数据,以确保每次生成的报告都是最新的
2. allure generate reports/temp -o reports/allure --clean
allure generate reports/temp: 这条命令会从 reports/temp 目录中读取测试结果数据,并使用 Allure 生成报告
-o reports/allure: 将生成的 Allure 报告输出到 reports/allure 目录中
--clean: 在生成新报告前,清理掉目标目录中的旧报告文件,以确保生成的报告是最新的
接下来让我们看结果:
执行完毕就能看到这个index.html的文件,我们右键用浏览器打开

我们能够看到这个页面

这就是alluer的用处,能够非常直观的看到我们的测试结果和分析
它还有很多的拓展用法能够显示更人性化更详细的信息,之后会专门出一篇来讲讲allure的拓展用法


 2550
2550

 被折叠的 条评论
为什么被折叠?
被折叠的 条评论
为什么被折叠?
 到【灌水乐园】发言


