


一、项目介绍
项目概述
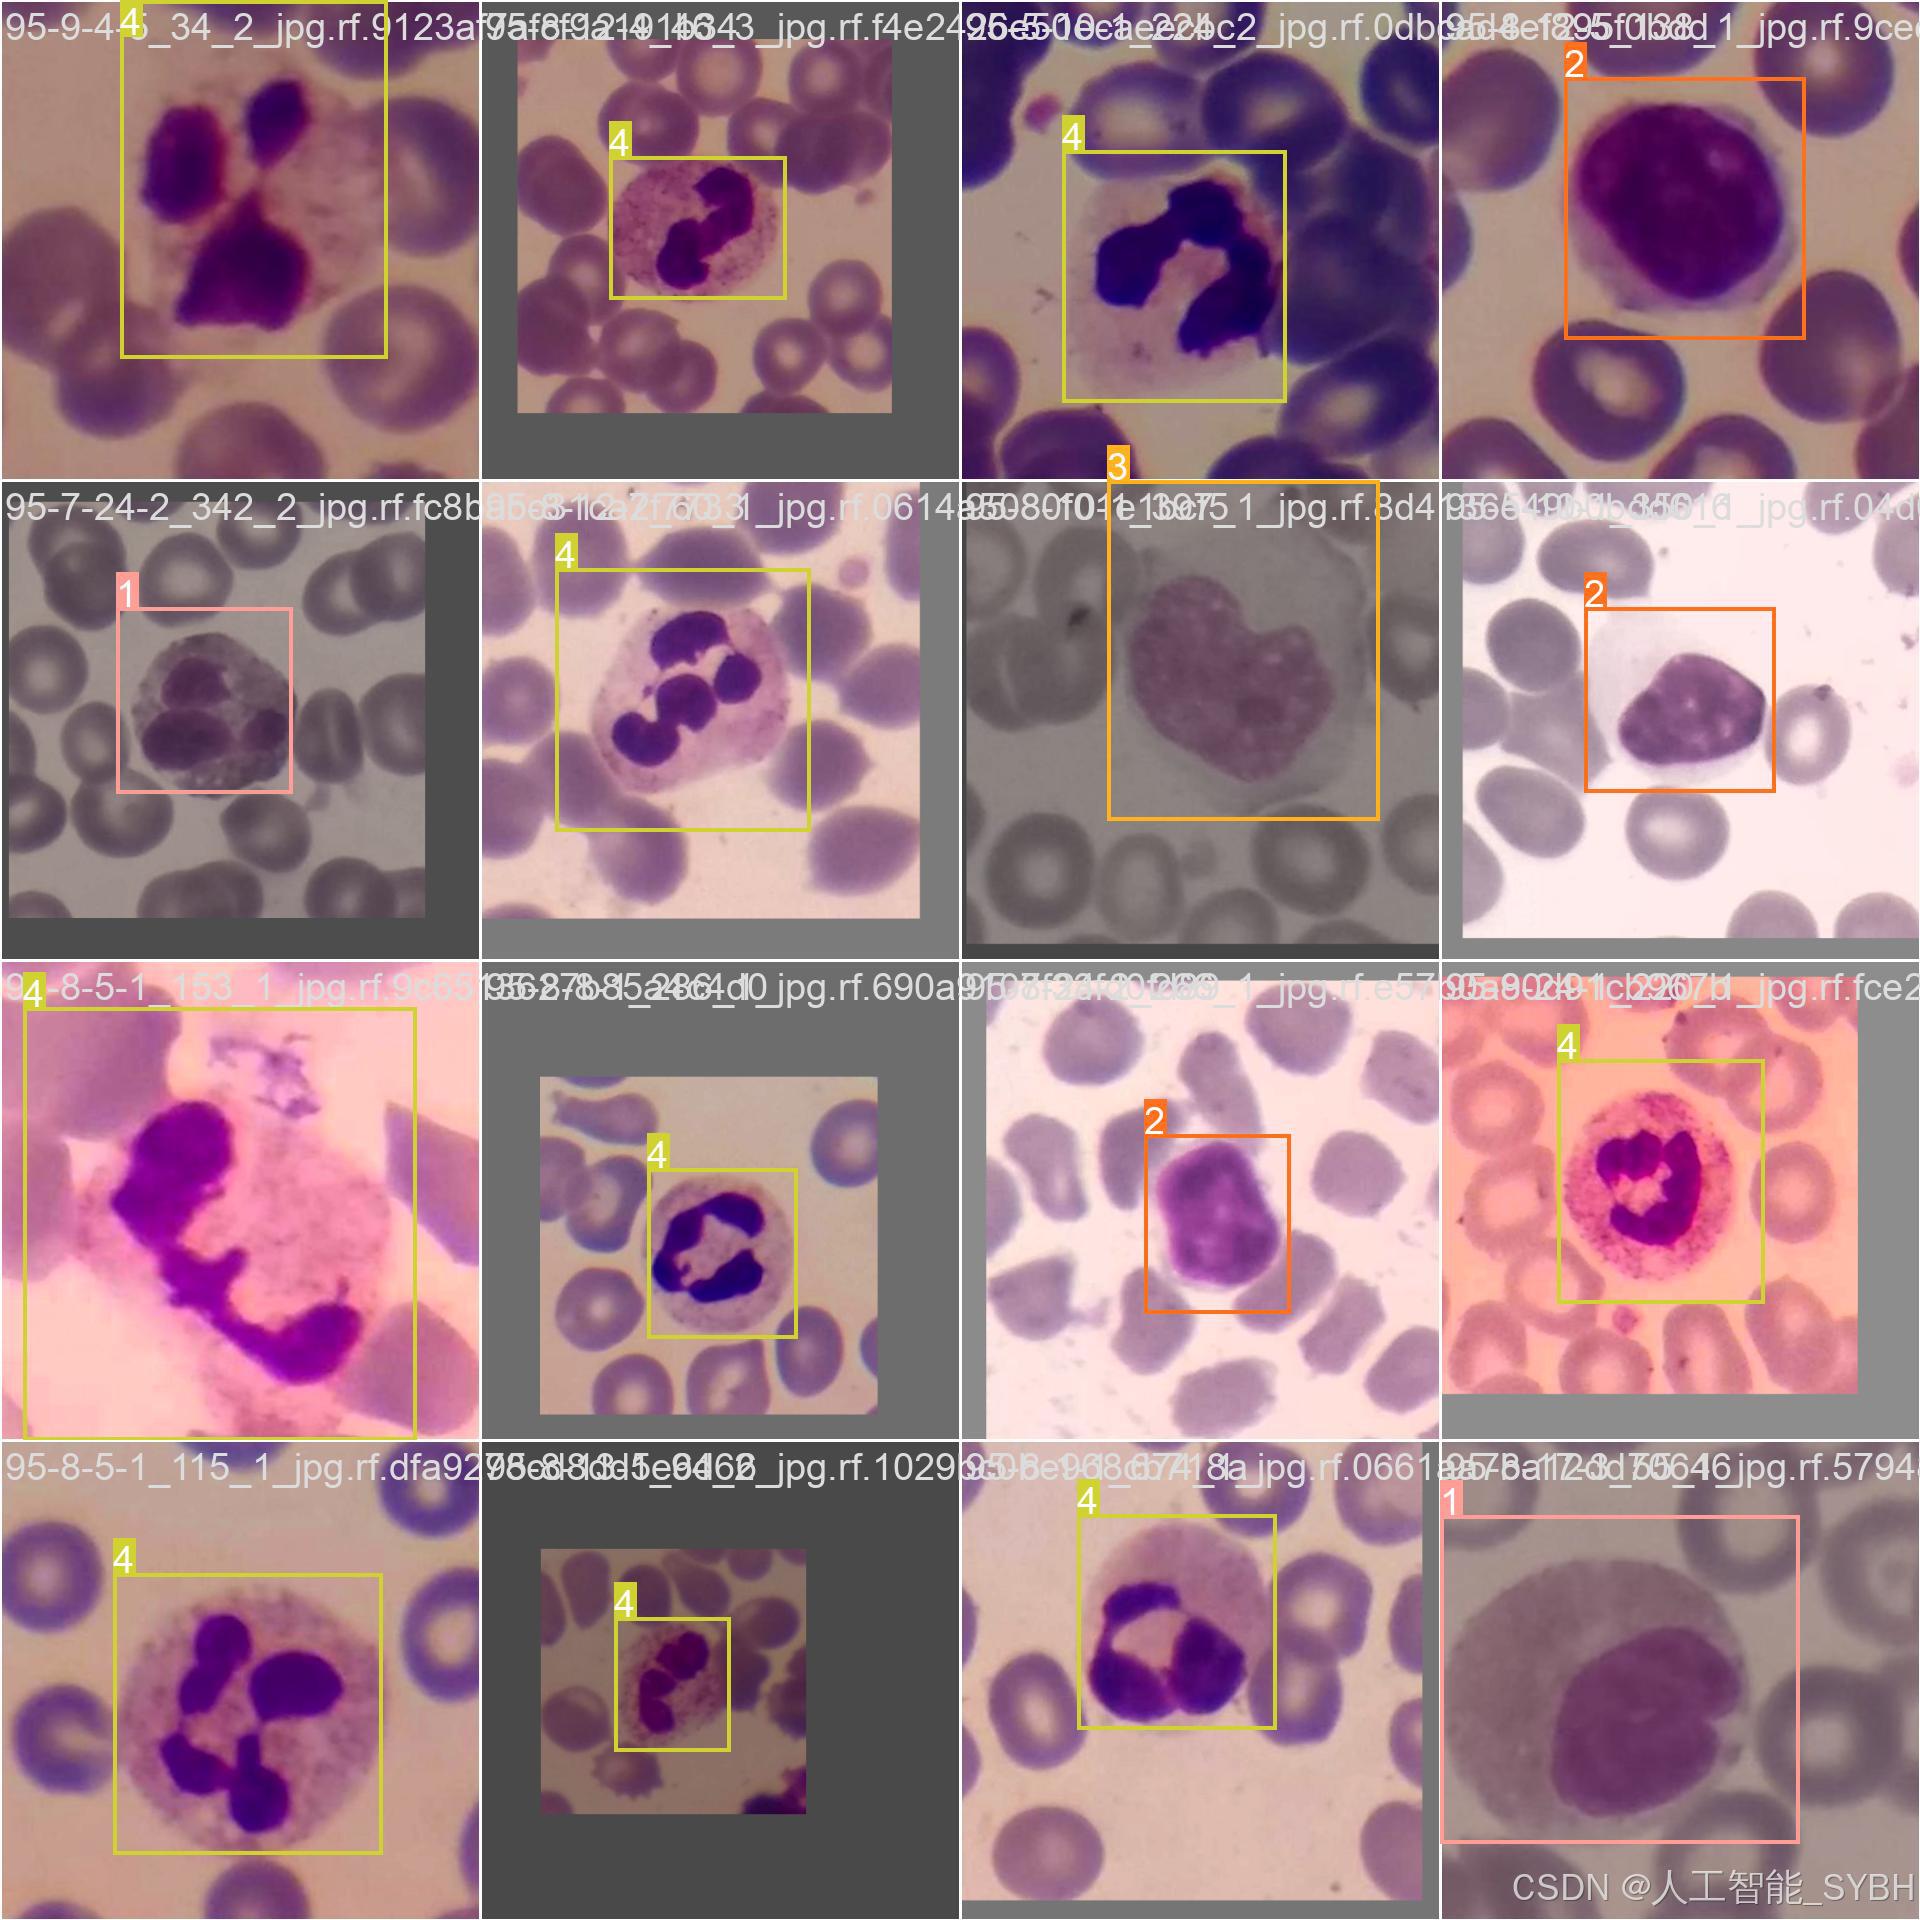
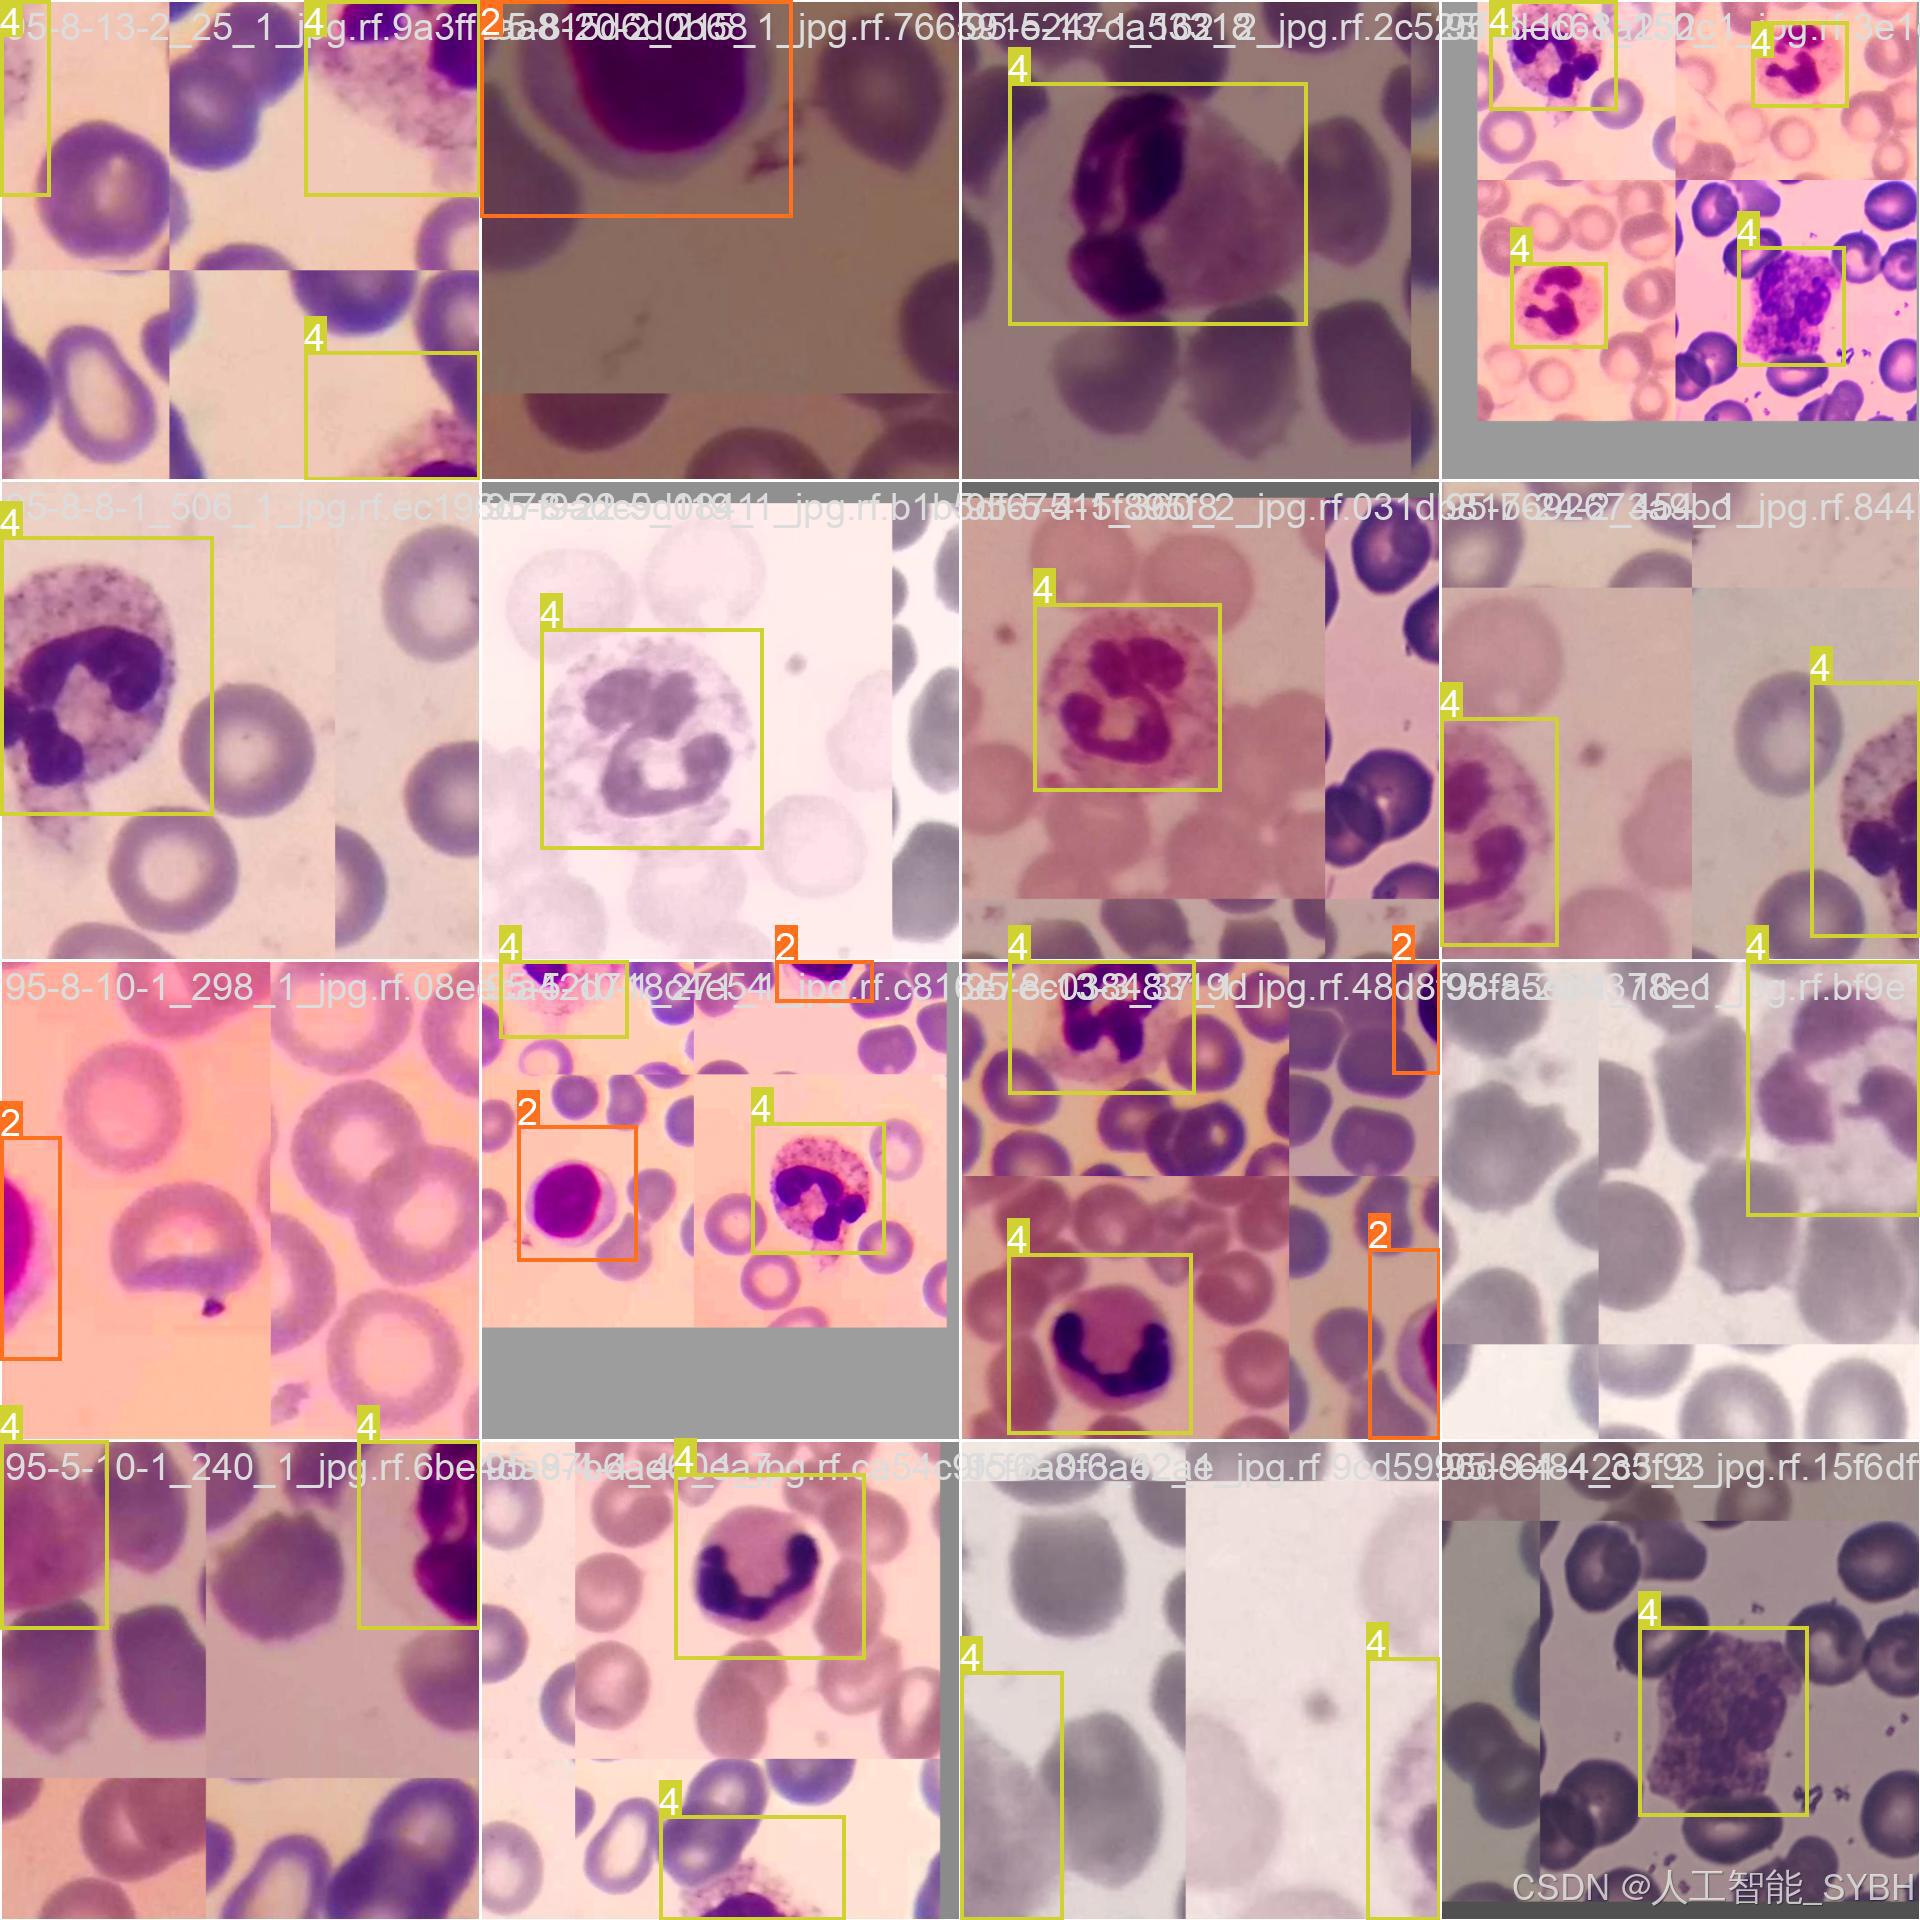
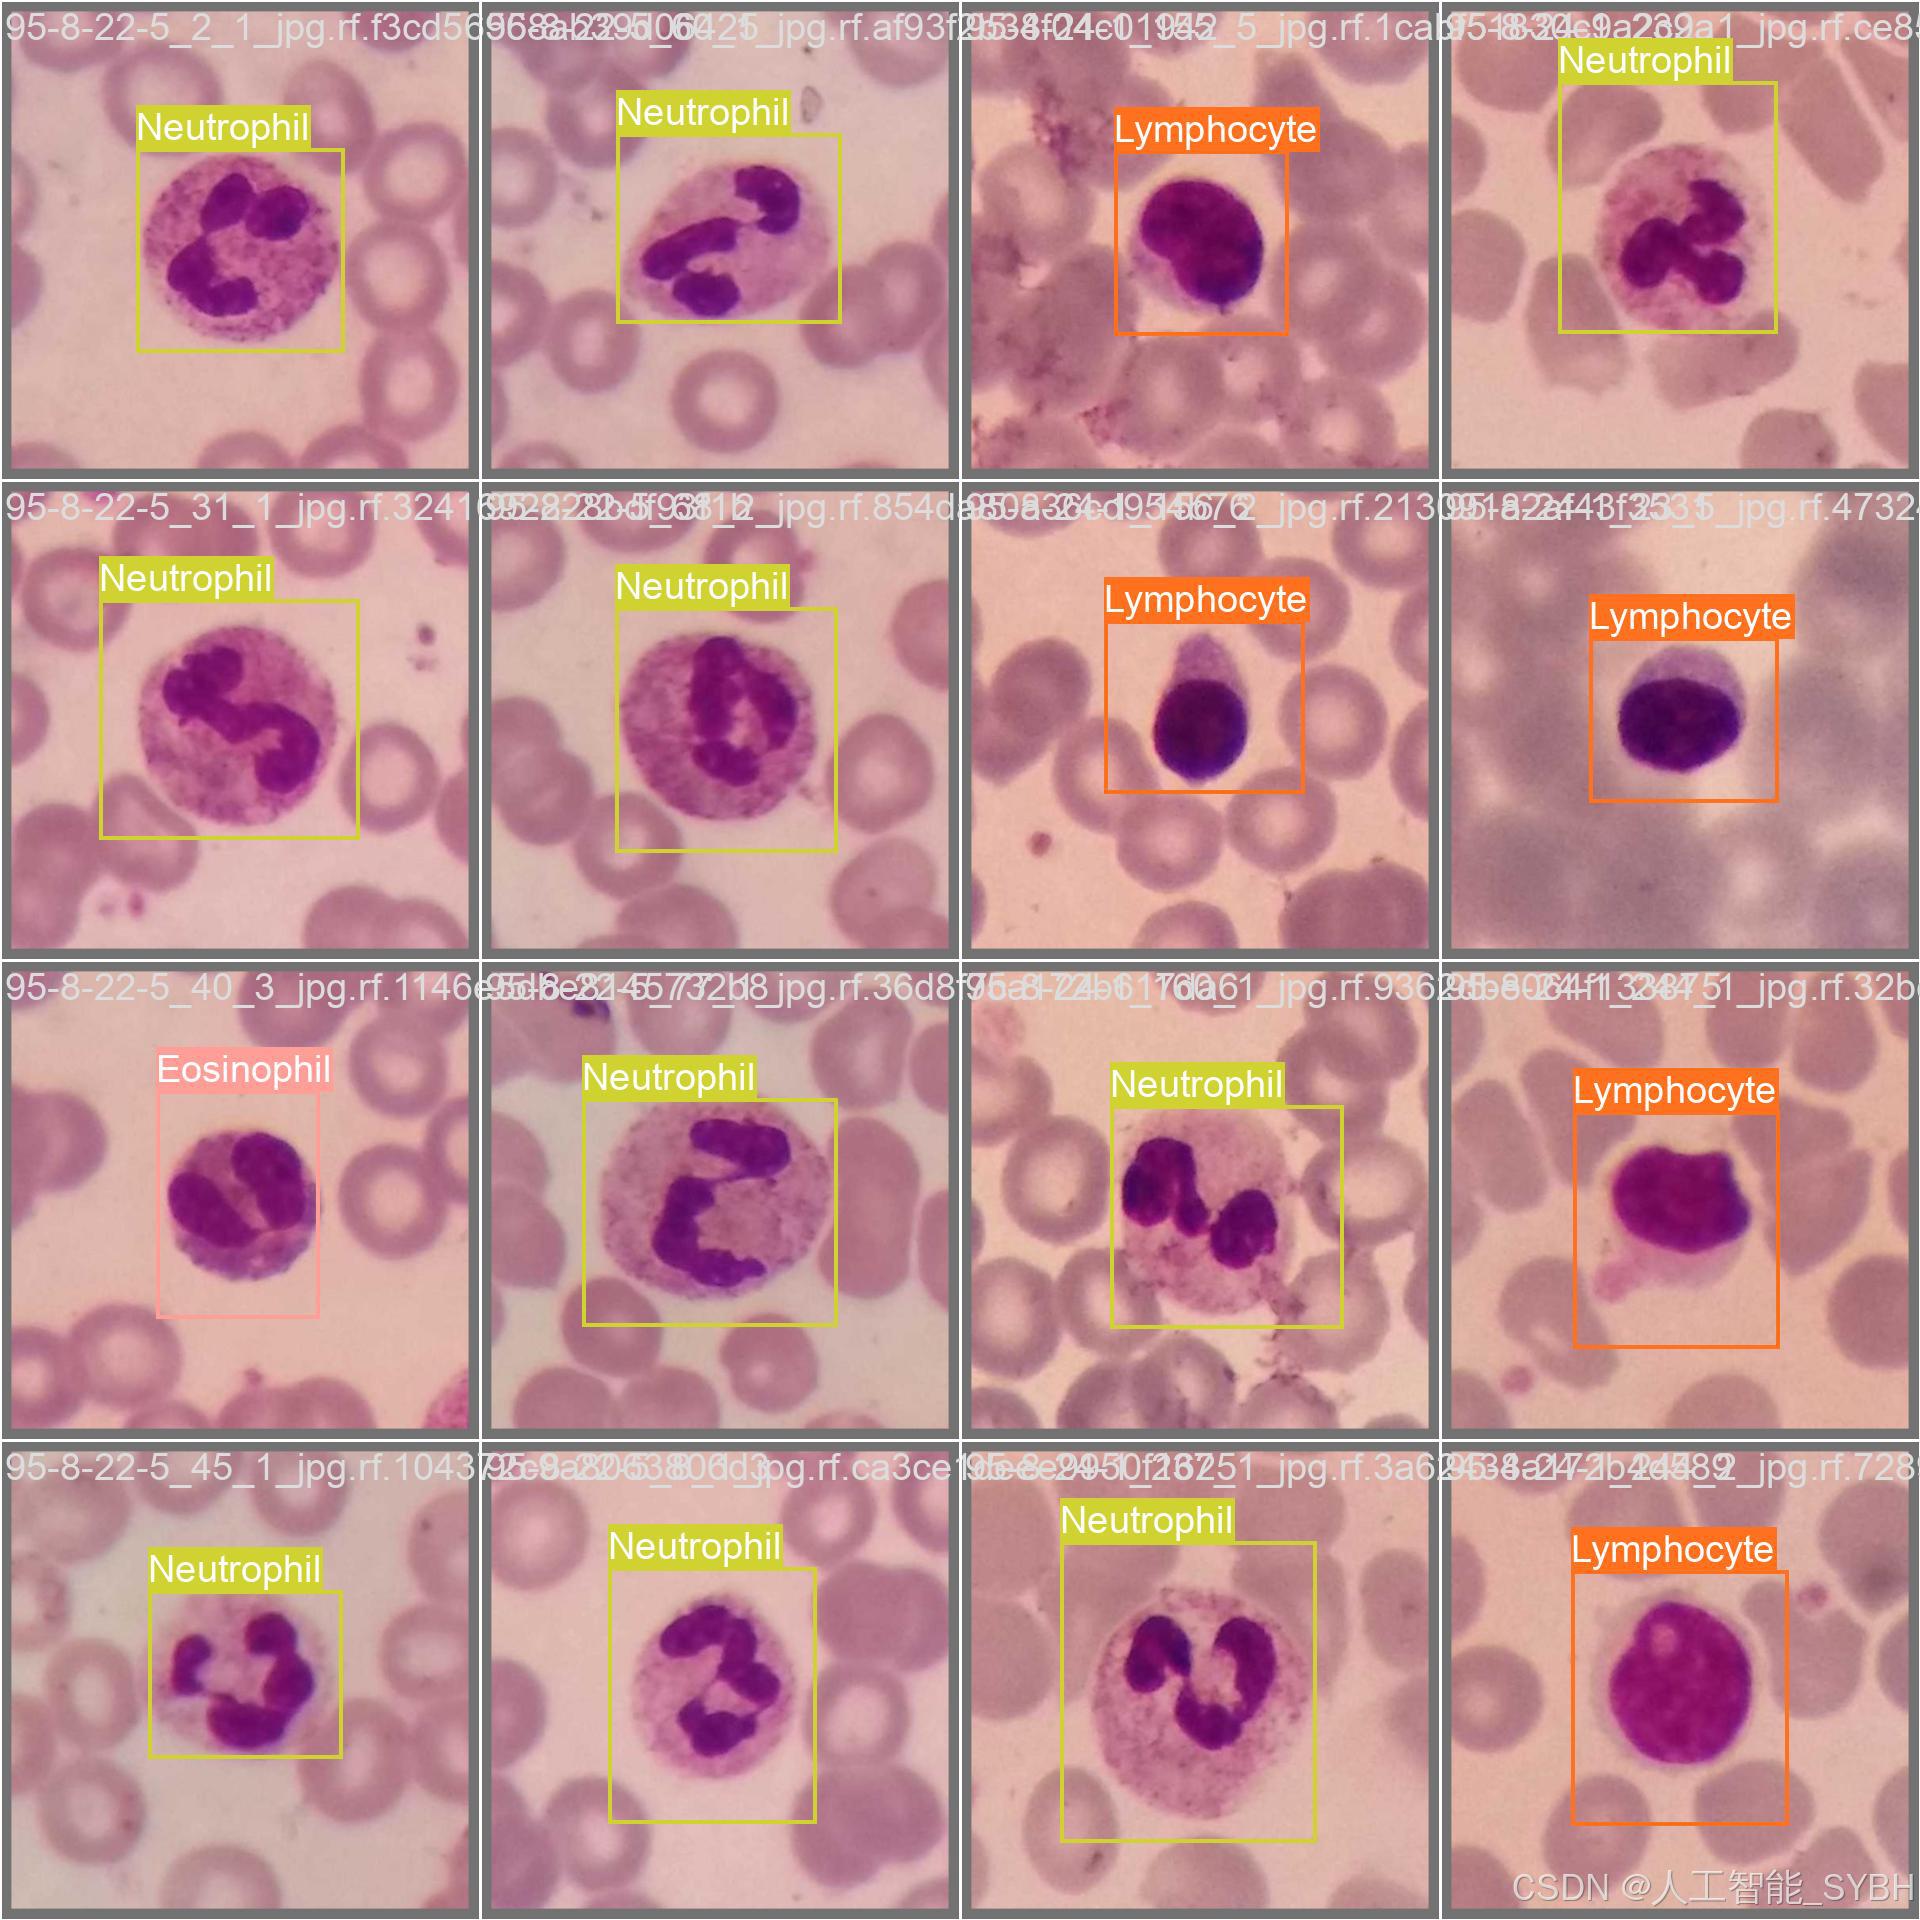
本项目开发了一个基于YOLOv10目标检测算法的白细胞类型自动分类系统,能够识别和分类外周血涂片中的五种主要白细胞类型:嗜碱性粒细胞(Basophil)、嗜酸性粒细胞(Eosinophil)、淋巴细胞(Lymphocyte)、单核细胞(Monocyte)和中性粒细胞(Neutrophil)。
背景与意义
白细胞分类计数是临床血液学检查的重要组成部分,对感染诊断、炎症监测、过敏反应评估和血液系统疾病筛查具有重要价值。传统的人工显微镜检查方法存在效率低、主观性强、重复性差等缺点。基于深度学习的自动分类系统可以:
-
提高检测效率和准确性
-
减少人工操作的主观差异
-
实现标准化、可重复的检测流程
-
为远程医疗和资源有限地区提供可靠解决方案
目录
七、项目源码下载链接
视频下方简介内有项目源码和数据集下载链接

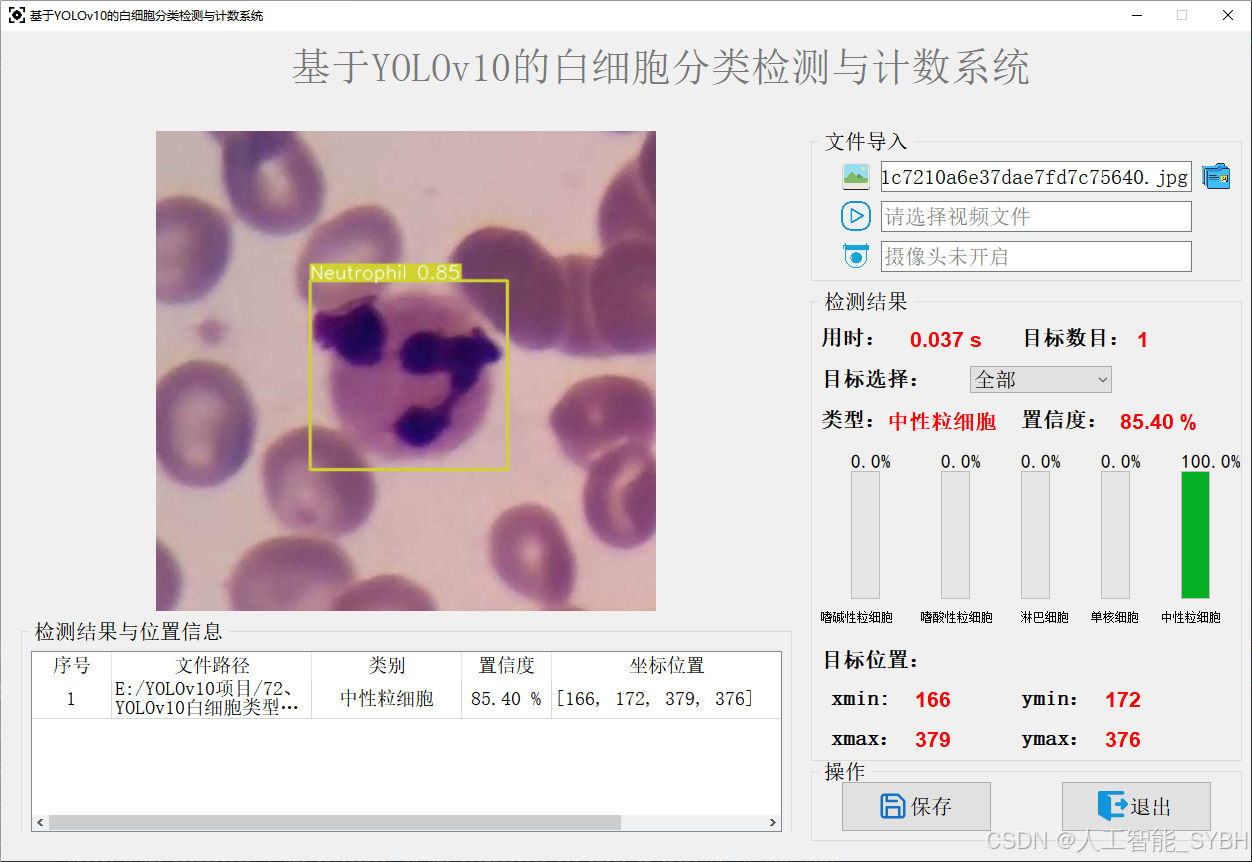
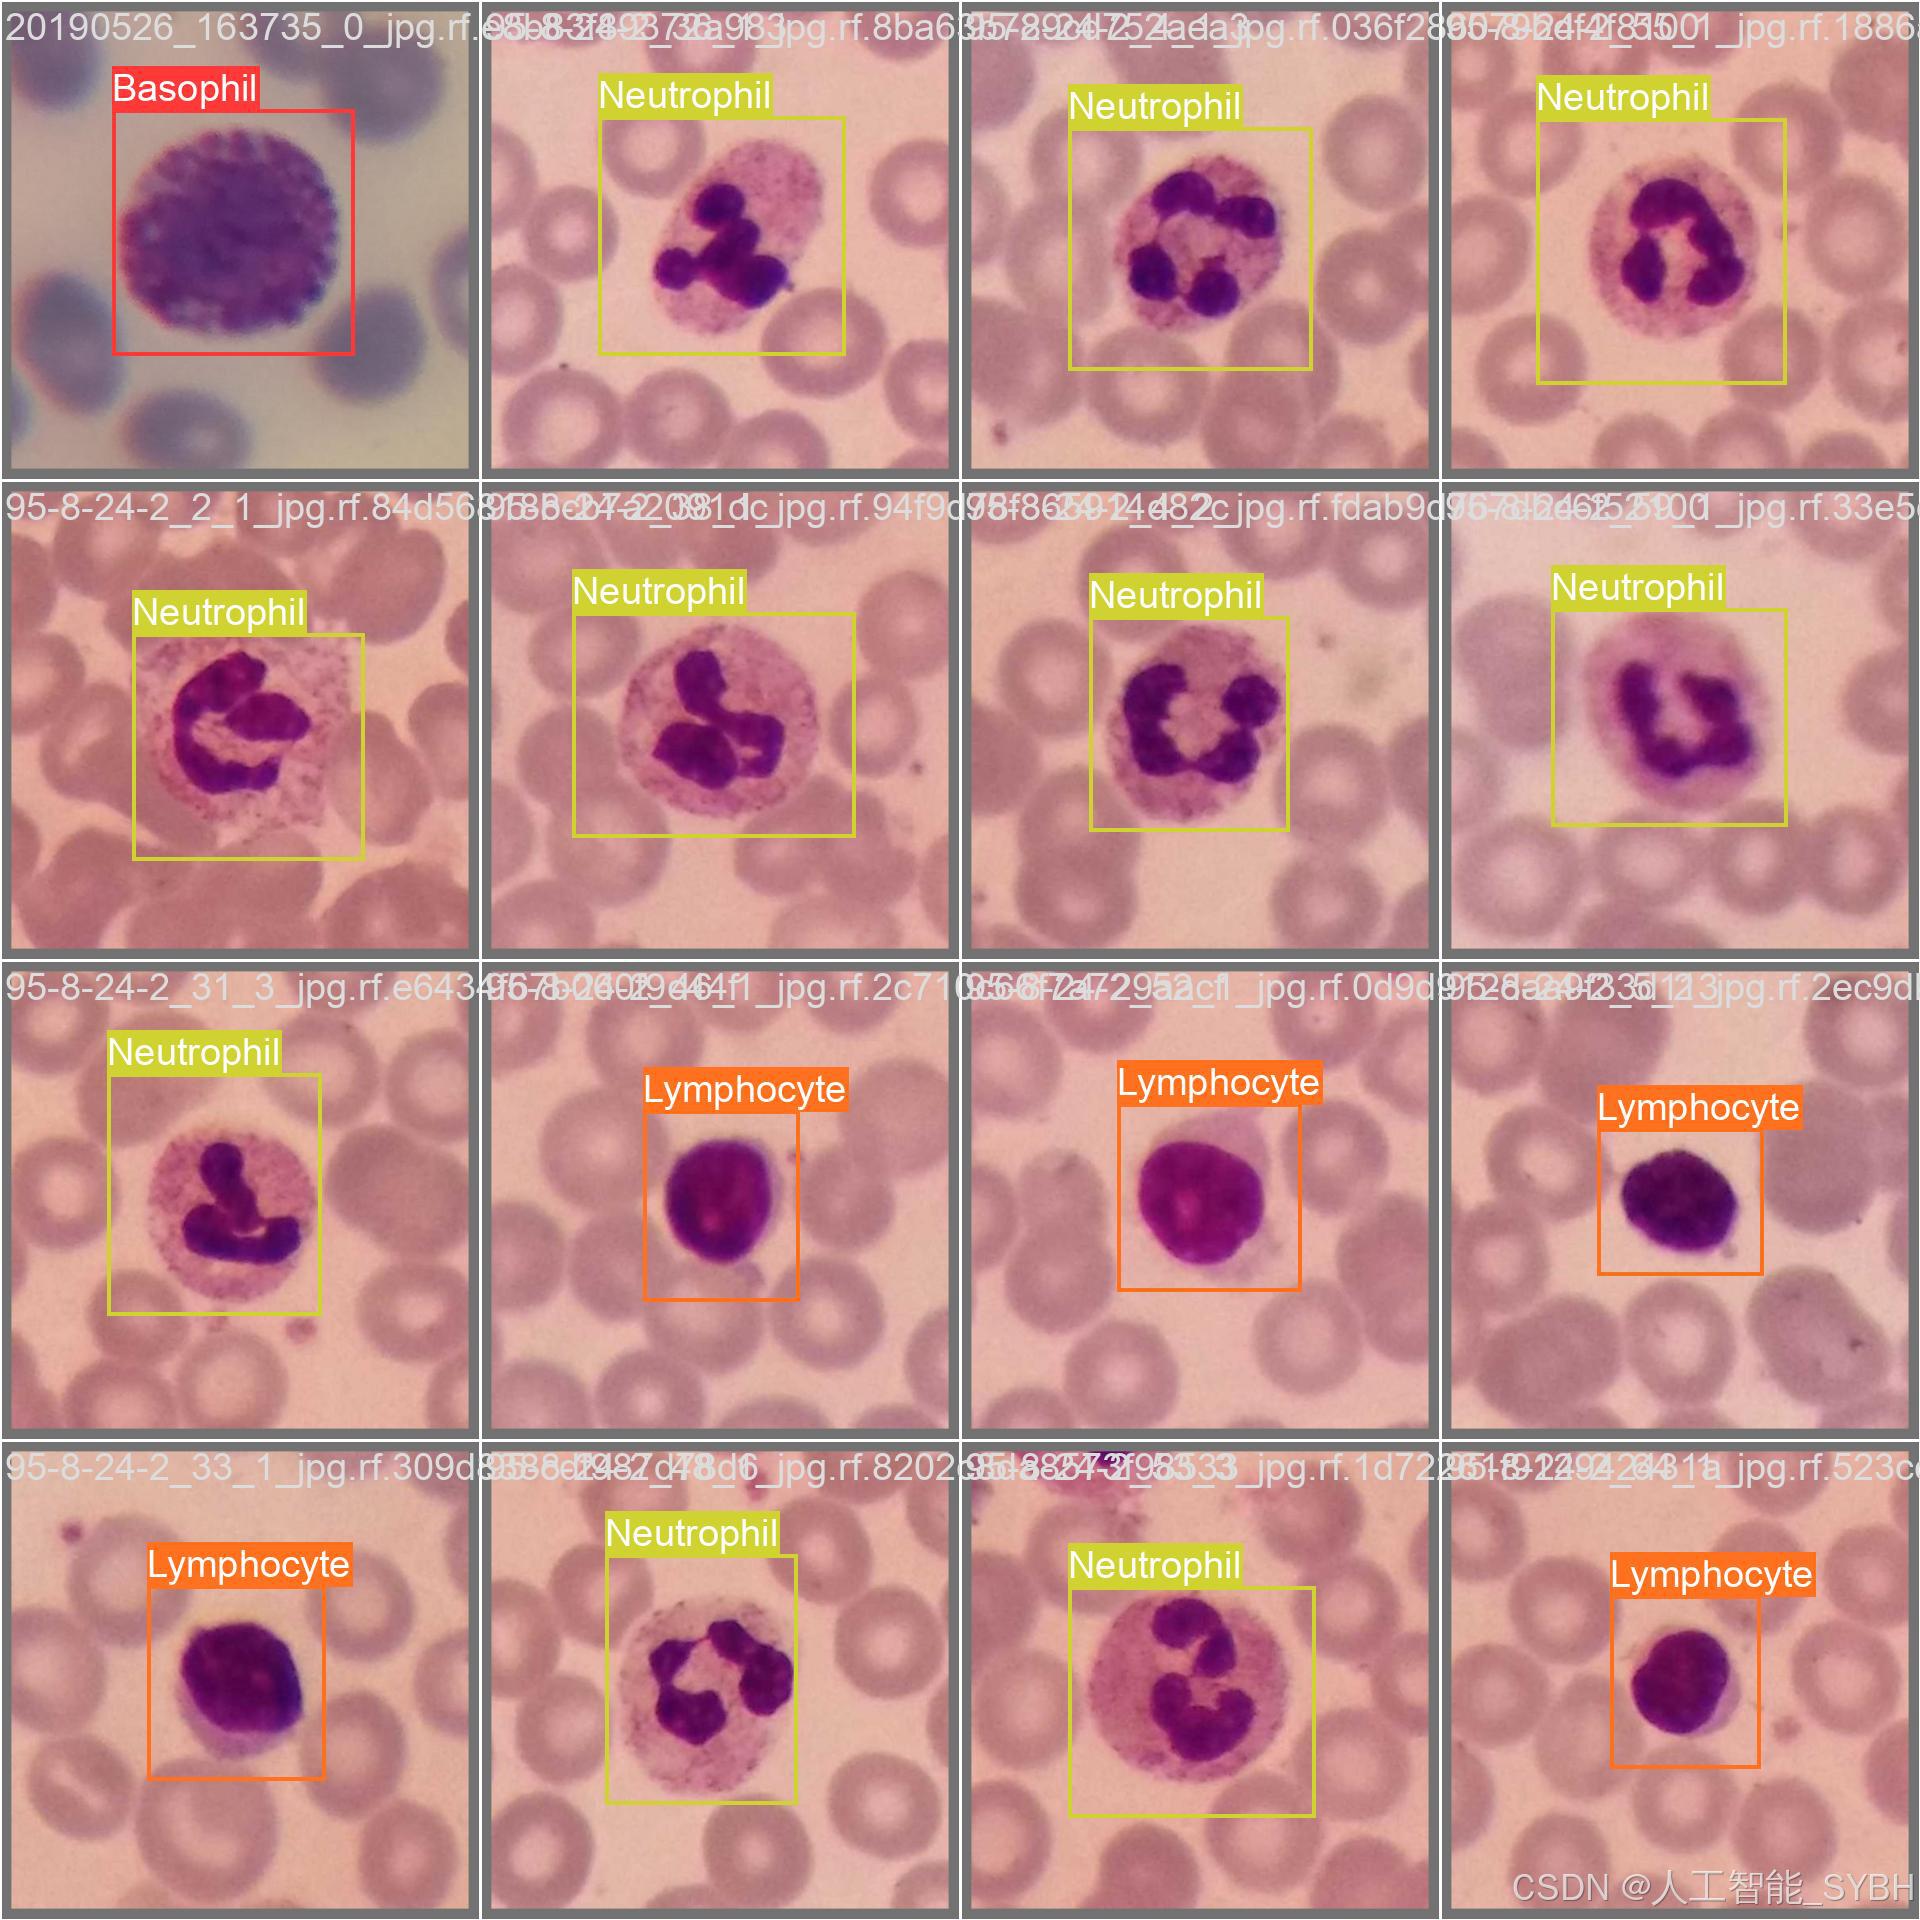
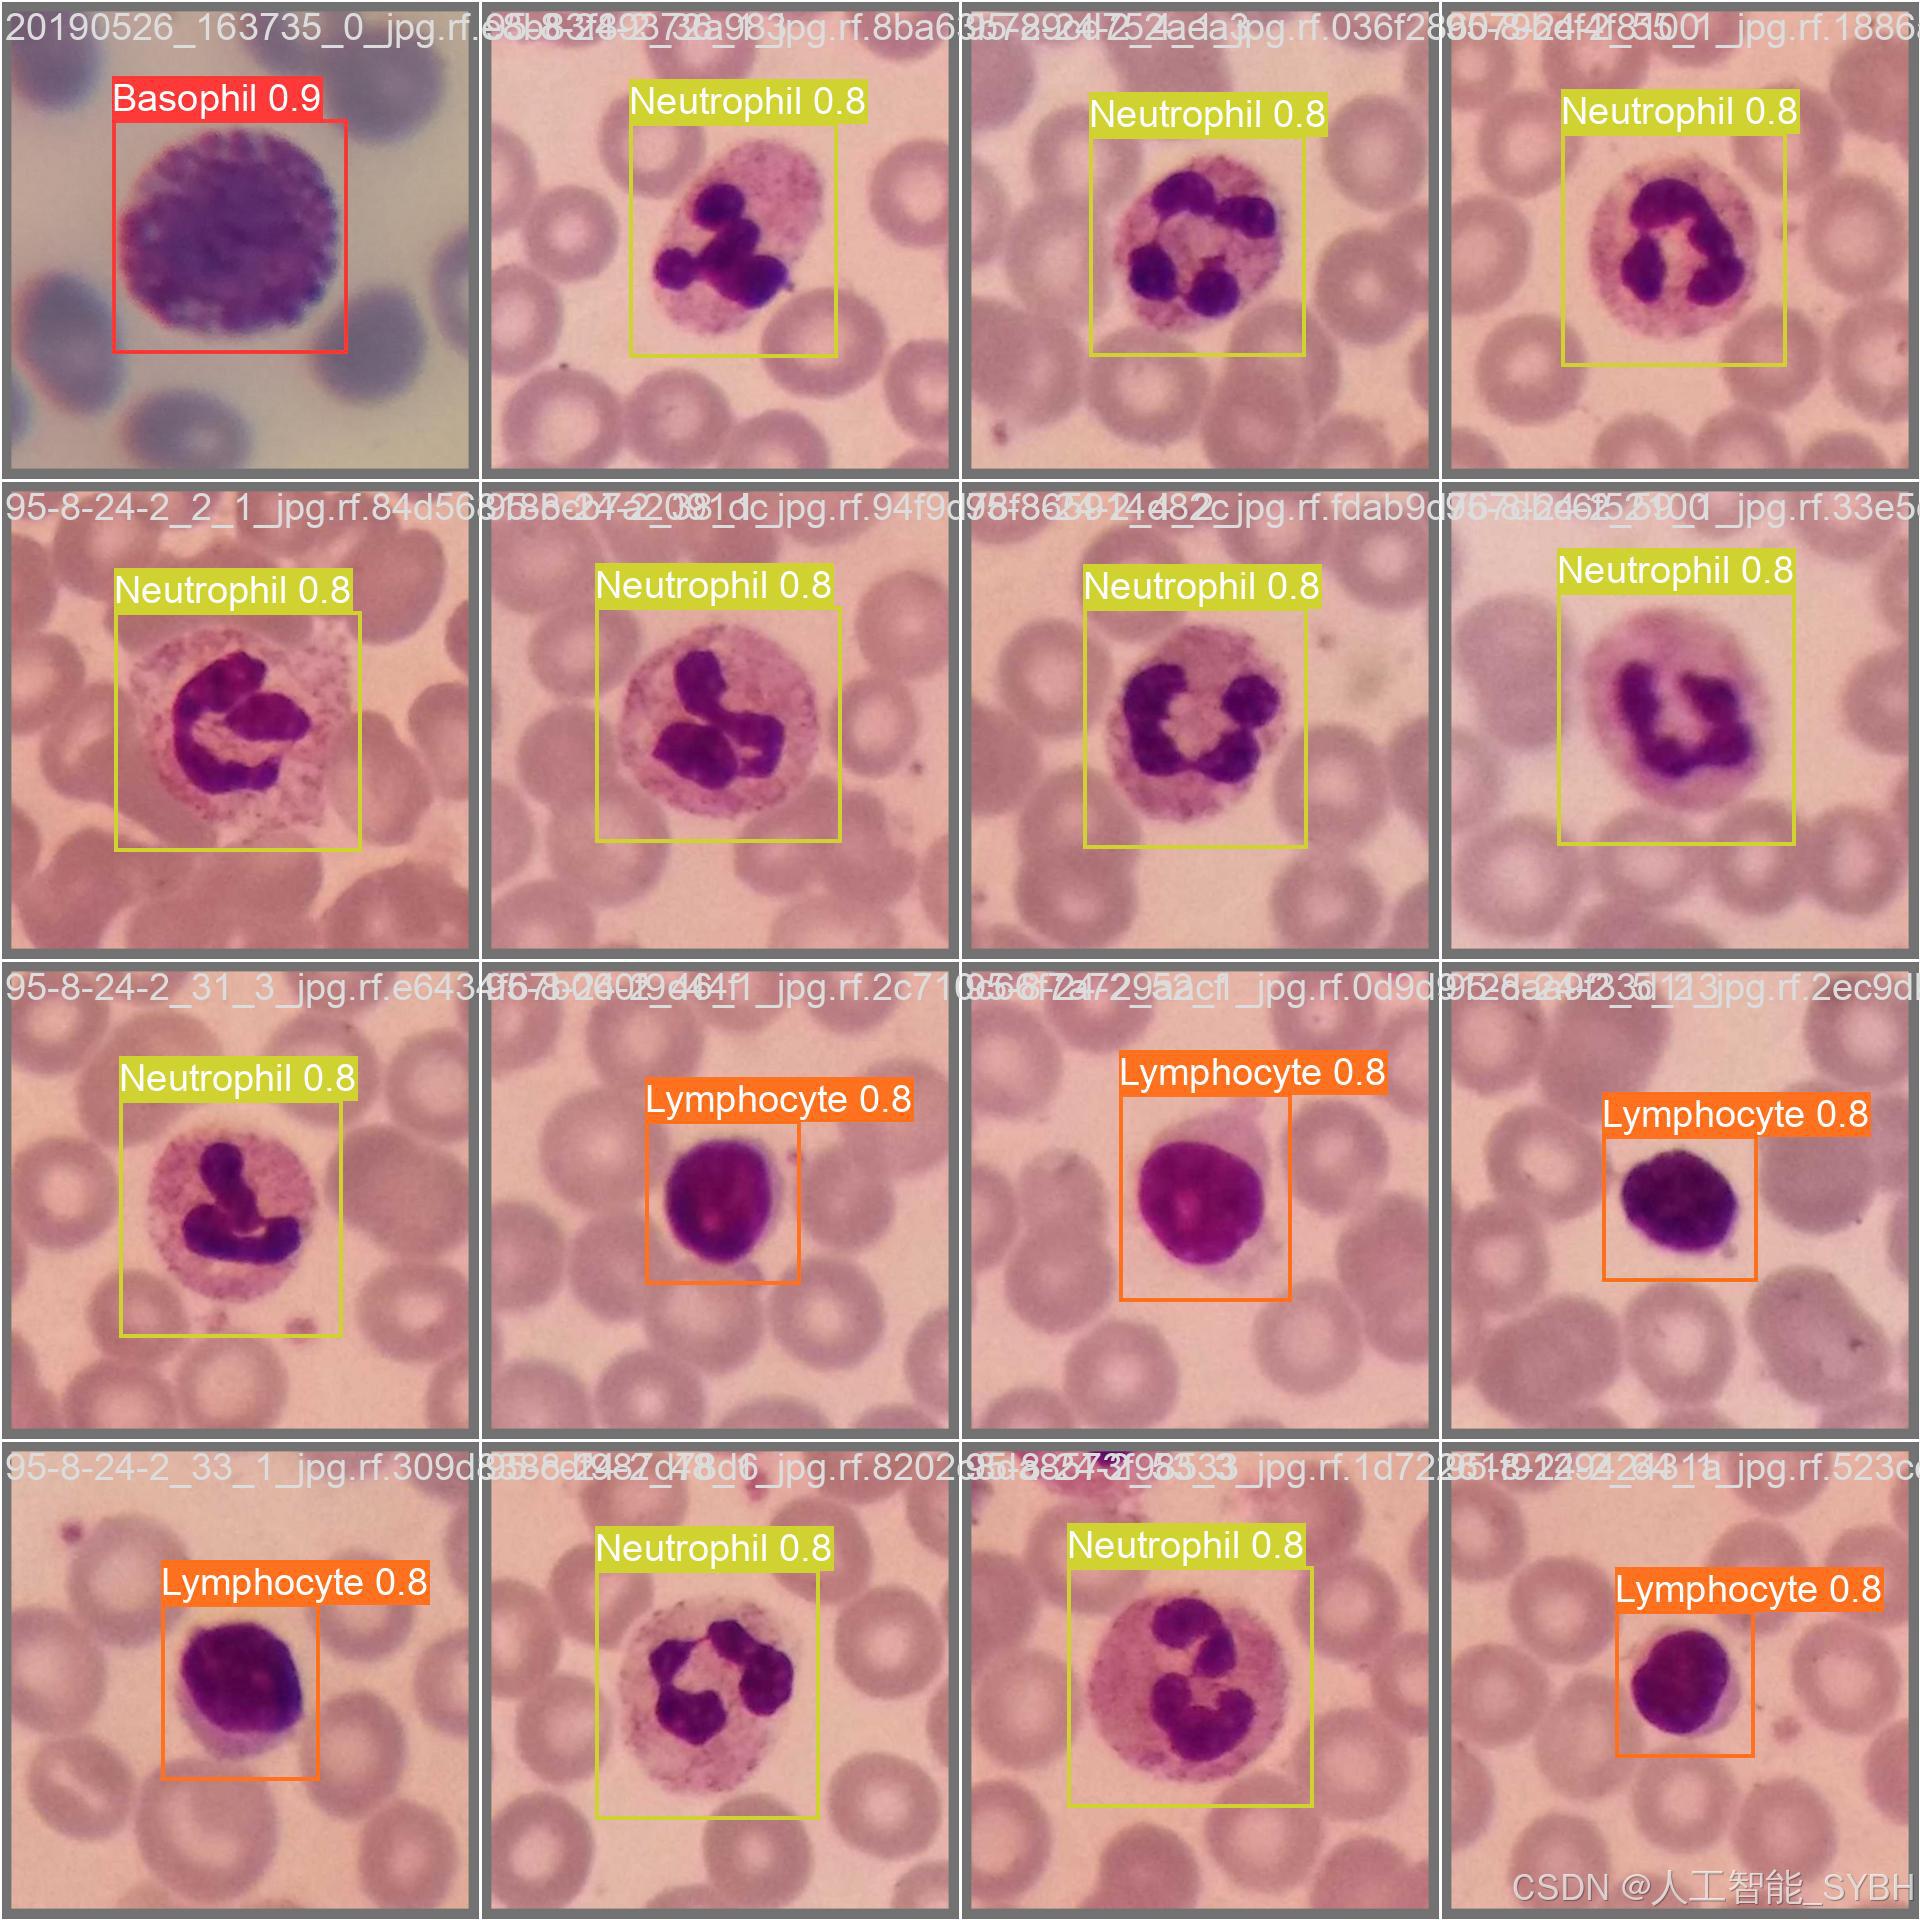
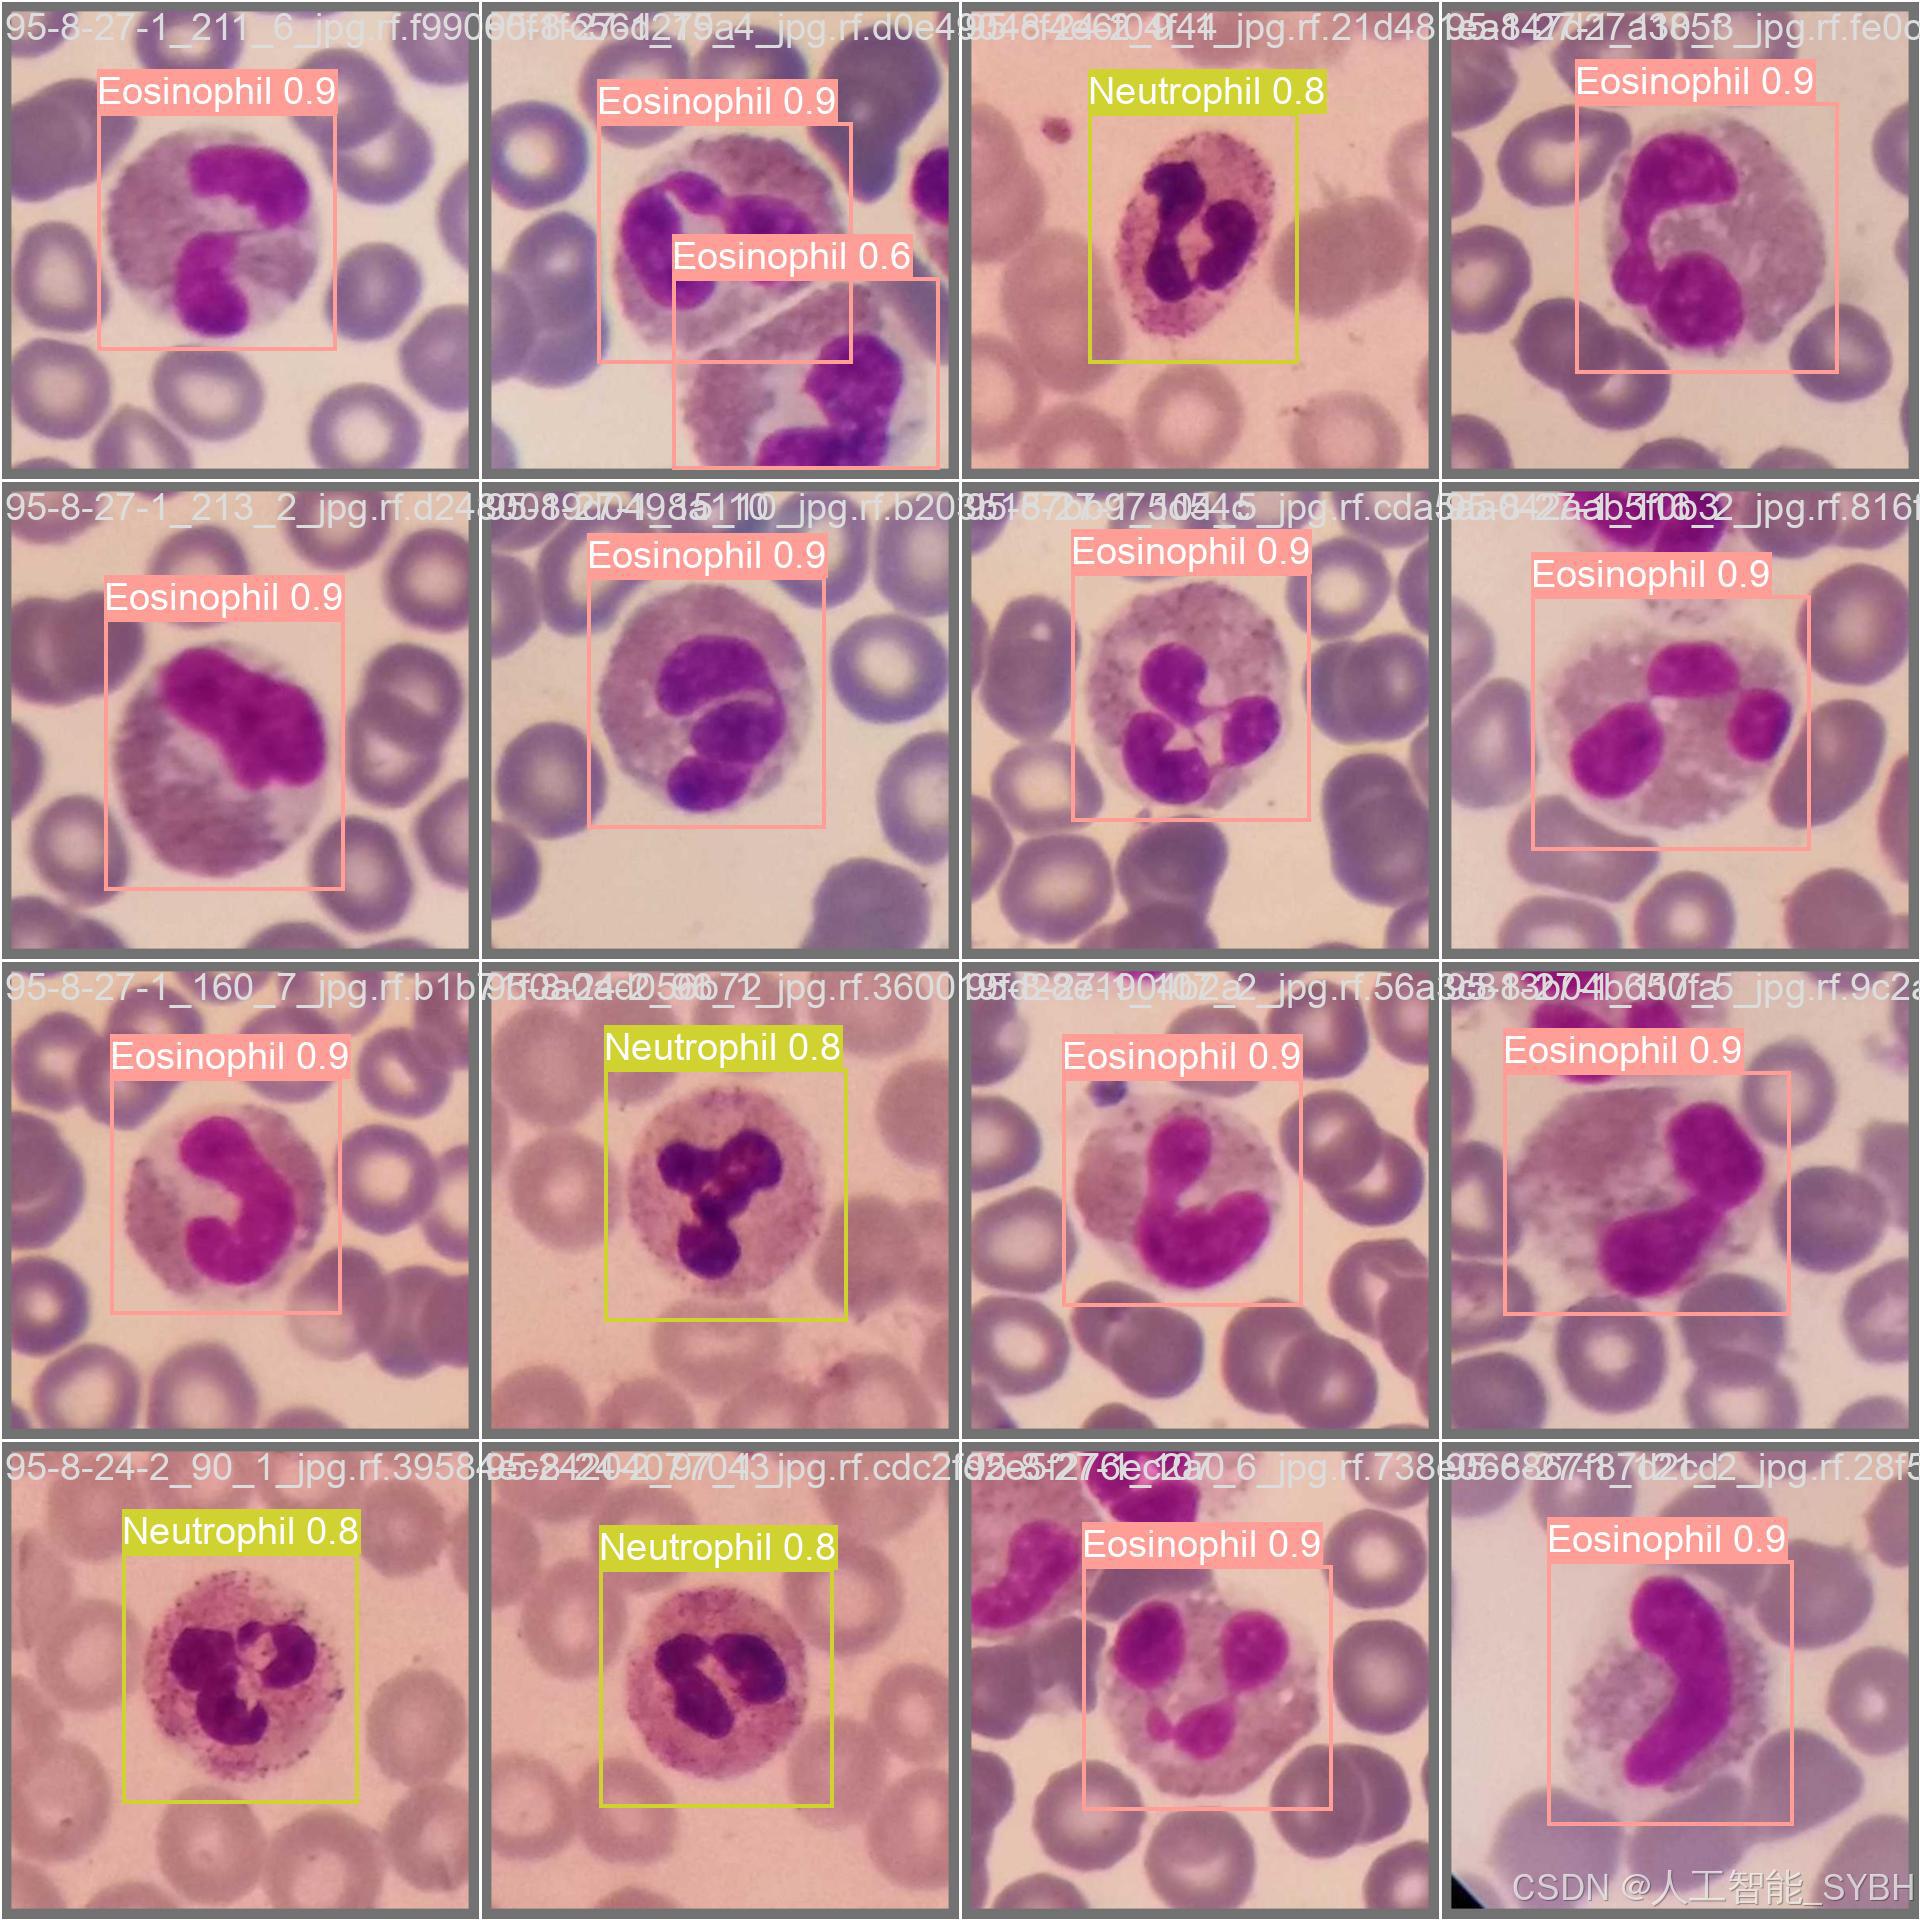
二、项目功能展示
系统功能
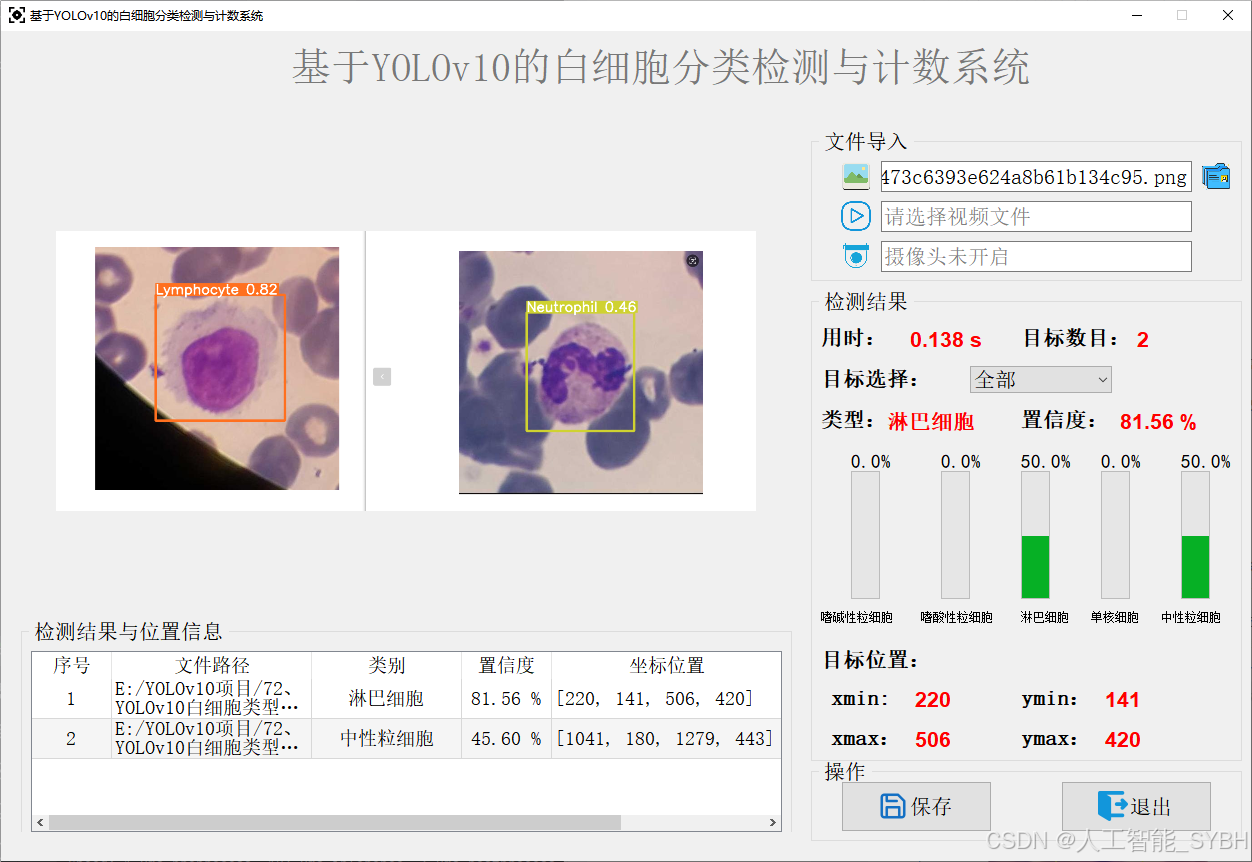
✅ 图片检测:可对单张图片进行检测,返回检测框及类别信息。
✅ 批量图片检测:支持文件夹输入,一次性检测多张图片,生成批量检测结果。
✅ 视频检测:支持视频文件输入,检测视频中每一帧的情况。
✅ 摄像头实时检测:连接USB 摄像头,实现实时监测,
项目视频演示
通过网盘分享的文件:项目源码.docx 链接: https://pan.baidu.com/s/1FU69VfNKpEY4PB4zQ1i0Ig?pwd=am7s 提取码: am7s
-
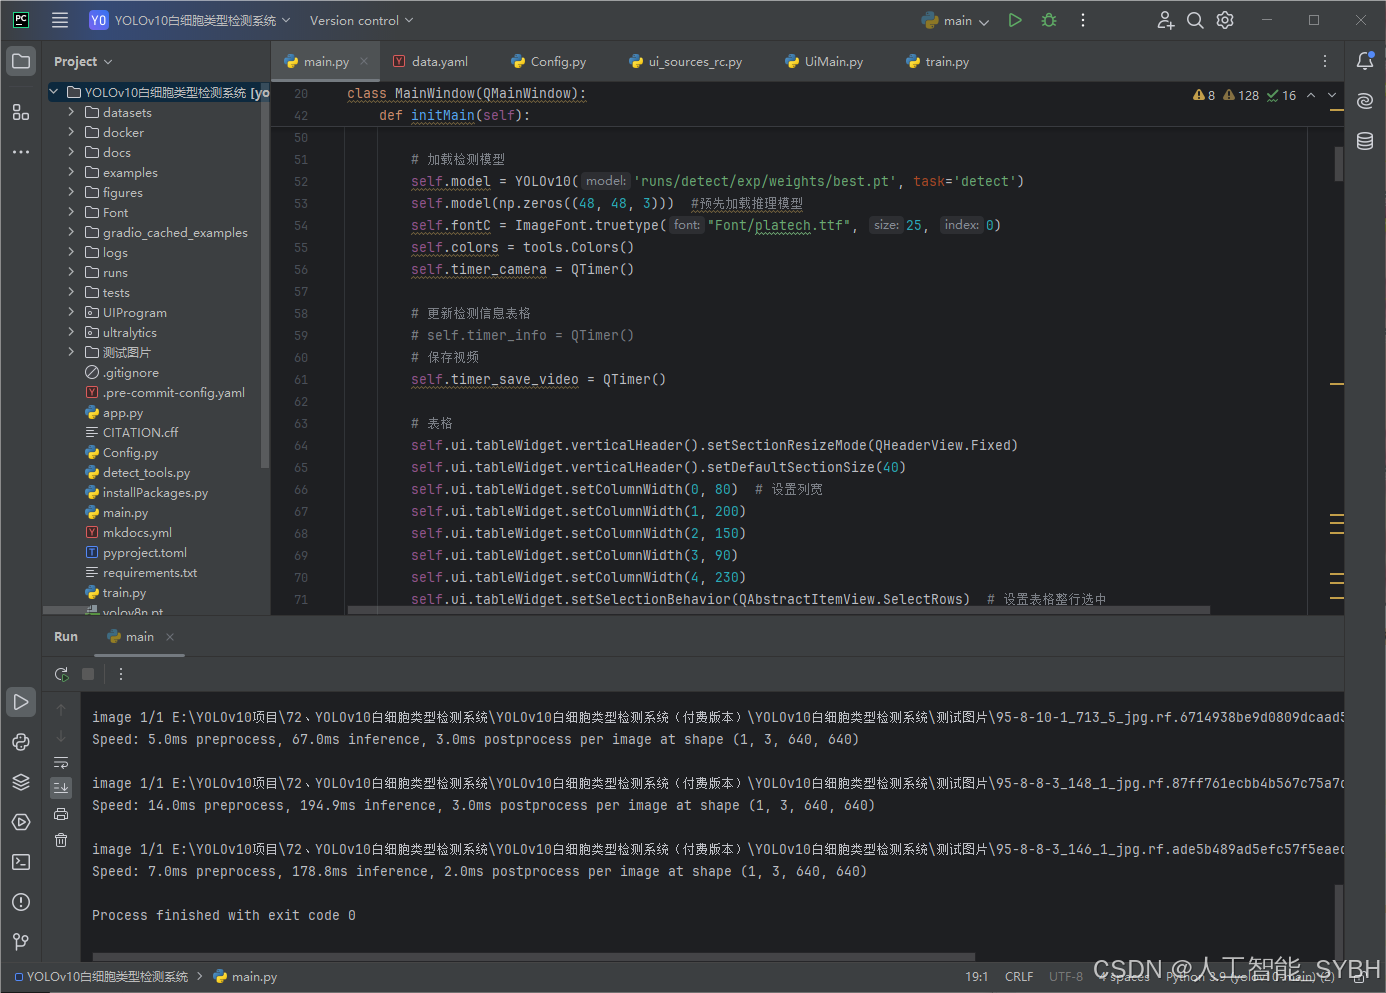
图片检测
该功能允许用户通过单张图片进行目标检测。输入一张图片后,YOLO模型会实时分析图像,识别出其中的目标,并在图像中框出检测到的目标,输出带有目标框的图像。批量图片检测
用户可以一次性上传多个图片进行批量处理。该功能支持对多个图像文件进行并行处理,并返回每张图像的目标检测结果,适用于需要大规模处理图像数据的应用场景。

-
视频检测
视频检测功能允许用户将视频文件作为输入。YOLO模型将逐帧分析视频,并在每一帧中标记出检测到的目标。最终结果可以是带有目标框的视频文件或实时展示,适用于视频监控和分析等场景。
-
摄像头实时检测
该功能支持通过连接摄像头进行实时目标检测。YOLO模型能够在摄像头拍摄的实时视频流中进行目标检测,实时识别并显示检测结果。此功能非常适用于安防监控、无人驾驶、智能交通等应用,提供即时反馈。
核心特点:
- 高精度:基于YOLO模型,提供精确的目标检测能力,适用于不同类型的图像和视频。
- 实时性:特别优化的算法使得实时目标检测成为可能,无论是在视频还是摄像头实时检测中,响应速度都非常快。
- 批量处理:支持高效的批量图像和视频处理,适合大规模数据分析。
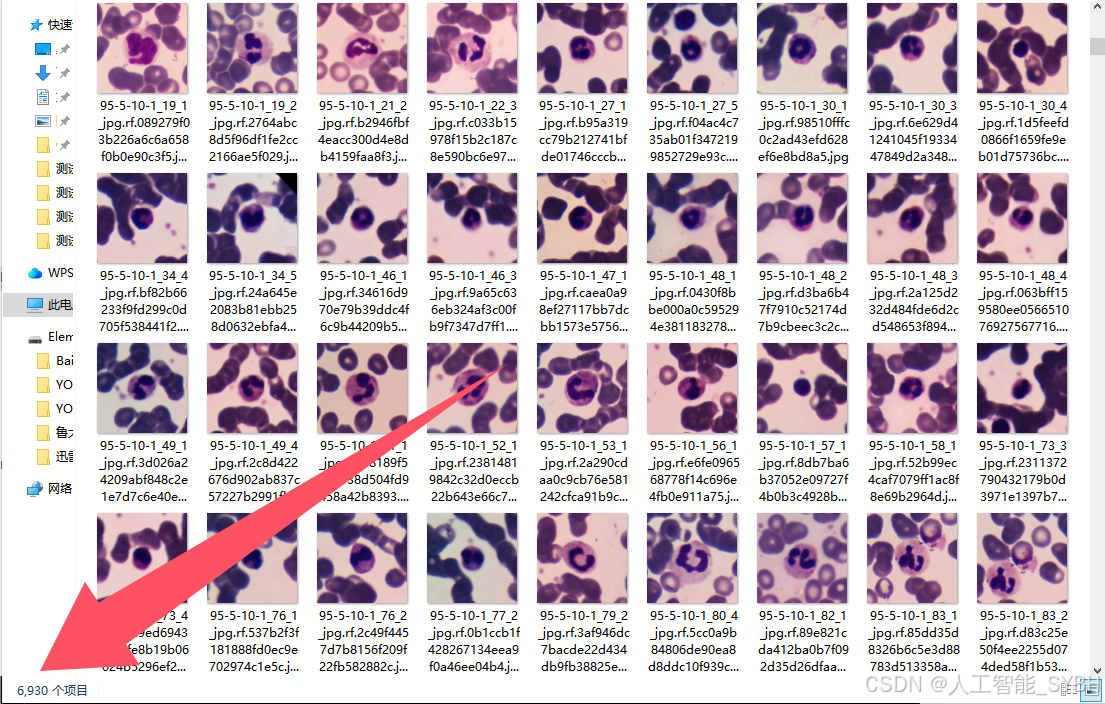
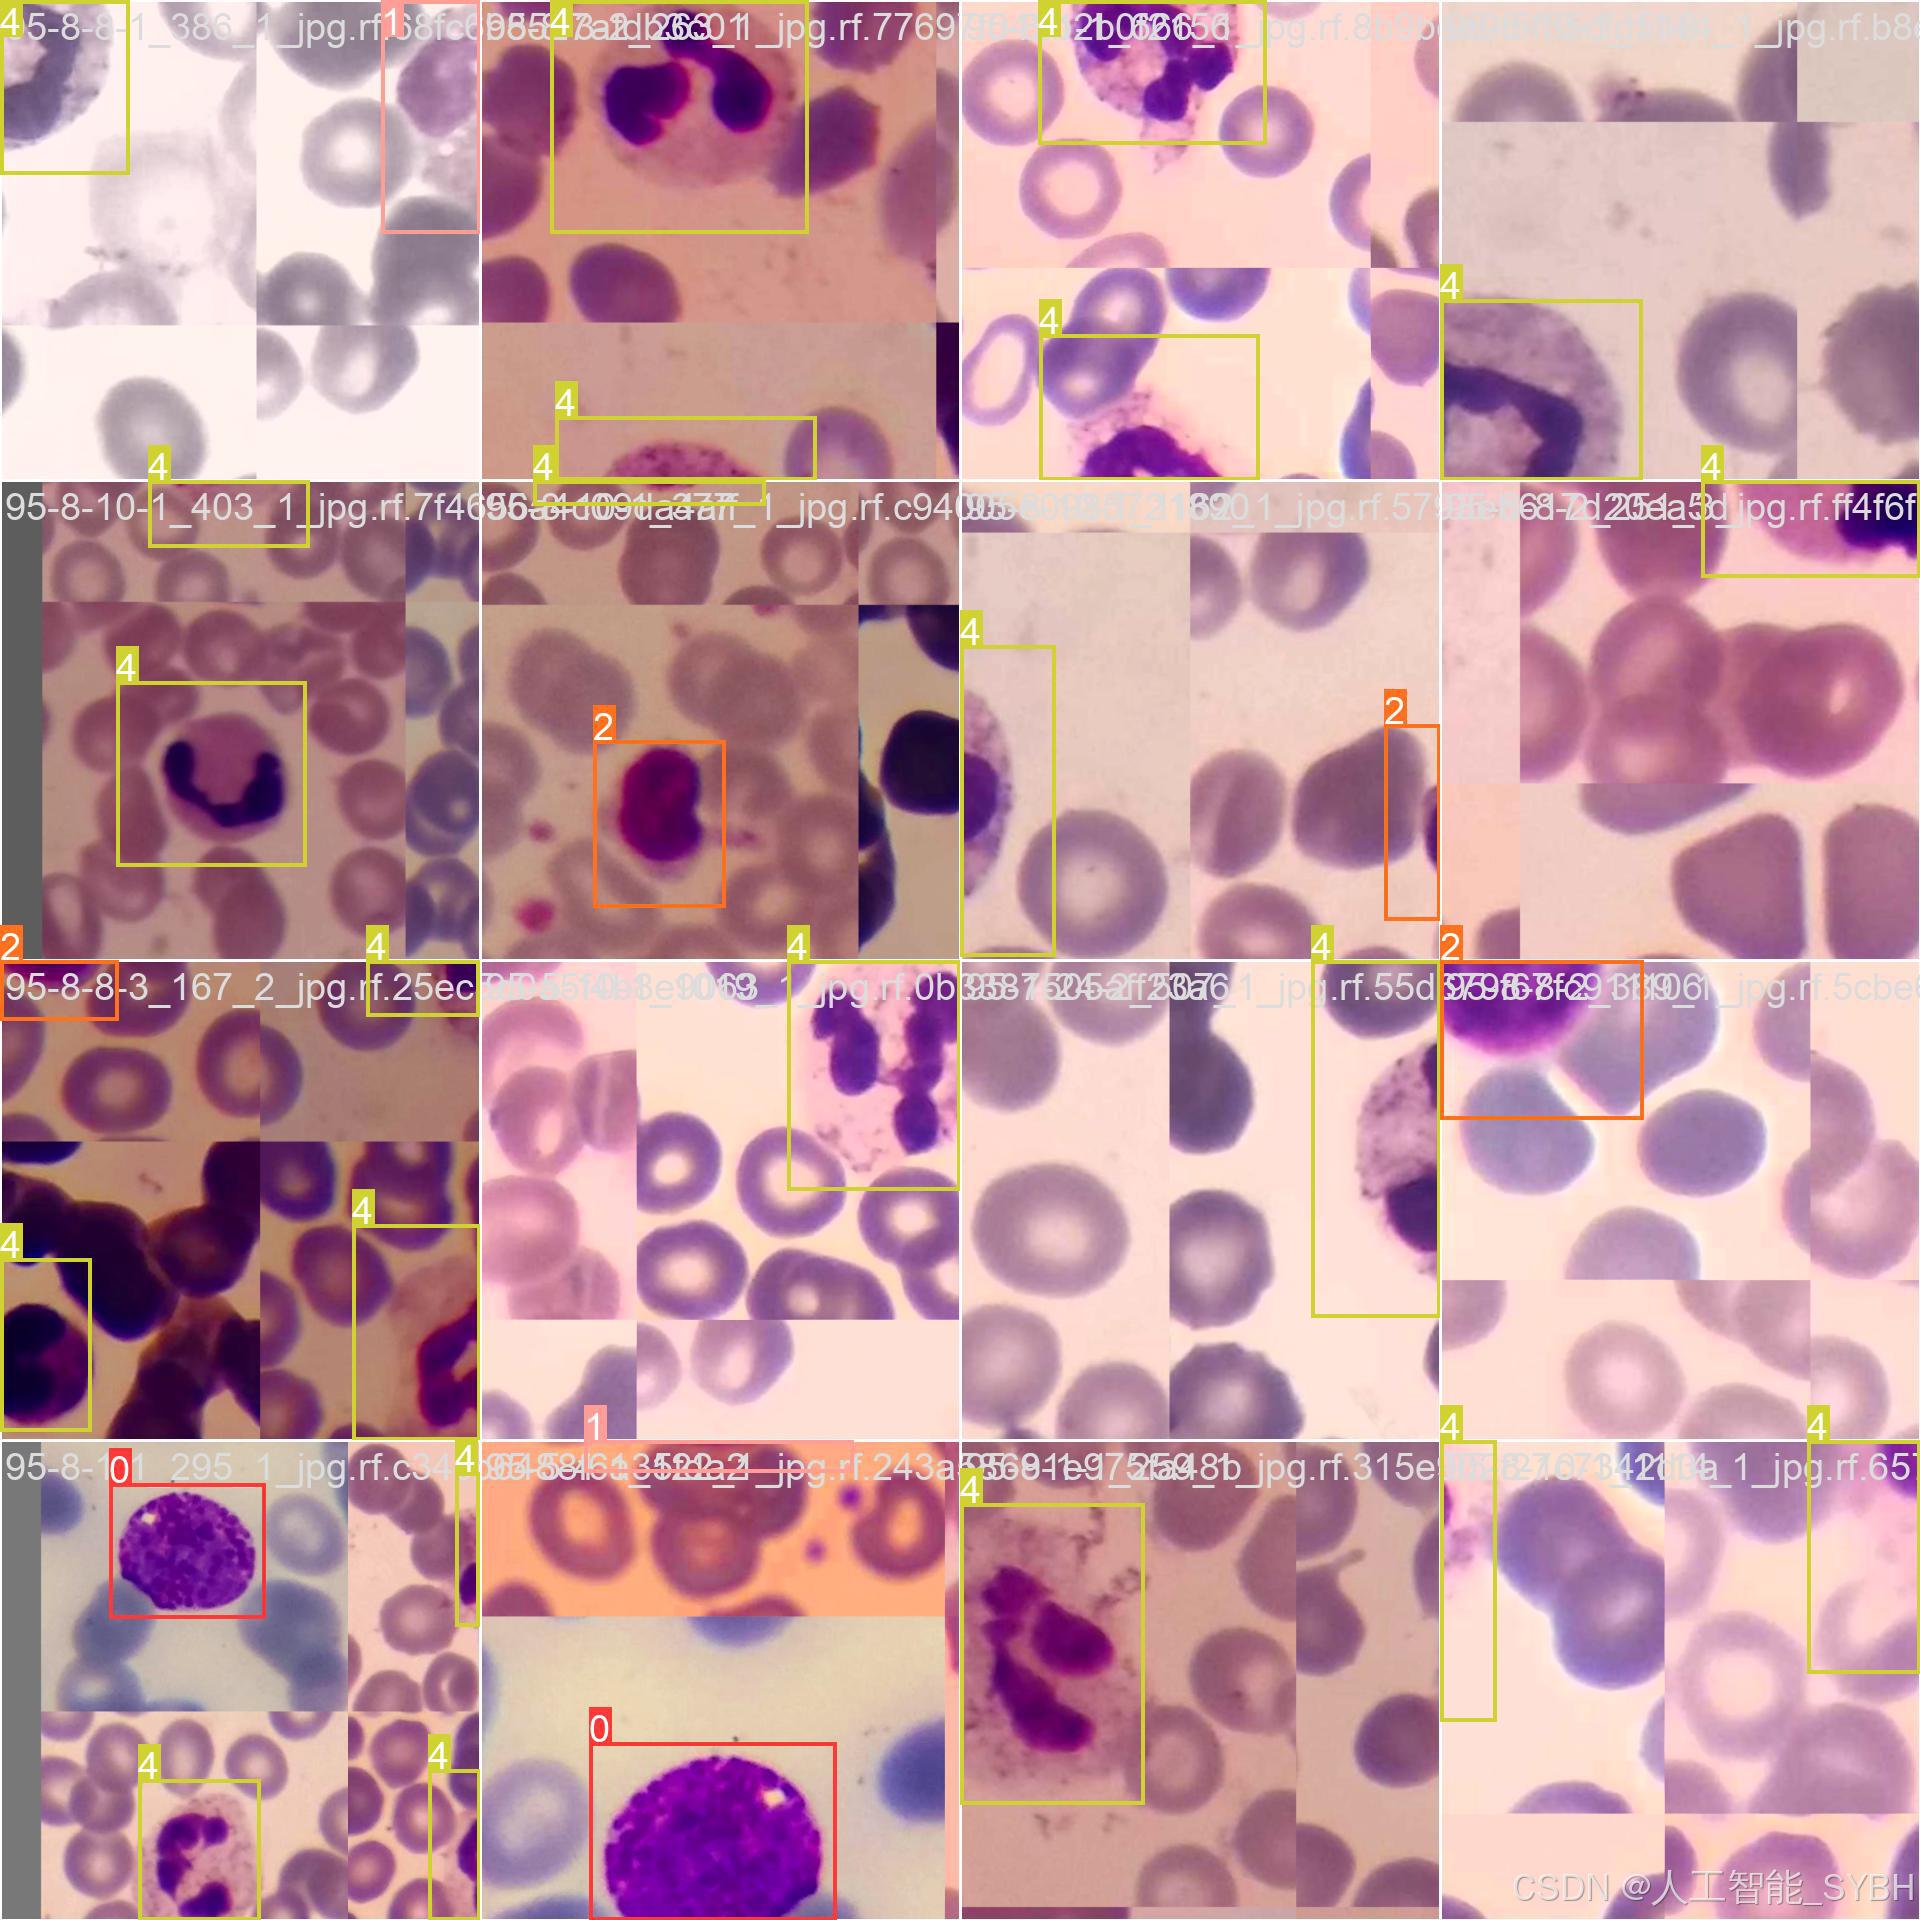
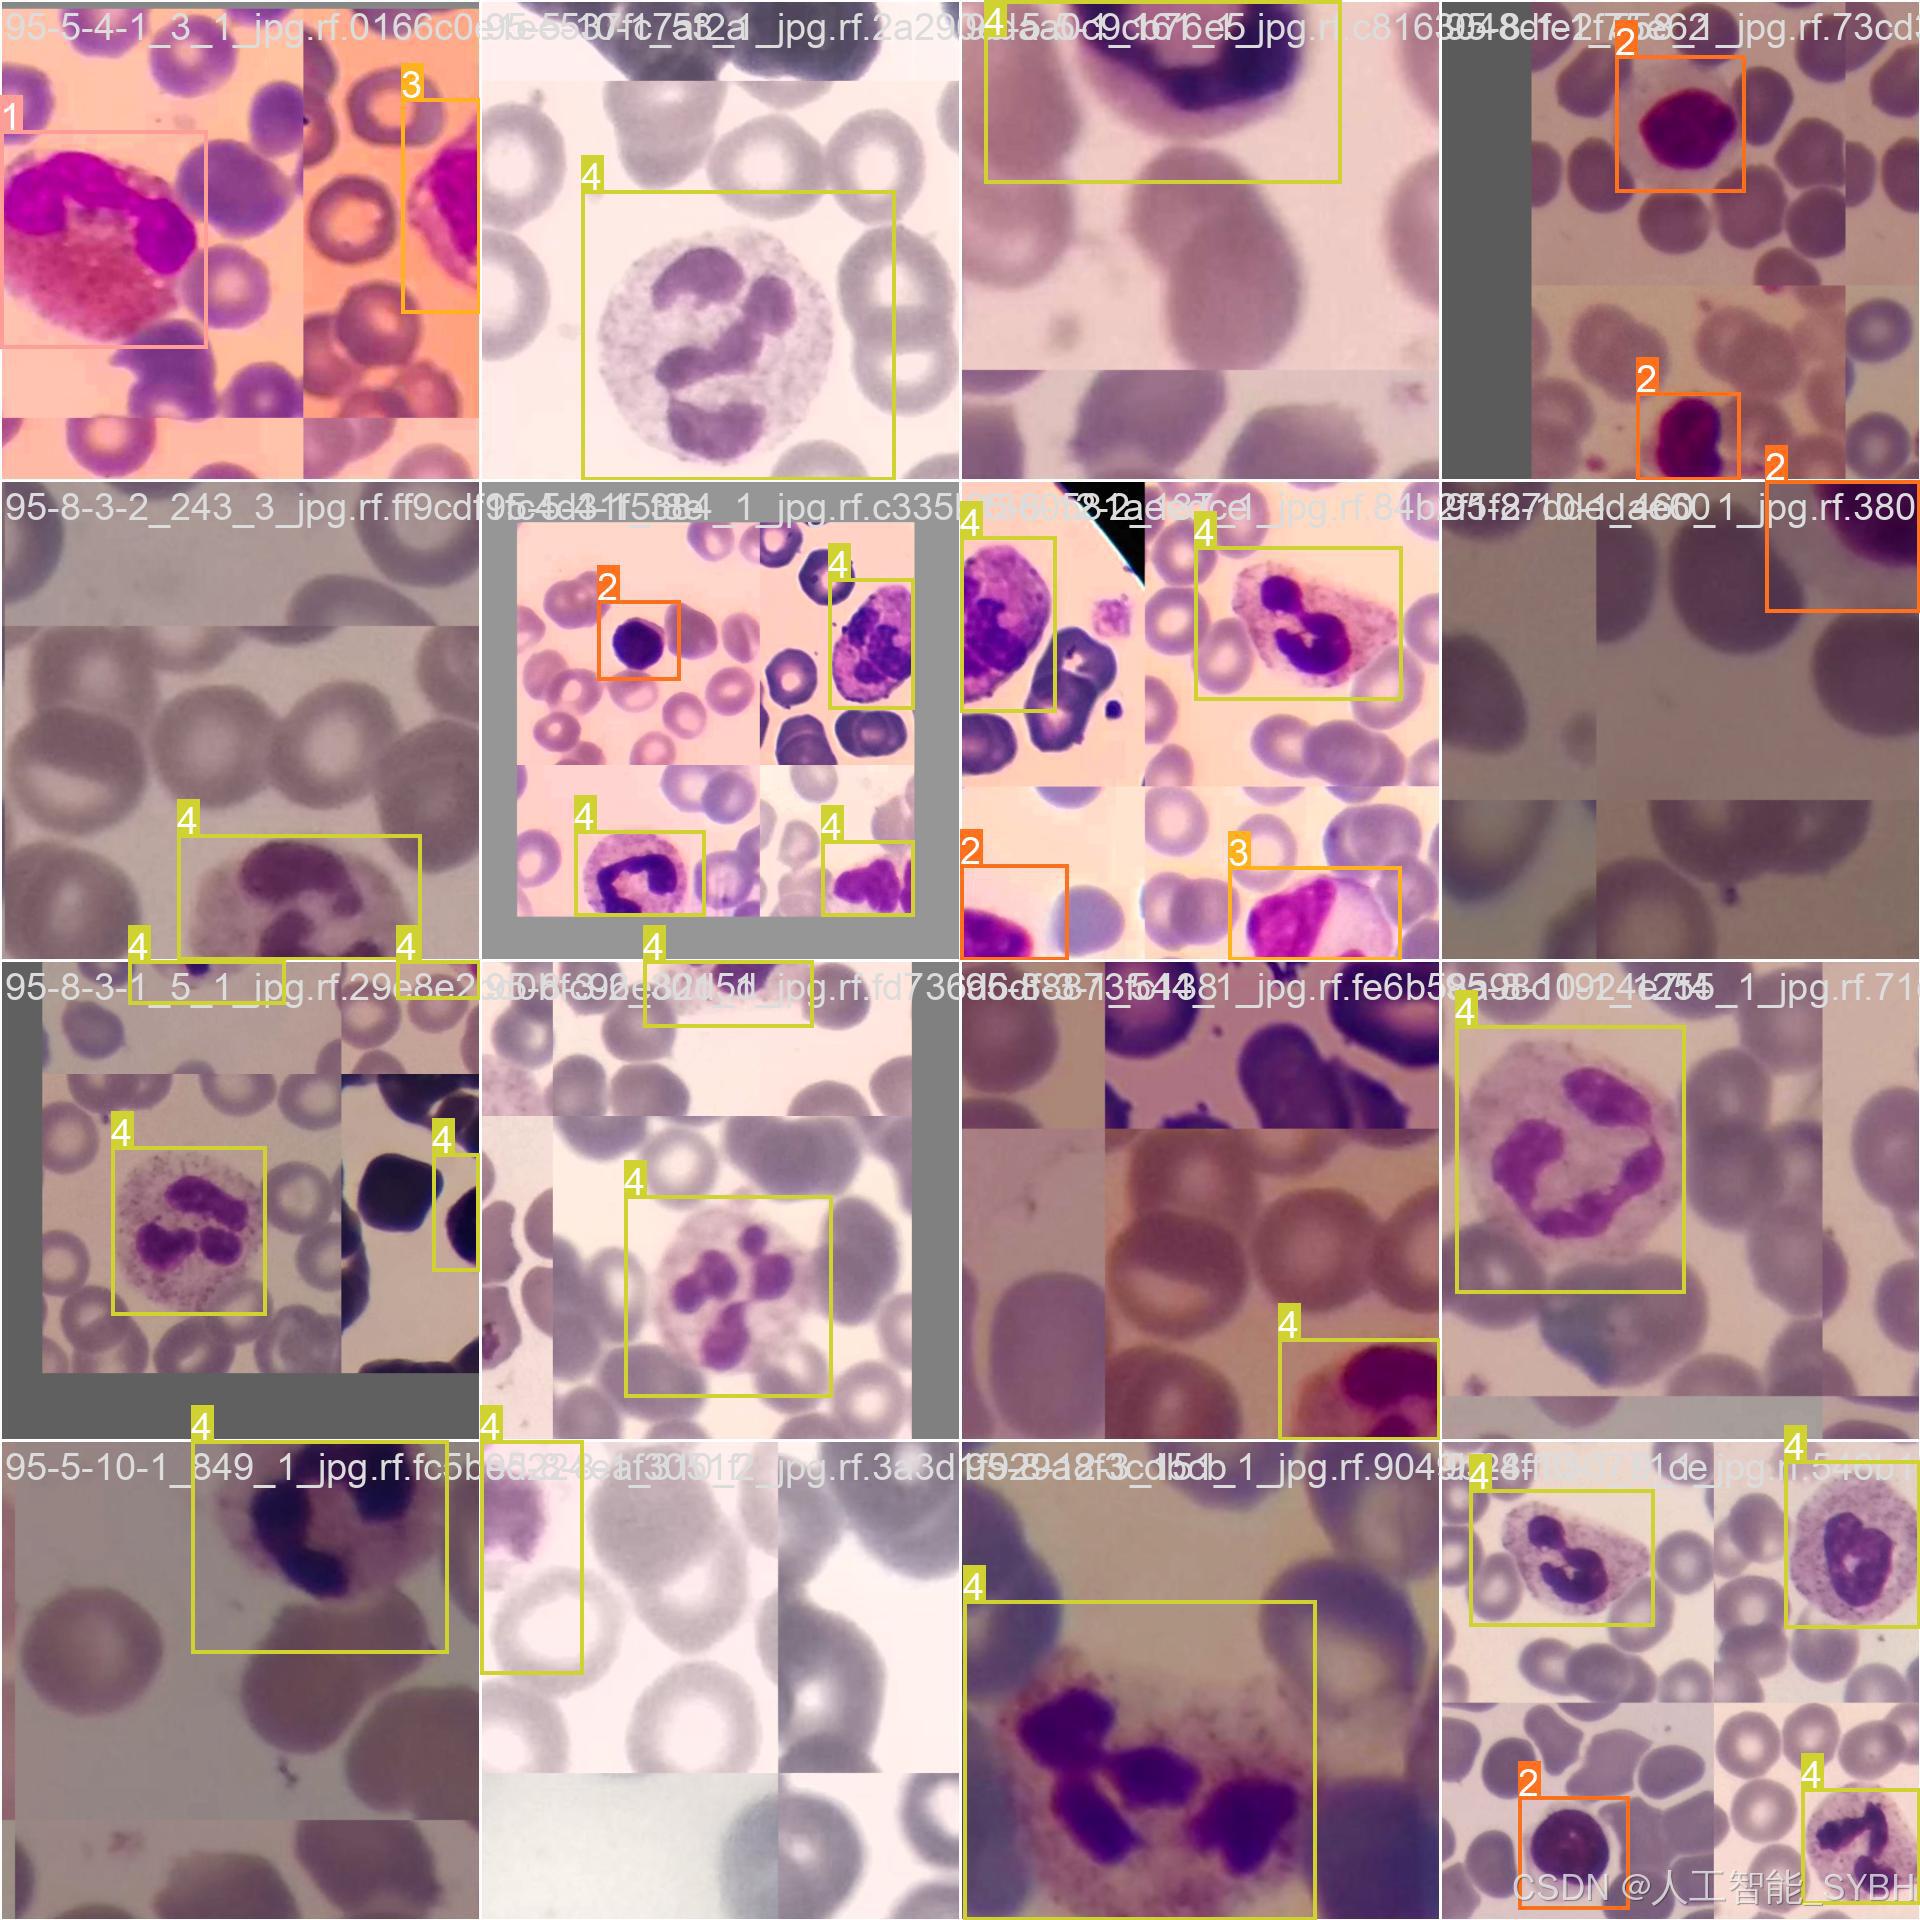
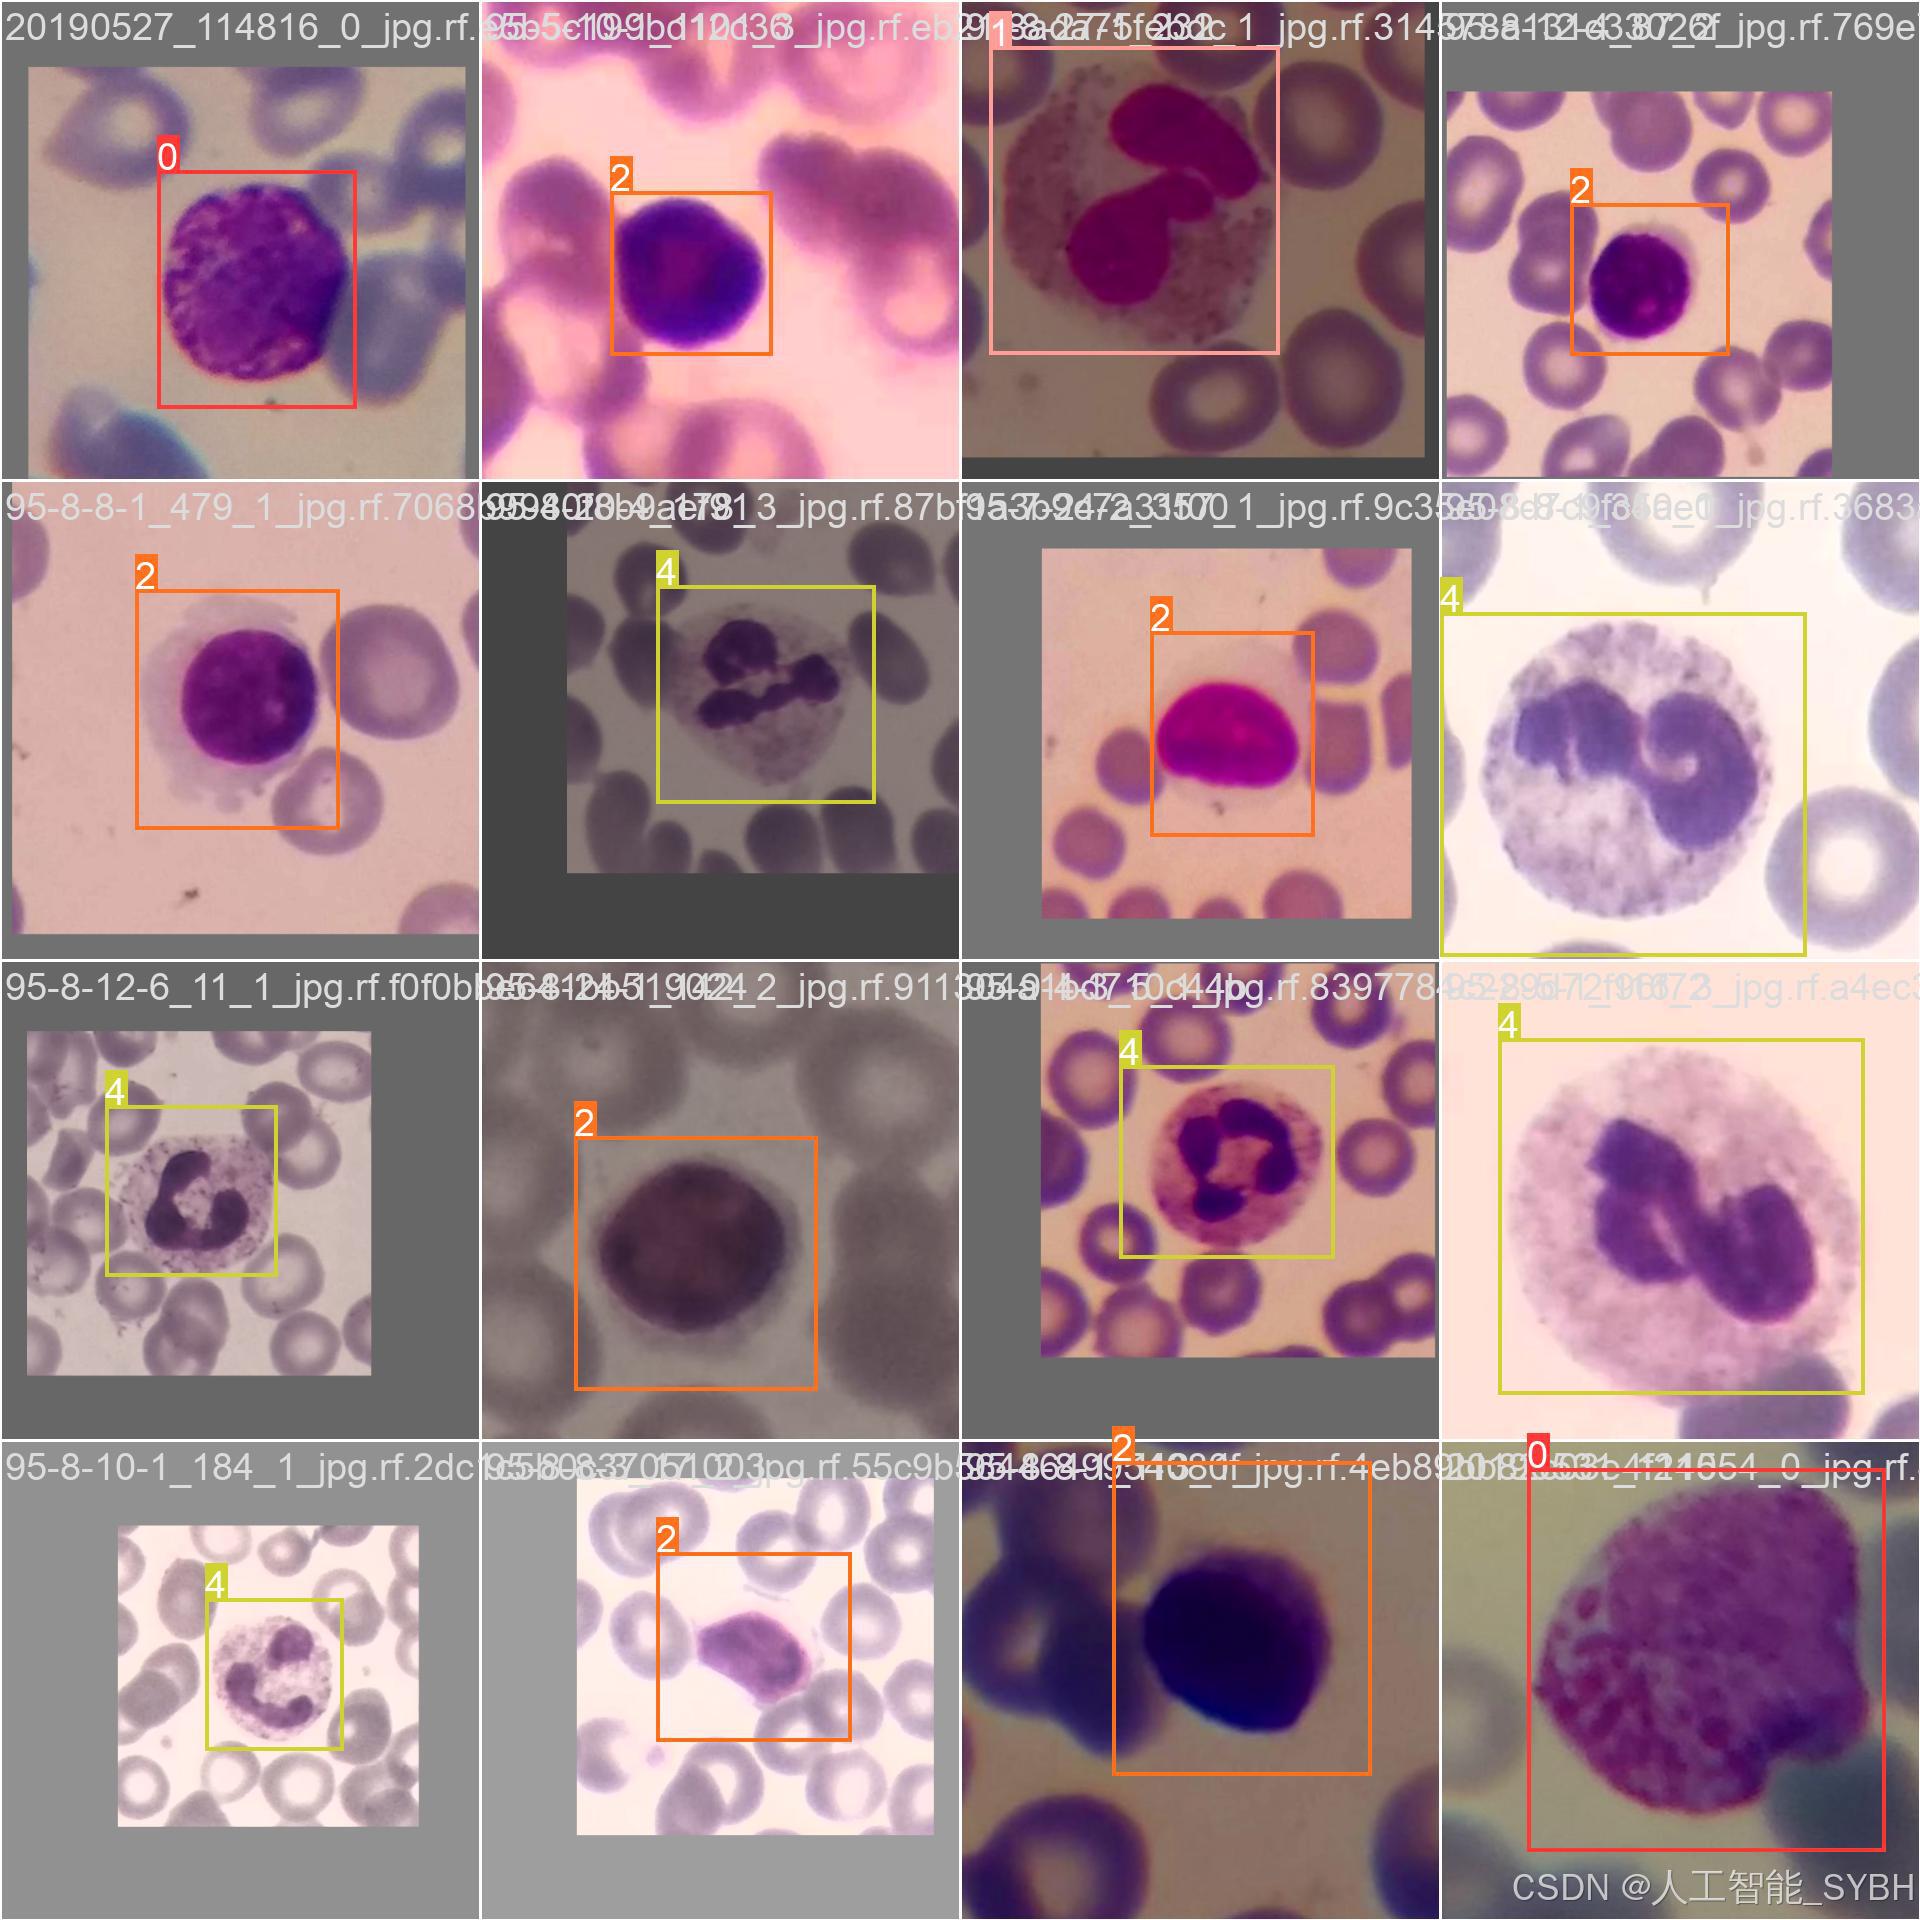
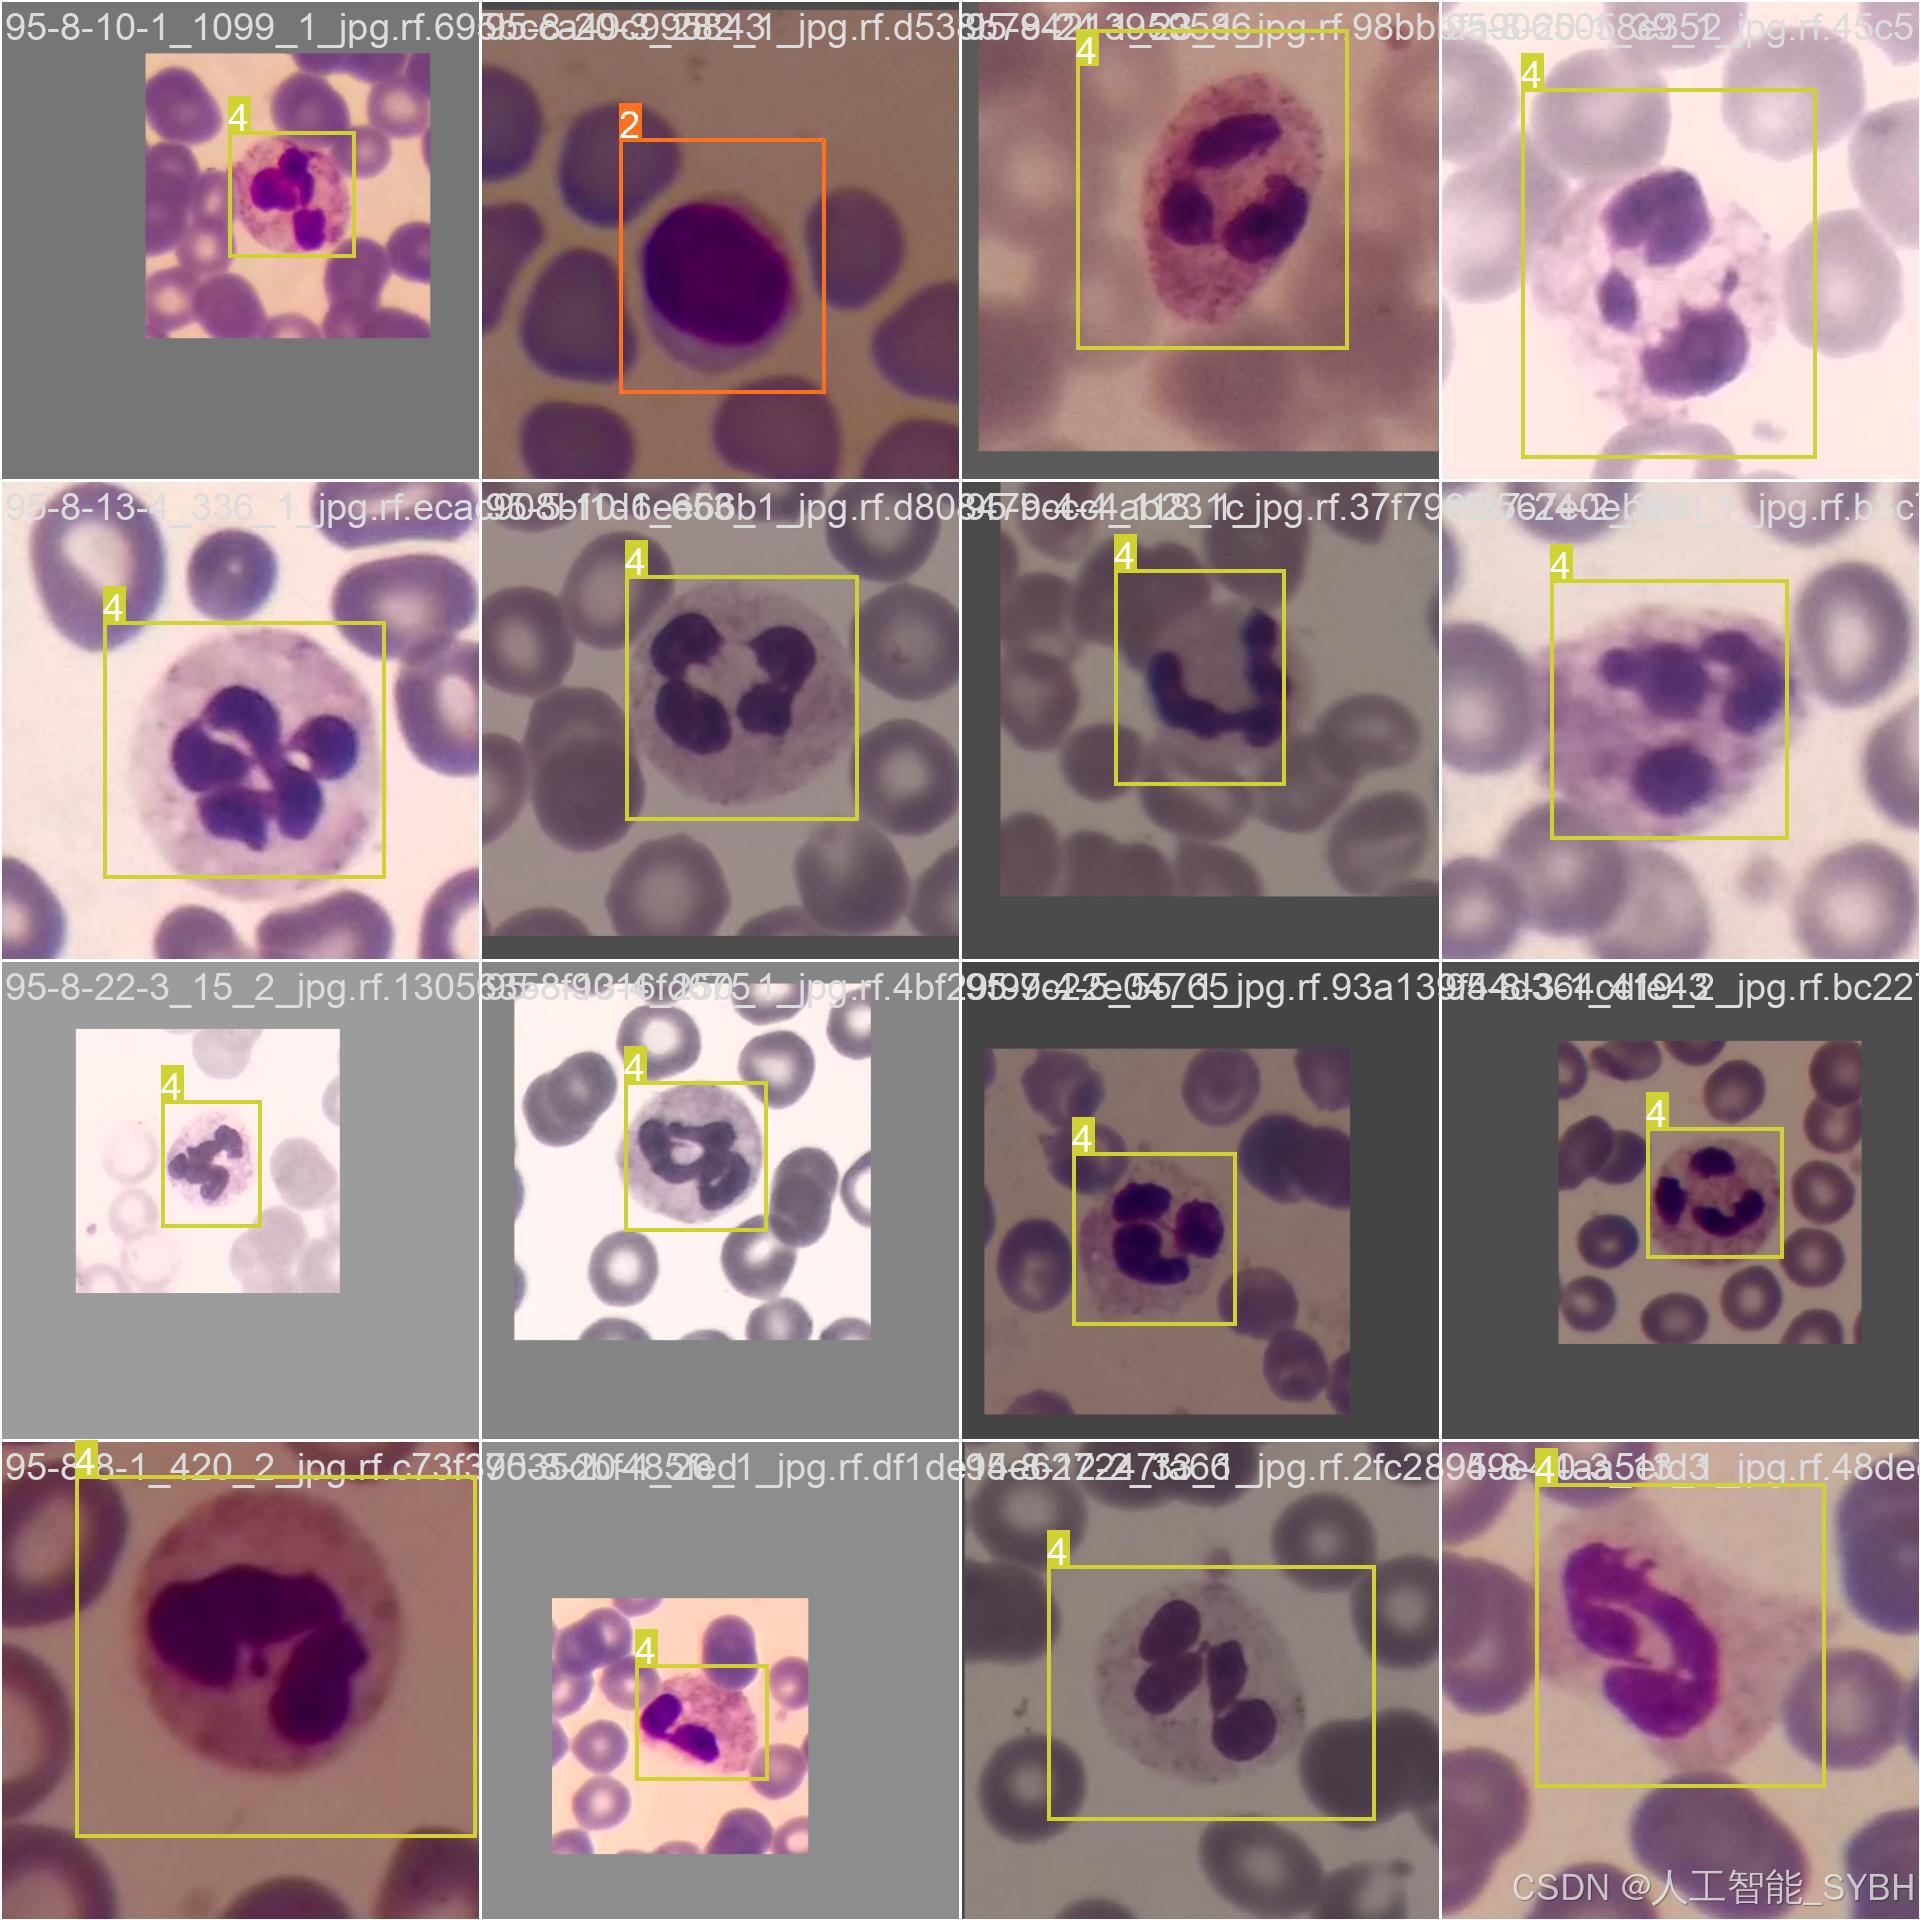
三、数据集介绍
基本统计
-
总样本量:9,900张白细胞图像
-
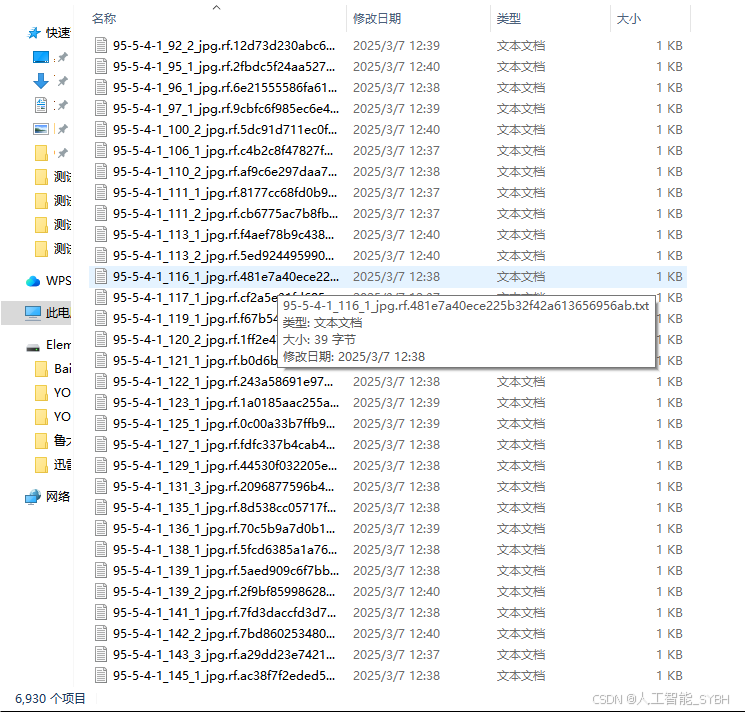
训练集:6,930张(70%)
-
验证集:2,970张(30%)
-
-
类别分布(5类白细胞):
-
嗜碱性粒细胞(Basophil)
-
嗜酸性粒细胞(Eosinophil)
-
淋巴细胞(Lymphocyte)
-
单核细胞(Monocyte)
-
中性粒细胞(Neutrophil)
-
数据来源与采集
数据集通过以下方式构建:
-
收集自多家医院实验室的外周血涂片样本
-
使用专业显微镜和数字成像系统捕获
-
由经验丰富的血液学专家进行标注和验证
数据集配置文件data.yaml
train: .\datasets\images\train
val: .\datasets\images\val
test: .\datasets\images\test


nc: 5
names: ['Basophil', 'Eosinophil', 'Lymphocyte', 'Monocyte', 'Neutrophil']
数据集制作流程
-
标注数据:使用标注工具(如LabelImg、CVAT等)对图像中的目标进行标注。每个目标需要标出边界框,并且标注类别。
-
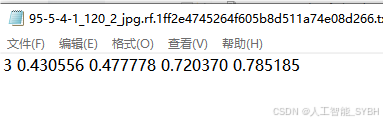
转换格式:将标注的数据转换为YOLO格式。YOLO标注格式为每行:
<object-class> <x_center> <y_center> <width> <height>,这些坐标是相对于图像尺寸的比例。 -
分割数据集:将数据集分为训练集、验证集和测试集,通常的比例是80%训练集、10%验证集和10%测试集。
-
准备标签文件:为每张图片生成一个对应的标签文件,确保标签文件与图片的命名一致。
-
调整图像尺寸:根据YOLO网络要求,统一调整所有图像的尺寸(如416x416或608x608)。
四、项目环境配置
创建虚拟环境
首先新建一个Anaconda环境,每个项目用不同的环境,这样项目中所用的依赖包互不干扰。
终端输入
conda create -n yolov10 python==3.9

激活虚拟环境
conda activate yolov10

安装cpu版本pytorch
pip install torch torchvision torchaudio

pycharm中配置anaconda


安装所需要库
pip install -r requirements.txt

五、模型训练
训练代码
from ultralytics import YOLOv10

model_path = 'yolov10s.pt'
data_path = 'datasets/data.yaml'

if __name__ == '__main__':
    model = YOLOv10(model_path)
    results = model.train(data=data_path,
                          epochs=500,
                          batch=64,
                          device='0',
                          workers=0,
                          project='runs/detect',
                          name='exp',
                          )
根据实际情况更换模型 yolov10n.yaml (nano):轻量化模型,适合嵌入式设备,速度快但精度略低。 yolov10s.yaml (small):小模型,适合实时任务。 yolov10m.yaml (medium):中等大小模型,兼顾速度和精度。 yolov10b.yaml (base):基本版模型,适合大部分应用场景。 yolov10l.yaml (large):大型模型,适合对精度要求高的任务。
--batch 64:每批次64张图像。--epochs 500:训练500轮。--datasets/data.yaml:数据集配置文件。--weights yolov10s.pt:初始化模型权重,yolov10s.pt是预训练的轻量级YOLO模型。
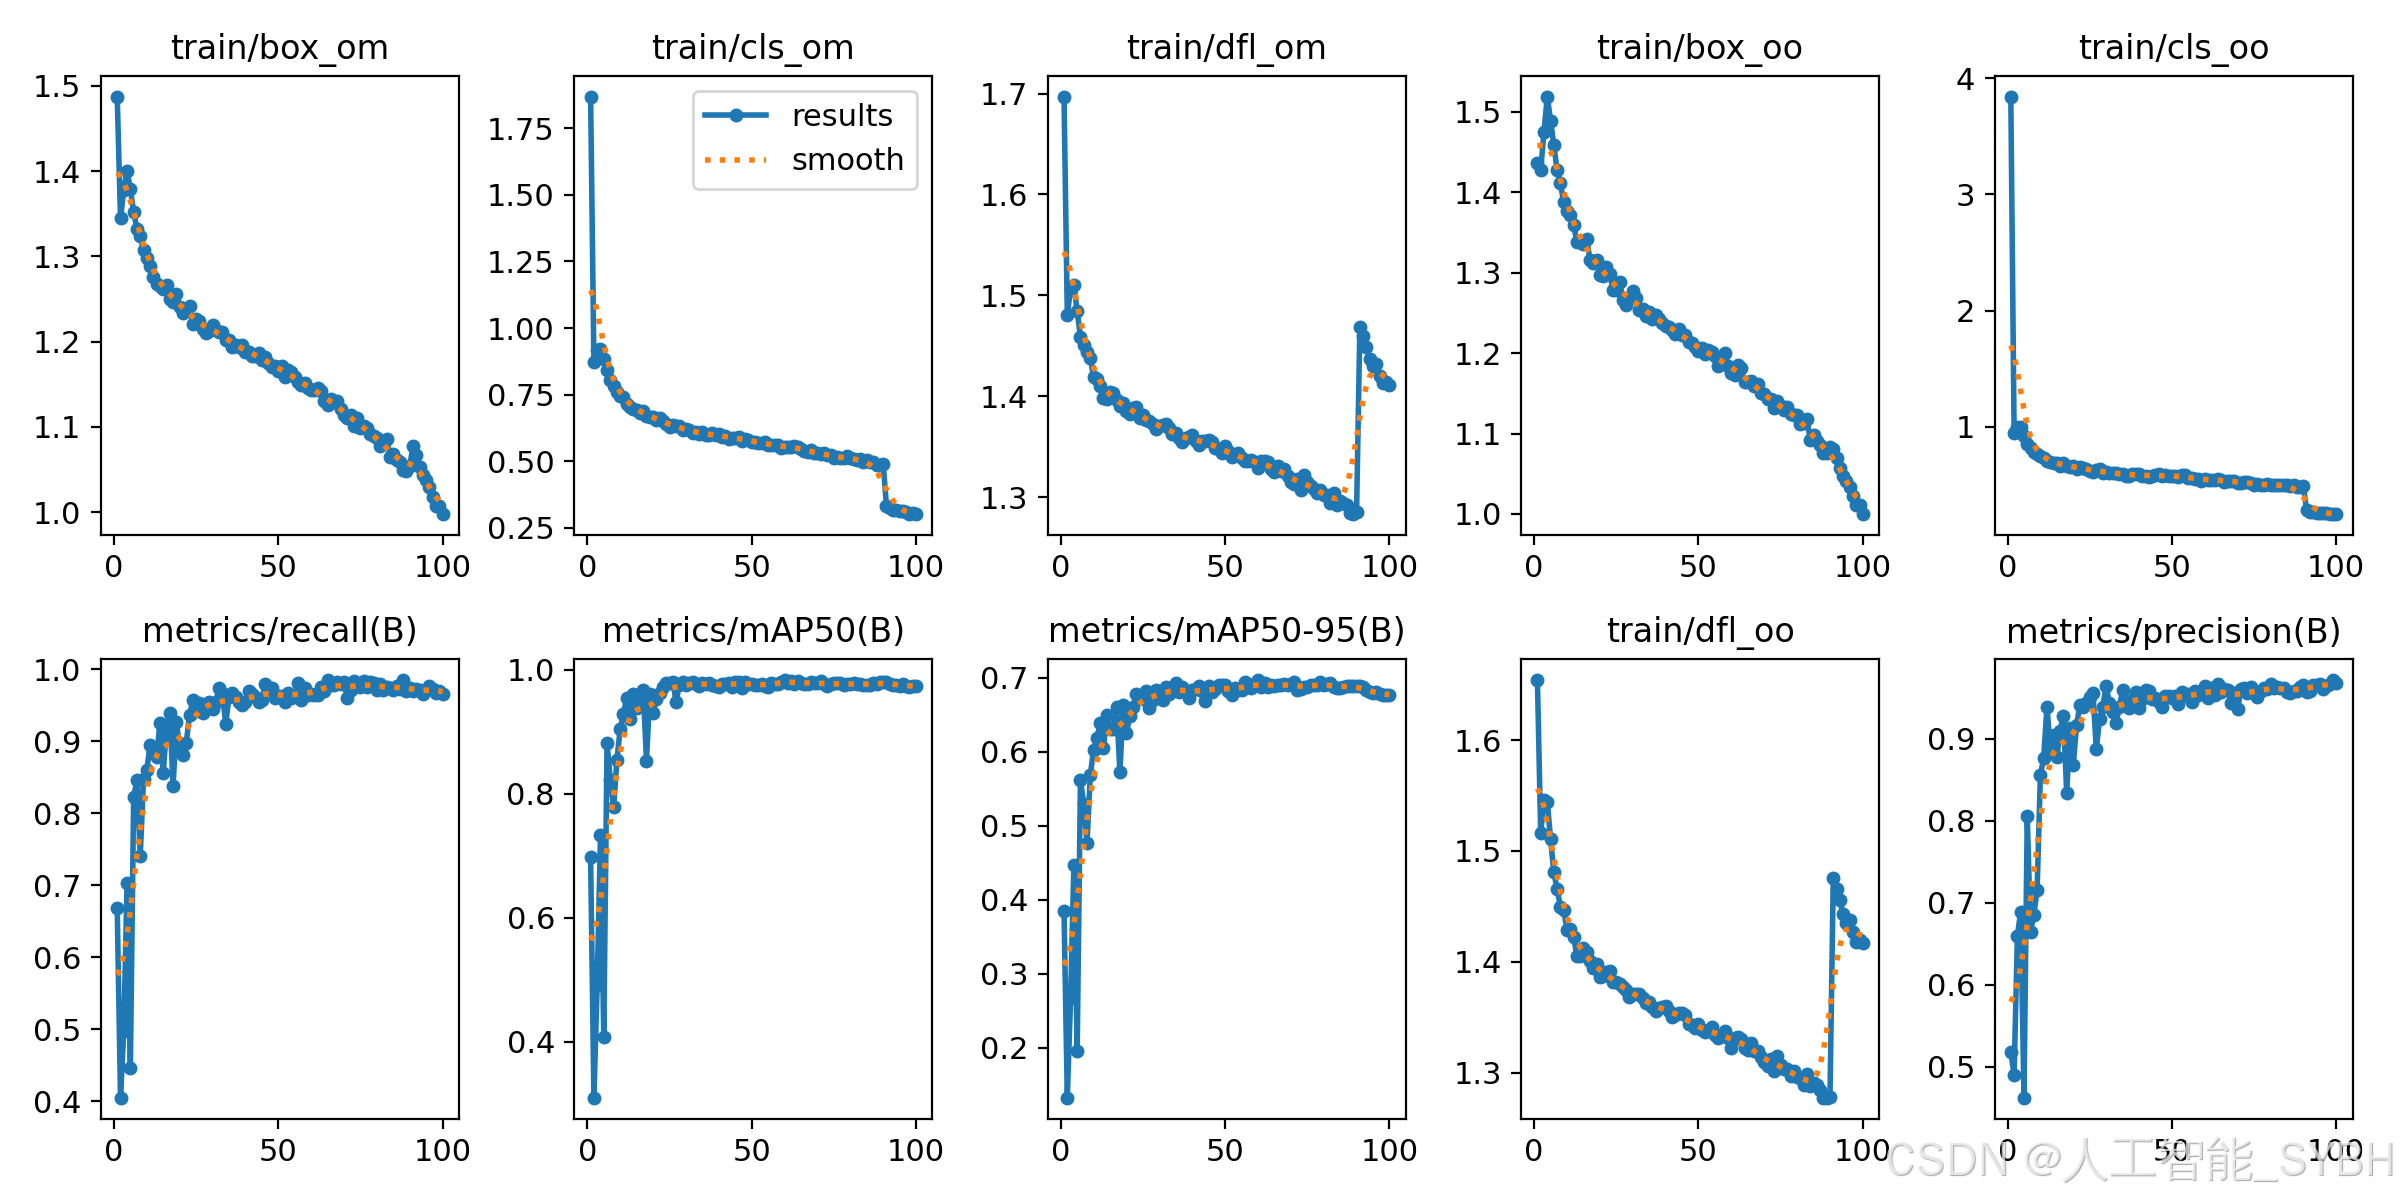
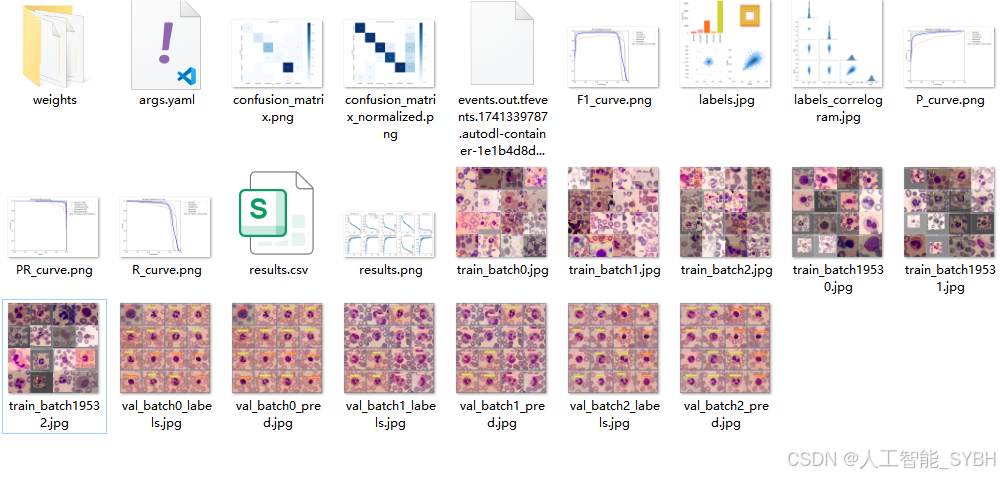
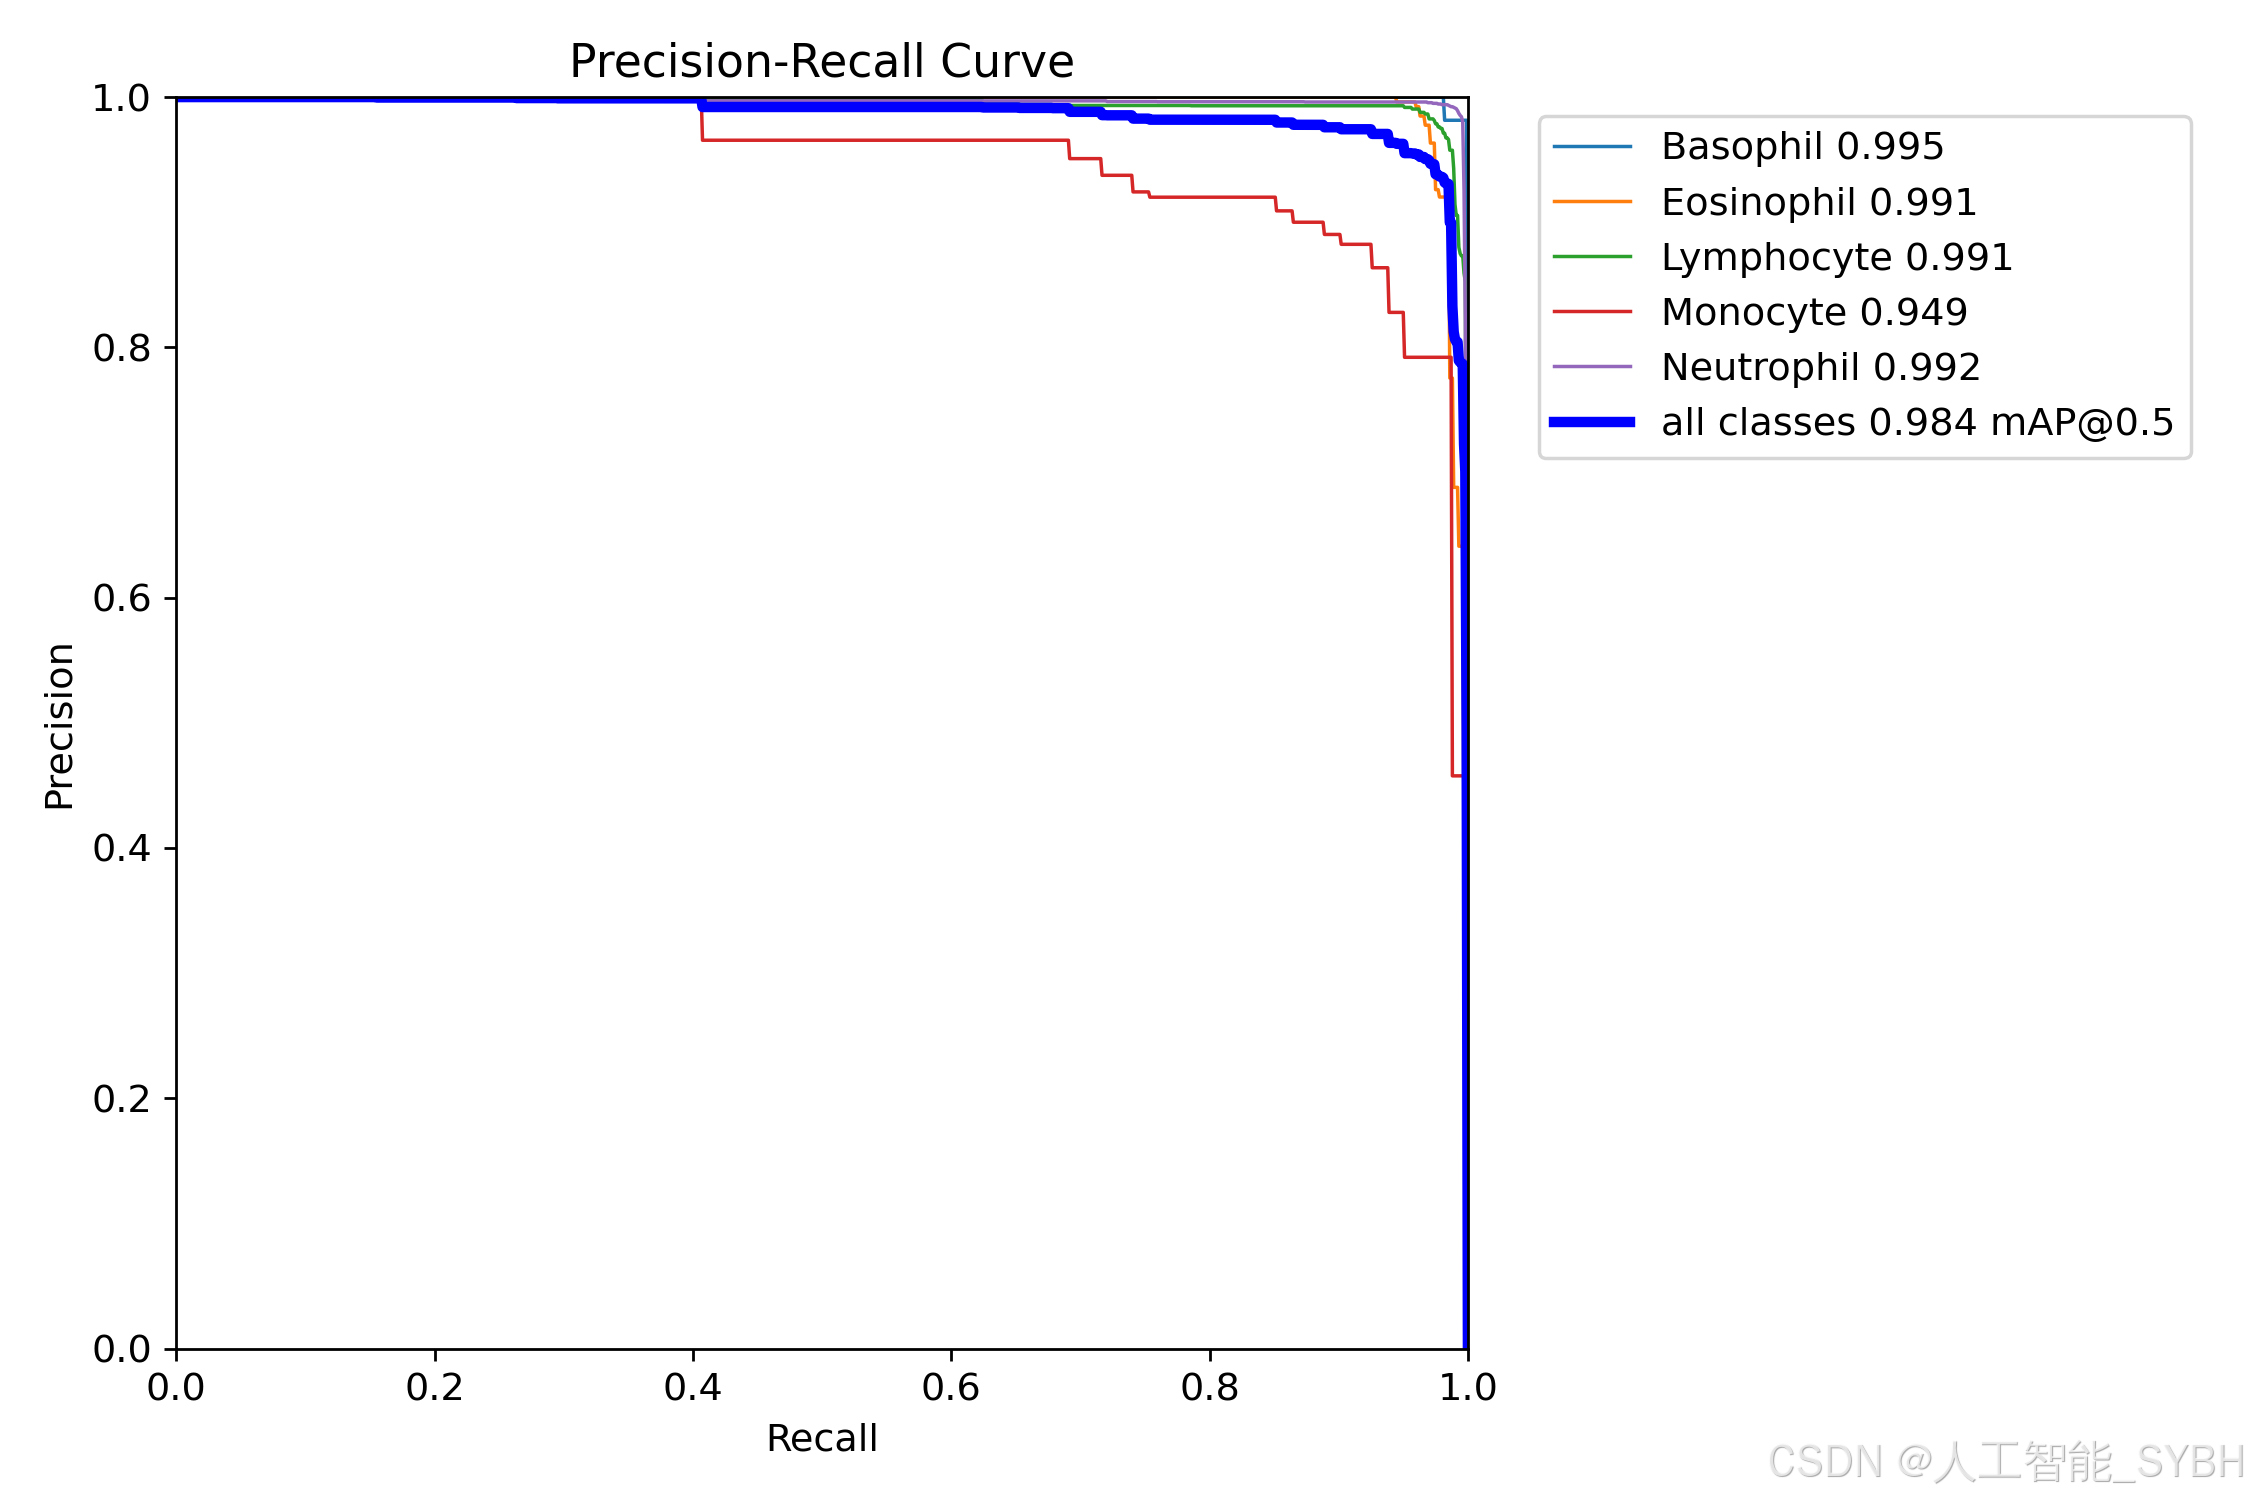
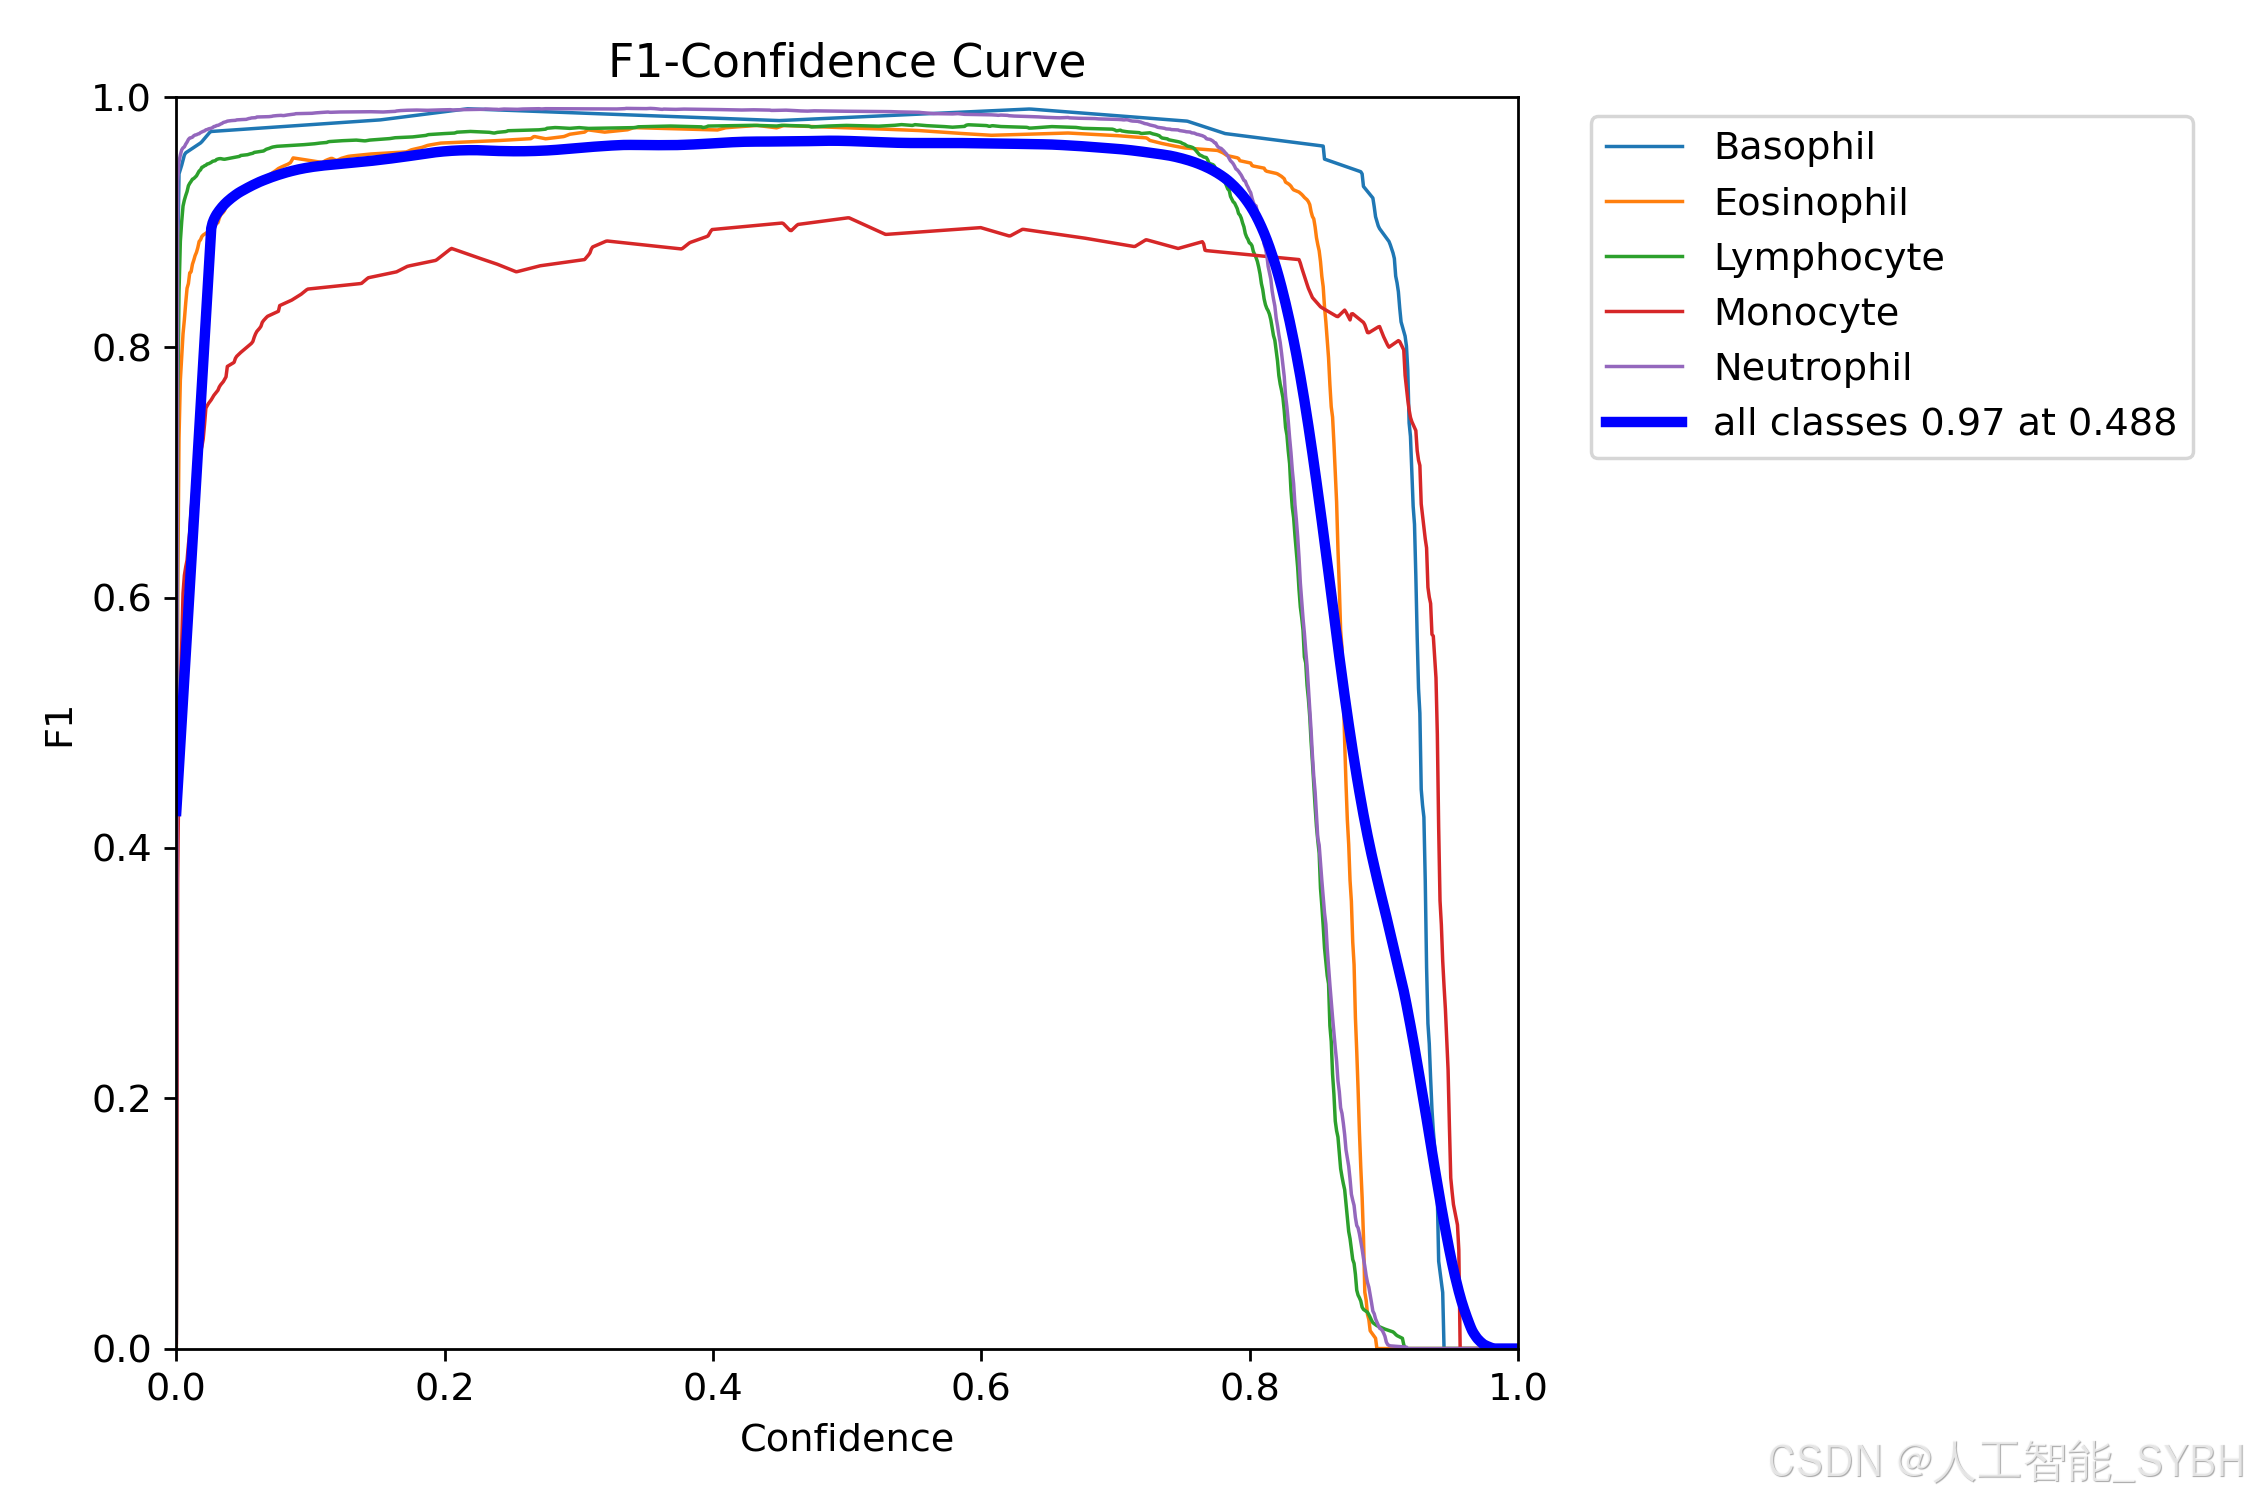
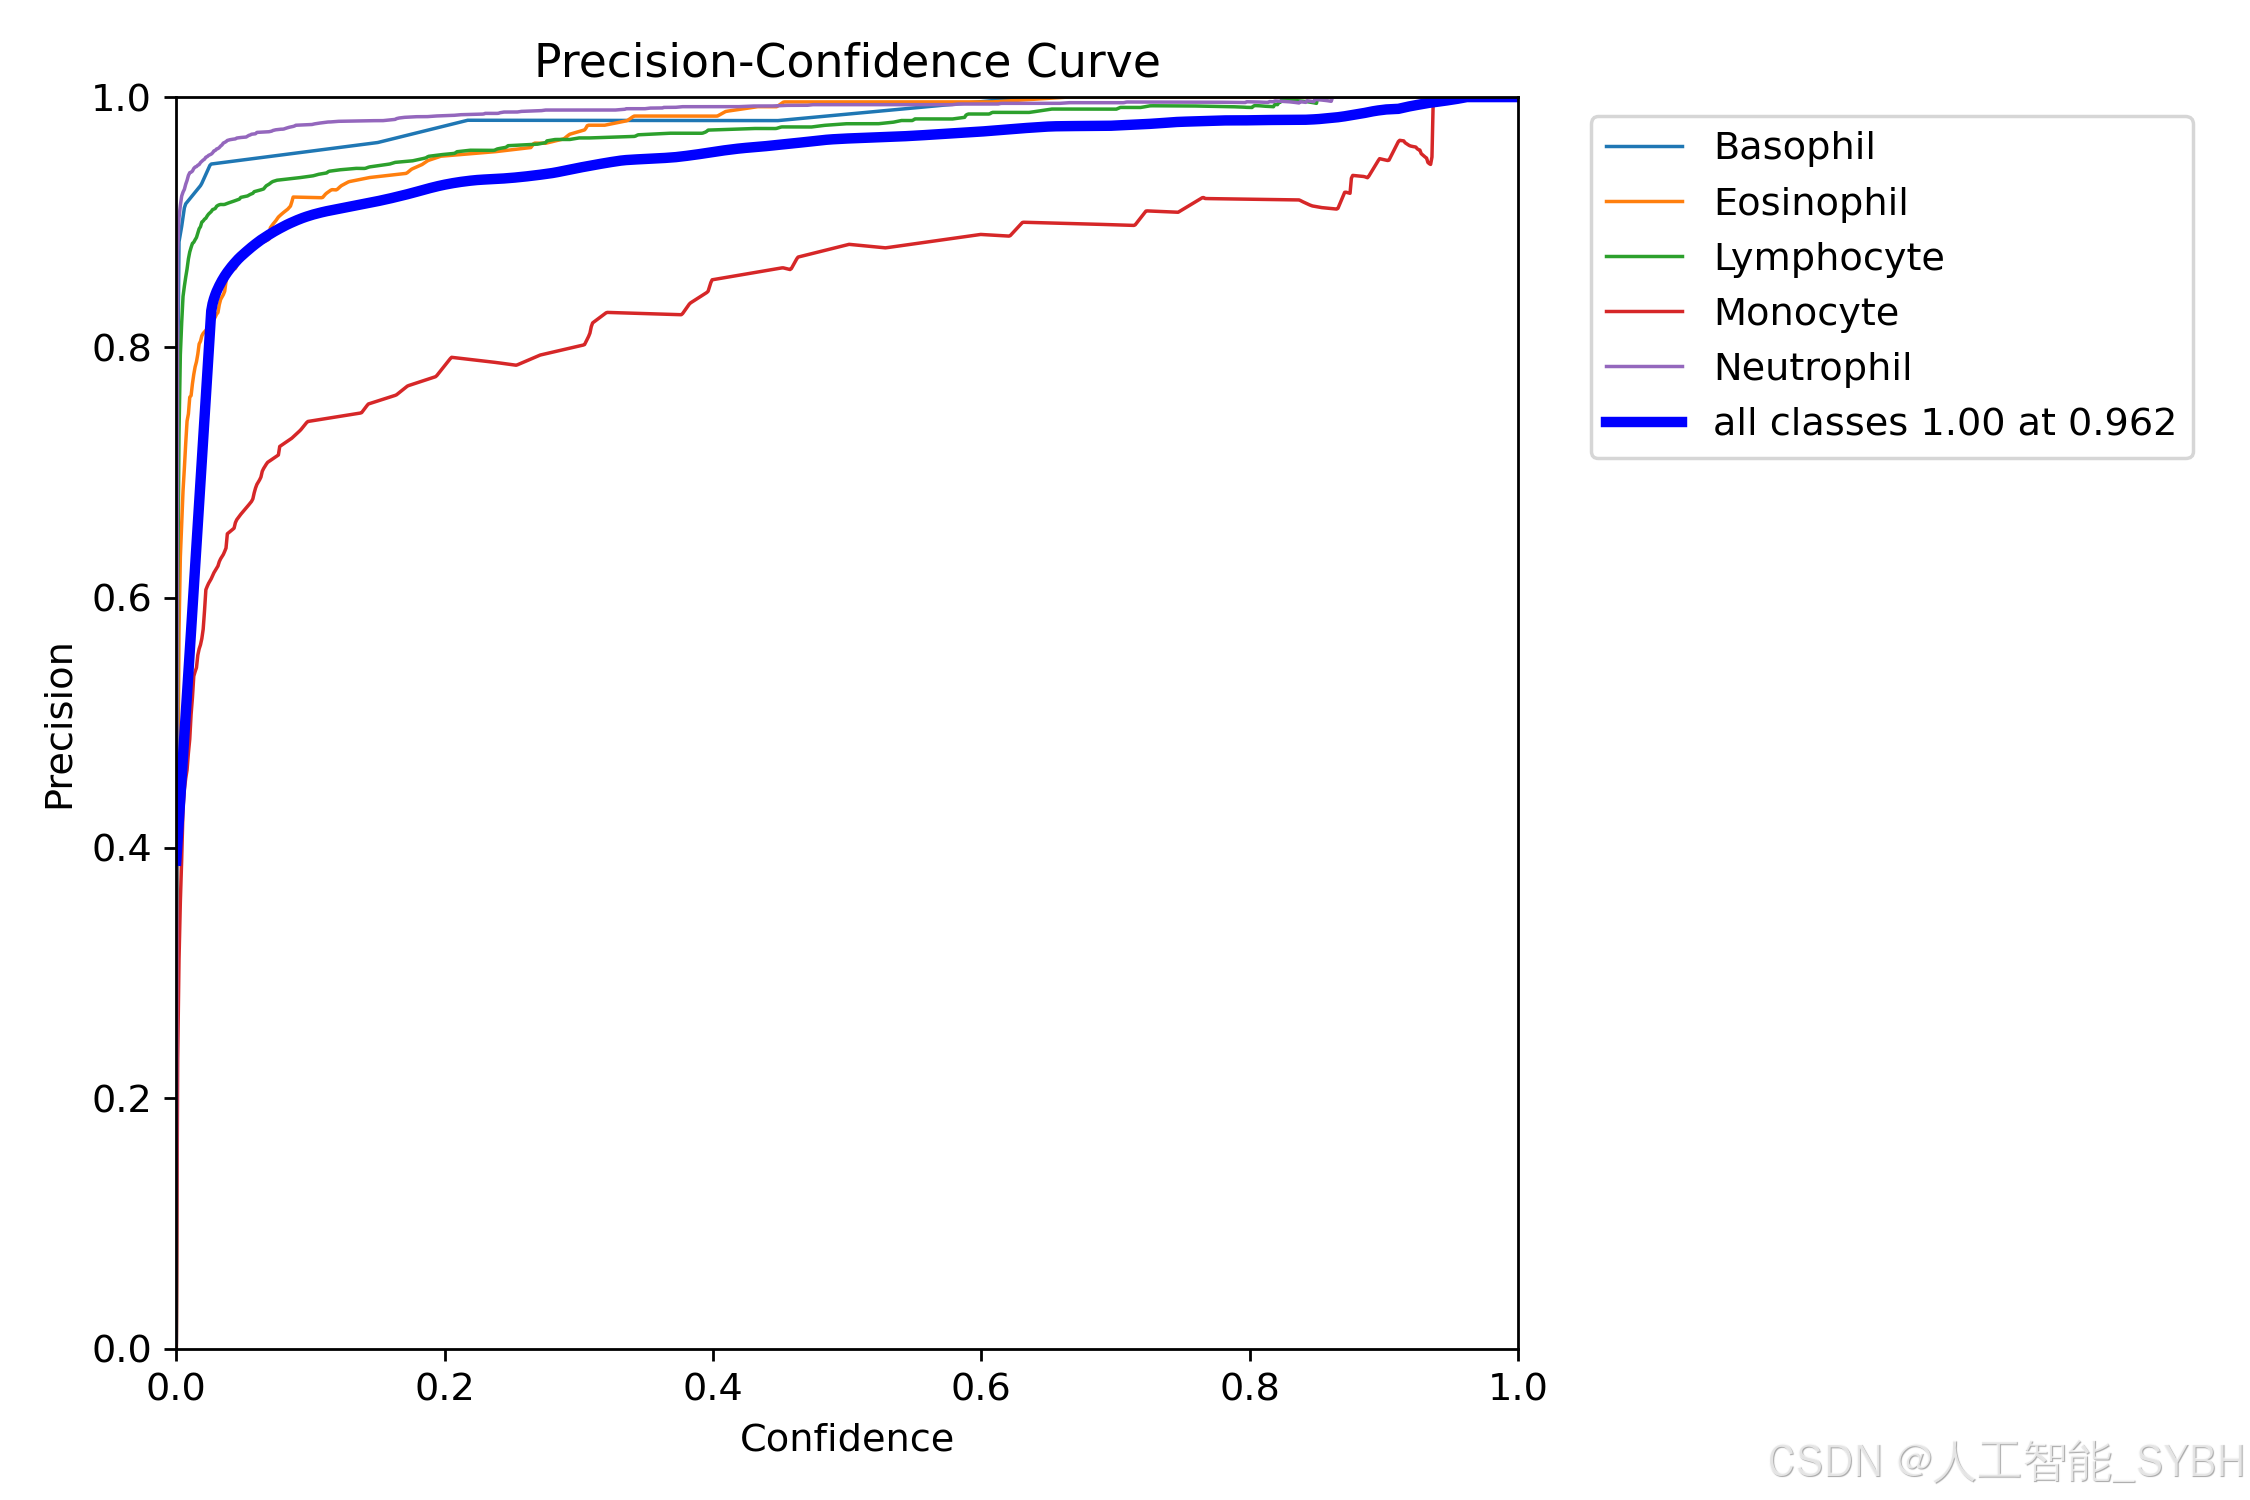
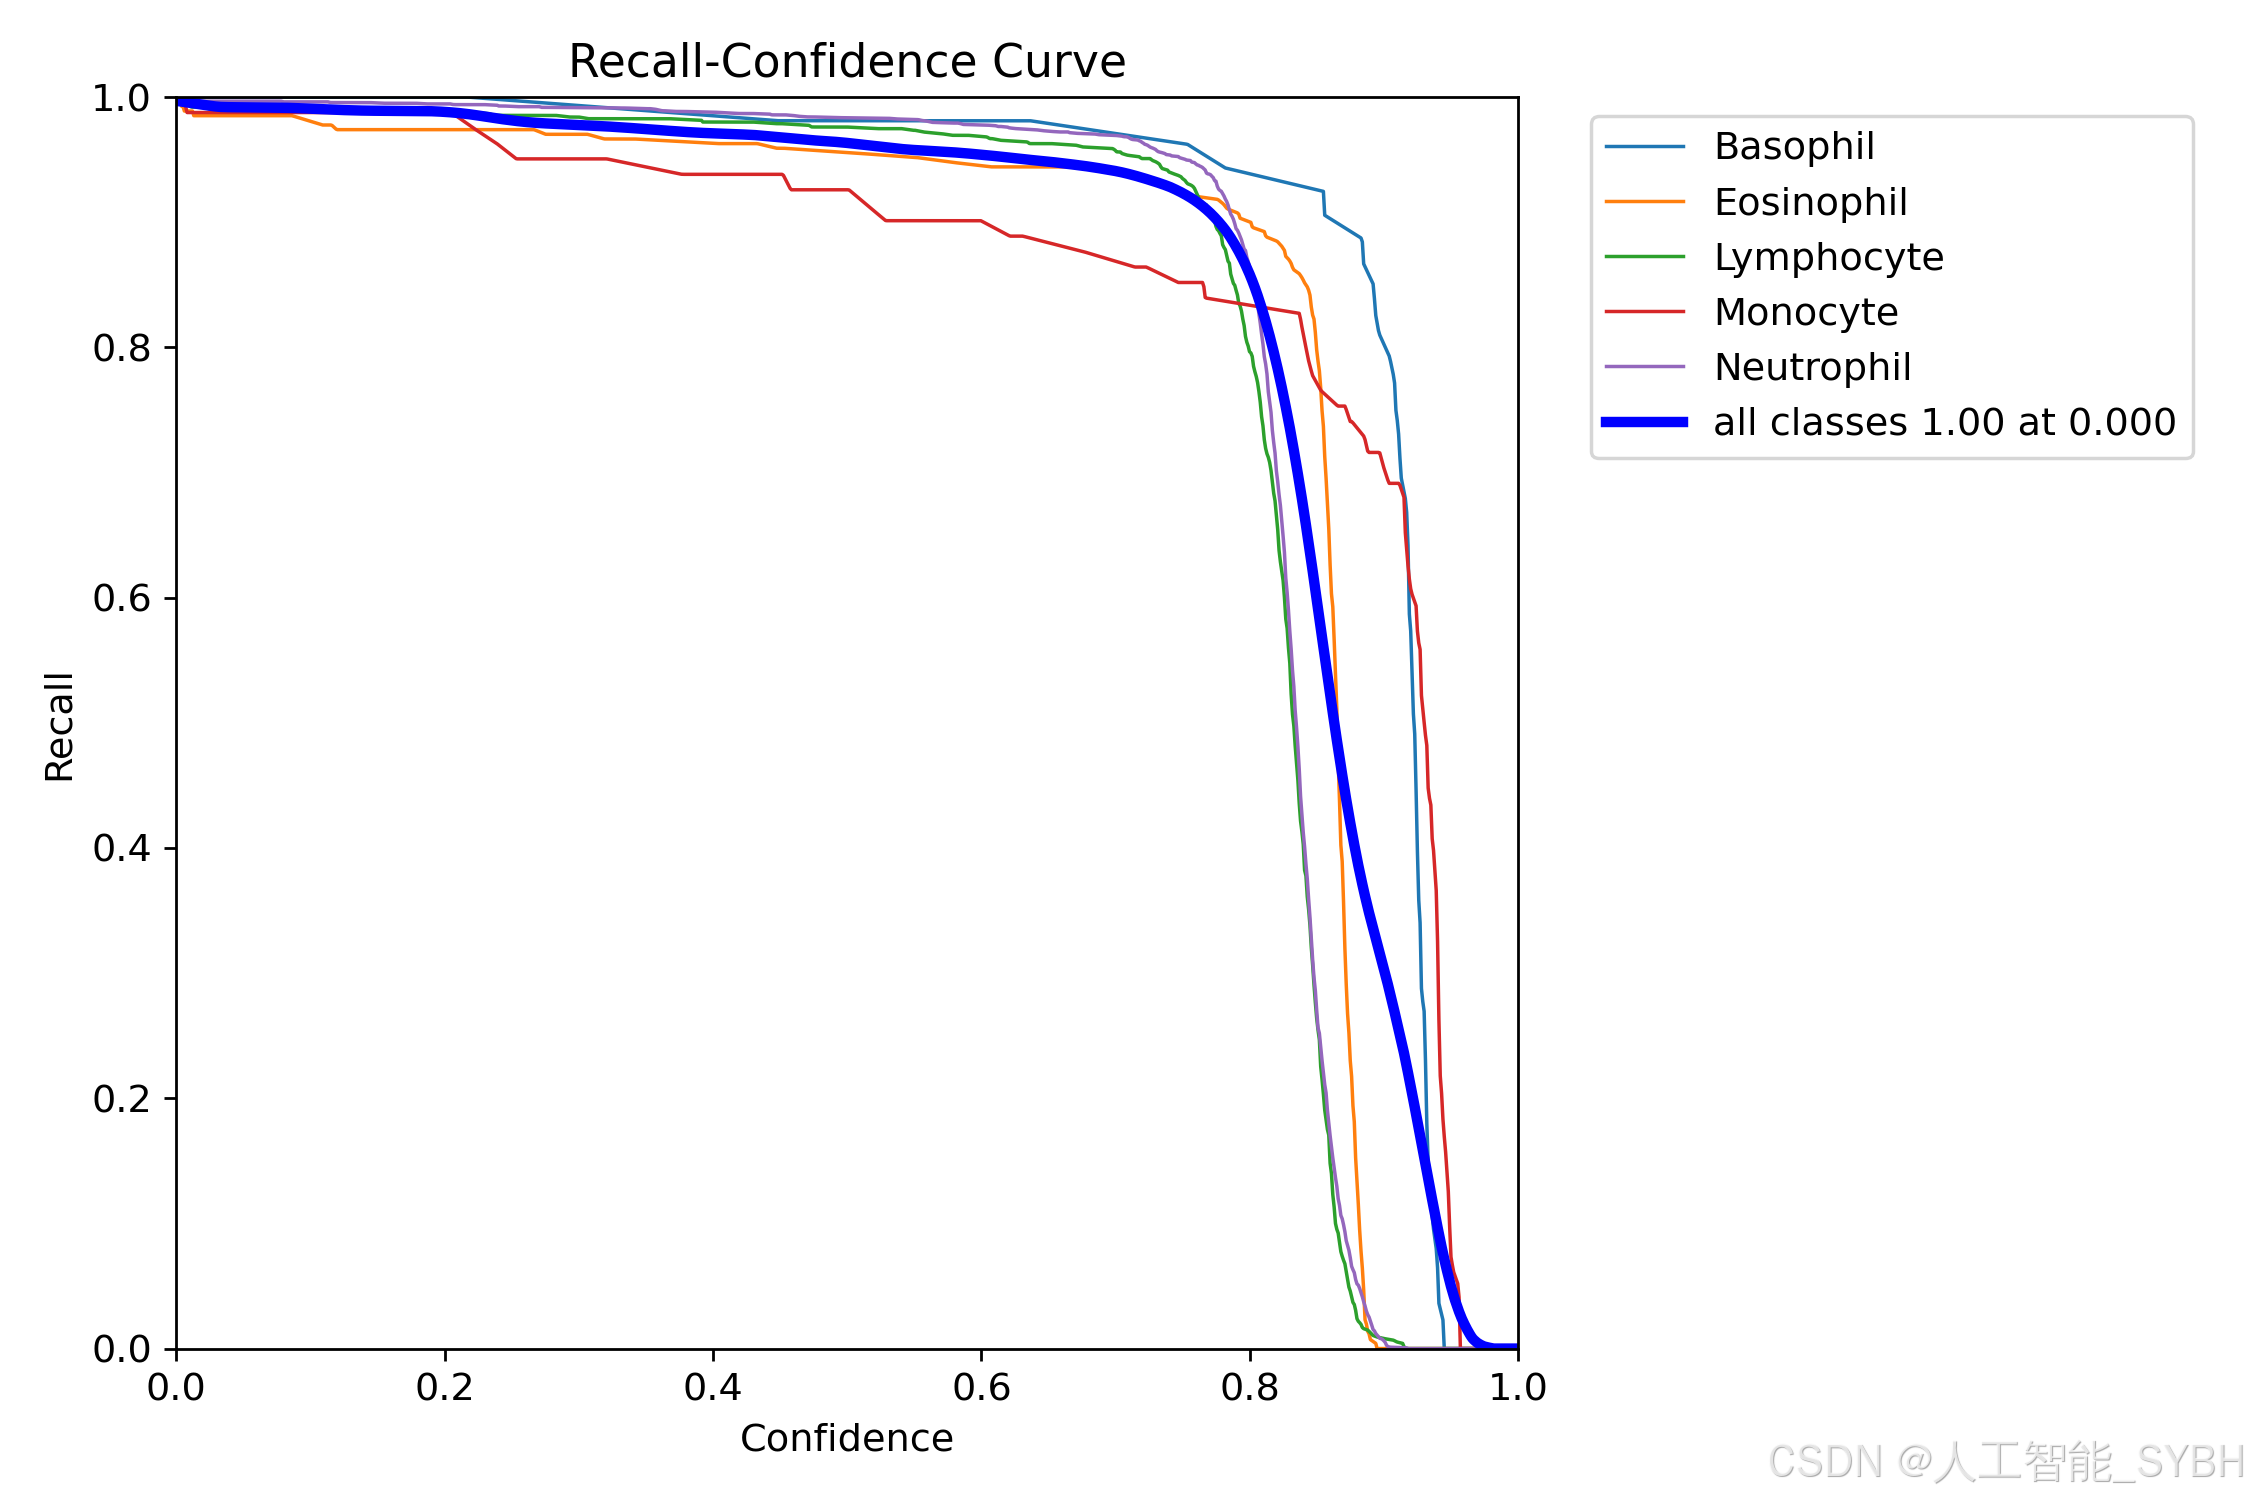
训练结果


六、核心代码
# -*- coding: utf-8 -*-
import time
from PyQt5.QtWidgets import QApplication , QMainWindow, QFileDialog,QMessageBox,QWidget,QHeaderView,QTableWidgetItem, QAbstractItemView
import sys
import os
from PIL import ImageFont
from ultralytics import YOLOv10
sys.path.append('UIProgram')
from UIProgram.UiMain import Ui_MainWindow
import sys
from PyQt5.QtCore import QTimer, Qt, QThread, pyqtSignal,QCoreApplication
import detect_tools as tools
import cv2
import Config
from UIProgram.QssLoader import QSSLoader
from UIProgram.precess_bar import ProgressBar
import numpy as np
# import torch
class MainWindow(QMainWindow):
def __init__(self, parent=None):
super(QMainWindow, self).__init__(parent)
self.ui = Ui_MainWindow()
self.ui.setupUi(self)
self.initMain()
self.signalconnect()
# 加载css渲染效果
style_file = 'UIProgram/style.css'
qssStyleSheet = QSSLoader.read_qss_file(style_file)
self.setStyleSheet(qssStyleSheet)
def signalconnect(self):
self.ui.PicBtn.clicked.connect(self.open_img)
self.ui.comboBox.activated.connect(self.combox_change)
self.ui.VideoBtn.clicked.connect(self.vedio_show)
self.ui.CapBtn.clicked.connect(self.camera_show)
self.ui.SaveBtn.clicked.connect(self.save_detect_video)
self.ui.ExitBtn.clicked.connect(QCoreApplication.quit)
self.ui.FilesBtn.clicked.connect(self.detact_batch_imgs)
def initMain(self):
self.show_width = 700
self.show_height = 500
self.org_path = None
self.is_camera_open = False
self.cap = None
# self.device = 0 if torch.cuda.is_available() else 'cpu'
# 加载检测模型
self.model = YOLOv10('runs/detect/exp/weights/best.pt', task='detect')
self.model(np.zeros((48, 48, 3))) #预先加载推理模型
self.fontC = ImageFont.truetype("Font/platech.ttf", 25, 0)
self.colors = tools.Colors()
self.timer_camera = QTimer()
# 更新检测信息表格
# self.timer_info = QTimer()
# 保存视频
self.timer_save_video = QTimer()
# 表格
self.ui.tableWidget.verticalHeader().setSectionResizeMode(QHeaderView.Fixed)
self.ui.tableWidget.verticalHeader().setDefaultSectionSize(40)
self.ui.tableWidget.setColumnWidth(0, 80) # 设置列宽
self.ui.tableWidget.setColumnWidth(1, 200)
self.ui.tableWidget.setColumnWidth(2, 150)
self.ui.tableWidget.setColumnWidth(3, 90)
self.ui.tableWidget.setColumnWidth(4, 230)
self.ui.tableWidget.setSelectionBehavior(QAbstractItemView.SelectRows) # 设置表格整行选中
self.ui.tableWidget.verticalHeader().setVisible(False) # 隐藏列标题
self.ui.tableWidget.setAlternatingRowColors(True) # 表格背景交替
def open_img(self):
if self.cap:
# 打开图片前关闭摄像头
self.video_stop()
self.is_camera_open = False
self.ui.CaplineEdit.setText('摄像头未开启')
self.cap = None
file_path, _ = QFileDialog.getOpenFileName(None, '打开图片', './', "Image files (*.jpg *.jepg *.png)")
if not file_path:
return
self.ui.comboBox.setDisabled(False)
self.org_path = file_path
self.org_img = tools.img_cvread(self.org_path)
# 目标检测
t1 = time.time()
self.results = self.model(self.org_path)[0]
t2 = time.time()
take_time_str = '{:.3f} s'.format(t2 - t1)
self.ui.time_lb.setText(take_time_str)
location_list = self.results.boxes.xyxy.tolist()
self.location_list = [list(map(int, e)) for e in location_list]
cls_list = self.results.boxes.cls.tolist()
self.cls_list = [int(i) for i in cls_list]
self.conf_list = self.results.boxes.conf.tolist()
self.conf_list = ['%.2f %%' % (each*100) for each in self.conf_list]
total_nums = len(location_list)
cls_percents = []
for i in range(1):
if total_nums ==0:
res =0
else:
res = self.cls_list.count(i) / total_nums
cls_percents.append(res)
self.set_percent(cls_percents)
now_img = self.results.plot()
self.draw_img = now_img
# 获取缩放后的图片尺寸
self.img_width, self.img_height = self.get_resize_size(now_img)
resize_cvimg = cv2.resize(now_img,(self.img_width, self.img_height))
pix_img = tools.cvimg_to_qpiximg(resize_cvimg)
self.ui.label_show.setPixmap(pix_img)
self.ui.label_show.setAlignment(Qt.AlignCenter)
# 设置路径显示
self.ui.PiclineEdit.setText(self.org_path)
# 目标数目
target_nums = len(self.cls_list)
self.ui.label_nums.setText(str(target_nums))
# 设置目标选择下拉框
choose_list = ['全部']
target_names = [Config.names[id]+ '_'+ str(index) for index,id in enumerate(self.cls_list)]
choose_list = choose_list + target_names
self.ui.comboBox.clear()
self.ui.comboBox.addItems(choose_list)
if target_nums >= 1:
self.ui.type_lb.setText(Config.CH_names[self.cls_list[0]])
self.ui.label_conf.setText(str(self.conf_list[0]))
self.ui.label_xmin.setText(str(self.location_list[0][0]))
self.ui.label_ymin.setText(str(self.location_list[0][1]))
self.ui.label_xmax.setText(str(self.location_list[0][2]))
self.ui.label_ymax.setText(str(self.location_list[0][3]))
else:
self.ui.type_lb.setText('')
self.ui.label_conf.setText('')
self.ui.label_xmin.setText('')
self.ui.label_ymin.setText('')
self.ui.label_xmax.setText('')
self.ui.label_ymax.setText('')
# # 删除表格所有行
self.ui.tableWidget.setRowCount(0)
self.ui.tableWidget.clearContents()
self.tabel_info_show(self.location_list, self.cls_list, self.conf_list,path=self.org_path)
def detact_batch_imgs(self):
if self.cap:
# 打开图片前关闭摄像头
self.video_stop()
self.is_camera_open = False
self.ui.CaplineEdit.setText('摄像头未开启')
self.cap = None
directory = QFileDialog.getExistingDirectory(self,
"选取文件夹",
"./") # 起始路径
if not directory:
return
self.org_path = directory
img_suffix = ['jpg','png','jpeg','bmp']
for file_name in os.listdir(directory):
full_path = os.path.join(directory,file_name)
if os.path.isfile(full_path) and file_name.split('.')[-1].lower() in img_suffix:
# self.ui.comboBox.setDisabled(False)
img_path = full_path
self.org_img = tools.img_cvread(img_path)
# 目标检测
t1 = time.time()
self.results = self.model(img_path)[0]
t2 = time.time()
take_time_str = '{:.3f} s'.format(t2 - t1)
self.ui.time_lb.setText(take_time_str)
location_list = self.results.boxes.xyxy.tolist()
self.location_list = [list(map(int, e)) for e in location_list]
cls_list = self.results.boxes.cls.tolist()
self.cls_list = [int(i) for i in cls_list]
self.conf_list = self.results.boxes.conf.tolist()
self.conf_list = ['%.2f %%' % (each * 100) for each in self.conf_list]
total_nums = len(location_list)
cls_percents = []
for i in range(1):
if total_nums == 0:
res = 0
else:
res = self.cls_list.count(i) / total_nums
cls_percents.append(res)
self.set_percent(cls_percents)
now_img = self.results.plot()
self.draw_img = now_img
# 获取缩放后的图片尺寸
self.img_width, self.img_height = self.get_resize_size(now_img)
resize_cvimg = cv2.resize(now_img, (self.img_width, self.img_height))
pix_img = tools.cvimg_to_qpiximg(resize_cvimg)
self.ui.label_show.setPixmap(pix_img)
self.ui.label_show.setAlignment(Qt.AlignCenter)
# 设置路径显示
self.ui.PiclineEdit.setText(img_path)
# 目标数目
target_nums = len(self.cls_list)
self.ui.label_nums.setText(str(target_nums))
# 设置目标选择下拉框
choose_list = ['全部']
target_names = [Config.names[id] + '_' + str(index) for index, id in enumerate(self.cls_list)]
choose_list = choose_list + target_names
self.ui.comboBox.clear()
self.ui.comboBox.addItems(choose_list)
if target_nums >= 1:
self.ui.type_lb.setText(Config.CH_names[self.cls_list[0]])
self.ui.label_conf.setText(str(self.conf_list[0]))
self.ui.label_xmin.setText(str(self.location_list[0][0]))
self.ui.label_ymin.setText(str(self.location_list[0][1]))
self.ui.label_xmax.setText(str(self.location_list[0][2]))
self.ui.label_ymax.setText(str(self.location_list[0][3]))
else:
self.ui.type_lb.setText('')
self.ui.label_conf.setText('')
self.ui.label_xmin.setText('')
self.ui.label_ymin.setText('')
self.ui.label_xmax.setText('')
self.ui.label_ymax.setText('')
# # 删除表格所有行
self.tabel_info_show(self.location_list, self.cls_list, self.conf_list, path=img_path)
self.ui.tableWidget.scrollToBottom()
QApplication.processEvents() #刷新页面
def draw_rect_and_tabel(self, results, img):
now_img = img.copy()
location_list = results.boxes.xyxy.tolist()
self.location_list = [list(map(int, e)) for e in location_list]
cls_list = results.boxes.cls.tolist()
self.cls_list = [int(i) for i in cls_list]
self.conf_list = results.boxes.conf.tolist()
self.conf_list = ['%.2f %%' % (each * 100) for each in self.conf_list]
for loacation, type_id, conf in zip(self.location_list, self.cls_list, self.conf_list):
type_id = int(type_id)
color = self.colors(int(type_id), True)
# cv2.rectangle(now_img, (int(x1), int(y1)), (int(x2), int(y2)), colors(int(type_id), True), 3)
now_img = tools.drawRectBox(now_img, loacation, Config.CH_names[type_id], self.fontC, color)
# 获取缩放后的图片尺寸
self.img_width, self.img_height = self.get_resize_size(now_img)
resize_cvimg = cv2.resize(now_img, (self.img_width, self.img_height))
pix_img = tools.cvimg_to_qpiximg(resize_cvimg)
self.ui.label_show.setPixmap(pix_img)
self.ui.label_show.setAlignment(Qt.AlignCenter)
# 设置路径显示
self.ui.PiclineEdit.setText(self.org_path)
# 目标数目
target_nums = len(self.cls_list)
self.ui.label_nums.setText(str(target_nums))
if target_nums >= 1:
self.ui.type_lb.setText(Config.CH_names[self.cls_list[0]])
self.ui.label_conf.setText(str(self.conf_list[0]))
self.ui.label_xmin.setText(str(self.location_list[0][0]))
self.ui.label_ymin.setText(str(self.location_list[0][1]))
self.ui.label_xmax.setText(str(self.location_list[0][2]))
self.ui.label_ymax.setText(str(self.location_list[0][3]))
else:
self.ui.type_lb.setText('')
self.ui.label_conf.setText('')
self.ui.label_xmin.setText('')
self.ui.label_ymin.setText('')
self.ui.label_xmax.setText('')
self.ui.label_ymax.setText('')
# 删除表格所有行
self.ui.tableWidget.setRowCount(0)
self.ui.tableWidget.clearContents()
self.tabel_info_show(self.location_list, self.cls_list, self.conf_list, path=self.org_path)
return now_img
def combox_change(self):
com_text = self.ui.comboBox.currentText()
if com_text == '全部':
cur_box = self.location_list
cur_img = self.results.plot()
self.ui.type_lb.setText(Config.CH_names[self.cls_list[0]])
self.ui.label_conf.setText(str(self.conf_list[0]))
else:
index = int(com_text.split('_')[-1])
cur_box = [self.location_list[index]]
cur_img = self.results[index].plot()
self.ui.type_lb.setText(Config.CH_names[self.cls_list[index]])
self.ui.label_conf.setText(str(self.conf_list[index]))
# 设置坐标位置值
self.ui.label_xmin.setText(str(cur_box[0][0]))
self.ui.label_ymin.setText(str(cur_box[0][1]))
self.ui.label_xmax.setText(str(cur_box[0][2]))
self.ui.label_ymax.setText(str(cur_box[0][3]))
resize_cvimg = cv2.resize(cur_img, (self.img_width, self.img_height))
pix_img = tools.cvimg_to_qpiximg(resize_cvimg)
self.ui.label_show.clear()
self.ui.label_show.setPixmap(pix_img)
self.ui.label_show.setAlignment(Qt.AlignCenter)
def get_video_path(self):
file_path, _ = QFileDialog.getOpenFileName(None, '打开视频', './', "Image files (*.avi *.mp4 *.jepg *.png)")
if not file_path:
return None
self.org_path = file_path
self.ui.VideolineEdit.setText(file_path)
return file_path
def video_start(self):
# 删除表格所有行
self.ui.tableWidget.setRowCount(0)
self.ui.tableWidget.clearContents()
# 清空下拉框
self.ui.comboBox.clear()
# 定时器开启,每隔一段时间,读取一帧
self.timer_camera.start(1)
self.timer_camera.timeout.connect(self.open_frame)
def tabel_info_show(self, locations, clses, confs, path=None):
path = path
for location, cls, conf in zip(locations, clses, confs):
row_count = self.ui.tableWidget.rowCount() # 返回当前行数(尾部)
self.ui.tableWidget.insertRow(row_count) # 尾部插入一行
item_id = QTableWidgetItem(str(row_count+1)) # 序号
item_id.setTextAlignment(Qt.AlignHCenter | Qt.AlignVCenter) # 设置文本居中
item_path = QTableWidgetItem(str(path)) # 路径
# item_path.setTextAlignment(Qt.AlignHCenter | Qt.AlignVCenter)
item_cls = QTableWidgetItem(str(Config.CH_names[cls]))
item_cls.setTextAlignment(Qt.AlignHCenter | Qt.AlignVCenter) # 设置文本居中
item_conf = QTableWidgetItem(str(conf))
item_conf.setTextAlignment(Qt.AlignHCenter | Qt.AlignVCenter) # 设置文本居中
item_location = QTableWidgetItem(str(location)) # 目标框位置
# item_location.setTextAlignment(Qt.AlignHCenter | Qt.AlignVCenter) # 设置文本居中
self.ui.tableWidget.setItem(row_count, 0, item_id)
self.ui.tableWidget.setItem(row_count, 1, item_path)
self.ui.tableWidget.setItem(row_count, 2, item_cls)
self.ui.tableWidget.setItem(row_count, 3, item_conf)
self.ui.tableWidget.setItem(row_count, 4, item_location)
self.ui.tableWidget.scrollToBottom()
def video_stop(self):
self.cap.release()
self.timer_camera.stop()
# self.timer_info.stop()
def open_frame(self):
ret, now_img = self.cap.read()
if ret:
# 目标检测
t1 = time.time()
results = self.model(now_img)[0]
t2 = time.time()
take_time_str = '{:.3f} s'.format(t2 - t1)
self.ui.time_lb.setText(take_time_str)
location_list = results.boxes.xyxy.tolist()
self.location_list = [list(map(int, e)) for e in location_list]
cls_list = results.boxes.cls.tolist()
self.cls_list = [int(i) for i in cls_list]
self.conf_list = results.boxes.conf.tolist()
self.conf_list = ['%.2f %%' % (each * 100) for each in self.conf_list]
total_nums = len(location_list)
cls_percents = []
for i in range(1):
if total_nums!= 0 :
res = self.cls_list.count(i) / total_nums
else :
res=0
cls_percents.append(res)
self.set_percent(cls_percents)
now_img = results.plot()
# 获取缩放后的图片尺寸
self.img_width, self.img_height = self.get_resize_size(now_img)
resize_cvimg = cv2.resize(now_img, (self.img_width, self.img_height))
pix_img = tools.cvimg_to_qpiximg(resize_cvimg)
self.ui.label_show.setPixmap(pix_img)
self.ui.label_show.setAlignment(Qt.AlignCenter)
# 目标数目
target_nums = len(self.cls_list)
self.ui.label_nums.setText(str(target_nums))
# 设置目标选择下拉框
choose_list = ['全部']
target_names = [Config.names[id] + '_' + str(index) for index, id in enumerate(self.cls_list)]
choose_list = choose_list + target_names
self.ui.comboBox.clear()
self.ui.comboBox.addItems(choose_list)
if target_nums >= 1:
self.ui.type_lb.setText(Config.CH_names[self.cls_list[0]])
self.ui.label_conf.setText(str(self.conf_list[0]))
self.ui.label_xmin.setText(str(self.location_list[0][0]))
self.ui.label_ymin.setText(str(self.location_list[0][1]))
self.ui.label_xmax.setText(str(self.location_list[0][2]))
self.ui.label_ymax.setText(str(self.location_list[0][3]))
else:
self.ui.type_lb.setText('')
self.ui.label_conf.setText('')
self.ui.label_xmin.setText('')
self.ui.label_ymin.setText('')
self.ui.label_xmax.setText('')
self.ui.label_ymax.setText('')
self.tabel_info_show(self.location_list, self.cls_list, self.conf_list, path=self.org_path)
else:
self.cap.release()
self.timer_camera.stop()
def vedio_show(self):
if self.is_camera_open:
self.is_camera_open = False
self.ui.CaplineEdit.setText('摄像头未开启')
video_path = self.get_video_path()
if not video_path:
return None
self.cap = cv2.VideoCapture(video_path)
self.video_start()
self.ui.comboBox.setDisabled(True)
def camera_show(self):
self.is_camera_open = not self.is_camera_open
if self.is_camera_open:
self.ui.CaplineEdit.setText('摄像头开启')
self.cap = cv2.VideoCapture(0)
self.video_start()
self.ui.comboBox.setDisabled(True)
else:
self.ui.CaplineEdit.setText('摄像头未开启')
self.ui.label_show.setText('')
if self.cap:
self.cap.release()
cv2.destroyAllWindows()
self.ui.label_show.clear()
def get_resize_size(self, img):
_img = img.copy()
img_height, img_width , depth= _img.shape
ratio = img_width / img_height
if ratio >= self.show_width / self.show_height:
self.img_width = self.show_width
self.img_height = int(self.img_width / ratio)
else:
self.img_height = self.show_height
self.img_width = int(self.img_height * ratio)
return self.img_width, self.img_height
def save_detect_video(self):
if self.cap is None and not self.org_path:
QMessageBox.about(self, '提示', '当前没有可保存信息,请先打开图片或视频!')
return
if self.is_camera_open:
QMessageBox.about(self, '提示', '摄像头视频无法保存!')
return
if self.cap:
res = QMessageBox.information(self, '提示', '保存视频检测结果可能需要较长时间,请确认是否继续保存?',QMessageBox.Yes | QMessageBox.No , QMessageBox.Yes)
if res == QMessageBox.Yes:
self.video_stop()
com_text = self.ui.comboBox.currentText()
self.btn2Thread_object = btn2Thread(self.org_path, self.model, com_text)
self.btn2Thread_object.start()
self.btn2Thread_object.update_ui_signal.connect(self.update_process_bar)
else:
return
else:
if os.path.isfile(self.org_path):
fileName = os.path.basename(self.org_path)
name , end_name= fileName.rsplit(".",1)
save_name = name + '_detect_result.' + end_name
save_img_path = os.path.join(Config.save_path, save_name)
# 保存图片
cv2.imwrite(save_img_path, self.draw_img)
QMessageBox.about(self, '提示', '图片保存成功!\n文件路径:{}'.format(save_img_path))
else:
img_suffix = ['jpg', 'png', 'jpeg', 'bmp']
for file_name in os.listdir(self.org_path):
full_path = os.path.join(self.org_path, file_name)
if os.path.isfile(full_path) and file_name.split('.')[-1].lower() in img_suffix:
name, end_name = file_name.rsplit(".",1)
save_name = name + '_detect_result.' + end_name
save_img_path = os.path.join(Config.save_path, save_name)
results = self.model(full_path)[0]
now_img = results.plot()
# 保存图片
cv2.imwrite(save_img_path, now_img)
QMessageBox.about(self, '提示', '图片保存成功!\n文件路径:{}'.format(Config.save_path))
def update_process_bar(self,cur_num, total):
if cur_num == 1:
self.progress_bar = ProgressBar(self)
self.progress_bar.show()
if cur_num >= total:
self.progress_bar.close()
QMessageBox.about(self, '提示', '视频保存成功!\n文件在{}目录下'.format(Config.save_path))
return
if self.progress_bar.isVisible() is False:
# 点击取消保存时,终止进程
self.btn2Thread_object.stop()
return
value = int(cur_num / total *100)
self.progress_bar.setValue(cur_num, total, value)
QApplication.processEvents()
def set_percent(self, probs):
pass
class btn2Thread(QThread):
update_ui_signal = pyqtSignal(int,int)
def __init__(self, path, model, com_text):
super(btn2Thread, self).__init__()
self.org_path = path
self.model = model
self.com_text = com_text
# 用于绘制不同颜色矩形框
self.colors = tools.Colors()
self.is_running = True # 标志位,表示线程是否正在运行
def run(self):
# VideoCapture方法是cv2库提供的读取视频方法
cap = cv2.VideoCapture(self.org_path)
# 设置需要保存视频的格式“xvid”
# 该参数是MPEG-4编码类型,文件名后缀为.avi
fourcc = cv2.VideoWriter_fourcc(*'XVID')
# 设置视频帧频
fps = cap.get(cv2.CAP_PROP_FPS)
# 设置视频大小
size = (int(cap.get(cv2.CAP_PROP_FRAME_WIDTH)), int(cap.get(cv2.CAP_PROP_FRAME_HEIGHT)))
# VideoWriter方法是cv2库提供的保存视频方法
# 按照设置的格式来out输出
fileName = os.path.basename(self.org_path)
name, end_name = fileName.split('.')
save_name = name + '_detect_result.avi'
save_video_path = os.path.join(Config.save_path, save_name)
out = cv2.VideoWriter(save_video_path, fourcc, fps, size)
prop = cv2.CAP_PROP_FRAME_COUNT
total = int(cap.get(prop))
print("[INFO] 视频总帧数:{}".format(total))
cur_num = 0
# 确定视频打开并循环读取
while (cap.isOpened() and self.is_running):
cur_num += 1
print('当前第{}帧,总帧数{}'.format(cur_num, total))
ret, frame = cap.read()
if ret == True:
# 检测
results = self.model(frame)[0]
frame = results.plot()
out.write(frame)
self.update_ui_signal.emit(cur_num, total)
else:
break
# 释放资源
cap.release()
out.release()
def stop(self):
self.is_running = False
if __name__ == "__main__":
app = QApplication(sys.argv)
win = MainWindow()
win.show()
sys.exit(app.exec_())
七、项目源码下载链接


 709
709

 被折叠的 条评论
为什么被折叠?
被折叠的 条评论
为什么被折叠?
 到【灌水乐园】发言


