


一、flowable介绍
Flowable 是一个用 Java 编写的轻量级业务流程引擎。Flowable 是 Activiti(Alfresco 的注册商标)的一个分支。实现任务流和审批流。通过导入jar包使用。可以通过Flowable REST API 通过 HTTP 进行通信。
中文手册Flowable开源介绍 · Flowable 中文文档
环境基础:
JDK 17 或更高版本
流程定义工具;flowable-ui
二、flowable-ui的使用
通过flowable-ui可以使用图形界面得到工作流的xml文件。那么怎么使用flowable-ui呢?
访问地址https://github.com/flowable/flowable-engine/releases/tag/flowable-6.7.2下载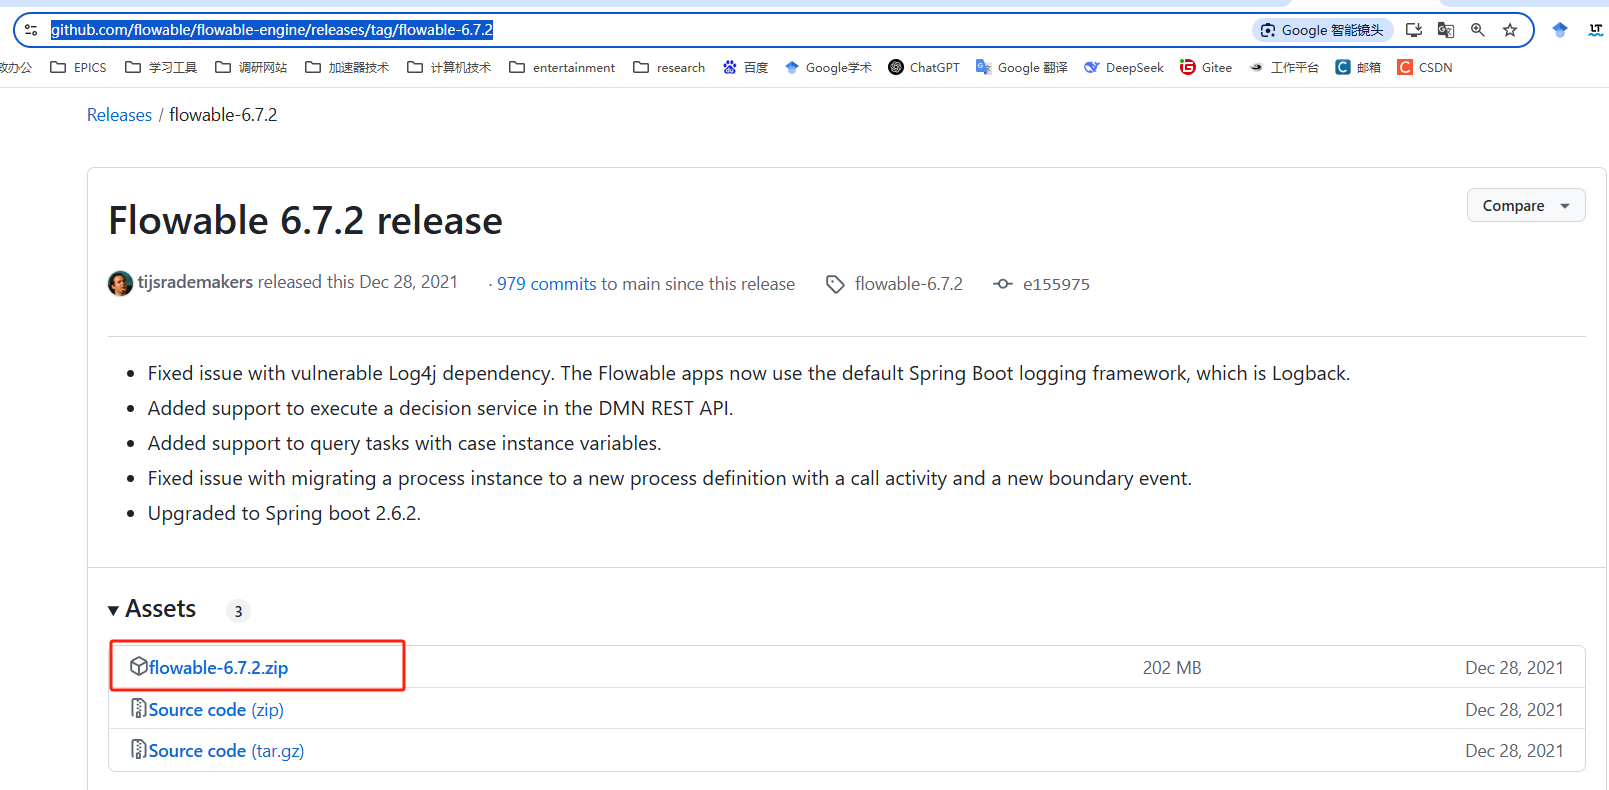
解压

进入cmd命令,输入
java -jar flowable-ui.war
启动成功后访问http://localhost:8080/flowable-ui/#/默认登录账号:admin,密码:test。
三、flowable流程引擎
1.配置过程
添加依赖
  <dependency>
    <groupId>org.flowable</groupId>
    <artifactId>flowable-engine</artifactId>
    <version>7.0.0</version>
  </dependency>

以及数据库依赖  我用的mysql
添加日志框架
<dependency>
  <groupId>org.slf4j</groupId>
  <artifactId>slf4j-api</artifactId>
  <version>2.0.7</version>
</dependency>
<dependency>
  <groupId>org.slf4j</groupId>
  <artifactId>slf4j-log4j12</artifactId>
  <version>2.0.7</version>
</dependency>
添加日志配置,在 src/main/resources 文件夹中添加一个带有以下内容的 log4j.properties 文件:
log4j.rootLogger=DEBUG, CA

log4j.appender.CA=org.apache.log4j.ConsoleAppender
log4j.appender.CA.layout=org.apache.log4j.PatternLayout
log4j.appender.CA.layout.ConversionPattern= %d{hh:mm:ss,SSS} [%t] %-5p %c %x - %m%n
2.流程定义和部署
2-1流程定义
流程以 BPMN 2.0 格式定义,这是一个在行业中被广泛接受的 XML 标准。 在 Flowable 术语中,我们称之为流程定义( 在 Flowable 术语中,我们称之为流程定义。从流程定义中,可以启动许多流程实例。)。从流程定义中,可以启动许多流程实例。这个流程建议使用可视化工具比如flowable-ui完成,并自动保存为xml的形式。
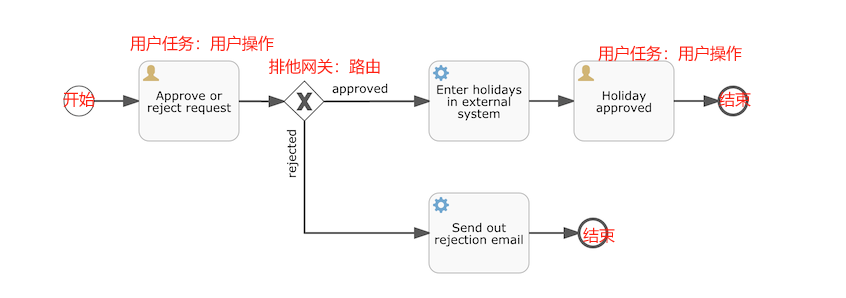
以上流程最终生成一个BPMN2.0的XML文件。将以下 XML 保存在 src/main/resources 文件夹中名为 holiday-request.bpmn20.xml 的文件中。
<?xml version="1.0" encoding="UTF-8"?>
<definitions xmlns="http://www.omg.org/spec/BPMN/20100524/MODEL"
  xmlns:xsi="http://www.w3.org/2001/XMLSchema-instance"
  xmlns:xsd="http://www.w3.org/2001/XMLSchema"
  xmlns:bpmndi="http://www.omg.org/spec/BPMN/20100524/DI"
  xmlns:omgdc="http://www.omg.org/spec/DD/20100524/DC"
  xmlns:omgdi="http://www.omg.org/spec/DD/20100524/DI"
  xmlns:flowable="http://flowable.org/bpmn"
  typeLanguage="http://www.w3.org/2001/XMLSchema"
  expressionLanguage="http://www.w3.org/1999/XPath"
  targetNamespace="http://www.flowable.org/processdef">

  <process id="holidayRequest" name="Holiday Request" isExecutable="true">

    <startEvent id="startEvent"/>
    <sequenceFlow sourceRef="startEvent" targetRef="approveTask"/>

    <userTask id="approveTask" name="Approve or reject request"/>
    <sequenceFlow sourceRef="approveTask" targetRef="decision"/>

    <exclusiveGateway id="decision"/>
    <sequenceFlow sourceRef="decision" targetRef="externalSystemCall">
      <conditionExpression xsi:type="tFormalExpression">
        <![CDATA[
          ${approved}
        ]]>
      </conditionExpression>
    </sequenceFlow>
    <sequenceFlow  sourceRef="decision" targetRef="sendRejectionMail">
      <conditionExpression xsi:type="tFormalExpression">
        <![CDATA[
          ${!approved}
        ]]>
      </conditionExpression>
    </sequenceFlow>

    <serviceTask id="externalSystemCall" name="Enter holidays in external system"
        flowable:class="com.cg.cms.process.CallExternalSystemDelegate"/>
    <sequenceFlow sourceRef="externalSystemCall" targetRef="holidayApprovedTask"/>

    <userTask id="holidayApprovedTask" name="Holiday approved"/>
    <sequenceFlow sourceRef="holidayApprovedTask" targetRef="approveEnd"/>

    <serviceTask id="sendRejectionMail" name="Send out rejection email"
        flowable:class="com.cg.cms.process.SendRejectionMail"/>
    <sequenceFlow sourceRef="sendRejectionMail" targetRef="rejectEnd"/>

    <endEvent id="approveEnd"/>

    <endEvent id="rejectEnd"/>

  </process>

</definitions>
a.每个步骤(活动)都有id属性作为唯一标识符
b.活动通过序列流链接。在可视化图中表现为有向箭头。
c.离开排他网关的序列流,需要遵循条件表达式。排他表示只选一个。流程实例执行到排他网关处,将采用第一个值为true的路径。
d.表达式的条件形式为 ${approved},这是 ${approved == true} 的简写。变量 'approved' 被称为流程变量。
e.流程变量和流程实例 都被存储为持久化数据
2-2部署
将BPMN2.0XML文件部署到引擎
a.流程引擎将XML文件存储在数据库中,以便在需要时检索它
b.流程定义被解析为内部的可执行的对象模型,以便可以从中启动流程实例
/**
*使用 RepositoryService,通过传递 XML 文件的位置并调用 deploy() 方法来实际执行它,从而创建新的 Deployment
*/
RepositoryService repositoryService = processEngine.getRepositoryService();
Deployment deployment = repositoryService.createDeployment()
.addClasspathResource("holiday-request.bpmn20.xml")
.deploy();
/**
*通过 API 查询来验证流程定义是否被引擎知晓。过 RepositoryService 创建新的 ProcessDefinitionQuery 对象来完成的。
*/
ProcessDefinition processDefinition = repositoryService.createProcessDefinitionQuery()
.deploymentId(deployment.getId())
.singleResult();
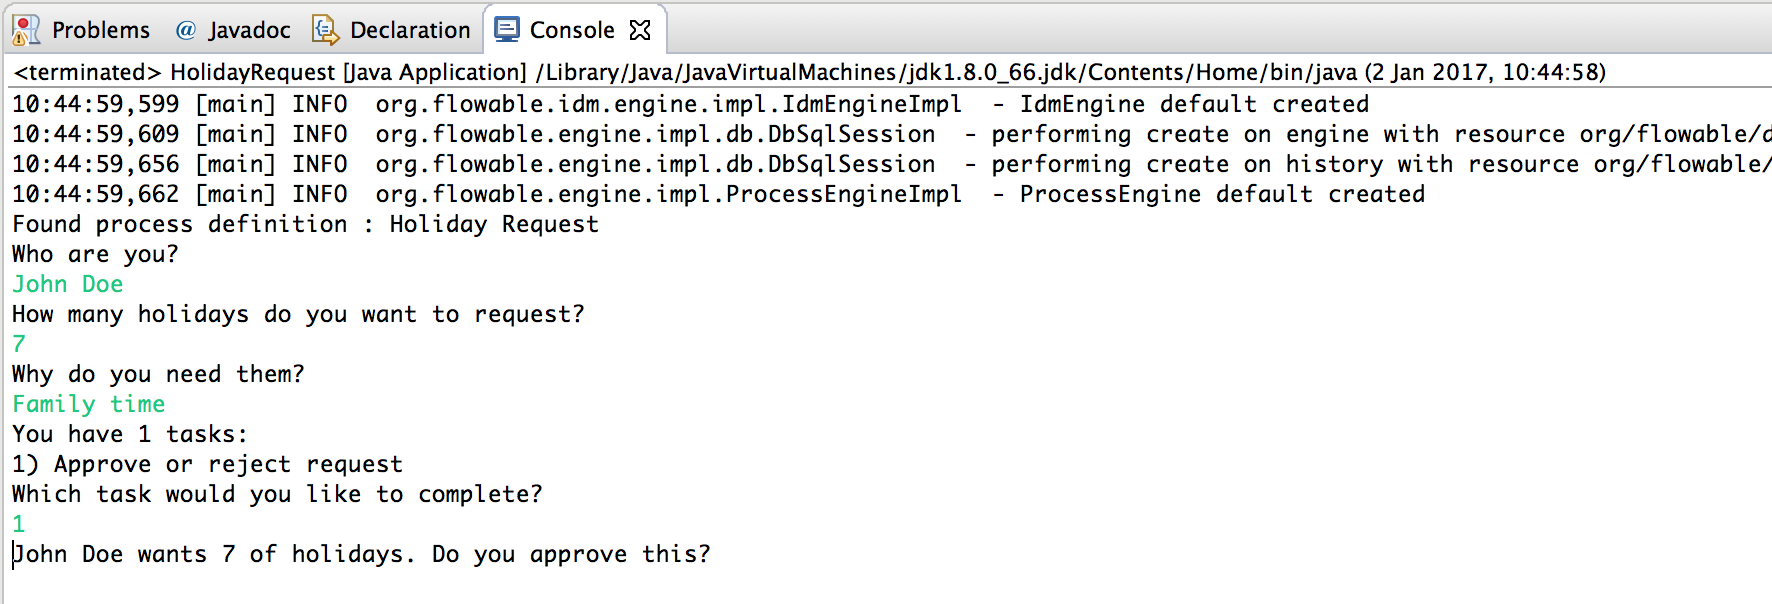
System.out.println("Found process definition : " + processDefinition.getName());2-3启动流程实例
使用这个流程定义作为"蓝图"来启动流程实例。需要提供一些初始的流程变量。通常,你会通过呈现给用户的表单或通过 REST API(当流程由某些自动化触发时)获取这些数据
这里使用一个简单的例子:
//使用 java.util.Scanner 类在命令行上简单输入一些数据
Scanner scanner= new Scanner(System.in);

System.out.println("Who are you?");
String employee = scanner.nextLine();

System.out.println("How many holidays do you want to request?");
Integer nrOfHolidays = Integer.valueOf(scanner.nextLine());

System.out.println("Why do you need them?");
String description = scanner.nextLine();


/**
*通过 RuntimeService 启动一个流程实例
*收集的数据作为 java.util.Map 实例传递,其中键是稍后用于检索变量的标识符
*使用键启动流程实例。这个键匹配在 BPMN 2.0 XML 文件中设置的 id 属性,在本例中是 holidayRequest。
*/
RuntimeService runtimeService = processEngine.getRuntimeService();

Map<String, Object> variables = new HashMap<String, Object>();
variables.put("employee", employee);
variables.put("nrOfHolidays", nrOfHolidays);
variables.put("description", description);
ProcessInstance processInstance =
  runtimeService.startProcessInstanceByKey("holidayRequest", variables);
为用户任务配置分配。我们希望第一个任务分配给"managers"组,第二个用户任务分配给原始的假期申请人。要做到这一点,在第一个任务中添加 candidateGroups 属性,并在第二个任务中添加 assignee 属性。所以现在XML文件是
<?xml version="1.0" encoding="UTF-8"?>
<definitions xmlns="http://www.omg.org/spec/BPMN/20100524/MODEL"
  xmlns:xsi="http://www.w3.org/2001/XMLSchema-instance"
  xmlns:xsd="http://www.w3.org/2001/XMLSchema"
  xmlns:bpmndi="http://www.omg.org/spec/BPMN/20100524/DI"
  xmlns:omgdc="http://www.omg.org/spec/DD/20100524/DC"
  xmlns:omgdi="http://www.omg.org/spec/DD/20100524/DI"
  xmlns:flowable="http://flowable.org/bpmn"
  typeLanguage="http://www.w3.org/2001/XMLSchema"
  expressionLanguage="http://www.w3.org/1999/XPath"
  targetNamespace="http://www.flowable.org/processdef">

  <process id="holidayRequest" name="Holiday Request" isExecutable="true">

    <startEvent id="startEvent"/>
    <sequenceFlow sourceRef="startEvent" targetRef="approveTask"/>

    <userTask id="approveTask" name="Approve or reject request" flowable:candidateGroups="managers"/>
    <sequenceFlow sourceRef="approveTask" targetRef="decision"/>

    <exclusiveGateway id="decision"/>
    <sequenceFlow sourceRef="decision" targetRef="externalSystemCall">
      <conditionExpression xsi:type="tFormalExpression">
        <![CDATA[
          ${approved}
        ]]>
      </conditionExpression>
    </sequenceFlow>
    <sequenceFlow  sourceRef="decision" targetRef="sendRejectionMail">
      <conditionExpression xsi:type="tFormalExpression">
        <![CDATA[
          ${!approved}
        ]]>
      </conditionExpression>
    </sequenceFlow>

    <serviceTask id="externalSystemCall" name="Enter holidays in external system"
         flowable:class="com.cg.cms.process.CallExternalSystemDelegate"/>
    <sequenceFlow sourceRef="externalSystemCall" targetRef="holidayApprovedTask"/>

    <userTask id="holidayApprovedTask" name="Holiday approved" flowable:assignee="${employee}"/>
    <sequenceFlow sourceRef="holidayApprovedTask" targetRef="approveEnd"/>

    <serviceTask id="sendRejectionMail" name="Send out rejection email"
        flowable:class="com.cg.cms.process.SendRejectionMail"/>
    <sequenceFlow sourceRef="sendRejectionMail" targetRef="rejectEnd"/>

    <endEvent id="approveEnd"/>

    <endEvent id="rejectEnd"/>

  </process>

</definitions>
获取"managers"实际的任务列表,我们通过 TaskService 创建一个 TaskQuery,并配置查询仅返回"managers"组的任务:
TaskService taskService = processEngine.getTaskService();
List<Task> tasks = taskService.createTaskQuery().taskCandidateGroup("managers").list();
System.out.println("You have " + tasks.size() + " tasks:");
for (int i=0; i<tasks.size(); i++) {
  System.out.println((i+1) + ") " + tasks.get(i).getName());
}
使用任务标识符,我们现在可以获取特定的流程实例变量并在屏幕上显示实际请求:
System.out.println("Which task would you like to complete?");
int taskIndex = Integer.valueOf(scanner.nextLine());
Task task = tasks.get(taskIndex - 1);
Map<String, Object> processVariables = taskService.getVariables(task.getId());
System.out.println(processVariables.get("employee") + " wants " +
    processVariables.get("nrOfHolidays") + " of holidays. Do you approve this?");
如果你运行这个,它应该看起来像这样:
经理现在可以完成任务了。在现实中,这通常意味着用户提交了一个表单。然后表单中的数据作为流程变量传递。在这里,我们将通过在完成任务时传递一个带有"approved"变量的 map 来模拟这一点(名称很重要,因为它稍后会在序列流的条件中使用!):
boolean approved = scanner.nextLine().toLowerCase().equals("y");
variables = new HashMap<String, Object>();
variables.put("approved", approved);
taskService.complete(task.getId(), variables);
2-4编写JavaDelegate
服务任务:当请求被批准时将执行的自动逻辑。例如:
<serviceTask id="externalSystemCall" name="Enter holidays in external system"

    flowable:class="com.cg.cms.process.CallExternalSystemDelegate"/>
创建一个新类com.cg.cms.process.CallExternalSystemDelegate并继承JavaDelegate。在现实中,这个逻辑可以是任何东西,从使用 HTTP REST 调用服务,到执行对组织使用了几十年的系统的遗留代码调用。
package com.cg.cms.process;

import org.flowable.engine.delegate.DelegateExecution;
import org.flowable.engine.delegate.JavaDelegate;


/**
 * @Author:bingfeng
 * @Date:2025/3/31 15:42
 */
public class CallExternalSystemDelegate implements JavaDelegate {

    public void execute(DelegateExecution execution) {
        System.out.println("Calling the external system for employee "
                + execution.getVariable("employee"));
    }

}当执行到达服务任务时,BPMN 2.0 XML 中引用的类将被实例化并调用。
现在运行示例,日志消息显示出来,证明确实执行了自定义逻辑:

2-5使用历史数据
flowable会自动为所有流程实例存储审计数据或历史数据。这些数据允许创建丰富的报告,这些报告可以洞察组织的工作方式,瓶颈在哪里等。
例如,假设我们想要显示我们到目前为止一直在执行的流程实例的持续时间。为此,我们从 ProcessEngine 获取 HistoryService 并创建一个历史活动查询。在下面的代码片段中,你可以看到我们添加了一些额外的过滤:
-
仅查询特定流程实例的活动
-
仅查询已完成的活动
结果也按结束时间排序,这意味着我们将按执行顺序获取它们。
HistoryService historyService = processEngine.getHistoryService();
List<HistoricActivityInstance> activities =
  historyService.createHistoricActivityInstanceQuery()
   .processInstanceId(processInstance.getId())
   .finished()
   .orderByHistoricActivityInstanceEndTime().asc()
   .list();

for (HistoricActivityInstance activity : activities) {
  System.out.println(activity.getActivityId() + " took "
    + activity.getDurationInMillis() + " milliseconds");
}
再次运行示例,我们现在在控制台中看到类似这样的内容:
startEvent took 1 milliseconds
approveTask took 2638 milliseconds
decision took 3 milliseconds
externalSystemCall took 1 milliseconds


 1万+
1万+

 被折叠的 条评论
为什么被折叠?
被折叠的 条评论
为什么被折叠?
 到【灌水乐园】发言


