


 文章详细解析了RocketMQ生产者进行异步发送消息的过程,从编程接口到内部的线程池、超时处理和重试机制,展示了消息如何通过回调函数在响应到达时执行相应逻辑。
1. 前言
RocketMQ源码5-producer 同步发送和单向发送一文中解析了RocketMQ生产者同步发送消息与单向发送消息,这个异步发送消息其实很多地方与同步发送一样,不过有一点是你在编程的时候需要提供SendCallback 对象,用来发送响应来的时候进行回调使用,我们知道同步发送是等待broker响应到来,然后将响应往上返回,这个异步调用就是响应来的时候,对你提供的回调对象进行调用,你这个回调对象可以写一些自己的逻辑等等。
2. 简单使用
在源码解析之前我们要先看一下异步发送消息是怎样编程的:org.apache.rocketmq.example.simple.AsyncProducer:
publicstaticvoidmain(
    String[] args)throws MQClientException, InterruptedException, UnsupportedEncodingException {

    DefaultMQProducerproducer=newDefaultMQProducer("Jodie_Daily_test");
    producer.start();
    producer.setRetryTimesWhenSendAsyncFailed(0);

    intmessageCount=100;
    finalCountDownLatchcountDownLatch=newCountDownLatch(messageCount);
    for (inti=0; i < messageCount; i++) {
        try {
            finalintindex= i;
            Messagemsg=newMessage("Jodie_topic_1023",
                "TagA",
                "OrderID188",
                "Hello world".getBytes(RemotingHelper.DEFAULT_CHARSET));
            producer.send(msg, newSendCallback() {
                @OverridepublicvoidonSuccess(SendResult sendResult) {
                    countDownLatch.countDown();
                    System.out.printf("%-10d OK %s %n", index, sendResult.getMsgId());
                }

                @OverridepublicvoidonException(Throwable e) {
                    countDownLatch.countDown();
                    System.out.printf("%-10d Exception %s %n", index, e);
                    e.printStackTrace();
                }
            });
        } catch (Exception e) {
            e.printStackTrace();
        }
    }
    countDownLatch.await(5, TimeUnit.SECONDS);
    producer.shutdown();
}
复制代码
这里需要我们提供一个SendCallback 对象用来响应来的时候回调,其中异常的时候会调用这里面的onException方法, 成功的时候调用onSuccess方法,执行相应的逻辑。
3. 源码解析
好了,现在开始源码解析:
publicvoidsend(Message msg,
    SendCallback sendCallback)throws MQClientException, RemotingException, InterruptedException {
    msg.setTopic(withNamespace(msg.getTopic()));
    this.defaultMQProducerImpl.send(msg, sendCallback);
}
复制代码
首先是调用了defaultMQProducerImpl 的send方法,并且将msg 与callback传进去:
publicvoidsend(Message msg,
    SendCallback sendCallback)throws MQClientException, RemotingException, InterruptedException {
    send(msg, sendCallback, this.defaultMQProducer.getSendMsgTimeout());
}
复制代码
这里又调用了下它的重载方法,然后将发送超时时间传进去,默认的一个发送超时时间是3s。
publicvoidsend(final Message msg, final SendCallback sendCallback, finallong timeout)throws MQClientException, RemotingException, InterruptedException {
    finallongbeginStartTime= System.currentTimeMillis();
    // 异步线程池ExecutorServiceexecutor=this.getAsyncSenderExecutor();
    try {
        executor.submit(newRunnable() {
            @Overridepublicvoidrun() {
                longcostTime= System.currentTimeMillis() - beginStartTime;
                if (timeout > costTime) {
                    try {
                        // todo
                        sendDefaultImpl(msg, CommunicationMode.ASYNC, sendCallback, timeout - costTime);
                    } catch (Exception e) {
                        sendCallback.onException(e);
                    }
                } else {
                    sendCallback.onException(
                        newRemotingTooMuchRequestException("DEFAULT ASYNC send call timeout"));
                }
            }

        });
    }
    ...
}
复制代码
这里需要注意的是,它将这个发送消息的任务交给了一个异步发送线程池,然后在任务中是调用了sendDefaultImpl 方法,然后通信方式是异步CommunicationMode.ASYNC,这里我们需要看下这个线程池的一些参数,因为关乎我们以后的调优:
public ExecutorService getAsyncSenderExecutor() {
    returnnull == asyncSenderExecutor ? defaultAsyncSenderExecutor : asyncSenderExecutor;
}
复制代码
这里先是判断asyncSenderExecutor 这个线程池是不是null,其实咱们这里它是null的(因为我们没有指定线程池,不过你编程的时候是可以指定的,使用setAsyncSenderExecutor()这个方法就可以设置了),就使用defaultAsyncSenderExecutor线程池,这个defaultAsyncSenderExecutor 线程池是在defaultMQProducerImpl 类构造方法创建的的,我们可以看下:
publicDefaultMQProducerImpl(final DefaultMQProducer defaultMQProducer, RPCHook rpcHook) {
    this.defaultMQProducer = defaultMQProducer;
    this.rpcHook = rpcHook;

    // 5w大小的链表队列,异步发送线程池队列this.asyncSenderThreadPoolQueue = newLinkedBlockingQueue<Runnable>(50000);
    // 默认的异步发送线程池this.defaultAsyncSenderExecutor = newThreadPoolExecutor(
        Runtime.getRuntime().availableProcessors(),// 核心线程池数,cpu核数
        Runtime.getRuntime().availableProcessors(), // 最大线程池数,cpu核数1000 * 60,
        TimeUnit.MILLISECONDS,
        this.asyncSenderThreadPoolQueue,
        newThreadFactory() {
            privateAtomicIntegerthreadIndex=newAtomicInteger(0);

            @Overridepublic Thread newThread(Runnable r) {
                returnnewThread(r, "AsyncSenderExecutor_" + this.threadIndex.incrementAndGet());
            }
        });
}
复制代码
队列是5w大小,然后核心线程数 是cpu的核心数,maxThreads也是cpu核心数。
好了,我们继续往下看,这个sendDefaultImpl 方法其实就是选择MessageQueue然后重试那一套东西,不过,异步发送虽然走这个方法,但是它的失败重试不是这样子玩的,我们接着往下看接着又调用了sendKernelImpl 方法:(DefaultMQProducerImpl#sendKernelImpl)
// 同步 异步  单向switch (communicationMode) {
    // 异步case ASYNC:
        MessagetmpMessage= msg;
        booleanmessageCloned=false;
        if (msgBodyCompressed) {
            //If msg body was compressed, msgbody should be reset using prevBody.//Clone new message using commpressed message body and recover origin massage.//Fix bug:https://github.com/apache/rocketmq-externals/issues/66
            tmpMessage = MessageAccessor.cloneMessage(msg);
            messageCloned = true;
            msg.setBody(prevBody);
        }

        if (topicWithNamespace) {
            if (!messageCloned) {
                tmpMessage = MessageAccessor.cloneMessage(msg);
                messageCloned = true;
            }
            msg.setTopic(NamespaceUtil.withoutNamespace(msg.getTopic(), this.defaultMQProducer.getNamespace()));
        }

        // 判断超时时间longcostTimeAsync= System.currentTimeMillis() - beginStartTime;
        if (timeout < costTimeAsync) {
            thrownewRemotingTooMuchRequestException("sendKernelImpl call timeout");
        }
        // todo
        sendResult = this.mQClientFactory.getMQClientAPIImpl().sendMessage(
            brokerAddr,
            mq.getBrokerName(),
            tmpMessage,
            requestHeader,
            timeout - costTimeAsync,
            communicationMode,
            sendCallback,
            topicPublishInfo,
            this.mQClientFactory,
            this.defaultMQProducer.getRetryTimesWhenSendAsyncFailed(),
            context,
            this);
        break;
        ...
复制代码
这里我们主要是看下异步处理这一块,因为我们在介绍同步发送与单向发送都有介绍过这个方法,其实这个方法就是封装请求头啥的,异步这一块我们可以看到,先是判断了一下超时没有,然后调用MQClientAPI的sendMessage方法,注意下它这个倒数第三个参数,这个参数是获取了一下默认的重试次数,默认是2。
接下来MQClientAPIImpl#sendMessage:
switch (communicationMode) {
   ...
    case ASYNC:
        finalAtomicIntegertimes=newAtomicInteger();
        longcostTimeAsync= System.currentTimeMillis() - beginStartTime;
        // 判断超时时间if (timeoutMillis < costTimeAsync) {
            thrownewRemotingTooMuchRequestException("sendMessage call timeout");
        }
        // todothis.sendMessageAsync(addr, brokerName, msg, timeoutMillis - costTimeAsync, request, sendCallback, topicPublishInfo, instance,
            retryTimesWhenSendFailed, times, context, producer);
        returnnull;
    ...
复制代码
这个方法我们也是主要看下这个异步发送这块,首先是定义了一个times,这个times记录的发送次数,然后判断了是否超时,然后调用sendMessageAsync这个异步发送方法。这个方法又调用了RemotingClient的invokeAsync方法,其中在sendMessageAsync 方法中创建了一个InvokeCallback 对象,我们先不管这个InvokeCallback ,后面再解释,先看下invokeAsync 方法:
publicvoidinvokeAsync(String addr, RemotingCommand request, long timeoutMillis, InvokeCallback invokeCallback)throws InterruptedException, RemotingConnectException, RemotingTooMuchRequestException, RemotingTimeoutException,
    RemotingSendRequestException {
    longbeginStartTime= System.currentTimeMillis();
    // 获取channelfinalChannelchannel=this.getAndCreateChannel(addr);
    // channel不为null 并且channel是激活if (channel != null && channel.isActive()) {
        try {
            // 调用之前的钩子
            doBeforeRpcHooks(addr, request);
            // 判断超时时间longcostTime= System.currentTimeMillis() - beginStartTime;
            if (timeoutMillis < costTime) {
                thrownewRemotingTooMuchRequestException("invokeAsync call timeout");
            }
            // todo 调用this.invokeAsyncImpl(channel, request, timeoutMillis - costTime, invokeCallback);
        } catch (RemotingSendRequestException e) {
            log.warn("invokeAsync: send request exception, so close the channel[{}]", addr);
            this.closeChannel(addr, channel);
            throw e;
        }
    } else {
        // 关闭channelthis.closeChannel(addr, channel);
        thrownewRemotingConnectException(addr);
    }
}
复制代码
其实套路都一样,先是根据broker addr 获取对应的channel,然后判断一下channel状态,然后执行调用前的钩子,判断有没有超时,调用invokeAsyncImpl方法进行发送。
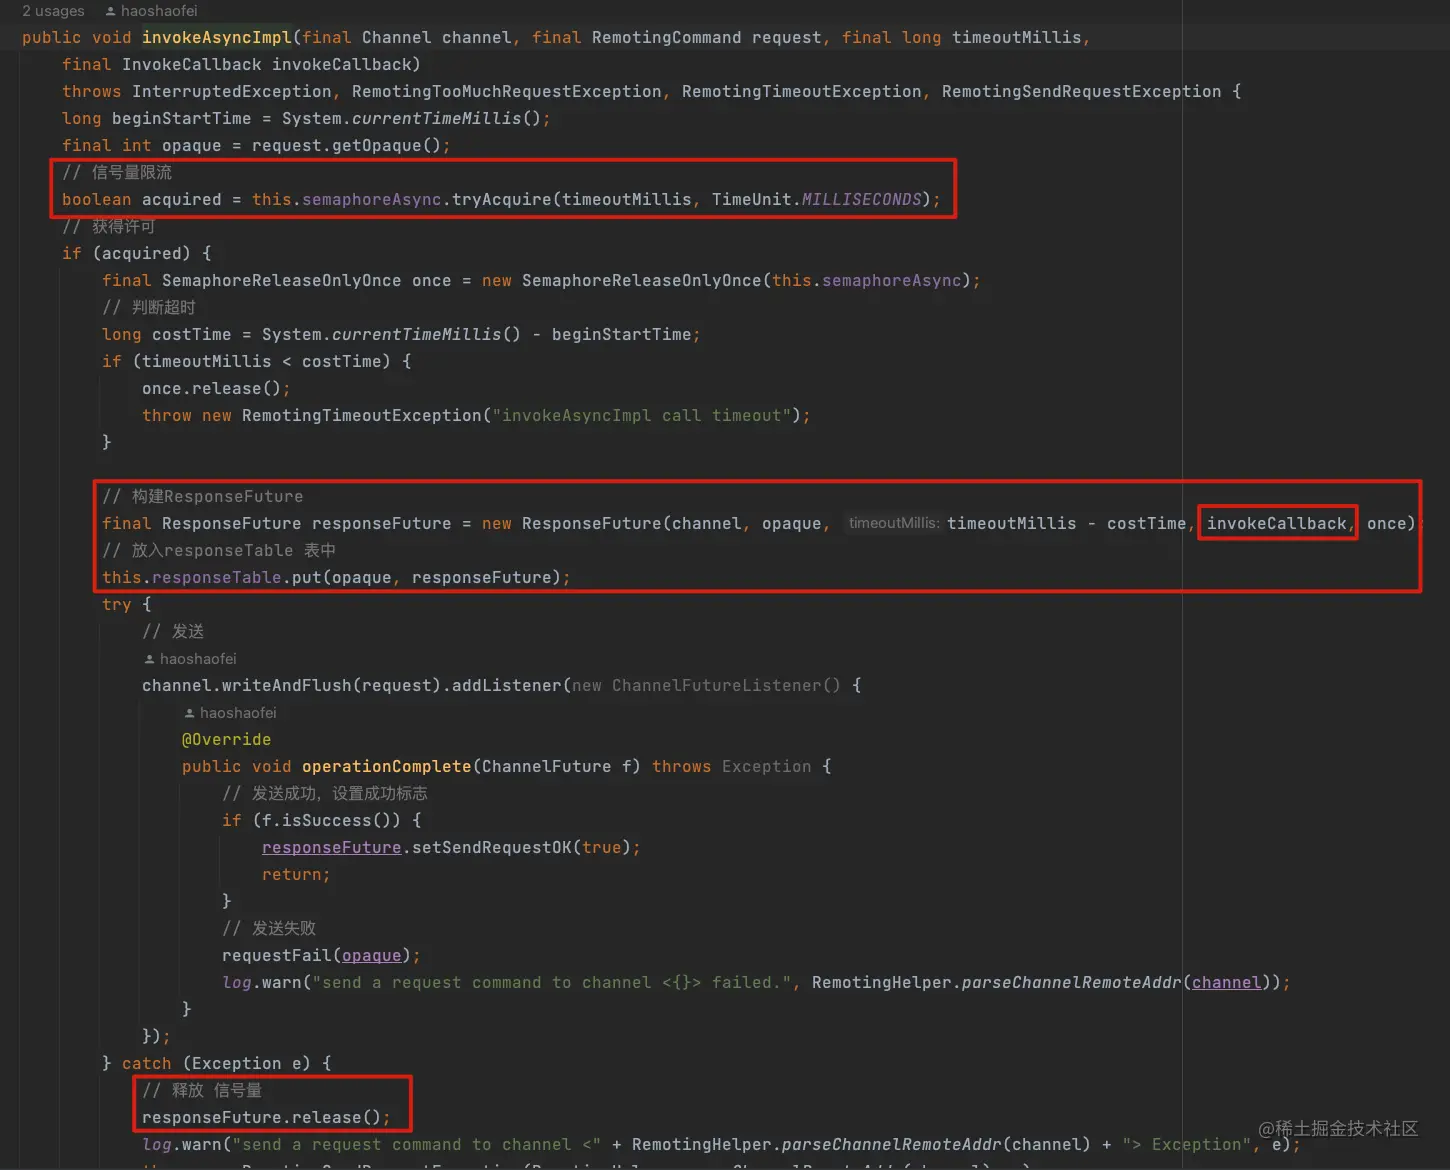
这个方法重要的操作就这几个,首先生成一个调用id ,也就是opaque , 接着获取信号量许可,这个信号量使用来限流的,默认是65535,获取之后判断一下有没有超时,然后封装ResponseFuture 对象,将ResponseFuture 对象缓存到response表中。
接着将消息写到channel中,注意有个listener 是在发送出去的时候执行,成功的话将ResponseFuture 对象设置发送成功,失败的走了requestFail(opaque)方法,失败我们先不看。这个时候就送成功了,等到收到broker响应的时候,NettyClientHandler 就能收到消息了
3.2 正常接收响应
classNettyClientHandlerextendsSimpleChannelInboundHandler<RemotingCommand> {

    /**
     * 处理接收到的远程
     */@OverrideprotectedvoidchannelRead0(ChannelHandlerContext ctx, RemotingCommand msg)throws Exception {
        // todo
        processMessageReceived(ctx, msg);
    }
}
复制代码
这个是netty的知识点,是将NettyClientHandler 对象注册到netty的pipeline上面,在发送内容,接收内容,都会执行响应的实现方法。
publicvoidprocessMessageReceived(ChannelHandlerContext ctx, RemotingCommand msg)throws Exception {
    finalRemotingCommandcmd= msg;
    if (cmd != null) {
        switch (cmd.getType()) {
            // 请求消息case REQUEST_COMMAND:
                // todo
                processRequestCommand(ctx, cmd);
                break;
            // 响应消息case RESPONSE_COMMAND:
                // todo
                processResponseCommand(ctx, cmd);
                break;
            default:
                break;
        }
    }
}
复制代码
我们这里是收到的响应消息,然后调用processResponseCommand 处理:
publicvoidprocessResponseCommand(ChannelHandlerContext ctx, RemotingCommand cmd) {
    finalintopaque= cmd.getOpaque();
    // 获取对应id 的responseFuturefinalResponseFutureresponseFuture= responseTable.get(opaque);
    if (responseFuture != null) {
        // 设置
        responseFuture.setResponseCommand(cmd);

        // 从响应表中移除
        responseTable.remove(opaque);

        if (responseFuture.getInvokeCallback() != null) {
            // todo 执行回调
            executeInvokeCallback(responseFuture);
        } else {
            responseFuture.putResponse(cmd);
            responseFuture.release();
        }
    } else {
        log.warn("receive response, but not matched any request, " + RemotingHelper.parseChannelRemoteAddr(ctx.channel()));
        log.warn(cmd.toString());
    }
}
复制代码
这里就是根据opaque去responseTable这个缓存中找到对应的ResponseFuture 对象,然后设置响应内容,最最最重要的点就是看一下它的invokeCallBack有没有,我们发送消息的时候是有设置进去的。它会调用executeInvokeCallback 方法执行:
privatevoidexecuteInvokeCallback(final ResponseFuture responseFuture) {
    booleanrunInThisThread=false;
    // 获取回调线程池ExecutorServiceexecutor=this.getCallbackExecutor();
    if (executor != null) {
        try {
            executor.submit(newRunnable() {
                @Overridepublicvoidrun() {
                    try {
                        // todo 执行回调
                        responseFuture.executeInvokeCallback();
                    } catch (Throwable e) {
                        log.warn("execute callback in executor exception, and callback throw", e);
                    } finally {
                        // 释放 信号量
                        responseFuture.release();
                    }
                }
            });
        } catch (Exception e) {
            runInThisThread = true;
            log.warn("execute callback in executor exception, maybe executor busy", e);
        }
    } else {
        runInThisThread = true;
    }

    // 如果需要在该线程池中执行if (runInThisThread) {
        try {
            responseFuture.executeInvokeCallback();
        } catch (Throwable e) {
            log.warn("executeInvokeCallback Exception", e);
        } finally {
            responseFuture.release();
        }
    }
}
复制代码
这里就是获取执行回调的线程池,如果线程池是null的话,就在当前线程执行。这个回调线程池参数我们也看下
publicNettyRemotingClient(final NettyClientConfig nettyClientConfig,
    final ChannelEventListener channelEventListener) {
    // 设置 异步与单向请求的信号量super(nettyClientConfig.getClientOnewaySemaphoreValue(), nettyClientConfig.getClientAsyncSemaphoreValue());
    // netty配置文件this.nettyClientConfig = nettyClientConfig;
    // listenerthis.channelEventListener = channelEventListener;

    // 这个是netty 客户端回调线程数,默认是cpu核数intpublicThreadNums= nettyClientConfig.getClientCallbackExecutorThreads();
    // 如果小于等于0 默认为4if (publicThreadNums <= 0) {
        publicThreadNums = 4;
    }

    // 设置线程池this.publicExecutor = Executors.newFixedThreadPool(publicThreadNums, newThreadFactory() {
        privateAtomicIntegerthreadIndex=newAtomicInteger(0);

        @Overridepublic Thread newThread(Runnable r) {
            returnnewThread(r, "NettyClientPublicExecutor_" + this.threadIndex.incrementAndGet());
        }
    });
    ...
复制代码
它是拿的这个线程是,默认核心线程数也是cpu核心数。
接着就是调用了ResponseFuture 的executeInvokeCallback 方法:
publicvoidexecuteInvokeCallback() {
    if (invokeCallback != null) {
        // 设置回调状态if (this.executeCallbackOnlyOnce.compareAndSet(false, true)) {
            // todo 执行回调
            invokeCallback.operationComplete(this);
        }
    }
}
复制代码
设置回调状态,然后调用invokeCallback的operationComplete 方法,现在我们再回到MQClientAPI的sendMessageAsync 方法中,因为当时是在这个方法中创建的这个 invokeCallback 对象:
privatevoidsendMessageAsync(
    final String addr,
    final String brokerName,
    final Message msg,
    finallong timeoutMillis,
    final RemotingCommand request,
    final SendCallback sendCallback,
    final TopicPublishInfo topicPublishInfo,
    final MQClientInstance instance,
    finalint retryTimesWhenSendFailed,
    final AtomicInteger times,
    final SendMessageContext context,
    final DefaultMQProducerImpl producer
)throws InterruptedException, RemotingException {
    finallongbeginStartTime= System.currentTimeMillis();
    // todothis.remotingClient.invokeAsync(addr, request, timeoutMillis, newInvokeCallback() {
        // 回调的方法@OverridepublicvoidoperationComplete(ResponseFuture responseFuture) {
            longcost= System.currentTimeMillis() - beginStartTime;
            RemotingCommandresponse= responseFuture.getResponseCommand();
            if (null == sendCallback && response != null) {

                try {
                    SendResultsendResult= MQClientAPIImpl.this.processSendResponse(brokerName, msg, response, addr);
                    if (context != null && sendResult != null) {
                        context.setSendResult(sendResult);
                        context.getProducer().executeSendMessageHookAfter(context);
                    }
                } catch (Throwable e) {
                }

                // 更新容错信息
                producer.updateFaultItem(brokerName, System.currentTimeMillis() - responseFuture.getBeginTimestamp(), false);
                return;
            }

            if (response != null) {
                try {
                    // todo 生成发送结果SendResultsendResult= MQClientAPIImpl.this.processSendResponse(brokerName, msg, response, addr);
                    assert sendResult != null;
                    if (context != null) {
                        context.setSendResult(sendResult);
                        context.getProducer().executeSendMessageHookAfter(context);
                    }

                    try {
                        // todo 调用回调 的成功方法
                        sendCallback.onSuccess(sendResult);
                    } catch (Throwable e) {
                    }

                    // 更新容错信息
                    producer.updateFaultItem(brokerName, System.currentTimeMillis() - responseFuture.getBeginTimestamp(), false);
                } catch (Exception e) {
                    // 跟新容错信息 isolation:true 隔离
                    producer.updateFaultItem(brokerName, System.currentTimeMillis() - responseFuture.getBeginTimestamp(), true);
                    // 异常
                    onExceptionImpl(brokerName, msg, timeoutMillis - cost, request, sendCallback, topicPublishInfo, instance,
                        retryTimesWhenSendFailed, times, e, context, false, producer);
                }
            } else {
                // 跟新容错信息 isolation:true 隔离
                producer.updateFaultItem(brokerName, System.currentTimeMillis() - responseFuture.getBeginTimestamp(), true);
                // 发送未成功if (!responseFuture.isSendRequestOK()) {
                    MQClientExceptionex=newMQClientException("send request failed", responseFuture.getCause());
                    // todo 异步模式 重试逻辑
                    onExceptionImpl(brokerName, msg, timeoutMillis - cost, request, sendCallback, topicPublishInfo, instance,
                        retryTimesWhenSendFailed, times, ex, context, true, producer);
                // 超时
                } elseif (responseFuture.isTimeout()) {
                    MQClientExceptionex=newMQClientException("wait response timeout " + responseFuture.getTimeoutMillis() + "ms",
                        responseFuture.getCause());
                    onExceptionImpl(brokerName, msg, timeoutMillis - cost, request, sendCallback, topicPublishInfo, instance,
                        retryTimesWhenSendFailed, times, ex, context, true, producer);
                } else {
                    MQClientExceptionex=newMQClientException("unknow reseaon", responseFuture.getCause());
                    onExceptionImpl(brokerName, msg, timeoutMillis - cost, request, sendCallback, topicPublishInfo, instance,
                        retryTimesWhenSendFailed, times, ex, context, true, producer);
                }
            }
        }
    });
}
复制代码
这个方法分为2部分吧,一是有响应,然后没有sendCallback ,这个sendCallback 是你自己写的那个回调对象,这个时候没有的话说明你不准备回调了,然后解析了一下结果,执行了一下 调用后的钩子,这部分就算完事了,二是有响应,然后也是有这个回调对象sendCallback的,先是解析了下响应,然后执行了你写的那个sendCallback 对象,另外就是执行了updateFaultItem ,进行更新一个响应信息,见
如果异常的话,执行了一个onExceptionImpl 方法来处理,我们来看下这个方法的实现:
privatevoidonExceptionImpl(final String brokerName,
    final Message msg,
    finallong timeoutMillis,
    final RemotingCommand request,
    final SendCallback sendCallback,
    final TopicPublishInfo topicPublishInfo,
    final MQClientInstance instance,
    finalint timesTotal,
    final AtomicInteger curTimes,
    final Exception e,
    final SendMessageContext context,
    finalboolean needRetry,
    final DefaultMQProducerImpl producer
) {
    // 增加次数inttmp= curTimes.incrementAndGet();
    // 需要重试 && 重试的次数 小于 允许的重试次数if (needRetry && tmp <= timesTotal) {
        StringretryBrokerName= brokerName;//by default, it will send to the same brokerif (topicPublishInfo != null) { //select one message queue accordingly, in order to determine which broker to send// 重新选取一个MessageQueueMessageQueuemqChosen= producer.selectOneMessageQueue(topicPublishInfo, brokerName);
            retryBrokerName = mqChosen.getBrokerName();
        }
        // 重新获取 broker地址Stringaddr= instance.findBrokerAddressInPublish(retryBrokerName);
        log.info("async send msg by retry {} times. topic={}, brokerAddr={}, brokerName={}", tmp, msg.getTopic(), addr,
            retryBrokerName);
        try {
            // 生成一个新的请求id
            request.setOpaque(RemotingCommand.createNewRequestId());
            // todo 重试
            sendMessageAsync(addr, retryBrokerName, msg, timeoutMillis, request, sendCallback, topicPublishInfo, instance,
                timesTotal, curTimes, context, producer);
        } catch (InterruptedException e1) {
            onExceptionImpl(retryBrokerName, msg, timeoutMillis, request, sendCallback, topicPublishInfo, instance, timesTotal, curTimes, e1,
                context, false, producer);
        } catch (RemotingConnectException e1) {
            // 设置容错隔离
            producer.updateFaultItem(brokerName, 3000, true);
            onExceptionImpl(retryBrokerName, msg, timeoutMillis, request, sendCallback, topicPublishInfo, instance, timesTotal, curTimes, e1,
                context, true, producer);
        } catch (RemotingTooMuchRequestException e1) {
            onExceptionImpl(retryBrokerName, msg, timeoutMillis, request, sendCallback, topicPublishInfo, instance, timesTotal, curTimes, e1,
                context, false, producer);
        } catch (RemotingException e1) {
            // 超时 设置容错隔离
            producer.updateFaultItem(brokerName, 3000, true);
            onExceptionImpl(retryBrokerName, msg, timeoutMillis, request, sendCallback, topicPublishInfo, instance, timesTotal, curTimes, e1,
                context, true, producer);
        }
    } else {
        // 不能重试if (context != null) {
            context.setException(e);
            context.getProducer().executeSendMessageHookAfter(context);
        }

        try {
            // 执行回调
            sendCallback.onException(e);
        } catch (Exception ignored) {
        }
    }
}
复制代码
增加调用次数,然后判断是否需要重试&& 重试次数在范围内,然后就是重新选择一个MessageQueue,重新设置请求id,也就是opaque这个,最后就是调用 sendMessageAsync 进行发送了,这就是异步调用的一个重试逻辑,并没有使用for循环的形式。
3.3 超时接收响应
在调用writeAndFlush(...)方法前,会先this.responseTable.put(opaque, responseFuture)方法,将responseFuture添加到responseTable中,这是个Map结构,rocketMq正是定时从responseTable中获取responseFuture并判断其状态来决定调用SendCallback的哪个方法的。
让我们回到NettyRemotingClient的启动流程,方法为NettyRemotingClient#start:
publicvoidstart() {
    ...
    // 扫描消息获取结果,每秒执行1次this.timer.scheduleAtFixedRate(newTimerTask() {
        @Overridepublicvoidrun() {
            try {
                NettyRemotingClient.this.scanResponseTable();
            } catch (Throwable e) {
                log.error("scanResponseTable exception", e);
            }
        }
    }, 1000 * 3, 1000);
    ...
}
复制代码
在这个方法中,启动了一个定时任务,每秒执行1次,所做的工作就是扫描在responseTable中的responseFuture,我们再进入NettyRemotingAbstract#scanResponseTable方法:
publicvoidscanResponseTable() {
    //本次要处理的返回final List<ResponseFuture> rfList = newLinkedList<ResponseFuture>();
    Iterator<Entry<Integer, ResponseFuture>> it = this.responseTable.entrySet().iterator();
    while (it.hasNext()) {
        Entry<Integer, ResponseFuture> next = it.next();
        ResponseFuturerep= next.getValue();

        // 判断时间,时间到了才转移到 rfList 中if ((rep.getBeginTimestamp() + rep.getTimeoutMillis() + 1000)
                <= System.currentTimeMillis()) {
            rep.release();
            it.remove();
            rfList.add(rep);
            log.warn("remove timeout request, " + rep);
        }
    }
    // 处理返回for (ResponseFuture rf : rfList) {
        try {
            executeInvokeCallback(rf);
        } catch (Throwable e) {
            log.warn("scanResponseTable, operationComplete Exception", e);
        }
    }
}
复制代码
在这个方法里,先遍历所有的ResponseFuture,然后判断每个ResponseFuture的时间,时间到了才会进行处理,从这里可以看出,并不是一有结果就立即处理,而是在消息发送后过了4秒(rep.getTimeoutMillis()的值为3)才去处理结果,处理方法为NettyRemotingAbstract#executeInvokeCallback,这个方法处理 跟 3.2 小节 是一样的,不在赘述
好了,到这我们的异步发送解析就已经ok了.
作者:hsfxuebao


 509
509

 被折叠的 条评论
为什么被折叠?
被折叠的 条评论
为什么被折叠?
 到【灌水乐园】发言


