


让我们回顾最古朴的进程和线程的区别:其中进程是资源封装的单位,其中具体封装的内容有CPU、内存、信号、文件系统;而线程则是最小的CPU资源的执行单元。
在我之前学习Linux的时候,总是对于进程和线程的区别不是太理解,在这个课程中,张师傅从几个方面来说明了其区别。首先二者实际上共用一个数据结构task_struct,这个数据结构定义在include/linux/sched.h中,我们首先关注其中的pid的部分:
c
复制代码
struct task_struct { pid_t pid; // 这个是 process 的 id pid_t tgid; // 这个是 thread 的 id }
为了验证我们的猜想,于是编写了一个函数,该文件名为 a0_tid_tgid.c:
c
复制代码
#include <stdio.h> #include <pthread.h> #include <stdlib.h> #include <unistd.h> void *foo(void * args) { sleep(1000); } int main() { printf("start ... \n"); pthread_t t[4]; int i = 0; for (i=0; i<4; i++) { pthread_create(&t[i], NULL, foo, NULL); } for (i=0; i<4; i++) { pthread_join(t[i], NULL); } printf("end ... \n"); return 0; }
然后开始编译以及运行程序:
shell
复制代码
gcc -pthread a0_tid_tgid.c -o a0_tid_tgid
然后进一步使用pstree | grep a0观察程序运行结果:
shell
复制代码
64264 64264 S ./a0_tid_tgid 64264 64265 S ./a0_tid_tgid 64264 64266 S ./a0_tid_tgid 64264 64267 S ./a0_tid_tgid 64264 64268 S ./a0_tid_tgid 64708 64708 S grep --color=auto a0
然后下面这个程序则是张师傅用来进一步说明在Linux中,进程和线程的区别的程序。首先张师傅说明了无论是fork() 还是 pthread_create()最后底层都是使用了sys_clone()以及_do_fork()函数。
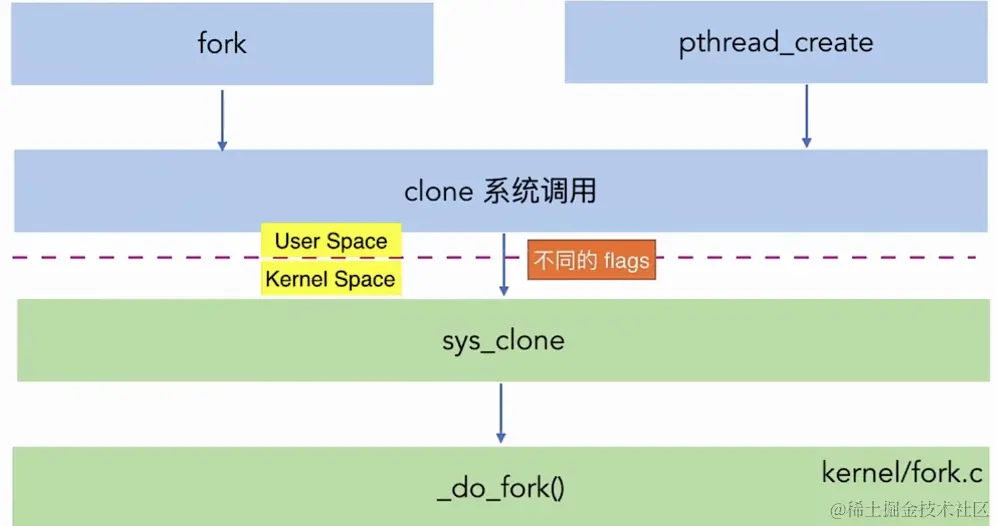
因此我们其实最需要关注的就是clone()这个函数的作用:
shell
复制代码
int clone(int (*fn)(void *), void *child_stack, int flags, void *args, ..);
其中:
fn:表示clone生成的时候会调用的fn参数child_stack表示生成的子进程的stackflag:这个参数区分了子进程和父进程如何共享资源
让我们来仔细了解一下 thread和process的区别:
c
复制代码
#define _GNU_SOURCE #include <sys/wait.h> #include <string.h> #include <stdio.h> #include <stdlib.h> #include <sched.h> #define STACK_SIZE (256 * 1024) int child_fun(void *arg) { char *buf = (char *)arg; strcpy(buf, "hello from child"); return 0; } int main(int argc, char **argv) { int clone_flags = SIGCHLD; // 如果有第二个参数,就修改在调用clone的时候共享内存, // 实际上我们可以认为 clone_flags |= CLONE_VM // 这个参数就是在 pthread_create 也用了 if (argc >1 && !strcmp(argv[1], "clone_vm")) { clone_flags |= CLONE_VM; } char buf[] = "msg from parent"; char *stack = malloc(STACK_SIZE); int child_pid = clone(child_fun, stack+STACK_SIZE, clone_flags, buf); if(child_pid < 0) { exit(1); } if(waitpid(child_pid, NULL, 0) < 0) { exit(1); } printf("buf: %s \n", buf); return 0; }
然后编译查看两个程序的运行情况:
shell
复制代码
./a3_clone buf: msg from parent ./a3_clone clone_vm buf: hello from child
最后还有一个我个人认为在这个课程中学到的知识,那就是thread才是CPU运行资源的单位,但是process才是CPU的资源封装的单位。为了让实验结果明显,首先查看一下CPU的属性:
shell
复制代码
lscpu Architecture: x86_64 CPU op-mode(s): 32-bit, 64-bit Byte Order: Little Endian Address sizes: 40 bits physical, 48 bits virtual CPU(s): 4 On-line CPU(s) list: 0-3
也就是我当前的vm中有四个vCPU,因此,我选择让线程数目超过四。
首先编写两个程序,首先是使用了四个线程的test_a。
c
复制代码
// test_a.c #include <stdio.h> #include <pthread.h> #define NUM_THREADS 4 void *do_work(void *args) { int i = 0; while (1) { i += 1; } return NULL; } int main() { pthread_t threads[NUM_THREADS]; int i; // 创建四个线程 for (i = 0; i < NUM_THREADS; ++i) { pthread_create(&threads[i], NULL, do_work, NULL); } // 等待所有线程结束 for (i = 0; i < NUM_THREADS; ++i) { pthread_join(threads[i], NULL); } return 0; }
以及使用了六个线程的test_b.c程序:
c
复制代码
#include <stdio.h> #include <pthread.h> #define NUM_THREADS 6 void *do_work(void *args) { int i = 0; while (1) { i += 1; } return NULL; } int main() { pthread_t threads[NUM_THREADS]; int i; // 创建四个线程 for (i = 0; i < NUM_THREADS; ++i) { pthread_create(&threads[i], NULL, do_work, NULL); } // 等待所有线程结束 for (i = 0; i < NUM_THREADS; ++i) { pthread_join(threads[i], NULL); } return 0; }
然后编译:
shell
复制代码
gcc -pthread test_a.c -o test_a gcc -pthread test_b.c -o test_b
同时运行,然后在top中查看CPU使用情况,可以看到二者使用的资源差不持平:


 1551
1551

 被折叠的 条评论
为什么被折叠?
被折叠的 条评论
为什么被折叠?
 到【灌水乐园】发言


