


一、使用导航器检查Ansible配置
1. 在交互模式下检查Ansible配置
使用 ansible-navigator config 命令可以显示当前的ansible配置(交互模式下执行ansible-navigator run命令时会用到),也可以用它来确定当前 ansible-navigator 导航器配置的设置来源,这样才能更清楚有些设置为什么具有特定的值。
导航器配置可以来自以下途径:
-
特定的环境变量
-
由ANSIBLE_CONFIG环境变量指定的配置文件
-
硬编码的默认值
使用ansible-navigator config命令不仅可以检查当前的配置设置,也可以检查默认的配置设置,并根据需要访问每个配置参数的文档。
用好ansible-navigator config命令有助于快速解决配置问题。例如,当配置参数未按预期工作或Ansible无视了一些参数时,这个命令可以帮助你查找问题。还可以用来显示Ansible为每个参数使用的实际值,以及它从哪个来源检查这个值、配置文件或环境变量。
以下是ansible-navigator config命令的典型输出(如图-1所示)。
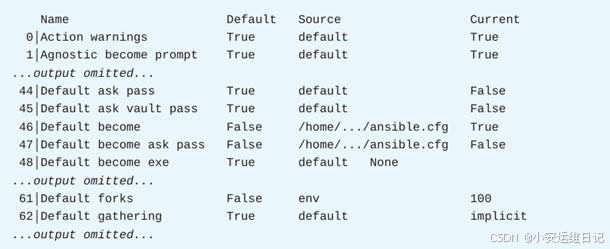
前面这个示例中,每行描述一个Ansible配置参数,主要包括这些列:
-
Name:这一列显示Ansible用作参数的内部名称,这些名称与ansible.cfg配置文件中使用的名称不一样。例如,Default become参数对应ansible.cfg配置文件中的become参数。你可以通过输入感兴趣的参数的编号来查看名称映射,对于大于9的编号,请加冒号前缀
-
Default:这一列用来指示参数是使用它的默认值(结果为Ture),还是使用在ansible.cfg配置文件中明确设置的值,或通过环境变量(当为False时)来设置。ansible-navigator命令以绿色显示默认的参数设置,以黄色显示从默认设置更改的参数设置。
-
Source:当参数未使用默认值时,Source列指示参数的设置方式。这一列提供了Ansible从中检索参数值的配置文件的完整路径。如果这一列显示env关键字,表示参数的值会由环境变量来设置。
-
Current:这一列显示了这个参数的实际的值。
1)搜索特定的配置参数
利用ansible-navigator命令的过滤功能,可以快速找到特定的配置参数。输入 :filter(或:f),后跟正则表达式,就可以进行搜索。例如,要查找Default forks参数,可以输入 :f forks 来查找。
这个功能不只是搜索参数的名称,也可以搜索任何其他模式。例如,可以输入 :f ansible.cfg来列出ansible.cfg配置文件中定义的所有参数。请记住,正则表达式区分大小写。
2)访问参数的详细信息
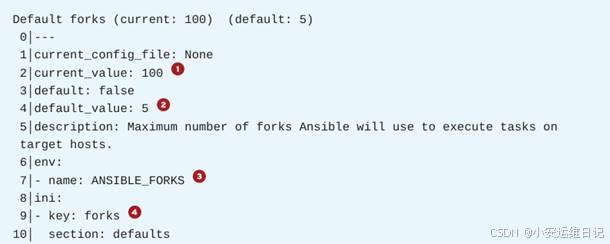
要获取参数的详细信息,请键入其编号,如果该编号大于9,则以冒号为前缀。以下示例显示了Default forks参数的详细信息(如图-2所示)。
其中,
-
current_value:表示这个参数实际的值(100)
-
default_value:表示这个参数默认的值(5),如果没有通过ansible.cfg配置或者环境变量来定义这个参数时,那么Ansible会使用默认的值
-
env – name:表示对应这个参数的环境变量的名称(ANSIBLE_FORKS)
-
ini – key:表示对应这个参数的ansible.cfg配置中[defaults]段下的配置语句(forks)
3)检查本地配置
ansible-navigator 命令默认使用自动化执行环境来执行任务。
如果你的Ansible项目没有提供ansible.cfg配置文件,则使用自动化执行环境内部的/etc/ansible/ansible.cfg文件。
正常情况下,不需要使用本地系统中的/etc/ansible/ansible.cfg或~/.ansible.cfg配置文件。如果确实要用这些本地的配置文件,请使用--execution-environment false(或--ee false)选项来阻止命令使用自动化执行环境。
因为ansible-navigator更多的时候是在自动化执行环境中运行剧本,而不是在本地控制节点环境中运行剧本,所以通常会检查自动化执行环境中的配置。
2. 在标准输出模式下检查Ansible配置
除了交互式模式以外,ansible-navigator config命令还可以通过标准输出列出配置参数,然后退出。只要添加 --mode stdout(或-m stdout)选项就可以使用标准输出模式。
使用这种非交互式模式时,ansible-navigator命令与ansible-config命令类似,也需要一个子命令:
-
list:list子命令列出了所有的Ansible配置参数,显示的是一个描述每个参数的静态列表,这个命令并不报告配置参数当前的值
-
dump:dump子命令列出了所有Ansible配置参数,以及这些参数当前的值
-
view:view子命令显示当前使用的ansible.cfg配置文件的内容,这个子命令有助于确认Ansible正在使用预期的配置文件
以下示例列出了配置参数及其当前值:
[user@host ansible-project]$ ansible-navigator config -m stdout dump

ACTION_WARNINGS(default) = True

AGNOSTIC_BECOME_PROMPT(default) = True

...output omitted...

DEFAULT_ASK_VAULT_PASS(default) = False

DEFAULT_BECOME(/home/user/ansible-project/ansible.cfg) = True

DEFAULT_BECOME_ASK_PASS(/home/user/ansible-project/ansible.cfg) = False

DEFAULT_BECOME_EXE(default) = None

...output omitted...

DEFAULT_FORCE_HANDLERS(default) = False

DEFAULT_FORKS(env: ANSIBLE_FORKS) = 100

DEFAULT_GATHERING(default) = implicit

...output omitted...
3. 课堂练习:使用导航器检查Ansible配置
开始练习(部署环境):
以用户student登入workstation虚拟机,使用lab命令来构建案例环境。
[student@workstation ~]$ lab start config-ansible步骤说明:
1)使用ansible-navigator导航器浏览当前的配置,并确认哪些设置使用默认值
使用ansible-navigator config命令:
[student@workstation ~]$ ansible-navigator config --eei hub.lab.example.com/ee-supported-rhel8 --pp missing就可以探索当前导航器的配置设置:
Name                            Default    Source     Current
0|Action warnings               True       default    True
1|Agnostic become prompt         True       default    True
2|Allow world readable tmpfiles  True       default    False
3|Ansible connection path        True       default    None
...output omitted...
输入 :f host 回车后即可搜索到 Default host list参数:
Name                            Default    Source     Current
0|Default host list             True       default    ['/etc/ansible/hosts']
1|Display skipped hosts          True       default    True

...output omitted...
注意编号0这一行,终端中应该显示为绿色,且对应Default列的值是True,表示当前使用的是默认设置。按0 来查看Default host list参数的详细信息:
Default host list (current/default: ['/etc/ansible/hosts'])
0│---
1│current_config_file: None
2│current_value:
3│- /etc/ansible/hosts
4│default: true
5│default_value: /etc/ansible/hosts
6│description: Comma separated list of Ansible inventory sources
7│env:
8│- name: ANSIBLE_INVENTORY
9│expand_relative_paths: true
10│ini:
11│- key: inventory
12│  section: defaults
13│name: Default host list
14│option: DEFAULT_HOST_LIST
15│source: default
16│type: pathlist
17│via: default
18│yaml:
19│  key: defaults.inventory
按两次Esc键退出ansible-navigator命令,或者输入 :q 再按Enter键也可以退出。
2)修改Ansible配置,并使用导航器来识别对默认设置所做的更改。在当前目录下ansible.cfg文件中的配置设置要优先于默认的Ansible配置设置。
进入/home/student/config 目录(切换目录),查看ansible.cfg配置文件:
[student@workstation ~]$ cd ~/config-ansible
[student@workstation config-ansible]$ cat ansible.cfg
[defaults]
inventory=inventory
remote_user=devops
使用ansible-navigator命令:
[student@workstation config-ansible]$ ansible-navigator config --eei hub.lab.example.com/ee-supported-rhel8 --pp missing输入 :f host 回车,再次搜索到Default host list参数:
Name                                Default       Source                                                                    Current
0│Default host list             False         /home/student/config-ansible/ansible.cfg           ['/home/student/config-ansible/inventory']
1│Display skipped hosts       True          default                                                                   True
...
注意编号0这一行为黄色,Default列中的值为False,表示它使用的不是默认设置(Source 用的不再是 /etc/ansible/hosts 参数路径)这一次,Default host list参数具有以下这些值(如表所示)。
| 字段 | 值 |
| Default | False |
| Source | /home/student/config-ansible/ansible.cfg |
| Current | ['/home/student/config-ansible/inventory'] |
按0 来查看Default host list参数的详细信息:
Default host list (current: ['/home/student/config-ansible/inventory'])  (default: /etc/ansible/hosts)
0│---
1│current_config_file: /home/student/config-ansible/ansible.cfg
2│current_value:
3│- /home/student/config-ansible/inventory
4│default: false
5│default_value: /etc/ansible/hosts
6│description: Comma separated list of Ansible inventory sources
7│env:
8│- name: ANSIBLE_INVENTORY
9│expand_relative_paths: true
10│ini:
11│- key: inventory
12│  section: defaults
13│name: Default host list
14│option: DEFAULT_HOST_LIST
15│source: /home/student/config-ansible/ansible.cfg
16│type: pathlist
17│via: /home/student/config-ansible/ansible.cfg
18│yaml:
19│  key: defaults.inventory
输入 :q 再按Enter键退出ansible-navigator命令。
3)使用导航器搜索特定的配置参数,确认是否已自定义,并发现任何自定义的来源
使用ansible-navigator命令:
[student@workstation config-ansible]$ ansible-navigator config --eei hub.lab.example.com/ee-supported-rhel8 --pp missing输入 :f ask 回车,搜索到Default ask pass参数:
Name                     Default    Source     Current
0|Default ask pass       True       default    False
1|Default ask vault pass  True       default    False

...output omitted...
注意编号0这一行,终端中应该显示为绿色,且对应Default列的值是True,表示这是Default askpass参数的默认设置。
输入 :q 再按Enter键退出ansible-navigator命令。
修改ansible.cfg文件,在[defaults]部分添加ask_pass=false行,就像这样:
[student@workstation config-ansible]$ vim ansible.cfg
[defaults]
inventory=inventory
remote_user=devops
ask_pass=false
再次使用ansible-navigator命令,输入 :f ask 回车,搜索到Default ask pass参数:
[student@workstation config-ansible]$ ansible-navigator config --eei hub.lab.example.com/ee-supported-rhel8 --pp missing
Name                     Default    Source                          Current
0|Default ask pass       False      /home/student/config-ansible/a   False
1|Default ask vault pass  True       default                         False

...output omitted...
注意编号0这一行为黄色,Default列中的值为False。显示的值对应Default ask pass参数。
按Esc键退出ansible-navigator命令。
修改ansible.cfg文件中的ask_pass设置,将其改为true,就像这样:
[defaults]
inventory=inventory
remote_user=devops
ask_pass=true
再次使用ansible-navigator命令,输入 :f ask 回车,搜索到Default ask pass参数:
Name                     Default    Source                          Current
0|Default ask pass       False      /home/student/config-ansible/a   True
1|Default ask vault pass  True       default                         False

...output omitted...
尽管Default ask pass的值与ansible.cfg文件中配置的值相匹配,注意编号0这一行仍然是黄色,Default列中的值为False(如表所示)
| 字段 | 值 |
| Default | False |
| Source | /home/student/config-ansible/ansible.cfg |
| Current | True |
按Esc键退出ansible-navigator命令。
结束练习(清理环境):
在workstation虚拟机上,切换到student用户主目录,使用lab命令来清理案例环境,确保先前练习的资源不会影响后续的练习。
[student@workstation ~]$ lab finish config-ansible二、配置导航器配置文件
1. 配置文件的格式
可以为ansible-navigator创建一个配置文件,来覆盖它默认的配置设置。例如,如果不想使用默认的自动化执行环境,又不想在每次运行ansible-navigator命令的时候添加--eei来指定环境,这时准备一份配置文件就非常有用了。
配置文件可以是JSON或YAML格式:(本课程重点介绍YAML格式配置文件)
-
对于JSON格式的设置,扩展名必须为 .json
-
对于YAML格式的设置,扩展名必须是 .yml 或 .yaml
2. 配置文件的定位
Navigator导航器按以下顺序查找(优先级从高到低),并使用找到的第一个配置文件:
1) 环境变量 ANSIBLE_NAVIGATOR_CONFIG,使用此变量指定的配置文件
2) 当前目录下的 ansible-navigator.yml 文件
3) 家目录下的 ~/.ansible-navigator.yml 隐藏文件
每个项目都可以有自己的导航器配置文件。常见的配置参数可以是项目所需的自动化执行环境镜像的名称,Ansible配置参数,如 fork、日志级别、工件创建等。
注意:每个项目目录下最多只能有一个导航器配置文件,如果同时存在.yml、.yaml、.json扩展名的多份配置,使用ansible-navigator命令时会报错。
选择要使用的配置文件
-
当项目的当前目录下有 ansible-navigator.yml文件时,它会覆盖用户家目录中的任何配置文件,使用这个项目并在项目目录下工作的所有用户使用相同的配置文件。
-
当用户的家目录下有~/.ansible-navigator.yml文件时,则只有找不到其他配置文件时才会用它。通常使用这个文件来定义ansible-navigator的默认设置。
-
如果想覆盖所有其他配置文件,应该只使用 ANSIBLE_NAVIGATOR_CONFIG 环境变量来指定导航器的配置文件。
3. 为导航器生成配置文件
使用 ansible-navigator settings 命令可以生成配置文件。
-
结合--sample选项,将输出一个YAML格式的样本配置;
-
结合--effective选项,将输出ansible-navigator命令的当前有效配置。
这两种情况,都可以将命令的输出通过重定向保存到一个文件中,以便后续编辑和使用它。
-
使用--sample选项:生成的配置中,大多数的行以 #号开头,实际上是关于有效设置及描述设置的一些注释。如果想使用这些注释的行,为了保留YAML文件的正确缩进,必须删除行首的数字符号和一个空格。删除额外的空格符合使用两个空格进行缩进的最佳实践,并确保未注释的行与日志顶层设置的现有缩进匹配。
-
使用--effective选项:生成的配置结果 更加精简,并且不包含任何注释。结果中配置了很多可以传递给命令的选项,例如--eei和--pp选项。模式键的值始终为stdout。如果不需要此值,则可以在生成示例文件后更改该值。这个命令已经正确调整了缩进,因此会生成一个能立即使用的工作配置。
注意:使用上述命令生成配置时,不要直接重定向以覆盖当前目录下的ansible-navigator.yml文件,否则会出错。建议的做法是:先重定向为其他文件,比如/tmp/ansible-navigator.yml,然后再复制或移动这个文件到正确的位置。
[user@host ~]$ ansible-navigator settings --effective --pp missing --eei ee-supported-rhel8 > /tmp/ansible-navigator.yml生成的配置内容以ansible-navigator开始,包含了一系列顶层设置类别和设置的子键。顶层设置包括ansible设置,以及execution-environment执行环境设置。
---
ansible-navigator:
...output omitted...
  execution-environment:
    container-engine: podman
    enabled: true
    image: ee-supported-rhel8:latest
    pull:
      policy: missing
...output omitted...
1)设置默认的自动化执行环境
使用 execution-environment 关键字来设置ansible-navigator使用的自动化执行环境,其中包括一系列选项的默认值。
-
image:指定对应自动化执行环境的容器镜像,相当于设置--execution-environment-image(或--eei)选项的默认值
-
pull:指定何时以及如何提取容器镜像,相当于使用--pull-policy(或--pp)选项
-
enabled:指定是否使用自动化执行环境,默认为True。
比如,参考下面这个例子:
[user@host ~]$ ansible-navigator run site.yml --eei ee-29-rhel8 --pp always如果在与site.yml文件的同级目录中创建包含以下内容的ansible-navigator.yml文件,后面再使用ansible-navigator命令时就可以省略--eei和--pp选项:
---
ansible-navigator:
  execution-environment:
    image: ee-29-rhel8:latest
    pull:
      policy: always
前面的那条命令可以简写为以下这样:
[user@host ~]$ ansible-navigator run site.yml其他的ansible-navigator行为,可以修改配置文件中的其他参数来实现。
2)将默认模式设置为标准输出
mode关键字的作用相当于--mode(-m)选项,默认为交互式模式。如果你更喜欢在stdout模式下工作,可以在ansible-navigator.yml配置文件中设置以下内容:
---
ansible-navigator:
mode: stdout一旦这个配置生效,默认就是非交互模式,再想进交互模式的话必须指定-m interactive选项。
3)禁用剧本工件(Artifacts)
Navigator导航器每次运行剧本时会留下一些工件文件,这些文件记录了关于剧本运行的信息,方便后续回看、排查问题。必要时,可以使用ansible-navigator replay filename命令来回看这些文件。但是,这些文件可能包含剧本运行的一些敏感信息,比如与身份验证相关的信息。如果你经常运行带有交互式密码提示或输入的剧本,可以使用配置文件(如以下示例)禁止剧本工件的生成。
要让ansible-navigator命令提示输入密码,可以禁止工件功能:
playbook-artifact:false
---
ansible-navigator:
  playbook-artifact:
    enable: false
或者,也可以在使用ansible-navigator run命令时结合--pae false选项来临时禁用工件。
4)其它常用配置文件配置示例
下面这个ansible-navigator.yml配置文件包含了一些常用设置:
---
ansible-navigator:
  ansible:
    config:
      path: ./ansible.cfg

  editor:
    command: /bin/emacs

  execution-environment:
    image: ee-supported-rhel8:latest
    pull:
      policy: missing

  playbook-artifact:
    enable: false
其中:
-
editor:用来配置ansible-navigator命令使用的默认文本编辑器
-
execution-vironment:用来指定ansible-navigator命令默认使用哪一个容器镜像,缺省会找registry.redhat.io/ ansible-automation-platform-22/ee-supported-rhel8:latest
更多信息可参考
4. 课堂练习:配置自动化导航器
开始练习(部署环境):
以用户student登入workstation虚拟机,使用lab命令来构建案例环境。
[student@workstation ~]$ lab start config-navigator步骤说明:
1)查看/home/student/config-navigator目录中的Ansible配置文件、清单和剧本,修改Ansible配置文件以使用secret-pass保险库密码文件
a)进入/home/student/config-navigator/目录:
[student@workstation ~]$ cd ~/config-navigator/b)观察 ansible1.cfg和 inventory1文件的内容,注意 ansible1.cfg配置文件调用的清单文件是 inventory1:
[defaults]
inventory = inventory1
清单文件inventory1 定义了 devservers 主机组,其中只包含serverb.lab.example.com 这一个受管主机:
[devservers]
serverb.lab.example.com
ansible1.cfg -> inventory1 -> devservers(serverb.lab.example.com)
c)观察 ansible2.cfg 和 inventory2 文件的内容,注意 ansible2.cfg配置文件调用的清单文件是 inventory2:
[defaults]
inventory = inventory2
清单文件inventory2 也定义了 devservers 主机组,其中包含servera.lab.example.com 这一个受管主机:
[devservers]
servera.lab.example.com
ansible2.cfg -> inventory2 -> devservers(servera.lab.example.com)
d)观察 create_users.yml 剧本的内容:
[student@workstation config-navigator]$ cat create_users.yml
---
- name: create user accounts in devservers
  hosts: devservers
  become: true
  remote_user: devops
  gather_facts: false
  vars_files:
    - secret.yml

  tasks:
    - name: Creating user from secret.yml
      ansible.builtin.user:
        name: "{{ username }}"
        password: "{{ pwhash }}"
这个剧本使用了加密文件 secret.yml 中定义的变量。
e)使用 ansible-vault view 命令来查看secret.yml文件的内容,解锁密码指定由文件secret-pass提供:
[student@workstation config-navigator]$ cat secret-pass
redhat
[student@workstation config-navigator]$ ansible-vault view secret.yml --vault-password-file=secret-pass
username: ansibleuser
pwhash: $6$j ... xhP1
修改 ansible1.cfg 文件,指定使用 secret-pass 文件作为保险库密码文件。ansible1.cfg文件的内容就像这样:
[student@workstation config-navigator]$ vim ansible1.cfg
[defaults]
inventory = inventory1
vault_password_file = secret-pass
2)创建ansible-navigator.yml配置文件并对其进行调整,以便ansible-navigator导航器使用 ansible1.cfg 配置文件、使用 hub.lab.example.com/ee-supported-rhel8:latest执行环境、使用标准输出模式
a)使用 ansible-navigator settings --effective 命令生成sample.yml设置文件,这个文件可以作为配置导航器的开始:
[student@workstation config-navigator]$ ansible-navigator settings --effective -m stdout --eei hub.lab.example.com/ee-supported-rhel8:latest --pp never > sample.yml将sample.yml文件重命名为ansible-navigator.yml:
[student@workstation config-navigator]$ mv -v sample.yml ansible-navigator.ymlb)修改 ansible-navigator.yml 配置文件,在execution-environment部分的environment-variables下设置环境变量ANSIBLE_CONFIG,指向ansible1.cfg 文件:
[student@workstation config-navigator]$ vim ansible-navigator.yml
---
ansible-navigator:
...output omitted...
  execution-environment:
    container-engine: podman
    enabled: true
    environment-variables:    # 配置ANSIBLE_CONFIG环境变量
      set:
        ANSIBLE_CONFIG: /home/student/config-navigator/ansible1.cfg
    image: hub.lab.example.com/ee-supported-rhel8:latest
    pull:
      policy: never
...output omitted...
c)检查ansible-navigator.yml配置文件,确保使用你通过--eei选项指定的镜像:
image: hub.lab.example.com/ee-supported-rhel8:latestd)检查ansible-navigator.yml配置文件,确保使用你通过--pp选项指定的拉取策略:
pull:
  policy: never
3)创建一个与ansible-navigator.yml类似的配置文件,但是使用ansible2.cfg配置文件
目的:通过运行 create_users.yml 剧本,来确认当前目录中的ansible-navigator.yml配置文件要优先于主目录中的~/.ansible-navigator.yml文件。
复制ansible-navigator.yml文件,部署为家目录下的~/.ansible-navigator.yml:
[student@workstation config-navigator]$ cp ansible-navigator.yml ~/.ansible-navigator.yml修改新部署的~/.ansible-navigator.yml文件,设置环境变量ANSIBLE_CONFIG,指向ansible2.cfg文件,就像这样:
[student@workstation config-navigator]$ vim ~/.ansible-navigator.yml
---
ansible-navigator:
...output omitted...
  execution-environment:
    container-engine: podman
    enabled: true
    environment-variables:
      set:
        ANSIBLE_CONFIG: /home/student/config-navigator/ansible2.cfg   # 修改ansible2
    image: hub.lab.example.com/ee-supported-rhel8:latest
    pull:
      policy: never
...output omitted...
使用ansible-navigator命令运行create_users.yml剧本:
[student@workstation config-navigator]$ ansible-navigator run create_users.yml


PLAY [create user accounts in devservers] **************************************


TASK [Creating user from secret.yml] *******************************************

changed: [serverb.lab.example.com]     ## 使用ansible1文件


PLAY RECAP *********************************************************************

serverb.lab.example.com  : ok=1  changed=1 unreachable=0 failed=0

skipped=0  rescued=0  ignored=0
使用ansible-navigator命令时,不需要指定已经在配置文件中设置的任何参数。
结论:上述剧本在serverb上运行,说明当前目录下的./ansible-navigator.yml的优先级要高于家目录下~/.ansible-navigator.yml 文件的优先级。
4)验证在当前项目目录中没有配置文件时,是否可以使用~/.ansible-navigator.yml作为导航器的设置文件
a)将ansible-navigator.yml文件改名为 backup-an.yml,然后使用带--pae false 和--ask-vault-pass 选项的ansible-navigator命令来运行create_users.yml剧本:
[student@workstation config-navigator]$ mv ansible-navigator.yml backup-an.yml

[student@workstation config-navigator]$ ansible-navigator run create_users.yml --pae false --ask-vault-pass

Vault password: redhat

PLAY [create user accounts in devservers] **************************************


TASK [Creating user from secret.yml] *******************************************

changed: [servera.lab.example.com]     ## 使用ansible2文件


PLAY RECAP *********************************************************************

servera.lab.example.com   : ok=1 changed=1  unreachable=0  failed=0

skipped=0  rescued=0  ignored=0
结论:这一次,剧本在servera服务器上运行,因为项目目录中没有设置文件,导航器在家目录中找到了设置文件。上面这个命令使用了--ask-vault-pass选项,是因为在ansible2.cfg文件中并未指定 vault_password_file 选项,这个选项还需要使用 --pae false 选项来临时禁用剧本工件。
5)验证在当前项目目录中有ansible-navigator.yml配置文件和~/.ansible-navigator.yml时,通过ANSIBLE_NAVIGATOR_CONFIG环境变量指定值时,是否可以使用作为导航器的设置文件
恢复本地自动化内容导航器设置文件,并将ANSIBLE_NAVIGATOR_CONFIG环境变量设置为~/.ansible-navigator.yml:
[student@workstation config-navigator]$ mv backup-an.yml ansible-navigator.yml
[student@workstation config-navigator]$ export ANSIBLE_NAVIGATOR_CONFIG=~/.ansible-navigator.yml
a)再次使用ansible-navigator命令运行create_users.yml剧本。
注意,环境变量使用的是 ~/.ansible-navigator.yml,ansible2.cfg 没有配置解密
[student@workstation config-navigator]$ ansible-navigator run create_users.yml --pae false --ask-vault-pass
servera.lab.example.com : ok=1 changed=0  unreachable=0 failed=0

skipped=0 rescued=0  ignored=0
结论:剧本在servera上运行,即使当前目录下./ansible-navigator.yml配置文件存在(指向serverb),因为ANSIBLE_NAVIGATOR_CONFIG 环境变量优先
b)清除ANSIBLE_NAVIGATOR_CONFIG环境变量,以便后续练习使用当前目录下./ansible-navigator.yml配置文件
[student@workstation config-navigator]$ unset ANSIBLE_NAVIGATOR_CONFIG6)运行create_users.yml剧本时,你可能更喜欢输入密码来解密secret.yml文件作为用户输入,而不是每次都使用--pae false选项。修改导航器配置,以提示输入保险库密码
删除 ansible1.cfg 文件中 vault_password_file 的行,就像这样:
[defaults]
inventory = inventory1
修改ansible-navigator.yml配置文件,将enbale关键字设置为false来禁止产生剧本工件:
---
ansible-navigator:
...output omitted...
  execution-environment:
    container-engine: podman
    enabled: true
    environment-variables:
      set:
        ANSIBLE_CONFIG: /home/student/config-navigator/ansible1.cfg
    image: hub.lab.example.com/ee-supported-rhel8:latest
    pull:
      policy: never
    ...output omitted...
    logging: append: true
    file: /home/student/config-navigator/ansible-navigator.log
    level: warning
  mode: stdout
  playbook-artifact:
    enable: false      # 禁止剧本工件
    save-as: '{playbook_dir}/{playbook_name}-artifact-{time_stamp}.json'
    ...output omitted...
禁止创建剧本工件使你能够以交互方式运行剧本,比如当你想使用 --ask-vault-pass 等选项时,交互式运行非常有用。但是,禁止工件创建以后想再使用 ansible-navigator replay功能就不方便了。
使用ansible-navigator命令运行create_users.yml剧本。这一次,指定--ask-vault-pass选项以提示输入保险库密码:
[student@workstation config-navigator]$ ansible-navigator run create_users.yml --ask-vault-pass

Vault password: redhat


PLAY [create user accounts in devservers] **************************************


TASK [Creating user from secret.yml] *******************************************

ok: [serverb.lab.example.com]


PLAY RECAP ******************************************************************

serverb.lab.example.com : ok=1 changed=0  unreachable=0 failed=0

skipped=0 rescued=0  ignored=0
结束练习(清理环境):
在workstation虚拟机上,切换到student用户主目录,使用lab命令来清理案例环境,确保先前练习的资源不会影响后续的练习。
[student@workstation ~]$ lab finish config-navigator三、综合实验:调整Ansible配置
开始实验(部署环境):
以用户student登入workstation虚拟机,使用lab命令来构建案例环境。
[student@workstation ~]$ lab start config-review解决方案:
1. 进入/home/student/config-review目录,调整导航器配置文件以默认使用hub.lab.example.com/ee-supported-rhel8:latest镜像并将pull策略设置为missing
进入/home/student/config-review directory目录:
[student@workstation ~]$ cd ~/config-review修改 ~/config-review/ansible-navigator.yml 配置文件,将默认的执行环境镜像指向hub.lab.example.com/ee-supported-rhel8:latest,将拉取策略改为missing。
参考下面的grep命令提取ansible-navigator.yml配置文件的内容(去掉以#开头的行),修改后的内容就像这样:
[student@workstation config-review]$ grep -v '^#' ansible-navigator.yml
---
ansible-navigator:
  execution-environment:
    enabled: True
    image: hub.lab.example.com/ee-supported-rhel8:latest   ## 修改私有化中心的supported镜像
    pull:
      policy: missing     ## pull策略
    logging:
      level: critical
    playbook-artifact:
      enable: True
2. 因为install-web.yml剧本需要提权密码,请调整导航器配置文件以禁止创建剧本工件
修改~/config-review/ansible-navigator.yml导航器配置文件。在剧本工件部分,将enable指令的值更改为False。
参考下面的grep命令提取ansible-navigator.yml配置文件的内容(去掉以#开头的行),就像这样:
[student@workstation config-review]$ grep -v '^#' ansible-navigator.yml
---
ansible-navigator:
  execution-environment:
    enabled: True
    image: hub.lab.example.com/ee-supported-rhel8:latest
    pull:
      policy: missing
  logging:
    level: critical
  playbook-artifact:
    enable: False     ## 禁止创建剧本工件
3. 使用导航器来确定如何指定Ansible执行任务的最大forks数。确认变量的名称,以及变量应放到哪个配置语句下。
修改~/config-review/ansible.cfg配置文件,将forks的最大数量设置为15,并使用导航器来验证更改。
a)运行 ansible-navigator config 命令,不带任何其他参数:
[student@workstation config-review]$ ansible-navigator config
Name                                         Default    Source     Current
0|Action warnings                       True       default    True
1|Agnostic become prompt         True       default    True
2|Allow world readable tmpfiles  True       default    False
3|Ansible connection path          True       default    None

...output omitted...
输入 :f forks 后按Enter键来查询配置设置:
Name                            Default    Source     Current
0|DefauLt forks                 True       default    5
按 0 检查Default forks配置:
Default forks (current/default: 5)
0|---
1|current_config_file: /home/student/config-review/ansible.cfg
2|current_value: 5
3|default: true
4|default_value: 5
5|description: Maximum number of forks Ansible will use to execute tasks on tar
6|env:
7|- name: ANSIBLE_FORKS
8|ini:
9|- key: forks
10| section: defaults
11|name: Default forks
12|option: DEFAULT_FORKS
13|source: default 14|type: integer
15|via: default-
key: forks:表示在ansible.cfg文件中使用的配置关键字是forks
-
section: defaults:表示在ansible.cfg文件中,这个关键字属于[defaults]配置段
按两次ESC键退出ansible-navigator命令。
b)修改~/config-review/ansible.cfg配置文件,将forks设置为15
参考下面的grep命令提取ansible.cfg配置文件的内容(去掉以#开头的行、去掉空行、去掉以分号开头的行),就像这样:
[student@workstation config-review]$ grep -Ev '^#|^$|^;' ansible.cfg

[defaults]
forks=15
inventory = inventory

[privilege_escalation]
...output omitted...
c)使用不带其他参数的ansible-navigator config命令来验证配置
[student@workstation config-review]$ ansible-navigator config输入 :f forks 后按Enter键来查询配置设置:
Name Default Source Current
0|DefauLt forks False /home/student/config-review/ansible.cfg 15按Esc 键退出ansible-navigator命令。
4. 使用ansible-navigator命令运行install-web.yml剧本,结合-m stdout和--ask-become-pass选项一起使用。出现提示时,输入student作为提权密码,确保剧本成功运行
使用ansible-navigator命令来运行install-web.yml剧本,注意加上-m stdout和--ask-become-pass选项:
[student@workstation config-review]$ ansible-navigator run install-web.yml -m stdout --ask-become-pass

BECOME password: student

PLAY [Install web server] ******************************************************


TASK [Gathering Facts] *********************************************************

ok: [servera.lab.example.com]


TASK [Install httpd package] ***************************************************
changed: [servera.lab.example.com]


PLAY RECAP *********************************************************************

servera.lab.example.com  : ok=2 changed=1  unreachable=0 failed=0 ...
结束实验(清理环境):
在workstation虚拟机上,切换到student用户主目录,使用lab命令来清理案例环境,确保先前练习的资源不会影响后续的练习。
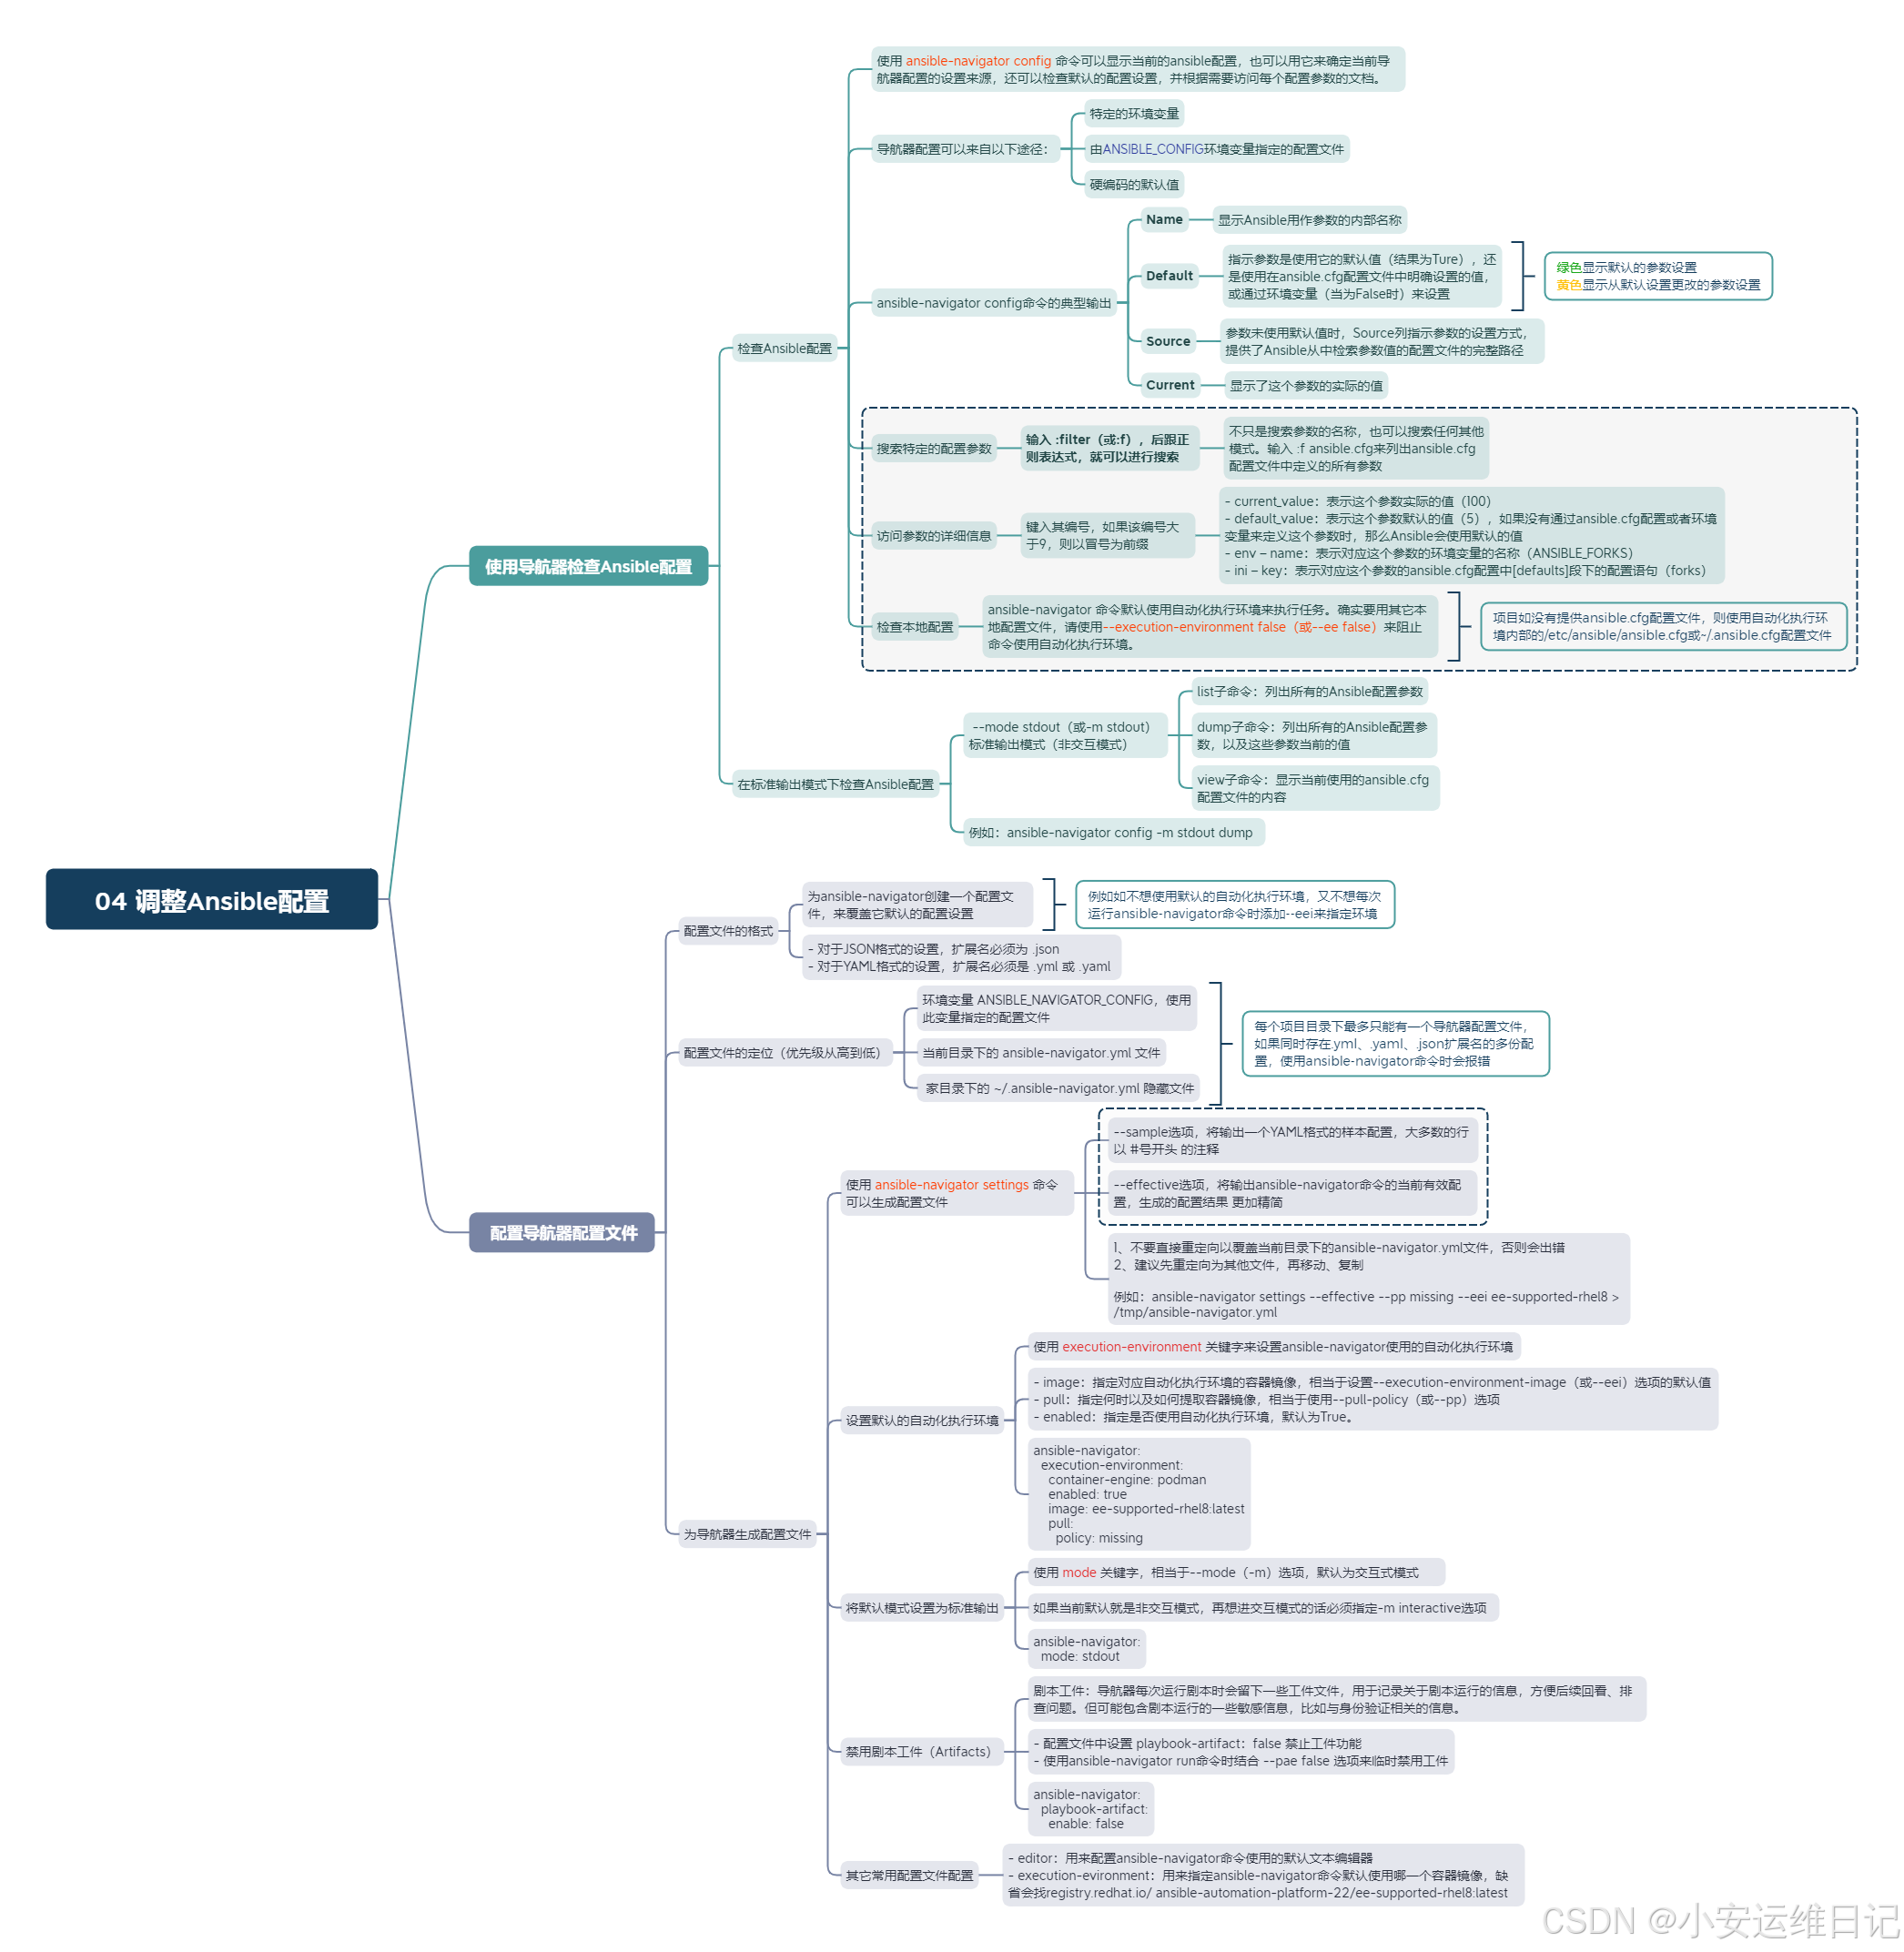
[student@workstation ~]$ lab finish config-review思维导图:
小结:
本篇为 【RHCA认证 - DO374 | Day04:调整Ansible配置】的学习笔记,希望这篇笔记可以让您初步了解如何使用导航器检查Ansible配置、如何配置导航器配置文件、综合实验:调整Ansible配置等,不妨跟着我的笔记步伐亲自实践一下吧!
Tip:毕竟两个人的智慧大于一个人的智慧,如果你不理解本章节的内容或需要相关环境、视频,可评论666并私信小安,请放下你的羞涩,花点时间直到你真正的理解。


 1107
1107

 被折叠的 条评论
为什么被折叠?
被折叠的 条评论
为什么被折叠?
 到【灌水乐园】发言


