


 本文介绍了如何使用Mycat作为数据库分库分表中间件,通过配置server.xml和schemas.xml实现不同用户访问不同数据库。在SpringBoot项目中,添加过滤器处理SQL,根据租户编号动态拼接schema,达到读写分离和分库分表的效果。
- 项目背景
现在业务想实现不同的用户分别看到不同的数据库,领导说用mycat中间件试试。没有接触过这个东西,刚拿到手直接头皮发麻,现在搞定了,索性就记录一下
- Mycat数据库分库分表中间件 简介
阿里大牛开发的开源免费产品,面向企业应用开发的大数据库集群 ;核心技术即使分表分片,我们不用在代码中配置很多数据源,只需要在mycat中就可以,增加节点很灵活,降低了和代码的耦合度;同时,这也是对分布式的数据库的支持,支持事务。
可以把mycat看作一个代理,根据负载均衡策略实现这样的分布式数据。
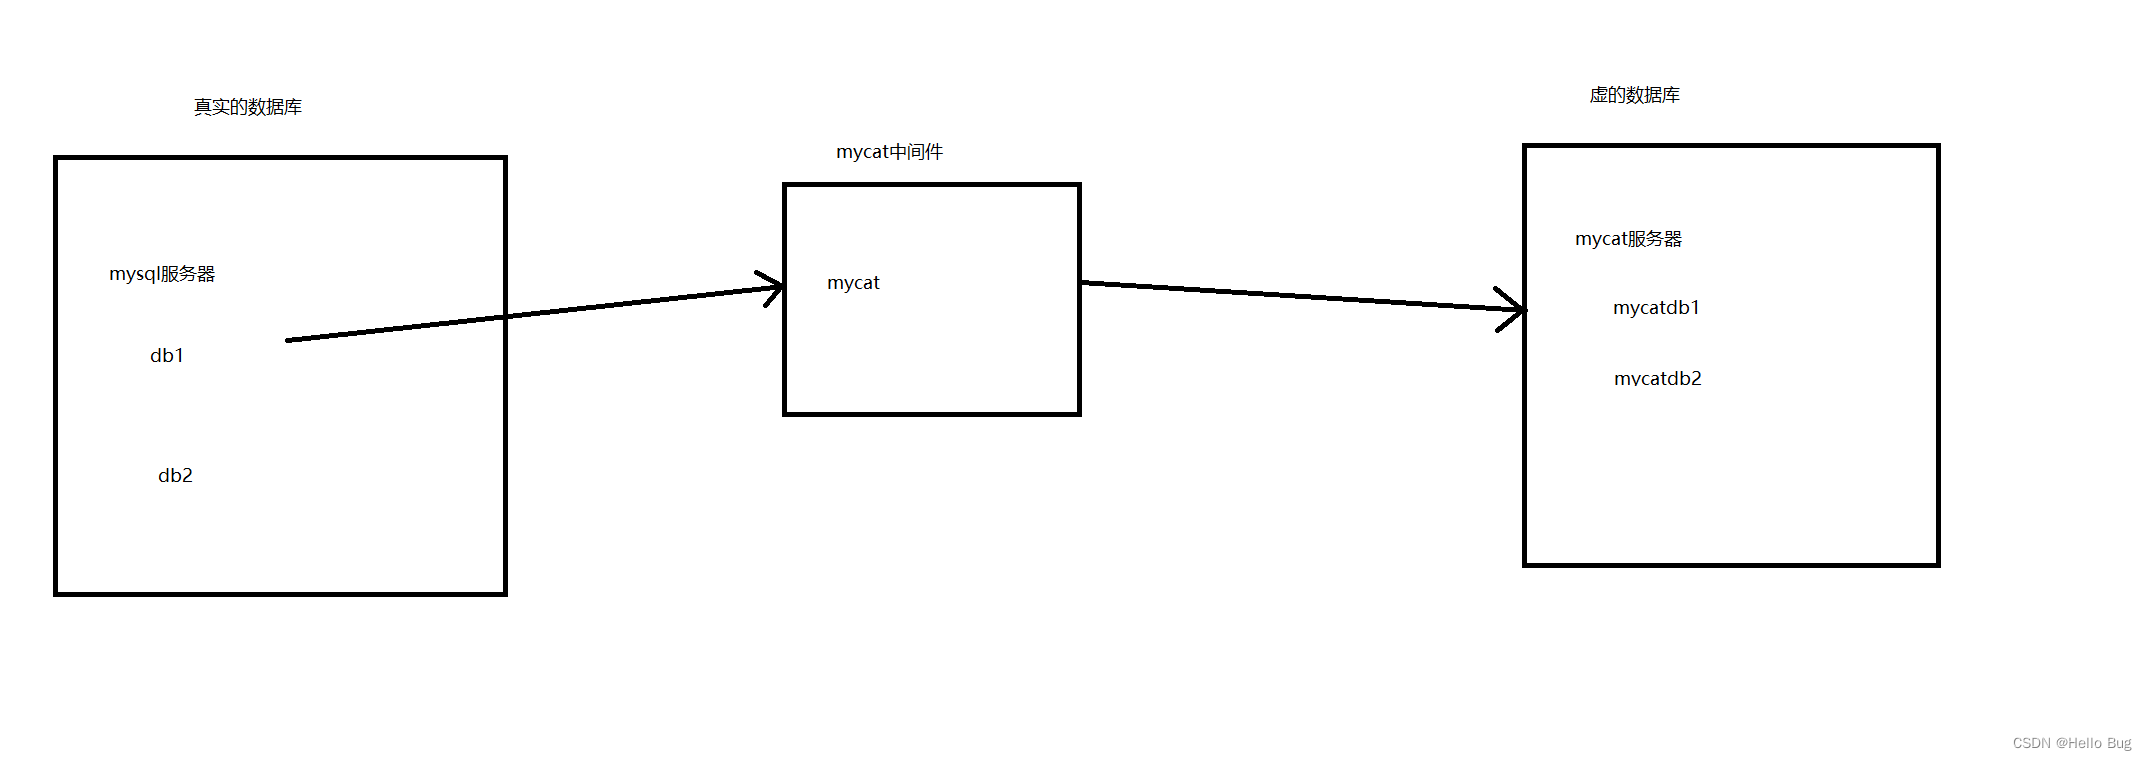
个人理解,mycat中间件就是把真实的数据库搞成一个虚的数据库来,访问不同的mycat的schema来实现访问不同的真实数据库,语法如下
/*!mycat:schema=你的schema*/SELECT * FROM USER
- 具体操作
mycat安装
官网下载1.6版本的解压,据说这个比较稳定。
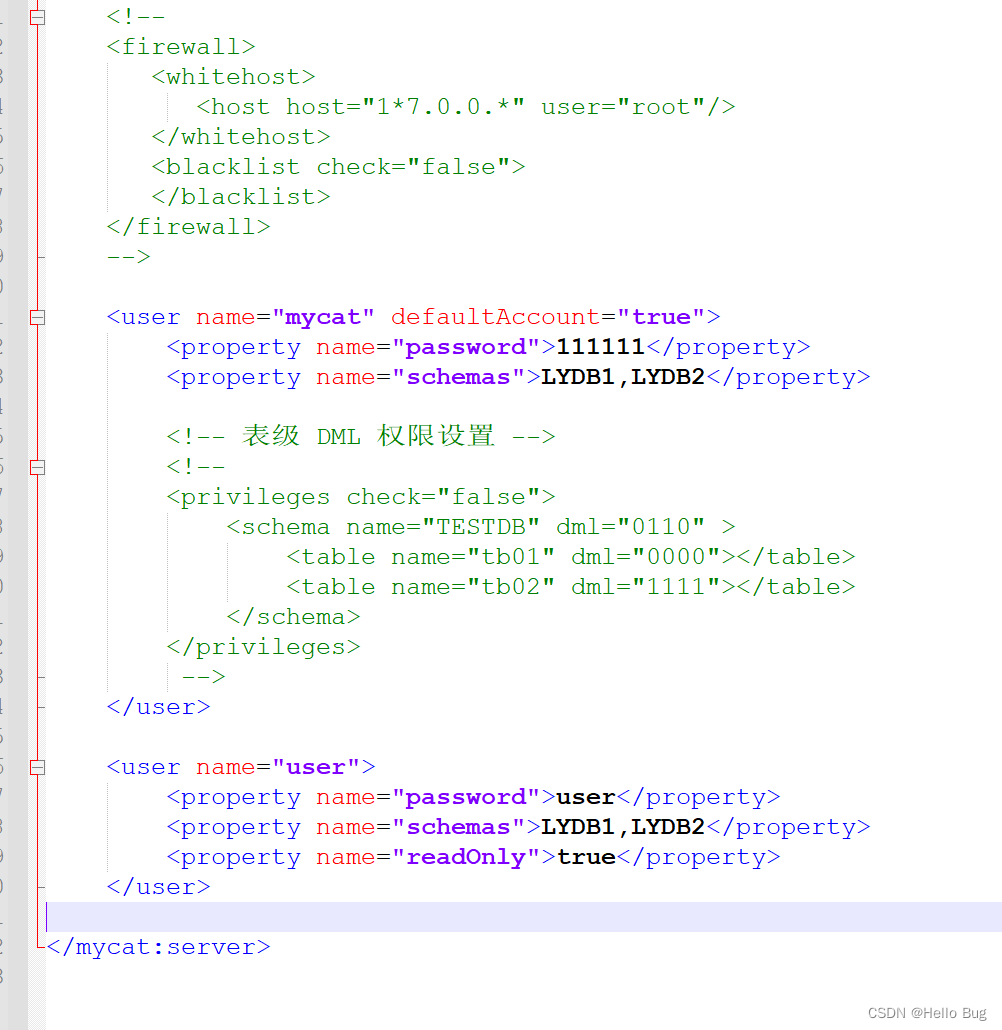
配置server.xml
<user name="mycat" defaultAccount="true">
		<property name="password">111111</property>
		<property name="schemas">LYDB1,LYDB2</property>

		<!-- 表级 DML 权限设置 -->
		<!--
		<privileges check="false">
			<schema name="TESTDB" dml="0110" >
				<table name="tb01" dml="0000"></table>
				<table name="tb02" dml="1111"></table>
			</schema>
		</privileges>
		 -->
	</user>

	<user name="user">
		<property name="password">user</property>
		<property name="schemas">LYDB1,LYDB2</property>
		<property name="readOnly">true</property>
	</user>
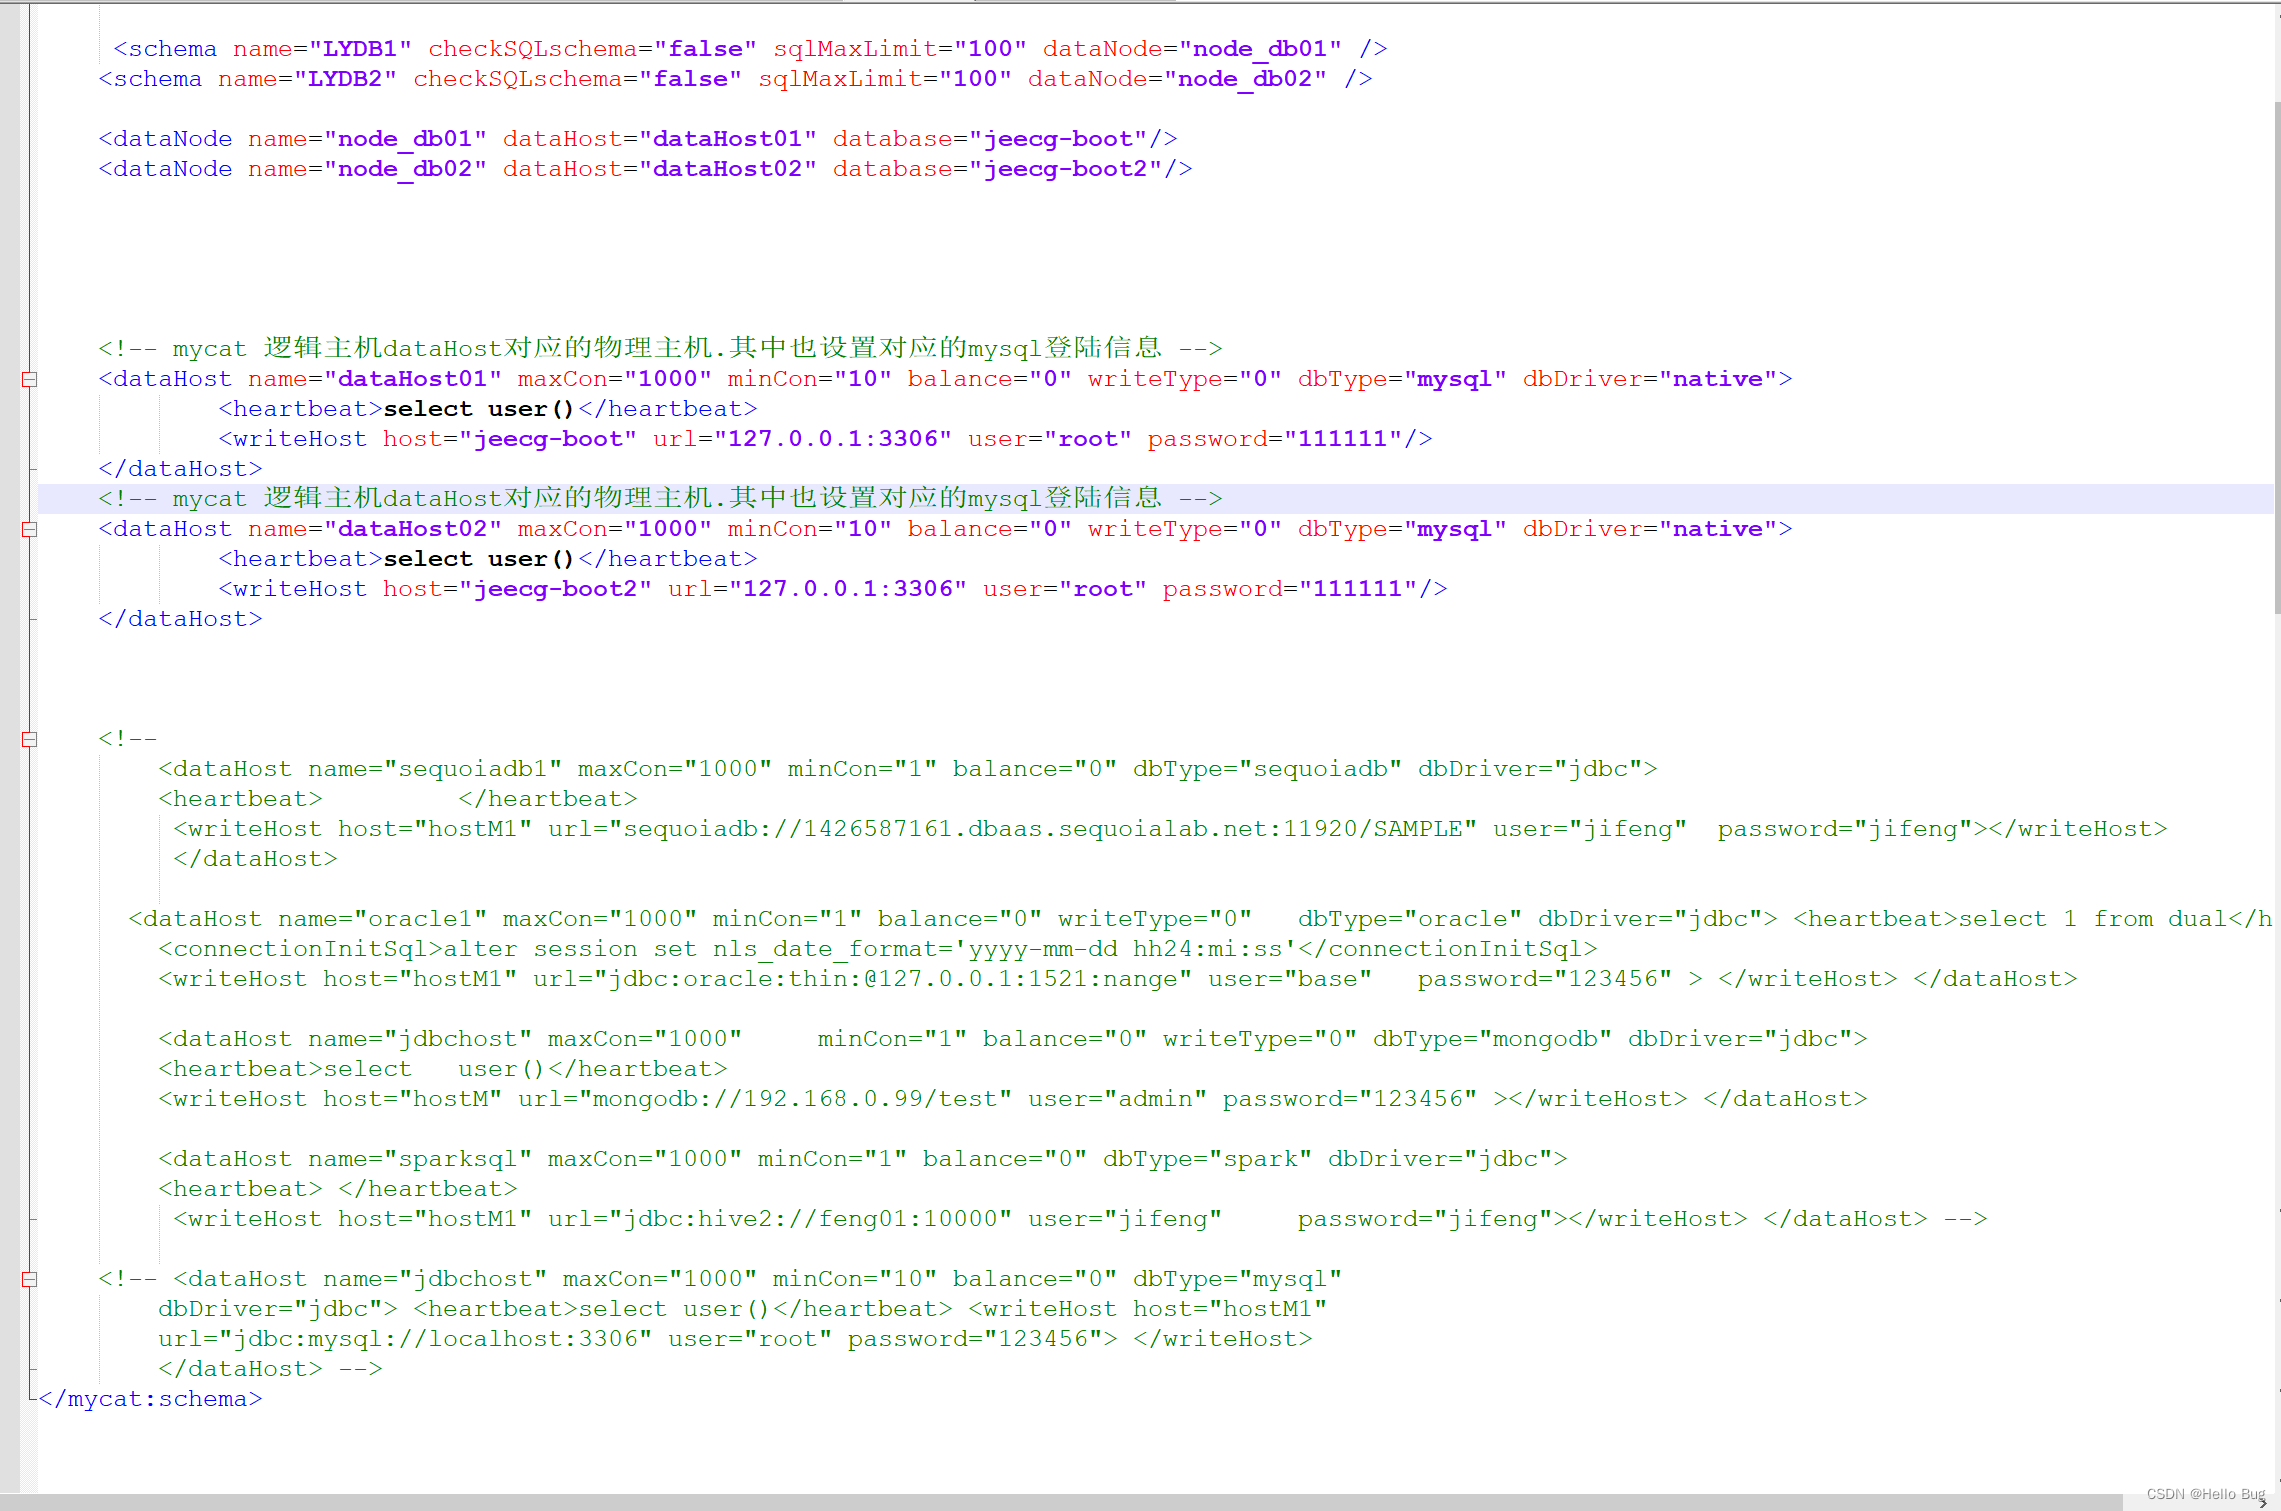
配置schemas.xml
 <schema name="LYDB1" checkSQLschema="false" sqlMaxLimit="100" dataNode="node_db01" />
    <schema name="LYDB2" checkSQLschema="false" sqlMaxLimit="100" dataNode="node_db02" />

    <dataNode name="node_db01" dataHost="dataHost01" database="jeecg-boot"/>
    <dataNode name="node_db02" dataHost="dataHost02" database="jeecg-boot2"/>


    <!-- mycat 逻辑主机dataHost对应的物理主机.其中也设置对应的mysql登陆信息 -->
    <dataHost name="dataHost01" maxCon="1000" minCon="10" balance="0" writeType="0" dbType="mysql" dbDriver="native">
            <heartbeat>select user()</heartbeat>
            <writeHost host="jeecg-boot" url="127.0.0.1:3306" user="root" password="111111"/>
    </dataHost>
	<!-- mycat 逻辑主机dataHost对应的物理主机.其中也设置对应的mysql登陆信息 -->
    <dataHost name="dataHost02" maxCon="1000" minCon="10" balance="0" writeType="0" dbType="mysql" dbDriver="native">
            <heartbeat>select user()</heartbeat>
            <writeHost host="jeecg-boot2" url="127.0.0.1:3306" user="root" password="111111"/>
    </dataHost>
如果是SpringBoot的话则增加一个过滤器
import java.sql.Connection;
import java.util.Properties;

import javax.servlet.http.HttpServletRequest;

import org.apache.ibatis.executor.statement.StatementHandler;
import org.apache.ibatis.plugin.Interceptor;
import org.apache.ibatis.plugin.Intercepts;
import org.apache.ibatis.plugin.Invocation;
import org.apache.ibatis.plugin.Plugin;
import org.apache.ibatis.plugin.Signature;
import org.apache.ibatis.reflection.MetaObject;
import org.apache.ibatis.reflection.SystemMetaObject;
import org.springframework.stereotype.Component;
import org.springframework.web.context.request.RequestContextHolder;
import org.springframework.web.context.request.ServletRequestAttributes;

import lombok.extern.slf4j.Slf4j;

@Slf4j
@Component
@Intercepts({@Signature(type = StatementHandler.class, method = "prepare", args = {Connection.class, Integer.class})})
public class SqlInterceptor implements Interceptor {

    //访问数据,加上mycat前缀
    private static final String preState="/*!mycat:schema=";
    private static final String afterState="*/";

    public Object intercept(Invocation invocation) throws Throwable {

    	ServletRequestAttributes attributes = (ServletRequestAttributes)RequestContextHolder.getRequestAttributes();
        HttpServletRequest request = attributes.getRequest();

        // 从请求头中获取租户编号
        String schema = request.getHeader("tenantCode");

        StatementHandler statementHandler = (StatementHandler) invocation.getTarget();
        MetaObject metaObject = SystemMetaObject.forObject(statementHandler);

        String sql=(String)metaObject.getValue("delegate.boundSql.sql");

        // 将租户编号拼接到sql中,访问mycat
        sql = preState + schema + afterState + sql;

        metaObject.setValue("delegate.boundSql.sql",sql);

        Object result = invocation.proceed();

        log.info("sql:" + sql);

        //执行结果
        return result;
    }

    public Object plugin(Object target) {
        return Plugin.wrap(target, this);
    }

    public void setProperties(Properties properties) {
    }
}
- 尾声
其他代码就省略了,用swagger测试
已经实现了读写分离和分库分表
如果发现老鸟发现博文有问题欢迎指点一二


 2845
2845

 被折叠的 条评论
为什么被折叠?
被折叠的 条评论
为什么被折叠?
 到【灌水乐园】发言


