


问题描述
运行python项目时,访问fastapi swagger出现连接超时。

https://cdn.jsdelivr.net/npm/swagger-ui-dist@4/swagger-ui.css
https://cdn.jsdelivr.net/npm/swagger-ui-dist@4/swagger-ui-bundle.js
解决方案
第一步 下载文件
https://pan.baidu.com/s/1EfKqxJvHKKs3vZEjTsYlIw
提取码: 1024
或者从github地址获取
https://github.com/swagger-api/swagger-uihttps://github.com/Redocly/redoc
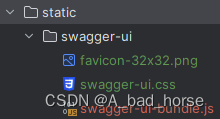
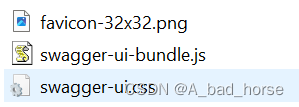
文件下载后保存在目录 static/swagger-ui 中(与app.py)同级。
第二步 修改docs.py
我使用的是miniconda
C:\Users\Jack\.conda\envs\python_project\Lib\site-packages\fastapi\openapi\docs.py
Jack 为计算机用户名,python_projct 为conda虚拟环境
swagger_js_url: str = "https://cdn.jsdelivr.net/npm/swagger-ui-dist@4/swagger-ui-bundle.js",
swagger_css_url: str = "https://cdn.jsdelivr.net/npm/swagger-ui-dist@4/swagger-ui.css",
swagger_favicon_url: str = "https://fastapi.tiangolo.com/img/favicon.png",
更新如下
    swagger_js_url: str = "/static/swagger-ui/swagger-ui-bundle.js",
    swagger_css_url: str = "/static/swagger-ui/swagger-ui.css",
    swagger_favicon_url: str = "/static/swagger-ui/favicon-32x32.png",
注释以下代码
redoc_js_url: str = "https://cdn.jsdelivr.net/npm/redoc@next/bundles/redoc.standalone.js",
redoc_favicon_url: str = "https://fastapi.tiangolo.com/img/favicon.png",
更新如下
    redoc_js_url: str = "/static/redoc/bundles/redoc.standalone.js",
    redoc_favicon_url: str = "/static/redoc/favicon.png",
第三步 修改app.py
from starlette.staticfiles import StaticFiles # 先引用包
from fastapi import FastAPI
import uvicorn
app = FastAPI(
title=settings.APP_NAME,
description=settings.APP_DESCRIPTION,
version=settings.APP_VERSION,
docs_url=settings.APP_DOCS_URL
)
app.mount('/static', StaticFiles(directory='static'), name='static')
if __name__ == "__main__":
setup_database()
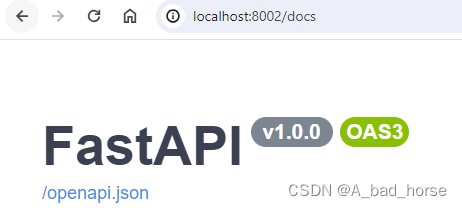
uvicorn.run("app:app", host=settings.RUN_HOST, port=settings.RUN_PORT, reload=True)运行项目后访问 http://localhost:8002/docs
附录
docs.py
import json
from typing import Any, Dict, Optional

from fastapi.encoders import jsonable_encoder
from starlette.responses import HTMLResponse

swagger_ui_default_parameters = {
    "dom_id": "#swagger-ui",
    "layout": "BaseLayout",
    "deepLinking": True,
    "showExtensions": True,
    "showCommonExtensions": True,
}


def get_swagger_ui_html(
    *,
    openapi_url: str,
    title: str,
    #swagger_js_url: str = "https://cdn.jsdelivr.net/npm/swagger-ui-dist@4/swagger-ui-bundle.js",
    #swagger_css_url: str = "https://cdn.jsdelivr.net/npm/swagger-ui-dist@4/swagger-ui.css",
    #swagger_favicon_url: str = "https://fastapi.tiangolo.com/img/favicon.png",

    swagger_js_url: str = "/static/swagger-ui/swagger-ui-bundle.js",
    swagger_css_url: str = "/static/swagger-ui/swagger-ui.css",
    swagger_favicon_url: str = "/static/swagger-ui/favicon-32x32.png",
    oauth2_redirect_url: Optional[str] = None,
    init_oauth: Optional[Dict[str, Any]] = None,
    swagger_ui_parameters: Optional[Dict[str, Any]] = None,
) -> HTMLResponse:
    current_swagger_ui_parameters = swagger_ui_default_parameters.copy()
    if swagger_ui_parameters:
        current_swagger_ui_parameters.update(swagger_ui_parameters)

    html = f"""
    <!DOCTYPE html>
    <html>
    <head>
    <link type="text/css" rel="stylesheet" href="{swagger_css_url}">
    <link rel="shortcut icon" href="{swagger_favicon_url}">
    <title>{title}</title>
    </head>
    <body>
    <div id="swagger-ui">
    </div>
    <script src="{swagger_js_url}"></script>
    <!-- `SwaggerUIBundle` is now available on the page -->
    <script>
    const ui = SwaggerUIBundle({{
        url: '{openapi_url}',
    """

    for key, value in current_swagger_ui_parameters.items():
        html += f"{json.dumps(key)}: {json.dumps(jsonable_encoder(value))},\n"

    if oauth2_redirect_url:
        html += f"oauth2RedirectUrl: window.location.origin + '{oauth2_redirect_url}',"

    html += """
    presets: [
        SwaggerUIBundle.presets.apis,
        SwaggerUIBundle.SwaggerUIStandalonePreset
        ],
    })"""

    if init_oauth:
        html += f"""
        ui.initOAuth({json.dumps(jsonable_encoder(init_oauth))})
        """

    html += """
    </script>
    </body>
    </html>
    """
    return HTMLResponse(html)


def get_redoc_html(
    *,
    openapi_url: str,
    title: str,
    #redoc_js_url: str = "https://cdn.jsdelivr.net/npm/redoc@next/bundles/redoc.standalone.js",
    #redoc_favicon_url: str = "https://fastapi.tiangolo.com/img/favicon.png",
    redoc_js_url: str = "/static/redoc/bundles/redoc.standalone.js",
    redoc_favicon_url: str = "/static/redoc/favicon.png",
    with_google_fonts: bool = True,
) -> HTMLResponse:
    html = f"""
    <!DOCTYPE html>
    <html>
    <head>
    <title>{title}</title>
    <!-- needed for adaptive design -->
    <meta charset="utf-8"/>
    <meta name="viewport" content="width=device-width, initial-scale=1">
    """
    if with_google_fonts:
        html += """
    <link href="https://fonts.googleapis.com/css?family=Montserrat:300,400,700|Roboto:300,400,700" rel="stylesheet">
    """
    html += f"""
    <link rel="shortcut icon" href="{redoc_favicon_url}">
    <!--
    ReDoc doesn't change outer page styles
    -->
    <style>
      body {{
        margin: 0;
        padding: 0;
      }}
    </style>
    </head>
    <body>
    <redoc spec-url="{openapi_url}"></redoc>
    <script src="{redoc_js_url}"> </script>
    </body>
    </html>
    """
    return HTMLResponse(html)


def get_swagger_ui_oauth2_redirect_html() -> HTMLResponse:
    html = """
    <!DOCTYPE html>
    <html lang="en-US">
    <body onload="run()">
    </body>
    </html>
    <script>
        'use strict';
        function run () {
            var oauth2 = window.opener.swaggerUIRedirectOauth2;
            var sentState = oauth2.state;
            var redirectUrl = oauth2.redirectUrl;
            var isValid, qp, arr;

            if (/code|token|error/.test(window.location.hash)) {
                qp = window.location.hash.substring(1);
            } else {
                qp = location.search.substring(1);
            }

            arr = qp.split("&")
            arr.forEach(function (v,i,_arr) { _arr[i] = '"' + v.replace('=', '":"') + '"';})
            qp = qp ? JSON.parse('{' + arr.join() + '}',
                    function (key, value) {
                        return key === "" ? value : decodeURIComponent(value)
                    }
            ) : {}

            isValid = qp.state === sentState

            if ((
            oauth2.auth.schema.get("flow") === "accessCode"||
            oauth2.auth.schema.get("flow") === "authorizationCode"
            ) && !oauth2.auth.code) {
                if (!isValid) {
                    oauth2.errCb({
                        authId: oauth2.auth.name,
                        source: "auth",
                        level: "warning",
                        message: "Authorization may be unsafe, passed state was changed in server Passed state wasn't returned from auth server"
                    });
                }

                if (qp.code) {
                    delete oauth2.state;
                    oauth2.auth.code = qp.code;
                    oauth2.callback({auth: oauth2.auth, redirectUrl: redirectUrl});
                } else {
                    let oauthErrorMsg
                    if (qp.error) {
                        oauthErrorMsg = "["+qp.error+"]: " +
                            (qp.error_description ? qp.error_description+ ". " : "no accessCode received from the server. ") +
                            (qp.error_uri ? "More info: "+qp.error_uri : "");
                    }

                    oauth2.errCb({
                        authId: oauth2.auth.name,
                        source: "auth",
                        level: "error",
                        message: oauthErrorMsg || "[Authorization failed]: no accessCode received from the server"
                    });
                }
            } else {
                oauth2.callback({auth: oauth2.auth, token: qp, isValid: isValid, redirectUrl: redirectUrl});
            }
            window.close();
        }
    </script>
        """
    return HTMLResponse(content=html)


 747
747

 被折叠的 条评论
为什么被折叠?
被折叠的 条评论
为什么被折叠?
 到【灌水乐园】发言


