


LogisticsCenter.init(mContext, executor);
logger.info(Consts.TAG, "ARouter init success!");
hasInit = true;
mHandler = new Handler(Looper.getMainLooper());
return true;
}
哦,`_ARouter`在`init`初始化方法里除了初始化一些变量和一个`handler`,又调用了`LogisticsCenter.init(mContext, executor)`, 其中`executor`是一个线程池, 继续跟到`LogisticsCenter`里去:
/**
- LogisticsCenter contains all of the map.
- 1. Creates instance when it is first used.
- 2. Handler Multi-Module relationship map(*)
- 3. Complex logic to solve duplicate group definition
*/
---
//LogisticsCenter.java
public synchronized static void init(Context context, ThreadPoolExecutor tpe) throws HandlerException {
  Set<String> routerMap;

  //1、遍历“com.alibaba.android.arouter.routes”路径下的类并把其加入到set中
  if (ARouter.debuggable() || PackageUtils.isNewVersion(context)) {
      // These class was generated by arouter-compiler.
      routerMap = ClassUtils.getFileNameByPackageName(mContext, ROUTE_ROOT_PAKCAGE);
      if (!routerMap.isEmpty()) {
         context.getSharedPreferences(AROUTER_SP_CACHE_KEY, Context.MODE_PRIVATE).edit().putStringSet(AROUTER_SP_KEY_MAP, routerMap).apply();
      }
     // Save new version name when router map update finishes.
     PackageUtils.updateVersion(context);
  } else {
      logger.info(TAG, "Load router map from cache.");
      routerMap = new HashSet<>(context.getSharedPreferences(AROUTER_SP_CACHE_KEY, Context.MODE_PRIVATE).getStringSet(AROUTER_SP_KEY_MAP, new HashSet<String>()));
        }

  //2、遍历set,将root、group、provider分类并填充到Warehouse路由表中
  for (String className : routerMap) {
      if (className.startsWith(ROUTE_ROOT_PAKCAGE + DOT + SDK_NAME + SEPARATOR + SUFFIX_ROOT)) {
          // This one of root elements, load root.
          ((IRouteRoot) (Class.forName(className).getConstructor().newInstance())).loadInto(Warehouse.groupsIndex);
      } else if (className.startsWith(ROUTE_ROOT_PAKCAGE + DOT + SDK_NAME + SEPARATOR + SUFFIX_INTERCEPTORS)) {
          // Load interceptorMeta
          ((IInterceptorGroup) (Class.forName(className).getConstructor().newInstance())).loadInto(Warehouse.interceptorsIndex);
      } else if (className.startsWith(ROUTE_ROOT_PAKCAGE + DOT + SDK_NAME + SEPARATOR + SUFFIX_PROVIDERS)) {
          // Load providerIndex
          ((IProviderGroup) (Class.forName(className).getConstructor().newInstance())).loadInto(Warehouse.providersIndex);
      }
  }
}
}
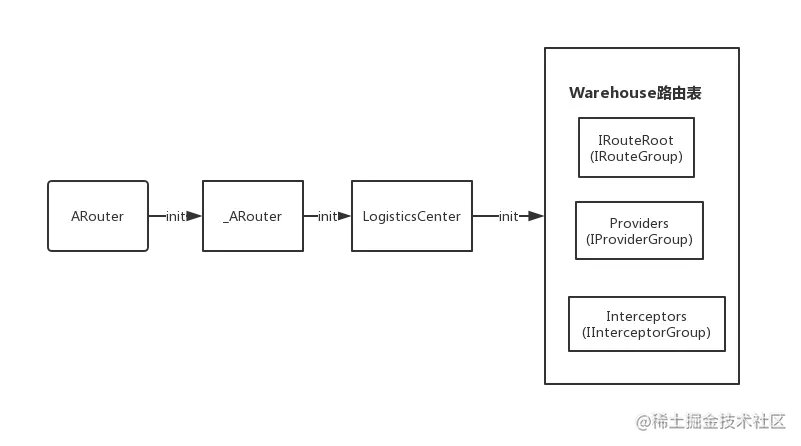
`LogisticsCenter.init`方法比较长,上面只保留了核心代码,`ARouter`优先使用`arouter-auto-register`插件去解析并填充`Warehouse`路由表,忽略这种方式。我们来看上面这种加载方式,`PackageUtils.isNewVersion(context)`中判断SharedPreferences(后面简称sp)里面是否有存储`versionName`及`versionCode`,如果没有或者他们有更新的时候,需要重新加载一次`com.alibaba.android.arouter.routes`这个路径下的类名并填充到Set中,否则直接从sp中取数据并赋值到Set中去。接着就开始遍历这个Set,并通过`Class.forName(className)`这种反射方式去实例化类并调用类中的`loadInto`方法将注解对应的索引信息添加到`Warehouse`路由表中。画个图来总结一下:
### ARouter跳转
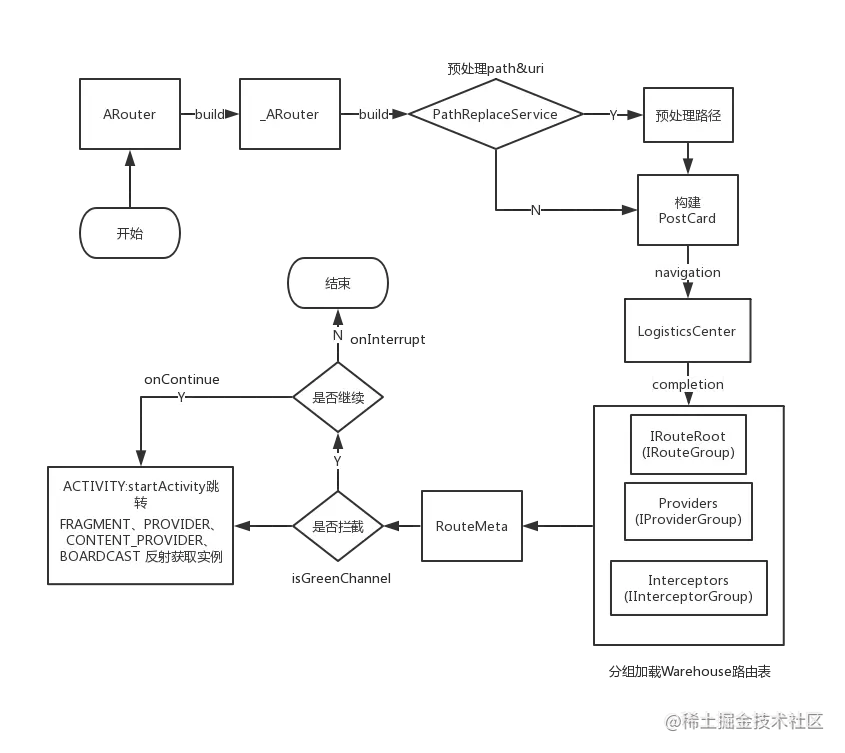
ARouter跳转时,直接使用`ARouter.getInstance().build("xxx/xxx").navigation()`即可完成跳转,那我们就来看一下源码,看看里面都做了什么,首先是`build`方法:
/**
- Build postcard by path and default group
*/
protected Postcard build(String path) {
if (TextUtils.isEmpty(path)) {
throw new HandlerException(Consts.TAG + “Parameter is invalid!”);
} else {
PathReplaceService pService = navigation(PathReplaceService.class);
if (null != pService) {
path = pService.forString(path);
}
return build(path, extractGroup(path));
}
}
/**
- Build postcard by uri
*/
protected Postcard build(Uri uri) {
if (null == uri || TextUtils.isEmpty(uri.toString())) {
throw new HandlerException(Consts.TAG + “Parameter invalid!”);
} else {
PathReplaceService pService = ARouter.getInstance().navigation(PathReplaceService.class);
if (null != pService) {
uri = pService.forUri(uri);
}
return new Postcard(uri.getPath(), extractGroup(uri.getPath()), uri, null);
}
}
/**
- Build postcard by path and group
*/
protected Postcard build(String path, String group) {
if (TextUtils.isEmpty(path) || TextUtils.isEmpty(group)) {
throw new HandlerException(Consts.TAG + “Parameter is invalid!”);
} else {
PathReplaceService pService = ARouter.getInstance().navigation(PathReplaceService.class);
if (null != pService) {
path = pService.forString(path);
}
return new Postcard(path, group);
}
}
三个方法中都有,`PathReplaceService pService = ARouter.getInstance().navigation(PathReplaceService.class);` 那么这个PathReplaceService是干啥的,点进去看看:
/**
-
Preprocess your path
*/
public interface PathReplaceService extends IProvider {/**
- For normal path.
- @param path raw path
*/
String forString(String path);
/**
- For uri type.
- @param uri raw uri
*/
Uri forUri(Uri uri);
}
看它的介绍就知道了,原来这个类是用来预处理path和uri的,调用方需要实现PathReplaceService就可以做预处理,如果不实现,默认pService==null,那么直接走下面的去初始化Postcard实体类。


接着来看`navigation`方法,因为`build`方法返回的是`PostCard`类,所以调用的是`PostCard`类的`navigation`方法,经过一系列跳转,最终来到`_ARouter.getInstance().navigation(mContext, postcard, requestCode, callback)` :
protected Object navigation(final Context context, final Postcard postcard, final int requestCode, final NavigationCallback callback) {
try {
LogisticsCenter.completion(postcard);
} catch (NoRouteFoundException ex) {
logger.warning(Consts.TAG, ex.getMessage());
}
return null;
}
if (null != callback) {
    callback.onFound(postcard);
}

if (!postcard.isGreenChannel()) {
   // It must be run in async thread, maybe interceptor cost too mush time made ANR.
    interceptorService.doInterceptions(postcard, new InterceptorCallback() {

        @Override
        public void onContinue(Postcard postcard) {
            _navigation(context, postcard, requestCode, callback);
        }

        @Override
        public void onInterrupt(Throwable exception) {
            if (null != callback) {
                callback.onInterrupt(postcard);
            }
        }
    });
} else {
    return _navigation(context, postcard, requestCode, callback);
}
return null;
}
去除了部分无关代码,只保留了核心代码,首先调用了`LogisticsCenter.completion`方法,我们追进去看看:
//LogisticsCenter.java
/**
-
Completion the postcard by route metas
-
@param postcard Incomplete postcard, should complete by this method.
*/
public synchronized static void completion(Postcard postcard) {
RouteMeta routeMeta = Warehouse.routes.get(postcard.getPath());
if (null == routeMeta) {
// Maybe its does’t exist, or didn’t load.
Class<? extends IRouteGroup> groupMeta = Warehouse.groupsIndex.get(postcard.getGroup()); // Load route meta.
if (null == groupMeta) {
throw new NoRouteFoundException(TAG + “There is no route match the path [” + postcard.getPath() + “], in group [” + postcard.getGroup() + “]”);
} else {
// Load route and cache it into memory, then delete from metas.
try {
IRouteGroup iGroupInstance = groupMeta.getConstructor().newInstance();
iGroupInstance.loadInto(Warehouse.routes);
Warehouse.groupsIndex.remove(postcard.getGroup());} catch (Exception e) { throw new HandlerException(TAG + "Fatal exception when loading group meta. [" + e.getMessage() + "]"); } completion(postcard); // Reload }} else {
postcard.setDestination(routeMeta.getDestination());
postcard.setType(routeMeta.getType());
postcard.setPriority(routeMeta.getPriority());
postcard.setExtra(routeMeta.getExtra());Uri rawUri = postcard.getUri(); if (null != rawUri) { // Try to set params into bundle. Map<String, String> resultMap = TextUtils.splitQueryParameters(rawUri); Map<String, Integer> paramsType = routeMeta.getParamsType(); if (MapUtils.isNotEmpty(paramsType)) { // Set value by its type, just for params which annotation by @Param for (Map.Entry<String, Integer> params : paramsType.entrySet()) { setValue(postcard, params.getValue(), params.getKey(), resultMap.get(params.getKey())); } // Save params name which need auto inject. postcard.getExtras().putStringArray(ARouter.AUTO_INJECT, paramsType.keySet().toArray(new String[]{})); } // Save raw uri postcard.withString(ARouter.RAW_URI, rawUri.toString()); } switch (routeMeta.getType()) { case PROVIDER: // if the route is provider, should find its instance // Its provider, so it must implement IProvider Class<? extends IProvider> providerMeta = (Class<? extends IProvider>) routeMeta.getDestination(); IProvider instance = Warehouse.providers.get(providerMeta); if (null == instance) { // There's no instance of this provider IProvider provider; try { provider = providerMeta.getConstructor().newInstance(); provider.init(mContext); Warehouse.providers.put(providerMeta, provider); instance = provider; } catch (Exception e) { throw new HandlerException("Init provider failed! " + e.getMessage()); } } postcard.setProvider(instance); postcard.greenChannel(); // Provider should skip all of interceptors break; case FRAGMENT: postcard.greenChannel(); // Fragment needn't interceptors default: break; }}
}
这个类很长,但是逻辑还是很清晰的:首先从`Warehouse`路由表的`routes`中获取`RouteMeta`,但是第一次获取的时候为空(因为init时只填充了Warehouse路由表的groupsIndex、interceptorsIndex、providersIndex,还记得吗?),接着从`Warehouse.groupsIndex`中根据`group`的名字找到对应的`group`索引,并将生成的索引类的`map`数据加载到`Warehouse.routes`中,然后把`Warehouse.groupsIndex`中对应的`group`删除掉,以免重复加载数据,然后调用了`completion(postcard)`进行重新加载。此时`Warehouse.routes`已经不为空,根据path获取对应的`RouteMeta`,就会走到`else`逻辑中,先是对`PostCard`设置了一堆属性,最后对`IProvider`的子类进行了初始化并加载到`Warehouse.providers`中,同时也设置到`PostCard`中,并给`PROVIDER`和`FRAGMENT`设置了绿色通道(不会被拦截)。总结一下:**主要逻辑就是通过Warehouse.groupsIndex找到对应的group并进行加载,实现了分组加载路由表。**


我们继续回到`navigation`方法中往下走,首先通过`postcard.isGreenChannel()`判断是否会拦截,如果拦截,就会走`interceptorService`的逻辑(interceptorService是在afeterInit中初始化的),否则就走到了`_navigation`逻辑中,那么来看`_navigation`方法:
private Object _navigation(final Context context, final Postcard postcard, final int requestCode, final NavigationCallback callback) {
final Context currentContext = null == context ? mContext : context;
switch (postcard.getType()) {
    case ACTIVITY:
        // Build intent
        final Intent intent = new Intent(currentContext, postcard.getDestination());
        intent.putExtras(postcard.getExtras());

        // Set flags.
        int flags = postcard.getFlags();
        if (-1 != flags) {
            intent.setFlags(flags);
        } else if (!(currentContext instanceof Activity)) {    // Non activity, need less one flag.
            intent.setFlags(Intent.FLAG_ACTIVITY_NEW_TASK);
        }

        // Set Actions
        String action = postcard.getAction();
        if (!TextUtils.isEmpty(action)) {
            intent.setAction(action);
        }

        // Navigation in main looper.
        runInMainThread(new Runnable() {
            @Override
            public void run() {
                startActivity(requestCode, currentContext, intent, postcard, callback);
            }
        });

        break;
    case PROVIDER:
        return postcard.getProvider();
    case BOARDCAST:
    case CONTENT_PROVIDER:
    case FRAGMENT:
        Class fragmentMeta = postcard.getDestination();
        try {
            Object instance = fragmentMeta.getConstructor().newInstance();
            if (instance instanceof Fragment) {
                ((Fragment) instance).setArguments(postcard.getExtras());
            } else if (instance instanceof android.support.v4.app.Fragment) {
                ((android.support.v4.app.Fragment) instance).setArguments(postcard.getExtras());
            }

            return instance;
        } catch (Exception ex) {
            logger.error(Consts.TAG, "Fetch fragment instance error, " + TextUtils.formatStackTrace(ex.getStackTrace()));
        }
    case METHOD:
    case SERVICE:
    default:
        return null;
}

return null;
}
private void startActivity(int requestCode, Context currentContext, Intent intent, Postcard postcard, NavigationCallback callback) {
if (requestCode >= 0) {
// Need start for result
if (currentContext instanceof Activity) {
ActivityCompat.startActivityForResult((Activity) currentContext, intent, requestCode, postcard.getOptionsBundle());
}
} else {
ActivityCompat.startActivity(currentContext, intent, postcard.getOptionsBundle());
}
if ((-1 != postcard.getEnterAnim() && -1 != postcard.getExitAnim()) && currentContext instanceof Activity) {    // Old version.
    ((Activity) currentContext).overridePendingTransition(postcard.getEnterAnim(), postcard.getExitAnim());
}

if (null != callback) { // Navigation over.
    callback.onArrival(postcard);
}
}
哦,原来`ARouter`跳转`Activity`最终也是用原生的`Intent`实现的,如果`navigation()`不传入`context`,则使用初始化时`Application`作为`context`,如果是`FRAGMENT、PROVIDER、CONTENT_PROVIDER、BOARDCAST`,通过反射方式初始化并返回即可。
尝试画个图来总结一下navigation:
嗯,到这里ARouter内部的主要流程就分析完了~
ARouter跳转原理:**ARouter路由跳转本质上也是通过原生的startActiviy及startActivityForResult来实现的,只不过ARouter通过APT形式将编译期通过解析注解生成的索引加载到Warehouse路由表中,从而制造跳转规则。并且可以在跳转之前设置拦截或过滤。**
**下面整理了《Android 架构学习手册》学习笔记,根据自己学习中所做的一些笔录来整的,主要也是方便后续好复习翻阅,省掉在去网上查找的时间,以免在度踩坑,如果大家有需要的可以直接 [通过点击此处↓↓↓ 进行参考学习:https://qr21.cn/CaZQLo?BIZ=ECOMMERCE]( )**


 被折叠的 条评论
为什么被折叠?
被折叠的 条评论
为什么被折叠?
 到【灌水乐园】发言


