


1、准备工作
上一篇帖子新建了一个web工程。在这个工程里面前台页面部分,因为primefaces在处理前台页面展示方面有很好的作用效果,决定后面的项目采用primeface来实现前台页面的展示。那么我们在maven工程里引入primeface的jar包就可以了。在此之前先做一些pom.xml里面的准备工作,否则在使用maven pom.xml会各种报错。打开pom.xml做如下改变:
1.1、如果pom.xml里面还没有依赖包的引入,则在下面代码后加入:原有代码段:
<project xmlns="http://maven.apache.org/POM/4.0.0"
	xmlns:xsi="http://www.w3.org/2001/XMLSchema-instance"
	xsi:schemaLocation="http://maven.apache.org/POM/4.0.0 http://maven.apache.org/maven-v4_0_0.xsd">
	<modelVersion>4.0.0</modelVersion>
	<groupId>com.dodow</groupId>
	<artifactId>test</artifactId>
	<packaging>war</packaging>
	<version>0.0.1-SNAPSHOT</version>
	<name>test Maven Webapp</name>
	<url>http://maven.apache.org</url>
在<url></url>后面加入项目需要引入的jar包:
     <dependencies>
		<dependency>
			<groupId>junit</groupId>
			<artifactId>junit</artifactId>
			<version>3.8.1</version>
			<scope>test</scope>
		</dependency>
		<dependency>
			<groupId>org.primefaces</groupId>
			<artifactId>primefaces</artifactId>
			<version>4.0</version>
		</dependency>
		<dependency>
			<groupId>javax.faces</groupId>
			<artifactId>jsf-api</artifactId>
			<version>2.1</version>
			<type>jar</type>
			<scope>provided</scope>
		</dependency>
	</dependencies>
如果有需要新的primeface,改一下你需要的版本即可。这样我们就会项目增加了primefaces的能力。
1.2,在</dependencies>后面加入build时maven的属性声明,这个根据maven的版本不一样,修改成你的版本,可参考我的,如下:
	<build>
		<finalName>test</finalName>
		<resources>
			<resource>
				<directory>src/main/resources</directory>
				<filtering>true</filtering>
			</resource>
		</resources>
		<plugins>
			<plugin>
				<groupId>org.apache.maven.plugins</groupId>
				<artifactId>maven-compiler-plugin</artifactId>
				<version>2.5.1</version>
				<configuration>
					<source>1.7</source>
					<target>1.7</target>
					<encoding>${mvn.project.build.sourceEncoding}</encoding>
				</configuration>
			</plugin>
			<plugin>
				<groupId>org.apache.maven.plugins</groupId>
				<artifactId>maven-war-plugin</artifactId>

			</plugin>
		</plugins>
	</build>
最后为maven指定下载伺服,如下:
	<repositories>
		<repository>
			<id>JBOSS_NEXUS</id>
			<url>http://repository.jboss.org/nexus/content/groups/public</url>
		</repository>
	</repositories>
修改后整个pom.xml就变成如下的样子:
<project xmlns="http://maven.apache.org/POM/4.0.0"
	xmlns:xsi="http://www.w3.org/2001/XMLSchema-instance"
	xsi:schemaLocation="http://maven.apache.org/POM/4.0.0 http://maven.apache.org/maven-v4_0_0.xsd">
	<modelVersion>4.0.0</modelVersion>
	<groupId>com.dodow</groupId>
	<artifactId>test</artifactId>
	<packaging>war</packaging>
	<version>0.0.1-SNAPSHOT</version>
	<name>test Maven Webapp</name>
	<url>http://maven.apache.org</url>

	<properties>
		<mvn.project.build.sourceEncoding>UTF-8</mvn.project.build.sourceEncoding>
	</properties>


	<dependencies>
		<dependency>
			<groupId>junit</groupId>
			<artifactId>junit</artifactId>
			<version>3.8.1</version>
			<scope>test</scope>
		</dependency>
		<dependency>
			<groupId>org.primefaces</groupId>
			<artifactId>primefaces</artifactId>
			<version>4.0</version>
		</dependency>
		<dependency>
			<groupId>javax.faces</groupId>
			<artifactId>jsf-api</artifactId>
			<version>2.1</version>
			<type>jar</type>
			<scope>provided</scope>
		</dependency>
	</dependencies>

	<build>
		<finalName>test</finalName>
		<resources>
			<resource>
				<directory>src/main/resources</directory>
				<filtering>true</filtering>
			</resource>
		</resources>
		<plugins>
			<plugin>
				<groupId>org.apache.maven.plugins</groupId>
				<artifactId>maven-compiler-plugin</artifactId>
				<version>2.5.1</version>
				<configuration>
					<source>1.7</source>
					<target>1.7</target>
					<encoding>${mvn.project.build.sourceEncoding}</encoding>
				</configuration>
			</plugin>
			<plugin>
				<groupId>org.apache.maven.plugins</groupId>
				<artifactId>maven-war-plugin</artifactId>

			</plugin>
		</plugins>
	</build>
	<repositories>
		<repository>
			<id>JBOSS_NEXUS</id>
			<url>http://repository.jboss.org/nexus/content/groups/public</url>
		</repository>
	</repositories>
2、更新项目
上面配置好后,利用maven来更新系统需要的资源,在eclipse中右键项目,如下图:
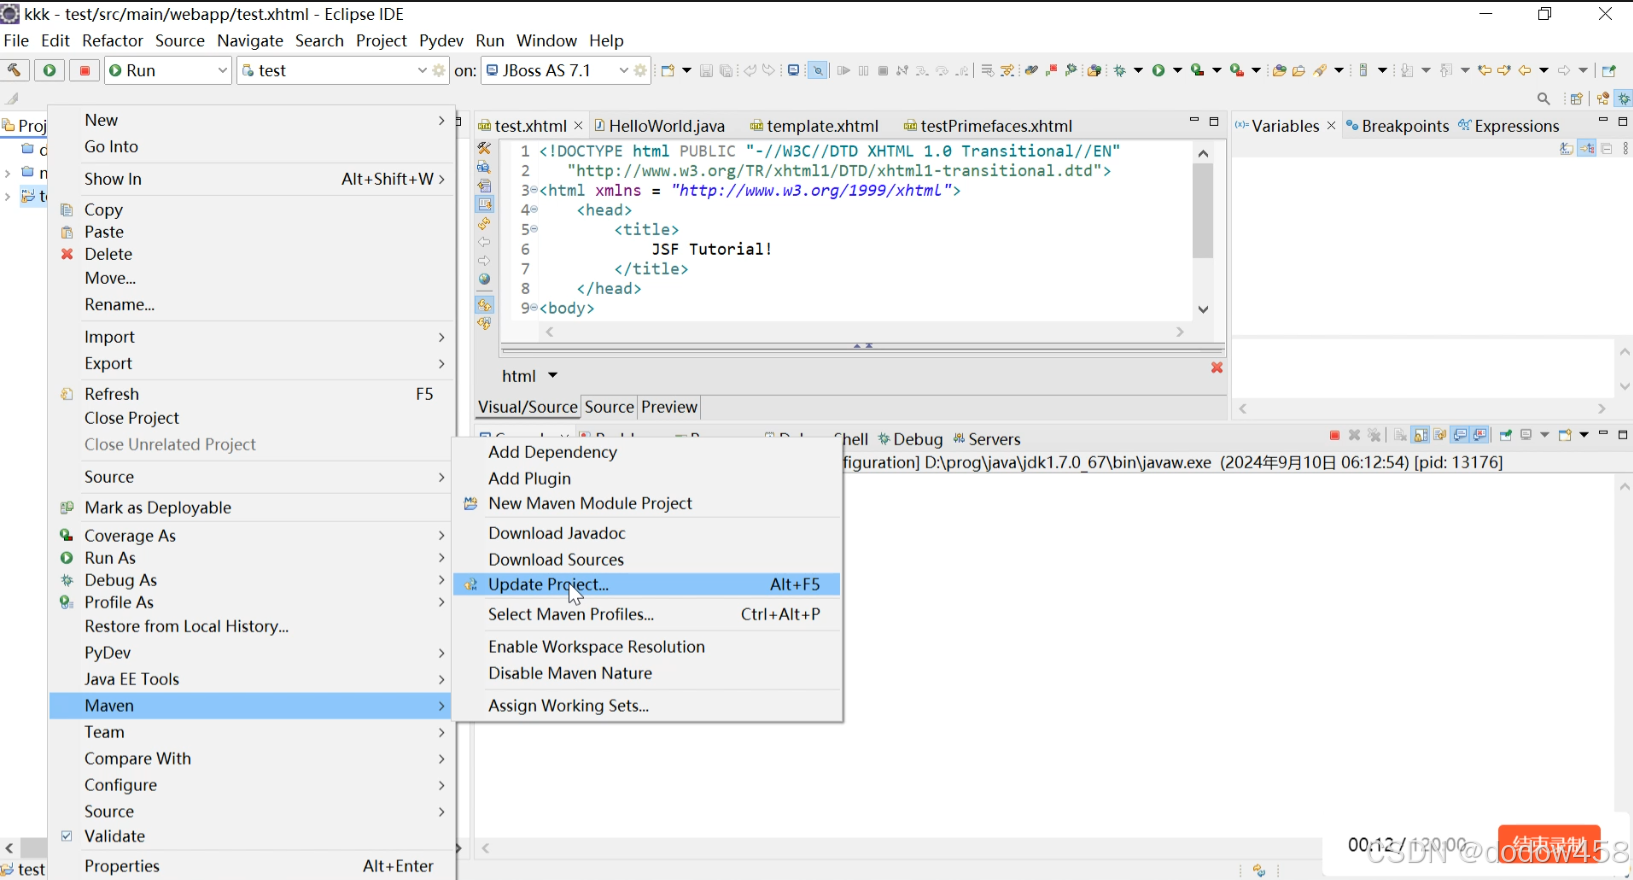
选择Maven-->Update Project,在弹出的窗口中勾选如下选项,进行项目更新:
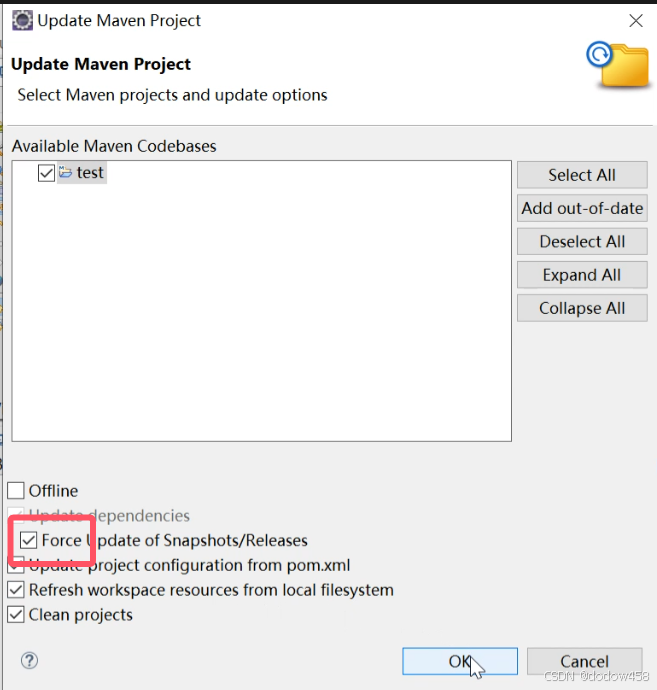
点击"ok",即可。如没有问题,就会下载需要的jar包。
3、打包项目:
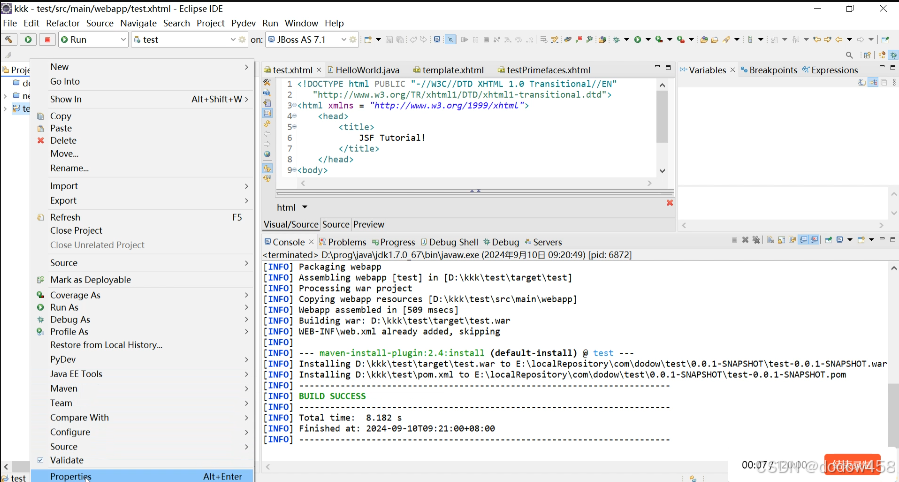
进行完上面的操作,可以试着maven install操作,右键项目,如下:
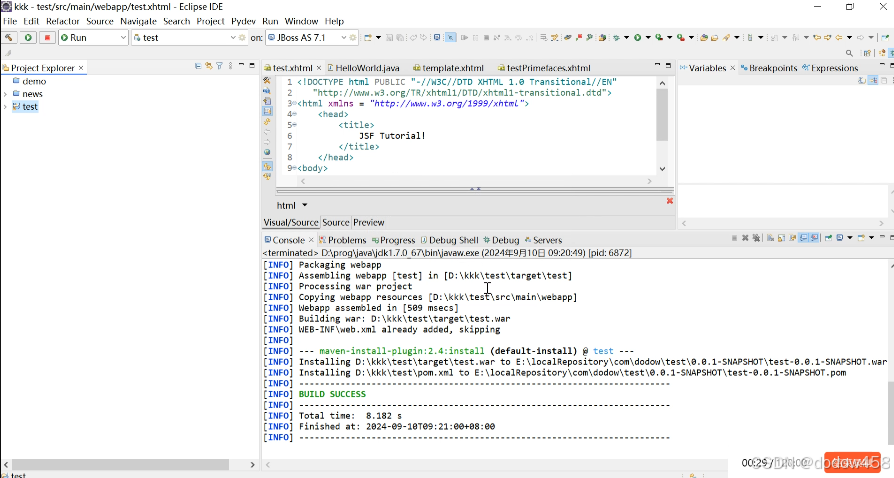
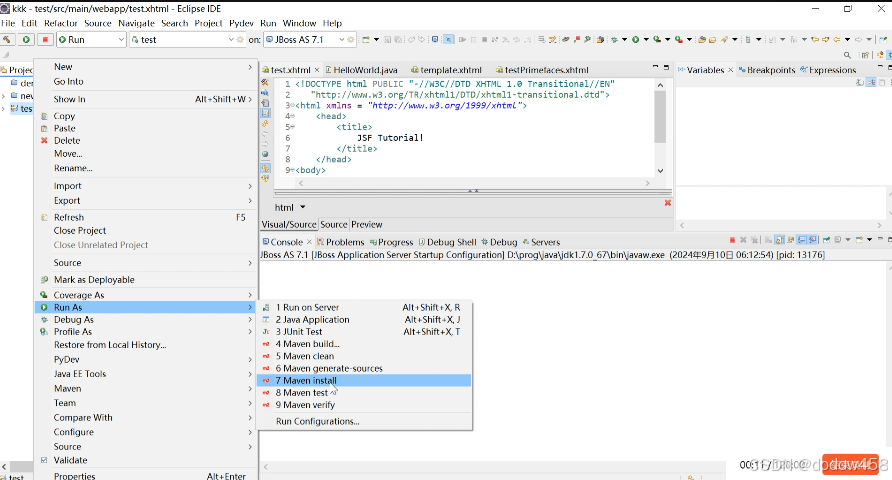 点击maven install,然后看到如下界面:build success,恭喜你成功了。
3、检查jar包
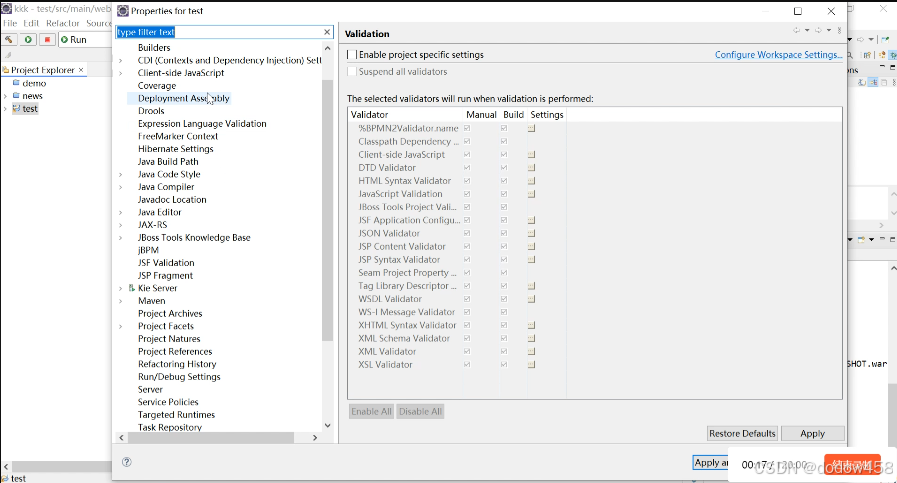
在进行项目开始之前,检查一下maven是否打包到war里面没有,如果没有jar包,则进行下面操作(如果我们的war包里已经有jar文件就无需下面的操作):
项目上右键,选择属性,如下
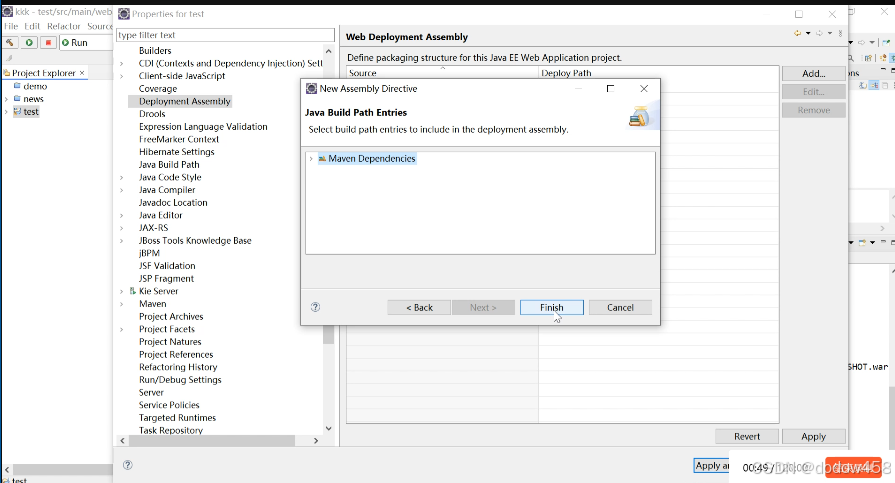
2、在弹出的菜单中,选择Delopment Assembly,点击
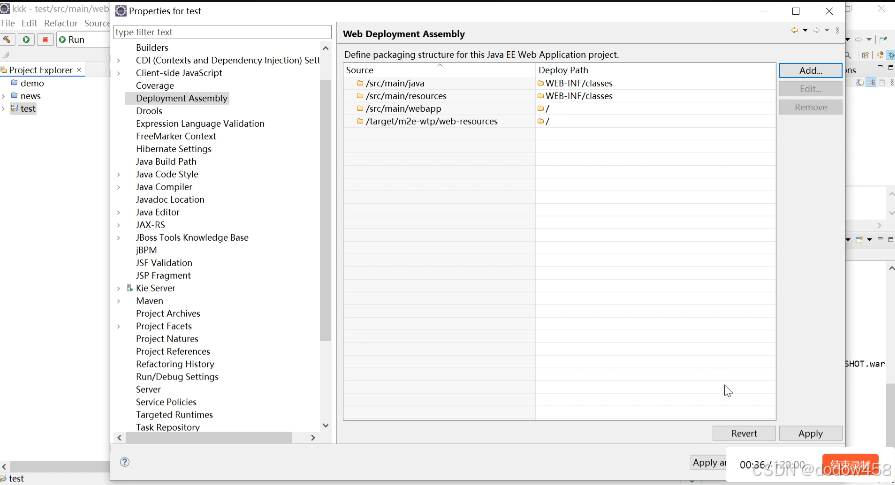
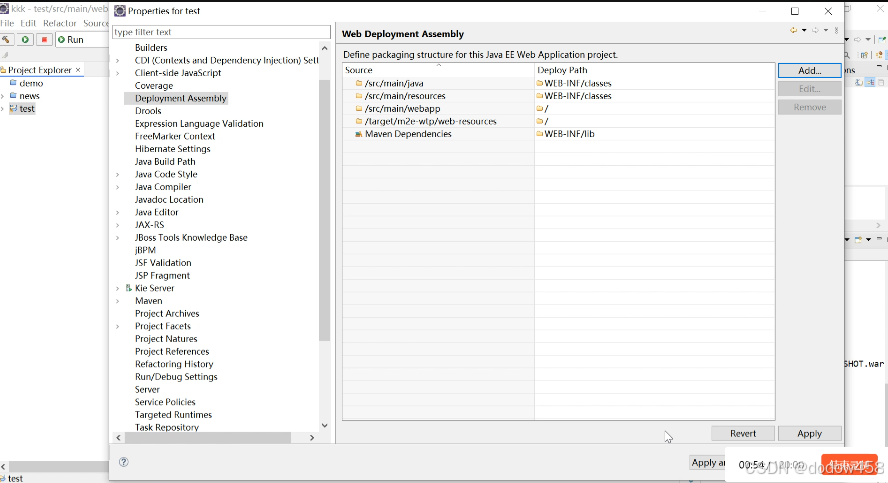
在弹出的窗口中,Web Deployment Assembly里面如果没有maven dependencies,则点击右边的add按钮,增加这个依赖:
选择 Java Build Path Entries项,点击下一步:
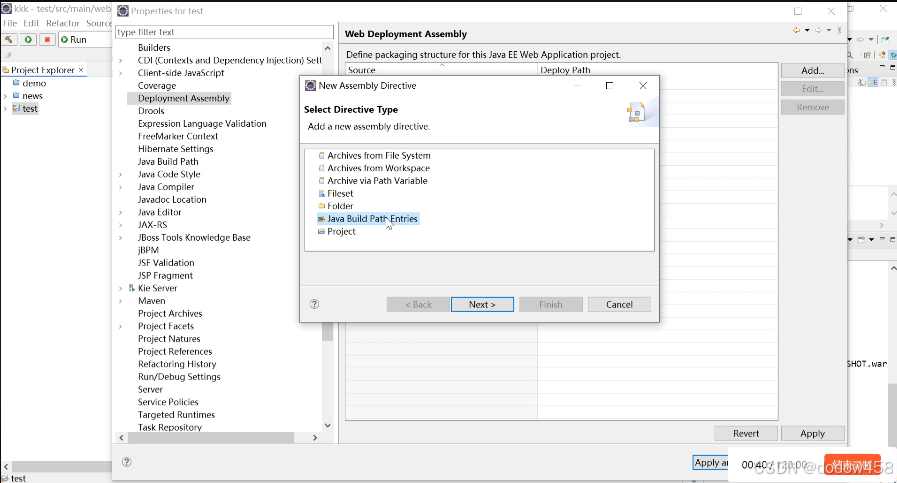
在窗口中选择maven dependencies,点击完成即可。
这样我们的项目中,在pom.xml中引入的jar包就会被打包到我们的war工程里去。有时我们启动jboss服务器报缺包的错,就可以检查这个,看我们的jar是否被打包到项目中。
准备好这些工作,我们就可以开始第一个primefaces页面。
4、第一个primefaces页面的构想:
我们开发web应用的时候,尤其管理程序,一般应用的顶部导航都是通用的样式,里面一般就是包括公司log,导航菜单这些,所以可以定制一个模板,其他的页面,包含这个模板,这样以后有变动或其他操作的时候,改起来也方便很多,所以我们把顶部需要的部分全部放到 一个模板文件 中,同时整个项目需要的js文件,还有css文件也放在这个模板中。我用到各种js文件,和css文件,如下声明在template.xhtml这个文件中。如下:
<!DOCTYPE HTML PUBLIC "-//W3C//DTD HTML 4.01 Transitional//EN" "http://www.w3.org/TR/html4/loose.dtd">
<html xmlns="http://www.w3.org/1999/xhtml"
	xmlns:h="http://java.sun.com/jsf/html"
	xmlns:f="http://java.sun.com/jsf/core"
	xmlns:ui="http://java.sun.com/jsf/facelets"
	xmlns:p="http://primefaces.org/ui"
	xmlns:c="http://java.sun.com/jsp/jstl/core"
	xmlns:shiro="http://shiro.apache.org/tags">
	<f:view contentType="text/html">
	<h:head>
		<f:facet name="first">
			<meta http-equiv="X-UA-Compatible" content="EmulateIE8" />
			<meta content='text/html; charset=UTF-8' http-equiv="Content-Type" />
			<title>欢迎使用《Test平台》</title>
		</f:facet>
		<!-- CSS & JS -->
		<script type="text/javascript" src="#{request.contextPath}/template/js/jquery.ztree.core-3.5.js"></script>
		<script type="text/javascript" src="#{request.contextPath}/template/js/jquery.easing.1.3.js" ></script>
		<script type="text/javascript" src="#{request.contextPath}/template/js/jquery.timer.js"></script>
		<script type="text/javascript" src="#{request.contextPath}/template/js/jquery.tooltip.js"></script>

		<script type="text/javascript" src="#{request.contextPath}/template/js/main.js" ></script>

		<script type="text/javascript" src="#{request.contextPath}/template/js/json.js" ></script>
		<script type="text/javascript" src="#{request.contextPath}/scripts/My97DatePicker/WdatePicker.js" ></script>
		<script type="text/javascript" src="#{request.contextPath}/template/js/util.js"></script>
		<script type="text/javascript" src="#{request.contextPath}/template/js/jquery-easyui-1.3.2/jquery.easyui.min.js"></script>
		<script type="text/javascript" src="#{request.contextPath}/template/js/jquery-easyui-1.3.2/locale/easyui-lang-zh_CN.js"></script>

		<link type="text/css" href="#{request.contextPath}/template/css/zTreeStyle/zTreeStyle.css" rel="stylesheet" />
		<link href="#{request.contextPath}/template/js/jquery-easyui-1.3.2/themes/default/easyui.css" rel="stylesheet" type="text/css" />
		<link href="#{request.contextPath}/template/js/jquery-easyui-1.3.2/themes/icon.css" rel="stylesheet" type="text/css" />
		<link href="#{request.contextPath}/template/css/primefaces/theme.css" rel="stylesheet" type="text/css" />

		<link href="#{request.contextPath}/template/css/default.css" rel="stylesheet" type="text/css" />

	</h:head>

	<h:body>

	</h:body>
	</f:view>
</html>
你可以根据你自己前台页面展示需要修改成你需要的js和css文件,在模板文件<h:body> </h:body>中间,加入导航菜单和其他的公用信息,就可以完成这个模板文件,为了测试,我在这之间加入一个primeface的menu,作为后继用来修改成导航条的起点吧:在<h:body> </h:body>中加入代码如下:
<h:form id="tableForm">
			<p:panel styleClass="panel1">
				<p:growl id="messages" />
				<!--通过将overlay属性设置为true并将菜单的trigger属性与id关联,通常可以定义菜单   触发动作-->
				<p:menu overlay="true" trigger="triggerButton" my="left top" at="right top">
					<p:submenu label="File">
						<p:menuitem value="Open"></p:menuitem>
						<p:menuitem value="Edit"></p:menuitem>
						<p:separator />
						<p:menuitem value="Exit"></p:menuitem>
					</p:submenu>
					<p:submenu lable="Help">
						<p:menuitem value="About PrimeFaces"></p:menuitem>
						<p:menuitem value="Contact Us"></p:menuitem>
						<p:separator/>
						<p:menuitem value="Help"></p:menuitem>
					</p:submenu>
				</p:menu>
				<p:commandButton id="triggerButton" value="Trigger Menu"></p:commandButton>
			</p:panel>
		</h:form>
然后保存这个文件,并放到template目录下,我的目录结构如下图:

结下来,我们新建一个testPrimefaces.xhml,包含这个模板文件(template.xhtml) ,以后我们其他的页面也都包含这个模板文件 即可,testPrimefaces.xhml文件代码如下:
<?xml version='1.0' encoding='UTF-8' ?>
<ui:composition xmlns="http://www.w3.org/1999/xhtml"
	xmlns:c="http://java.sun.com/jstl/core"
	xmlns:h="http://java.sun.com/jsf/html"
	xmlns:f="http://java.sun.com/jsf/core"
	xmlns:p="http://primefaces.org/ui"
	xmlns:ui="http://java.sun.com/jsf/facelets"
	template="/template/template.xhtml">
		<ui:define name="styleAndScript">
			<style type="text/css">

			</style>
		</ui:define>
		<h:form id="tableForm">

		</h:form>
</ui:composition>
通过这个template="/template/template.xhtml"就可以在testPrimefaces.xhtml里加上模板文件。这样也方便了很多。
然后发布项目,并启动jboss,成功后,在浏览器里输入:http://localhost/test/testPrimefaces.xhtml(我里我把前面的项目改成了test,如果你们前面用的demo,则把test这上路径换成demo),则可以看到如下界面,点击按钮,就弹出菜单:
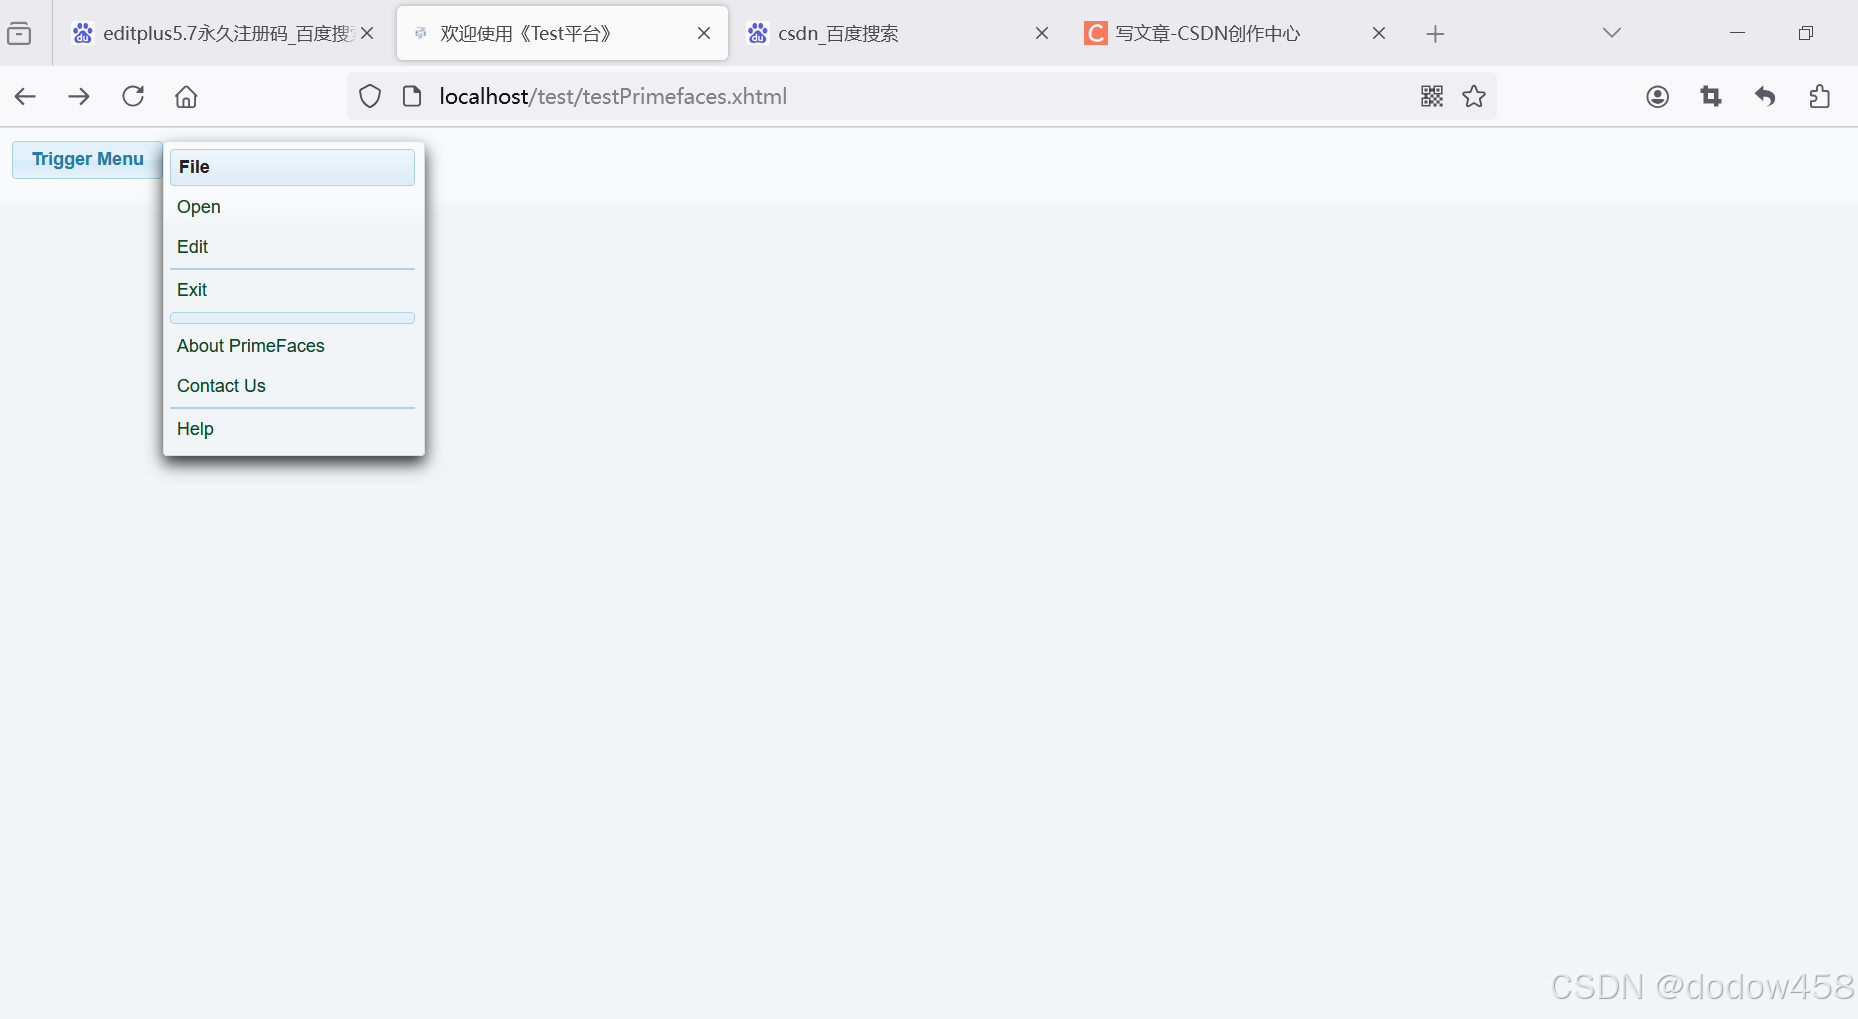
前台primefaces示例就完成了。如果对你有帮助,请帮忙点个赞


 5026
5026

 被折叠的 条评论
为什么被折叠?
被折叠的 条评论
为什么被折叠?
 到【灌水乐园】发言


