


提示:文章写完后,目录可以自动生成,如何生成可参考右边的帮助文档
一、redis 安装环境要求
- windows 版安装
- linux 版安装


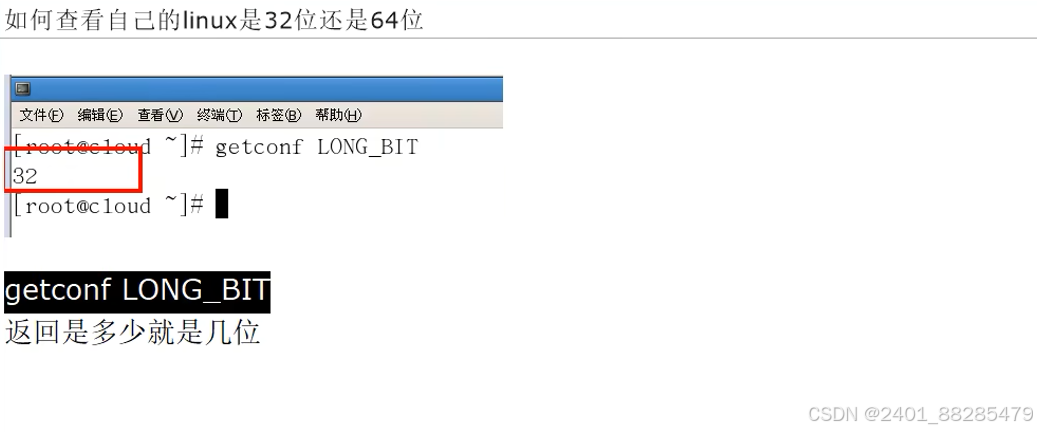
- 查看自己 redis 版本的命令
redis- server -v

二、Redis7 安装步骤
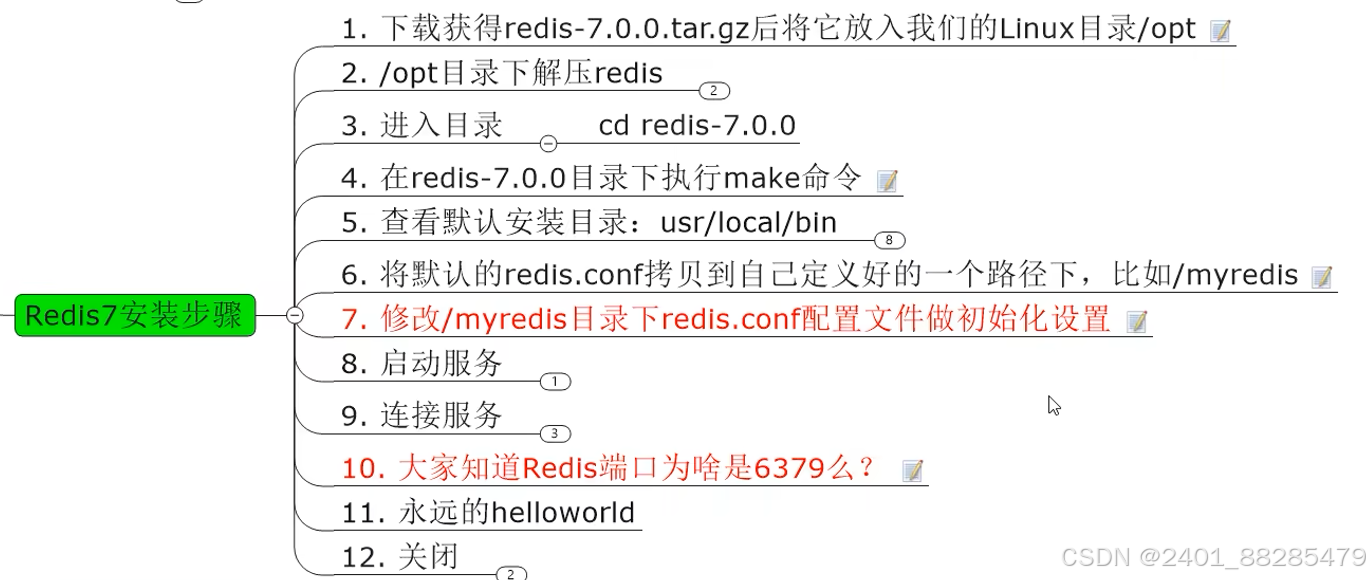
1、下载 redis 安装包后,放入 Linux 目录 /opt 下
下载的网址如下:
http://download.redis.io/releases/
2、/opt 目录下解压 redis
[root@localhost opt]# tar -zxvf redis-stable.tar.gz
解压完成后 ll 查看
[root@localhost opt]# ll
总用量 503656
-rw-r--r--. 1 root     root      47836256 12月  2 15:06 mysql-community-client-8.0.26-1.el7.x86_64.rpm
-rw-r--r--. 1 root     root       4694644 12月  2 15:06 mysql-community-client-plugins-8.0.26-1.el7.x86_64.rpm
-rw-r--r--. 1 root     root        634632 12月  2 15:06 mysql-community-common-8.0.26-1.el7.x86_64.rpm
-rw-r--r--. 1 root     root       4243808 12月  2 15:06 mysql-community-libs-8.0.26-1.el7.x86_64.rpm
-rw-r--r--. 1 root     root     454689776 12月  2 15:07 mysql-community-server-8.0.26-1.el7.x86_64.rpm
drwxrwxr-x. 8 tangseng tangseng      4096 10月  3 03:04 redis-stable
-rw-r--r--. 1 root     root       3626867 12月 26 16:31 redis-stable.tar.gz
3、进入redis目录 cd redis-stable
[root@localhost opt]# cd redis-stable
[root@localhost redis-stable]# ll
总用量 280
-rw-rw-r--.  1 tangseng tangseng  10420 10月  3 03:04 00-RELEASENOTES
-rw-rw-r--.  1 tangseng tangseng     51 10月  3 03:04 BUGS
-rw-rw-r--.  1 tangseng tangseng   5023 10月  3 03:04 CODE_OF_CONDUCT.md
-rw-rw-r--.  1 tangseng tangseng   7178 10月  3 03:04 CONTRIBUTING.md
drwxrwxr-x.  8 tangseng tangseng    133 10月  3 03:04 deps
-rw-rw-r--.  1 tangseng tangseng     11 10月  3 03:04 INSTALL
-rw-rw-r--.  1 tangseng tangseng  37493 10月  3 03:04 LICENSE.txt
-rw-rw-r--.  1 tangseng tangseng    151 10月  3 03:04 Makefile
-rw-rw-r--.  1 tangseng tangseng   6888 10月  3 03:04 MANIFESTO
-rw-rw-r--.  1 tangseng tangseng  23845 10月  3 03:04 README.md
-rw-rw-r--.  1 tangseng tangseng 108981 10月  3 03:04 redis.conf
-rw-rw-r--.  1 tangseng tangseng   1805 10月  3 03:04 REDISCONTRIBUTIONS.txt
-rwxrwxr-x.  1 tangseng tangseng    279 10月  3 03:04 runtest
-rwxrwxr-x.  1 tangseng tangseng    283 10月  3 03:04 runtest-cluster
-rwxrwxr-x.  1 tangseng tangseng   1804 10月  3 03:04 runtest-moduleapi
-rwxrwxr-x.  1 tangseng tangseng    285 10月  3 03:04 runtest-sentinel
-rw-rw-r--.  1 tangseng tangseng   1480 10月  3 03:04 SECURITY.md
-rw-rw-r--.  1 tangseng tangseng  14700 10月  3 03:04 sentinel.conf
drwxrwxr-x.  4 tangseng tangseng   8192 10月  3 03:04 src
drwxrwxr-x. 11 tangseng tangseng    199 10月  3 03:04 tests
-rw-rw-r--.  1 tangseng tangseng   3628 10月  3 03:04 TLS.md
drwxrwxr-x.  9 tangseng tangseng   4096 10月  3 03:04 utils
4、在 redis 目录下,执行 make 命令
[root@localhost redis-stable]# pwd
/opt/redis-stable
[root@localhost redis-stable]# make && make install
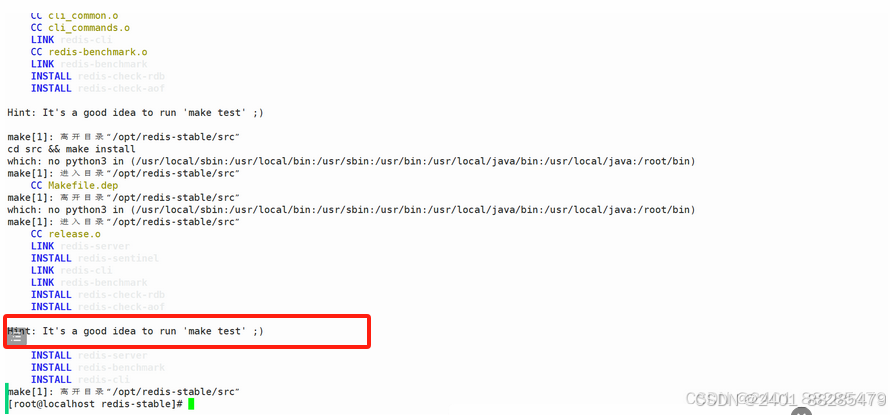
至此编译安装成功
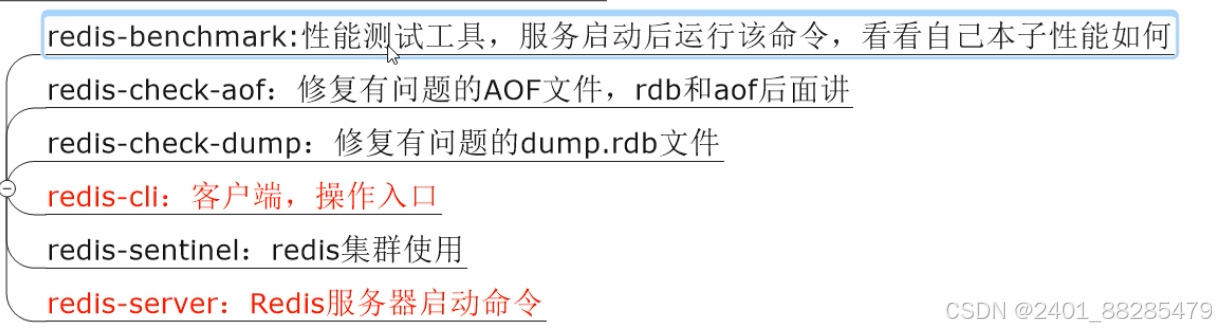
5、查看默认安装目录:usr/local/bin
[root@localhost redis-stable]# cd /usr/local/bin
[root@localhost bin]# pwd
/usr/local/bin
[root@localhost bin]# ll
总用量 30080
-rwxr-xr-x. 1 root root  6818512 12月 26 16:49 redis-benchmark
lrwxrwxrwx. 1 root root       12 12月 26 16:49 redis-check-aof -> redis-server
lrwxrwxrwx. 1 root root       12 12月 26 16:49 redis-check-rdb -> redis-server
-rwxr-xr-x. 1 root root  7800848 12月 26 16:49 redis-cli
lrwxrwxrwx. 1 root root       12 12月 26 16:49 redis-sentinel -> redis-server
-rwxr-xr-x. 1 root root 16178768 12月 26 16:49 redis-server
- 详细说明
6、将默认的 redis.conf 拷贝到自己定义好的一个路径下,比如 /myredis
[root@localhost redis-stable]# mkdir /myredis
[root@localhost redis-stable]# cp redis.conf /myredis/redis7.conf
[root@localhost redis-stable]# cd /myredis/
[root@localhost myredis]# pwd
/myredis
[root@localhost myredis]# ll
总用量 108
-rw-r--r--. 1 root root 108981 12月 26 17:15 redis7.conf
[root@localhost myredis]#
7、修改 /myredis 目录下的 redis.conf 配置文件做初始化设置

[root@localhost myredis]# vim redis7.conf
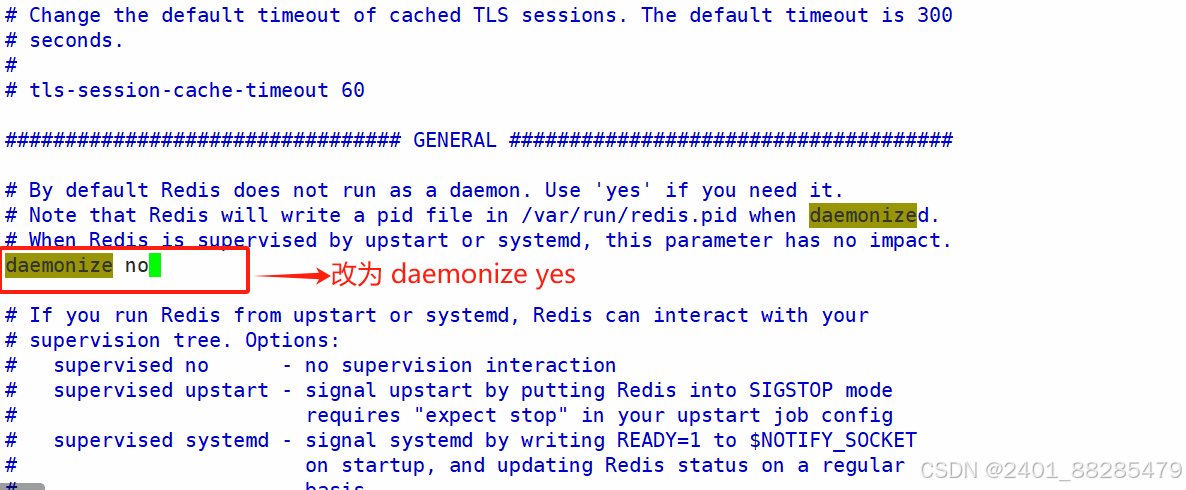
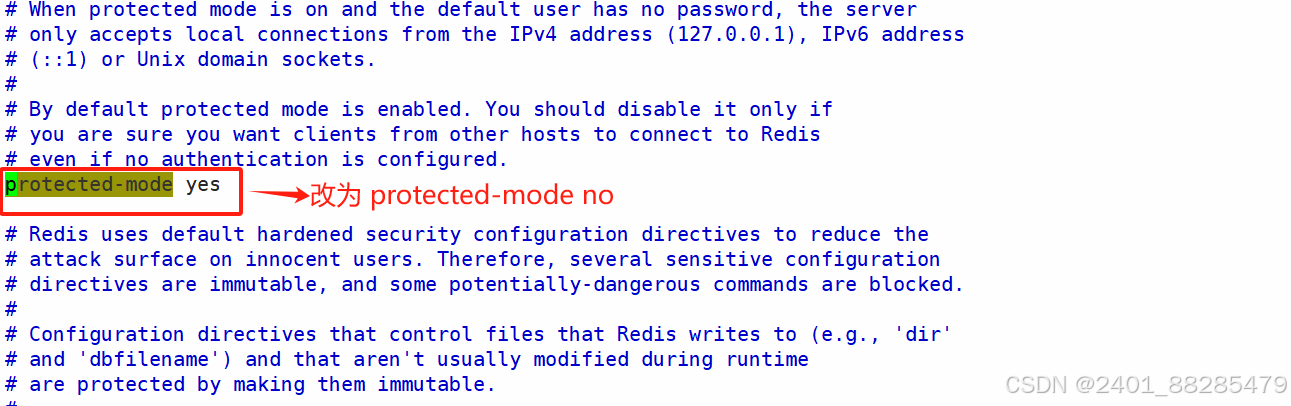

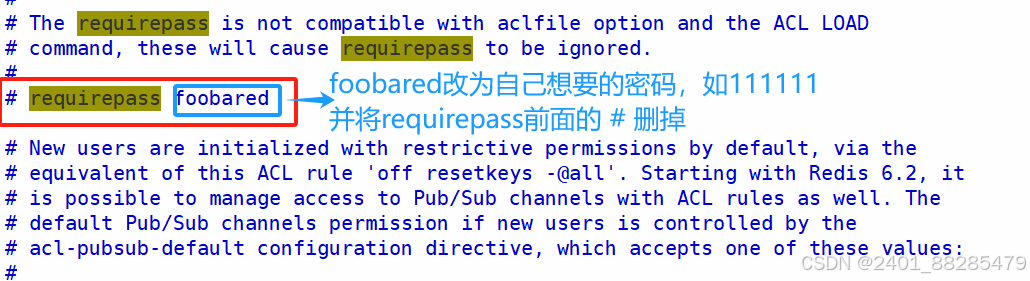
操作完成后,保存退出
8、启动服务

[root@localhost myredis]# pwd
/myredis
[root@localhost myredis]# ll
总用量 108
-rw-r--r--. 1 root root 108980 12月 26 17:55 redis7.conf
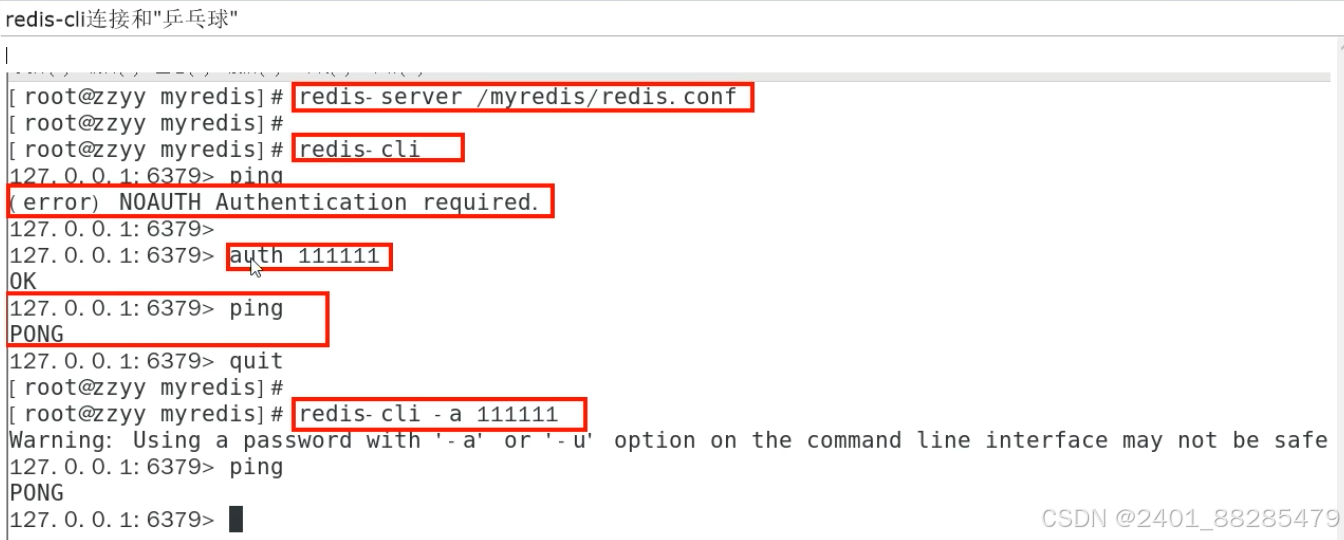
[root@localhost myredis]# redis-server /myredis/redis7.conf
1451:C 26 Dec 2024 18:09:22.264 # WARNING Memory overcommit must be enabled! Without it, a background save or replication may fail under low memory condition. Being disabled, it can also cause failures without low memory condition, see https://github.com/jemalloc/jemalloc/issues/1328. To fix this issue add 'vm.overcommit_memory = 1' to /etc/sysctl.conf and then reboot or run the command 'sysctl vm.overcommit_memory=1' for this to take effect.
[root@localhost myredis]# sysctl vm.overcommit_memory=1
vm.overcommit_memory = 1
[root@localhost myredis]# redis-server /myredis/redis7.conf
[root@localhost myredis]#
9、连接服务
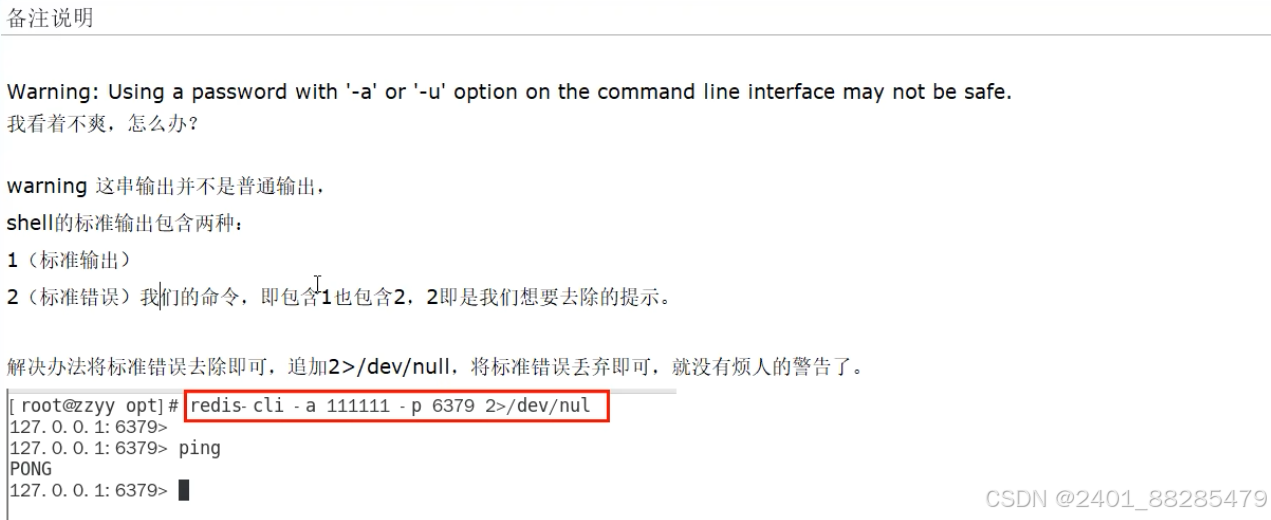
[root@localhost myredis]# redis-cli -a 111111 -p 6379
Warning: Using a password with '-a' or '-u' option on the command line interface may not be safe.
127.0.0.1:6379>
127.0.0.1:6379>
127.0.0.1:6379>
[root@localhost opt]# ps -ef |grep redis
root       1452      1  0 18:09 ?        00:00:02 redis-server 127.0.0.1:6379
root       1489   1431  0 18:20 pts/0    00:00:00 redis-cli -a 111111 -p 6379
root       1491   1470  0 18:21 pts/1    00:00:00 grep --color=auto redis
[root@localhost opt]#
[root@localhost opt]# ps -ef |grep redis|grep -v grep
root       1452      1  0 18:09 ?        00:00:03 redis-server 127.0.0.1:6379
root       1489   1431  0 18:20 pts/0    00:00:00 redis-cli -a 111111 -p 6379
127.0.0.1:6379> ping
PONG
127.0.0.1:6379>
至此连接成功。
- 案例说明

10、大家知道 Redis 端口为啥是6379么?
[root@localhost myredis]# ps -ef|grep redis|grep -v grep
root       1452      1  0 18:09 ?        00:00:01 redis-server 127.0.0.1:6379
[root@localhost myredis]#

11、永远的 helloworld
[root@localhost myredis]# redis-cli -a 111111 -p 6379
Warning: Using a password with '-a' or '-u' option on the command line interface may not be safe.
127.0.0.1:6379> ping
PONG
127.0.0.1:6379> set k1 helloworld
OK
127.0.0.1:6379> get k1
"helloworld"
127.0.0.1:6379>
12、关闭

- 关闭方式1
127.0.0.1:6379> shutdown
not connected> quit
[root@localhost myredis]#
[root@localhost myredis]# lsof -i:6379
- 关闭方式2
[root@localhost myredis]# redis-server /myredis/redis7.conf
[root@localhost myredis]# redis-cli -a 111111
Warning: Using a password with '-a' or '-u' option on the command line interface may not be safe.
127.0.0.1:6379>

[root@localhost opt]# redis-cli -a 111111 shutdown
Warning: Using a password with '-a' or '-u' option on the command line interface may not be safe.
[root@localhost opt]#

127.0.0.1:6379> ping
Error: Server closed the connection
not connected> quit
[root@localhost myredis]#
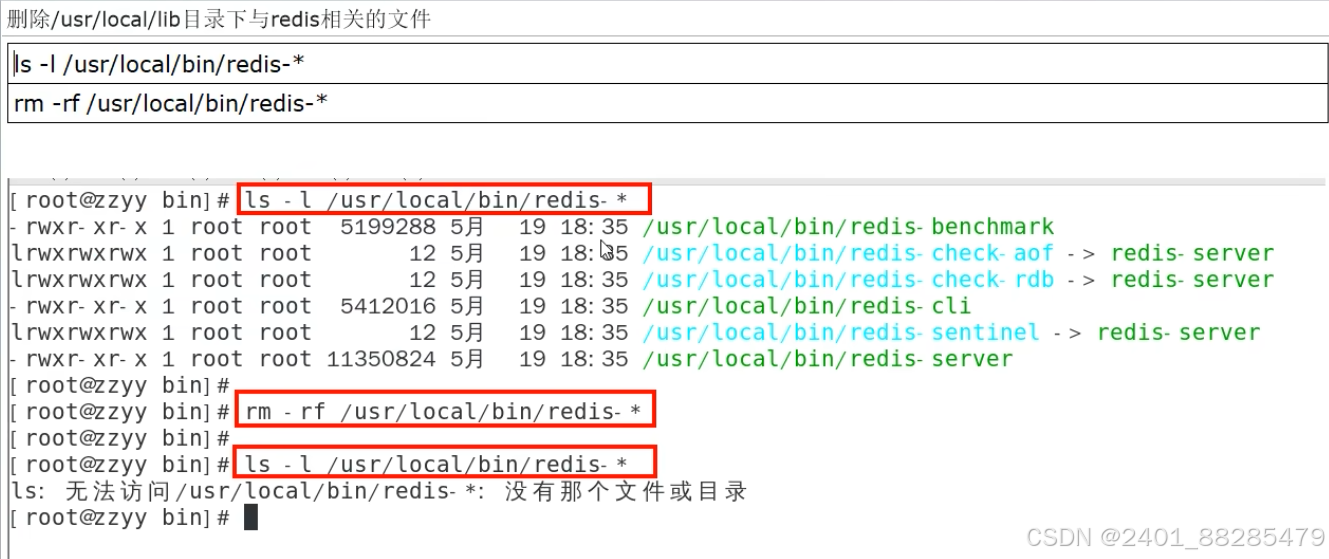
三、Redis7 卸载步骤


 17万+
17万+

 被折叠的 条评论
为什么被折叠?
被折叠的 条评论
为什么被折叠?
 到【灌水乐园】发言


