


    requests:
      storage: 10Gi
template:
metadata:
labels:
k8s-app: logstash
annotations:
#“cni.projectcalico.org/ipAddrs”: “[“10.244.220.10”]” #pod绑定固定ip,依赖于calico ipam插件,必须使用calico 3.24.1以上的版本才可以
spec:
restartPolicy: Always
affinity:
nodeAffinity: # node 亲和度
preferredDuringSchedulingIgnoredDuringExecution:
- weight: 100 #软亲和匹配条件1,权重100优先级
preference:
matchExpressions:
- key: podtype
operator: In
values:
- web
podAntiAffinity:
requiredDuringSchedulingIgnoredDuringExecution: #反硬亲和,不调度到同一个node上
- labelSelector: #标签选择
matchExpressions: #正则匹配
- key: k8s-app
operator: In
values:
- logstash
topologyKey: kubernetes.io/hostname
namespaces:
- es
  terminationGracePeriodSeconds: 20 #容器被删除变为Terminating状态的等待时间,默认是30s,以便于做一些容器删除前的处理工作
  #imagePullSecrets: #私服认证信息
  #- name: local-registry-key #私服账号secret资源名称,需要单独创建:kubectl create secret generic... 详见:https://kubernetes.io/zh-cn/docs/tasks/configure-pod-container/pull-image-private-registry/
  initContainers:
  - name: init-logstash
    image: logstash:8.12.2
    #securityContext:
    # runAsUser: 0 #由于需要更改挂在目录的归属用户,需要以root运行
    command:
    - "bash"
    - "-c"
    # 可执行多行命令
    - >
      echo $DOWN\_LOAD\_URLS;
      IFS=',' read -r -a my_array <<< "$DOWN\_LOAD\_URLS";
      for URL in "${my\_array[@]}"; do
          echo 'URL:'$URL;
          FILE=$(echo $URL | awk -F '/' '{print $NF}');
          SAVE\_PATH='/local-certs';

          if [ ! -f $SAVE\_PATH"/"$FILE ] || [ "$DOWN\_LOAD" = "true" ];then
              res\_status=$(curl -u $DOWNLOAD\_ACCESS\_USER:$DOWNLOAD\_ACCESS\_PASS -I -m 10 -o /dev/null -s -w %{http\_code} $URL);
              echo 'res\_status: ' $res\_status;
              if [ "$res\_status" != "200" ];then
                echo "===================== "$FILE"不可下载 =======================";
              else
                echo "===================== "$FILE"可下载,执行下载 =======================";
                cd $SAVE\_PATH;
                curl -u $DOWNLOAD\_ACCESS\_USER:$DOWNLOAD\_ACCESS\_PASS $URL -O;
                ls $SAVE\_PATH;
              fi
          else
                  echo "===================== "$FILE"已存在 或 ENV:DOWN\_LOAD=false =======================";
          fi
      done

    env:   #环境变量配置
    - name: DOWN_LOAD
      value: "true"
    - name: "DOWN\_LOAD\_URLS"
      value: "http://{jenkins\_hosts}/job/{job\_name}/ws/{jenkins\_upload\_path}/elasticsearch-ca.pem,http://{jenkins\_hosts}/job/{job\_name}/ws/{jenkins\_upload\_path}/GeoLite2-City.mmdb"
    - name: DOWNLOAD_ACCESS_USER
      value: ""
    - name: DOWNLOAD_ACCESS_PASS
      value: ""
    - name: POD_NAME
      valueFrom:
        fieldRef:
          apiVersion: v1
          fieldPath: metadata.name
    volumeMounts:
    - name: logstash-volume  #挂载存储目录
      mountPath: /local-certs
      subPath: local-certs
  containers:
    - name: logstash
      image: logstash:8.12.2
      imagePullPolicy: IfNotPresent # IfNotPresent | Always | Never
      securityContext: ##开启特权,因为要调整系统内核
      # runAsUser: 0 #由于需要更改挂在目录的归属用户,需要以root运行
      # privileged: true
      resources:
        requests:
          memory: "600Mi" #Gi=G Mi=M 只支持整数
          cpu: "250m" #1000m=1cpu (cpu物理线程)
        limits:
          memory: "1256Mi" #Gi=G Mi=M 只支持整数
          cpu: "1000m"  #1000m=1cpu (cpu物理线程)
      #securityContext: ###添加参数启用容器root权限
      # privileged: true
      ports:
      - containerPort: 9600
        protocol: TCP

      command: ["/bin/sh","-c"]
      args: #可以设置多行命令,不过启动后初始化还是推荐使用postStart钩子函数来执行,不能有#注释符
       #将挂载的配置文件同步到默认的ES配置文件中,因为elastic的安全机制,软连接无法生效
       #将${POD\_NAME}'.es.ndcto.com添加到本机hosts中,以便于与http.p12中的授信主机名适配
      - |
        cat /config/logstash.yml > /usr/share/logstash/config/logstash.yml;
        cat /config/jvm.options > /usr/share/logstash/config/jvm.options;
        /usr/local/bin/docker-entrypoint
        #sleep 3600;

      env:   #环境变量配置
      #- name: xxx
      # value: xxx
      - name: POD_NAME
        valueFrom:
          fieldRef:
            apiVersion: v1
            fieldPath: metadata.name
      - name: POD_IP
        valueFrom:
          fieldRef:
            fieldPath: status.podIP
      volumeMounts:
      - name: logstash-volume    #logstash数据
        mountPath: /usr/share/logstash/data/
        subPath: data
      - name: logstash-volume  #挂载部署目录
        mountPath: /logstash/logs
        subPath: logs
      #- name: logstash-volume #挂载部署目录
      # mountPath: /usr/share/logstash/pipeline
      # subPath: pipeline
      - name: logstash-pipelines  #挂载配置文件
        mountPath: /usr/share/logstash/pipeline
      - name: logstash-volume  #挂载存储目录
        mountPath: /local-certs
        subPath: local-certs
      - name: logstash-config  #挂载配置文件
        mountPath: /config
      - name: target-logs
        mountPath: /data/logs
        readOnly: true
      - name: host-time  #挂载本地时区
        mountPath: /etc/localtime
        readOnly: true
  volumes:
  - name: logstash-config  #使用pvc
    configMap:    #使用configMap
      name:  logstash-config
      defaultMode: 420 #420-644 493-755
  - name: logstash-pipelines  #使用pvc
    configMap:    #使用configMap
      name:  logstash-pipelines
      defaultMode: 420 #420-644 493-755
  - name: host-time
    hostPath: #挂载本地时区
      path: /etc/localtime
      type: ""
  - name: target-logs
    hostPath: #本地日志收集目录
      path: /data/logs
      type: ""
---


### 配置文件


一共3个配置文件
 logstash.yml logstash的主程序配置
 jvm.options logstash主程序jvn运行环境的配置
 logstash-xxx.conf 收集任务配置文件,可以有多个.cnf文件,统一挂载到容器的/usr/share/logstash/pipeline目录下即可


### logstash.yml 和 jvm.options


注意:设置config.reload.interval时,一定要带上s(秒),否则会变成以毫秒间隔运行(官方文档还强调这是以秒为单位运行的,结果一开始没有设置单位,cpu瞬间爆满)
 同样的pipeline.batch.delay 固定以毫秒间隔运行,也不宜设置过短,否则会频繁线程切换
apiVersion: v1
kind: ConfigMap #配置信息
metadata:
name: logstash-config #es-010配置
namespace: es
data:
logstash.yml: |
http.host: “0.0.0.0”
 #数据存放位置
#path.data: /logstash/data

#logstash 使用elastic 做监控(非必需)
#xpack.monitoring.enabled: true
#xpack.monitoring.elasticsearch.username: logstash\_system
#xpack.monitoring.elasticsearch.password: 1q2w3e
#这里必须用 https
#xpack.monitoring.elasticsearch.hosts: "https://es-01-svc.es:9200"
#你的ca.pem 的所在路径
#xpack.monitoring.elasticsearch.ssl.verification\_mode: certificate
#xpack.monitoring.elasticsearch.ssl.certificate\_authority: "/local-certs/elasticsearch-ca.pem"

# 探嗅 es节点,设置为 false
#xpack.monitoring.elasticsearch.sniffing: false

#并行执行管道的过滤器和输出阶段的worker数量。
pipeline.workers: 2
#单个工作线程在尝试执行其筛选器和输出之前将从输入中收集的事件的最大数量。较大的批量大小通常更有效,但是要以增加的内存开销为代价。
# 4000 -> jvm 1536m 默认256
pipeline.batch.size: 512
#在创建 pipeline 事件批处理时,以ms为单位等待每个事件多长时间,然后才向 pipeline 工作者分发小批处理。
pipeline.batch.delay: 500
#pipeline.batch.size 或 pipeline.batch.delay 达到任意一项,则会提交数据给output

#当设置为true时,定期检查配置是否已更改,并在更改时重新加载配置。
config.reload.automatic: true
#Logstash以秒为单位检查配置文件的更改频率,一定要带上单位S,否则会按照单位毫秒去执行
config.reload.interval: 15s

#当设置为true时,将完全编译的配置显示为调试日志消息。还必须设置log.level:debug。
#config.debug: true
#日志级别。fatal,error,warn,info,debug,trace。
log.level: info
#日志格式。设置为json以JSON格式登录,或者直接使用Object#.inspect。
#log.format:
#日志目录位置。
path.logs: /logstash/logs
#哪里可以找到自定义插件。您可以多次指定此设置以包括多个路径。插件应该位于特定的目录层次结构中PATH/logstash/TYPE/NAME.rb,其中TYPE是输入、过滤器、输出或编解码器,而NAME是插件的名称。
#path.plugins:
jvm.options: |
## JVM configuration
-Xms1g
-Xmx1g
################################################################
## Expert settings
################################################################
##
## All settings below this section are considered
## expert settings. Don't tamper with them unless
## you understand what you are doing
##
################################################################

## GC configuration
11-13:-XX:+UseConcMarkSweepGC
11-13:-XX:CMSInitiatingOccupancyFraction=75
11-13:-XX:+UseCMSInitiatingOccupancyOnly

-Djava.awt.headless=true
# ensure UTF-8 encoding by default (e.g. filenames)
-Dfile.encoding=UTF-8


-Djruby.compile.invokedynamic=true


-XX:+HeapDumpOnOutOfMemoryError

# Entropy source for randomness
-Djava.security.egd=file:/dev/urandom

# Copy the logging context from parent threads to children
-Dlog4j2.isThreadContextMapInheritable=true
-Dlogstash.jackson.stream-read-constraints.max-string-length=200000000
-Dlogstash.jackson.stream-read-constraints.max-number-length=10000
### logstash-nginx-log.conf


**要点说明**


* 声明一个目标索引名称的变量,这样多个任务可以通过变量指定不同的目标索引,而共享同个ES连接池,降低对ES连接的消耗
mutate { add_field => { “[@metadata][target_index]” =>“nginx-log-%{+YYYY.MM}” } }
* 我在nginx中配置的access log模板为
‘$remote_addr $host s e r v e r _ a d d r [ server\_addr [ server_addr[time_local] “$request” $request_time $upstream_response_time $status b o d y _ b y t e s _ s e n t " body\_bytes\_sent " body_bytes_sent"http_referer" “ h t t p _ u s e r _ a g e n t " " http\_user\_agent" " http_user_agent""upstream_addr” “$http_x_forwarded_for” $http_device’;
* 对应logstah的匹配规则为
'%{IPORHOST:remote_addr} %{HOSTNAME:http_host} %{IPORHOST:server_addr} [%{HTTPDATE:timestamp}] “%{WORD:http_method} %{URIPATH:request_path}?%{GREEDYDATA:request_param} %{DATA:http_protocol}” %{NUMBER:response_time} %{NUMBER:upstream_time} %{NUMBER:http_status} %{NUMBER:body_bytes_sent} “%{DATA:http_referer}” “%{DATA:user_agent}” “%{HOSTPORT:upstream_addr}” “%{DATA:http_x_forward}” (%{WORD:http_device}|-)
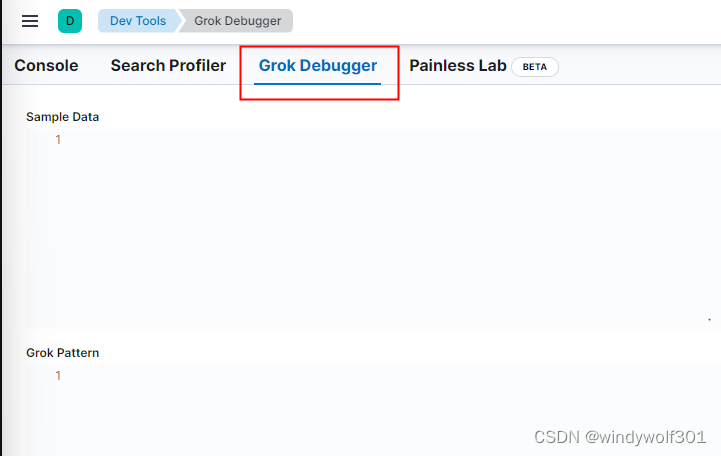
* 可以在kibana的Dev Tools 的 Grok Debugger中进行匹配调试
* 
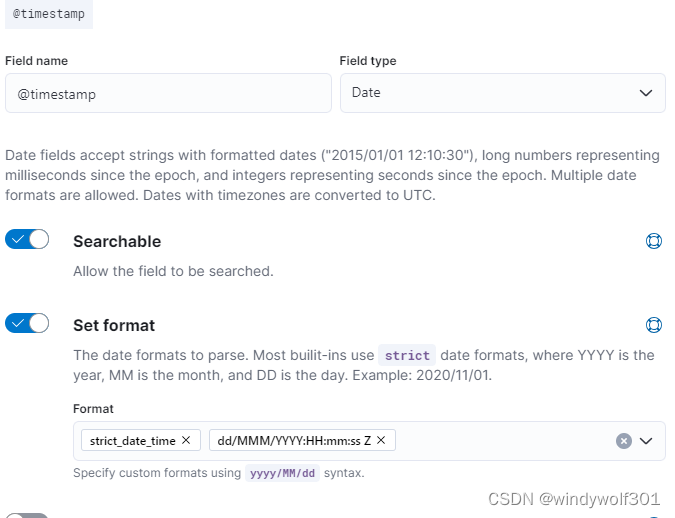
* 这里我没有关键固定索引,而是使用了kibana创建了索引模板+lifecycle生命周期,避免单一索引过大并随日期滚动清理,创建索引模板时注意设定@timstamp的date格式时要包含时区信息,这样logstash提交日期数据(ngnix log中会带上时区:**[16/Mar/2024:20:00:00 +0800]**)到@timstamp中时才能保存成咱们东8区的时间,否则会变成UTC时间,晚了8个小时,kibana 中设置如图
-
* 索引模板一定要设置别名**alias**,以便于life-cycle做索引滚动,alias跟索引前缀保持同意即可,比如我的索引模板匹配的 nginx-log-\* (只要有这名称索引要创建,都可以根据模板做自动创建,不需要手动一个一个配置),alias我也设置成了**nginx-log**;
* 为了保存客户端真实ip,需要在logstash中split处理 http\_x\_forward,截取第一个ip信息保存,并把这个ip赋值给geoip已解析地理位置信息;
* logstash默认会丢弃为空的字段,由于我使用的是动态映射的索引模板(只配了个string字段动态映射),为避免第一个请求字段不全导致索引创建出来少字段,因此特意针对可能为空的字段进行处理,确保生成好的索引字段都是全的。
* 在业务中使用ES,推荐还是使用静态索引模板,手动写全字段,不要依赖动态映射创建,避免出现类似问题,这里是日志收集,格式固定不会变因此影响不大。
这里我是用动态映射配置如下:

**配置文件内容如下:**
apiVersion: v1
kind: ConfigMap #配置信息
metadata:
name: logstash-pipelines #es-010配置
namespace: es
data:
logstash-nginx-log.conf: |
input {
file {
path => “/data/logs/nginx/ndcto_access.log”
#start_position => “beginning” # 此参数表示在第一次读取日志时从头读取
start_position => “beginning” # 此参数表示在第一次读取日志时从末尾读取
stat_interval => “3” # 采集频率为 3 秒
# sincedb_path => “自定义位置” # 此参数记录了读取日志的位置,默认在 data/plugins/inputs/file/.sincedb*
}
}
filter {
# 定义保存索引目标,注意全程小写.
mutate { add_field => { “[@metadata][target_index]” => “nginx-log-%{+YYYY.MM}” } }
  grok {
      match => { "message" => '%{IPORHOST:remote\_addr} %{HOSTNAME:http\_host} %{IPORHOST:server\_addr} \[%{HTTPDATE:timestamp}\] \"%{WORD:http\_method} %{URIPATH:request\_path}?%{GREEDYDATA:request\_param} %{DATA:http\_protocol}\" %{NUMBER:response\_time} %{NUMBER:upstream\_time} %{NUMBER:http\_status} %{NUMBER:body\_bytes\_sent} \"%{DATA:http\_referer}\" \"%{DATA:user\_agent}\" \"%{HOSTPORT:upstream\_addr}\" \"%{DATA:http\_x\_forward}\" (%{WORD:http\_device}|-)'}
  }

  mutate {
    split => ["http\_x\_forward", ","]
    add_field => { "real\_client\_ip" => "%{[http\_x\_forward][0]}" }
    #remove\_field => ["uid\_info"]
  }

  #借助geoip 将日志中的IP地址映射出具体的地理位置信息
  geoip {
    #将real\_client\_ip字段设置为源IP
    source => "real\_client\_ip"
    database => "/local-certs/GeoLite2-City.mmdb"
    target => "geoip"
  }

  date {
    match => [ "@timestamp" , "dd/MMM/YYYY:HH:mm:ss Z" ]
  }

  #将string %{timestamp} 转为东8区 date %{timestamp}
  #ruby {
  # code => "event.set('timestamp', event.get('@timestamp').time.localtime + 8\*60\*60); event.set('@timestamp', event.get('timestamp'))"
  #
  #}

  # 将时间戳转为本地时间
  # ruby {
  # code => "event['@timestamp'] = event['@timestamp'].getlocal"
  # }

  ruby {
    code => "event.set('milliseconds', event.get('timestamp').to\_i \* 1000)"
  }


 被折叠的 条评论
为什么被折叠?
被折叠的 条评论
为什么被折叠?
 到【灌水乐园】发言


