


### 2.RouterOutlet:


这是一个占位符组件,用于告诉Angular要把每个路由的内容放在哪儿。
{{ title }}
### 3.RouterLink:


用于创建各种路由链接
Dashboard
Heroes
为了使用以上三大部件:
 就要导入@angular/router中的常量
import { RouterModule, Routes } from ‘@angular/router’
## 路由配置
const routes: Routes =
[
{ path: ‘’, redirectTo: ‘home’, pathMatch: ‘full’ },
{ path: ‘home’, component: HomeComponent },
{ path: ‘about’, component: AboutComponent },
{ path: ‘contact’, component: ContactComponent },
{ path: ‘contactus’, redirectTo: ‘contact’ },
];
* path:指定了该路由要处理的url路径
* component:用于连接当前路由与处理该路由的组件
* redirectTo:一个可选项,用于将当前路径重定向到另一个已知路由
{ path: ‘’, redirectTo: ‘home’, pathMatch: ‘full’ },
这即是重定向
 空即跳转到home


## 安装路由配置
@NgModule({
declarations: [
RoutesDemoApp,
HomeComponent,
AboutComponent,
ContactComponent ],
imports: [
BrowserModule,
RouterModule.forRoot(routes) // <-- routes
],
bootstrap: [ RoutesDemoApp ],
providers: [
{ provide:LocationStrategy,useClass:HashLocationStrategy }
]
})
class RoutesDemoAppModule {}
platformBrowserDynamic().bootstrapModule(RoutesDemoAppModule)
.catch((err: any) => console.error(err));
## 第二大技能:get post请求
get请求的步骤:
### 导入模块

### 构建视图

此处点击事件运用了click方法,实现makeRequest
loading为加载数据,可以传值,进行显示正在加载还是显示数据
最后显示data数据
>
> 纯代码步骤
>
>
>
#### 1
import {Component} from ‘@angular/core’;
import {Http, Response} from ‘@angular/http’;
#### 2
@Component
({ selector: ‘simple-http’,
template: `
Basic Request
#### 3
export class SimpleHTTPComponent
{ data: Object; loading: boolean;
#### 4
constructor(private http: Http) { }
#### 5
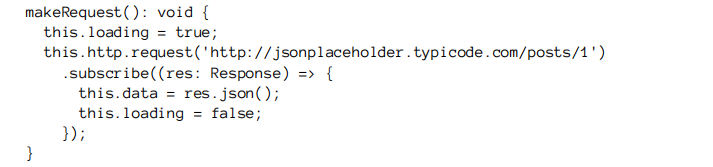
makeRequest(): void {
this.loading = true; this.http.request(‘http://jsonplaceholder.typicode.com/posts/1’)
.subscribe((res: Response) => {
this.data = res.json();


 被折叠的 条评论
为什么被折叠?
被折叠的 条评论
为什么被折叠?
 到【灌水乐园】发言


