


总结
上述知识点,囊括了目前互联网企业的主流应用技术以及能让你成为“香饽饽”的高级架构知识,每个笔记里面几乎都带有实战内容。
很多人担心学了容易忘,这里教你一个方法,那就是重复学习。
打个比方,假如你正在学习 spring 注解,突然发现了一个注解@Aspect,不知道干什么用的,你可能会去查看源码或者通过博客学习,花了半小时终于弄懂了,下次又看到@Aspect 了,你有点郁闷了,上次好像在哪哪哪学习,你快速打开网页花了五分钟又学会了。
从半小时和五分钟的对比中可以发现多学一次就离真正掌握知识又近了一步。
人的本性就是容易遗忘,只有不断加深印象、重复学习才能真正掌握,所以很多书我都是推荐大家多看几遍。哪有那么多天才,他只是比你多看了几遍书。
@SuppressWarnings(“deprecation”)
@Deprecated
@NonNull
public static RequestManager with(@NonNull android.app.Fragment fragment) {
return getRetriever(fragment.getActivity()).get(fragment);
}
@NonNull
public static RequestManager with(@NonNull View view) {
return getRetriever(view.getContext()).get(view);
}
复制代码
悄咪咪数了数,Oh my Gosh!!! 竟然高达有6个重载方法。不过呢想必你也发现这些方法都直接调用了getRetriever().get()的方法,那目的就非常明显了,我们进到这个方法去一探究竟了。
@NonNull
private static RequestManagerRetriever getRetriever(@Nullable Context context) {
return Glide.get(context).getRequestManagerRetriever(); // 1 -->
}
@NonNull
public static Glide get(@NonNull Context context) {
if (glide == null) {
// 使用了context.getApplicationContext()是为了防止内存泄漏的发生
GeneratedAppGlideModule annotationGeneratedModule =
getAnnotationGeneratedGlideModules(context.getApplicationContext());
synchronized (Glide.class) {
if (glide == null) {
// 对glide整体地进行初始化
// 其中就包含了对RequestManagerRetriever的初始化流程
// 代码量比较大就不做介绍了
checkAndInitializeGlide(context, annotationGeneratedModule);
}
}
}
return glide;
}
既然是一堆的初始化操作,最后我们的目标又是RequestManagerRetriever这个类,那自然是有必要对这个类进行探究的。
public class RequestManagerRetriever implements Handler.Callback {
public RequestManagerRetriever(@Nullable RequestManagerFactory factory) {
this.factory = factory != null ? factory : DEFAULT_FACTORY;
handler = new Handler(Looper.getMainLooper(), this /* Callback */);
}
private static final RequestManagerFactory DEFAULT_FACTORY =
new RequestManagerFactory() {
@NonNull
@Override
public RequestManager build(
@NonNull Glide glide,
@NonNull Lifecycle lifecycle,
@NonNull RequestManagerTreeNode requestManagerTreeNode,
@NonNull Context context) {
return new RequestManager(glide, lifecycle, requestManagerTreeNode, context);
}
};
// getRetriever()的get()方法
// 对标上面的6个重载方法的调用,这里只取其一
@NonNull
public RequestManager get(@NonNull FragmentActivity activity) {
// 如果当前的线程是在后台线程中,则进入
if (Util.isOnBackgroundThread()) {
return get(activity.getApplicationContext()); // 1–>
} else {
assertNotDestroyed(activity);
FragmentManager fm = activity.getSupportFragmentManager();
return supportFragmentGet(activity, fm, /parentHint=/ null, isActivityVisible(activity)); // 2 -->
}
}
}
(1)通过构造函数我们能够猜测的内容是通信的工具是Handler,而Looper使用的是MainLooper也就是主线程的,那说明最后异步通信也就直接扔到主线程完成了。
(2)通过get()函数,可以发现其实分为两个部分。一是再一层的get()方法;二是supportFragmentGet()或者是FragmentGet()方法。
他们最后的任务都是为了创建出一个RequestManager,但是我们得关注一下它的创建方式。
get()
对于这个方法而言就是对context的判定是否为Application,然后给出相应的结果。
(1)不是Application且是在主线程中时
if (Util.isOnMainThread() && !(context instanceof Application)) {
if (context instanceof FragmentActivity) {
return get((FragmentActivity) context);
} else if (context instanceof Activity) {
return get((Activity) context);
} else if (context instanceof ContextWrapper
&& ((ContextWrapper) context).getBaseContext().getApplicationContext() != null) {
return get(((ContextWrapper) context).getBaseContext());
}
}
而他们的归宿,最后还是回到我们上方的重载方法。
(2)是Application或是不再主线程时
getApplicationManager(context); // 1 -->
// 使用DCL的方式来创建了单例
@NonNull
private RequestManager getApplicationManager(@NonNull Context context) {
// Either an application context or we’re on a background thread.
if (applicationManager == null) {
synchronized (this) {
if (applicationManager == null) {
Glide glide = Glide.get(context.getApplicationContext());
applicationManager =
factory.build(
glide,
new ApplicationLifecycle(), // 2
new EmptyRequestManagerTreeNode(),
context.getApplicationContext());
}
}
}
return applicationManager;
}
通过工厂来自建了一个RequestManager,注释2处他直接使用了ApplicationLifecycle原因是因为某些情况下会接受不到生命周期的事件,这里是做的强制性的操作是为了生命周期变化时能够正常相应。
FragmentGet()
瞟了一下,这是要一个废弃的方法了,但是和supportFragmentGet()的方法相比其实也差不太多。
private RequestManager fragmentGet(
@NonNull Context context,
@NonNull android.app.FragmentManager fm,
@Nullable android.app.Fragment parentHint,
boolean isParentVisible) {
RequestManagerFragment current = getRequestManagerFragment(fm, parentHint, isParentVisible); // 1 -->
RequestManager requestManager = current.getRequestManager();
if (requestManager == null) {
// TODO(b/27524013): Factor out this Glide.get() call.
Glide glide = Glide.get(context);
requestManager =
factory.build(
glide, current.getGlideLifecycle(), current.getRequestManagerTreeNode(), context);
// 将requestManager和Fragment相挂钩
// 用以完成生命周期的监听
current.setRequestManager(requestManager);
}
return requestManager;
}
// 1 -->
// 获取对应的Fragment
private RequestManagerFragment getRequestManagerFragment(
@NonNull final android.app.FragmentManager fm,
@Nullable android.app.Fragment parentHint,
boolean isParentVisible) {
// 寻找的方式是通过设置的TAG
RequestManagerFragment current = (RequestManagerFragment) fm.findFragmentByTag(FRAGMENT_TAG);
// 先去等待队列中进行查询
// 这一步的作用是防止Fragment的重复添加
// 因为添加的Fragment的所谓的生命周期有一定的延时性
if (current == null) {
current = pendingRequestManagerFragments.get(fm);
// 如果等待队列创建一个新的TAG
if (current == null) {
current = new RequestManagerFragment();
current.setParentFragmentHint(parentHint);
if (isParentVisible) {
current.getGlideLifecycle().onStart();
}
pendingRequestManagerFragments.put(fm, current);
fm.beginTransaction().add(current, FRAGMENT_TAG).commitAllowingStateLoss();
handler.obtainMessage(ID_REMOVE_FRAGMENT_MANAGER, fm).sendToTarget();
}
}
return current;
}
总结
- 初始化
Glide的同时在内部完成了RequestManagerRetriever的创建 - 获取到的
RequestManagerRetriever调用get()方法,获取到RequestManager,获取方式分为以下两种:
Context为Application时, 通过getApplicationManager()方法创建RequestManager完成,将生命周期的监听与Application强制绑定用于接收。Context不为Application时, 通过supportFragmentGet()方法创建RequestManager完成,生命周期的监听是与Fragment进行绑定实现。
创建对应TAG的一个非常直接的好处,我们的图片像RecyclerView会放置中不容易出现错位的现象。
load(ImageURL)
总体来说上面的就是一个初始化和必要变量获取的操作,那接下从函数方法来看我们似乎是要去获得的图片了呢。
public RequestBuilder load(@Nullable String string) {
return asDrawable().load(string); // 1 -->
}
注释1处,我们通过观察可以知道他最后会选择将获取的数据转化变成一个Drawable的类然后再在我们对应的ImageView上来进行显示。那我们就对asDrawable()先进行一段源码的分析。
// asDrawable()不断深入能发现调用到的函数
// 是完成一个类RequestBuilder的对象创建
public RequestBuilder as(
@NonNull Class resourceClass) { // Drawable.class
return new RequestBuilder<>(glide, this, resourceClass, context);
}
复制代码
那接下来的问题就要进入到这个类中,因为在前面我们的探索其实算是并没有什么收获的,而如果只是创建一个类显然是不会让这句话显得这么重要,那关键点一定会出现在这个类的构造中了。
protected RequestBuilder(
@NonNull Glide glide,
RequestManager requestManager,
Class transcodeClass,
Context context) {
this.glide = glide;
this.requestManager = requestManager;
this.transcodeClass = transcodeClass;
this.context = context;
this.transitionOptions = requestManager.getDefaultTransitionOptions(transcodeClass);
this.glideContext = glide.getGlideContext();
initRequestListeners(requestManager.getDefaultRequestListeners()); // 1 -->
// 这段代码过长,不做展示,它的主要任务就是一些策略开关
// 各种选项的开启装置,比如错误提示、优先级、磁盘缓存策略、固定宽高等等
apply(requestManager.getDefaultRequestOptions());
}
// 1–>
// 从某种意义上讲就是对生命周期的监听
private void initRequestListeners(List<RequestListener> requestListeners) {
for (RequestListener listener : requestListeners) {
addListener((RequestListener) listener);
}
}
而如果回到load(string)方法。
private RequestBuilder loadGeneric(@Nullable Object model) {
this.model = model;
isModelSet = true;
return this;
}
他最后的差事也就是将URI的值放到了model这个变量中,那整个load()函数作用其实最后只是创建了一个RequestBuilder的事例,那最后的获取和加载工作肯定是在into()函数中才进行了操作的。
into(ImageView)
public ViewTarget<ImageView, TranscodeType> into(@NonNull ImageView view) {
Util.assertMainThread();
Preconditions.checkNotNull(view);
BaseRequestOptions<?> requestOptions = this;
if (!requestOptions.isTransformationSet()
&& requestOptions.isTransformationAllowed()
&& view.getScaleType() != null) {
// 通过scaleType,对图片的属性进行设定
switch (view.getScaleType()) {
case CENTER_CROP:
// 。。。。。。
default:
// Do nothing.
}
}
// 正式将图片数据塞入
// 1 -->
return into(
// 2 -->
glideContext.buildImageViewTarget(view, transcodeClass), // 深度调用可以知道也就是将View进行了赋值
/targetListener=/ null,
requestOptions,
// 能够看到线程池的影子,后面的图片的获取和处理我们猜测就是通过池来进行处理
Executors.mainThreadExecutor());
}
// 1 --> 将数据塞入
private <Y extends Target> Y into(
@NonNull Y target,
@Nullable RequestListener targetListener,
BaseRequestOptions<?> options,
Executor callbackExecutor) {
// 正常情况构建SingleRequest的请求
// 因为thumbnail一般需要额外的需求
Request request = buildRequest(target, targetListener, options, callbackExecutor);
Request previous = target.getRequest();
// 当前请求和最新的一样
if (request.isEquivalentTo(previous)
&& !isSkipMemoryCacheWithCompletePreviousRequest(options, previous)) {
// 如果请求完成,重新启动会保证结果送达并触动目标
// 如果请求失败,会给出机会去再次完成
// 如果请求正在运行,不会打断
if (!Preconditions.checkNotNull(previous).isRunning()) {
previous.begin();
}
return target;
}
requestManager.clear(target);
target.setRequest(request); // 置换最新的请求
requestManager.track(target, request); // 3 -->
return target;
}
下面的内容将主要对上述代码中的注释2和注释3进行讲解。
glideContext.buildImageViewTarget(view, transcodeClass)
从字面意思,相比你也能够进行理解了,就是要构建一个存放的目标。
@NonNull
public ViewTarget<ImageView, X> buildImageViewTarget(
@NonNull ImageView imageView, @NonNull Class transcodeClass) {
return imageViewTargetFactory.buildTarget(imageView, transcodeClass); // 1 -->
}
// 1–>
// 根据不同的数据类型选择存储是以Drawable还是Bitmap构建
public ViewTarget<ImageView, Z> buildTarget(
@NonNull ImageView view, @NonNull Class clazz) {
if (Bitmap.class.equals(clazz)) {
// 以Bitmap构建
return (ViewTarget<ImageView, Z>) new BitmapImageViewTarget(view); // 2–>
} else if (Drawable.class.isAssignableFrom(clazz)) {
// 以Drawable构建
return (ViewTarget<ImageView, Z>) new DrawableImageViewTarget(view); // 2 -->
} else {
throw new IllegalArgumentException(
"Unhandled class: " + clazz + “, try .as*(Class).transcode(ResourceTranscoder)”);
}
}
// 2–>
// 两个注释最后深度调用之后都会调用到这段代码
// 如果单看这段代码的时候其实
public ViewTarget(@NonNull T view) {
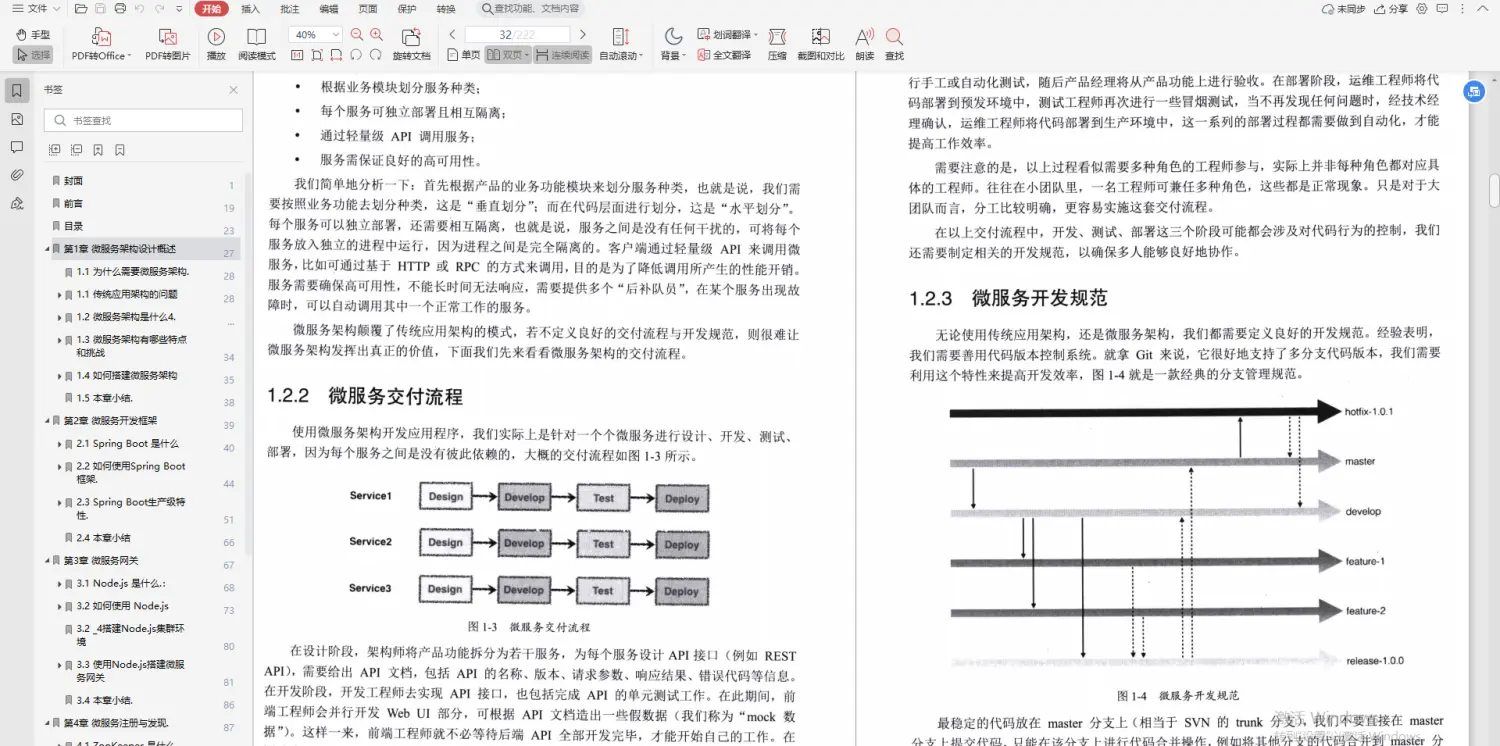
this.view = Preconditions.checkNotNull(view);
// 如果只看这个构造函数,确实没什么东西
// 不行你可以直接看注释3的代码处
sizeDeterminer = new SizeDeterminer(view); // 3 -->
}
// 非常简单的就只是对view进行了一个赋值操作
SizeDeterminer(@NonNull View view) {
this.view = view;
}

那如果就只有上面那么一点不就完了??其实并不,如果你观察了一下DrawableImageViewTarget和BitmapImageViewTarget的其他方法,能发现这样的一个特征。
protected void setResource(Bitmap resource) {
view.setImageBitmap(resource);
}
protected void setResource(@Nullable Drawable resource) {
view.setImageDrawable(resource);
}
没错!! 赋值操作,这个操作说明最后其实的结束点肯定是在这里的,而调用他的函数最后也就是onResourceReady()这个方法,也就意味着图片获取成功了,不过呢这个请求完成肯定是和数据的获取相互关联的,也就是下面部分的内容了。
requestManager.track(target, request)
// 以同步的方式完成数据的请求
synchronized void track(@NonNull Target<?> target, @NonNull Request request) {
targetTracker.track(target); // 对当前的目标的生命周期有一个追踪
requestTracker.runRequest(request); // 2 --> 执行操作正式开启
}
// 2 -->
public void runRequest(@NonNull Request request) {
requests.add(request);
// 会对当前的所有请求做一个判断处理
// 会根据当前的状态确定是否要进行数据加载的操作
// 一般来说对应的就是生命周期
if (!isPaused) {
request.begin();
} else {
request.clear();
pendingRequests.add(request);
}
}
那上面一段代码说明我们正常运行的时候,网络传输的操作肯定是已经在正常运行了的,而其实正常没有设置时调用的会是SingleRequest的类,不多逼逼,瞅瞅它的begin()方法有什么特殊之处了。
public void begin() {
synchronized (requestLock) {
// 。。。。。
// 如果正在运行就抛出异常
if (status == Status.RUNNING) {
throw new IllegalArgumentException(“Cannot restart a running request”);
}
// 从缓存中直接拿出数据
if (status == Status.COMPLETE) {
onResourceReady(resource, DataSource.MEMORY_CACHE);
return;
}
// 重中之重
// 因为在上述文章中讲到过了图片的大小问题
// 在Glide中这里就是给出解决方案的地方,两种方案:
// 1. 给出了固定长宽
// 2. 没有设置时
status = Status.WAITING_FOR_SIZE;
if (Util.isValidDimensions(overrideWidth, overrideHeight)) {
onSizeReady(overrideWidth, overrideHeight);
} else {
target.getSize(this);
}
// 使用一个占位符先顶替
if ((status == Status.RUNNING || status == Status.WAITING_FOR_SIZE)
&& canNotifyStatusChanged()) {
target.onLoadStarted(getPlaceholderDrawable());
}
}
}
那接下来要讲述的内容就应该是他的一些大小设置问题了,Glide到底是用什么样的方式完成大小的设置的呢?
onSizeReady(overrideWidth, overrideHeight)
public void onSizeReady(int width, int height) {
stateVerifier.throwIfRecycled();
synchronized (requestLock) {
// …
status = Status.RUNNING;
// 对长宽重新进行预估
float sizeMultiplier = requestOptions.getSizeMultiplier();
this.width = maybeApplySizeMultiplier(width, sizeMultiplier);
this.height = maybeApplySizeMultiplier(height, sizeMultiplier);
loadStatus =
engine.load(各种参数);
// …
}
}
通过观察对onSizeReady()函数发现,他使用的方案其实又是一个名叫做engine.load()的方式。
public LoadStatus load(各种参数) {
EngineResource<?> memoryResource;
synchronized (this) {
memoryResource = loadFromMemory(key, isMemoryCacheable, startTime);
if (memoryResource == null) {
return waitForExistingOrStartNewJob(各种参数);
}
}
cb.onResourceReady(memoryResource, DataSource.MEMORY_CACHE);
return null;
}
总结
以上是字节二面的一些问题,面完之后其实挺后悔的,没有提前把各个知识点都复习到位。现在重新好好复习手上的面试大全资料(含JAVA、MySQL、算法、Redis、JVM、架构、中间件、RabbitMQ、设计模式、Spring等),现在起闭关修炼半个月,争取早日上岸!!!
下面给大家分享下我的面试大全资料
- 第一份是我的后端JAVA面试大全
后端JAVA面试大全
- 第二份是MySQL+Redis学习笔记+算法+JVM+JAVA核心知识整理
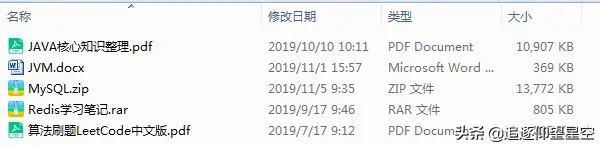
MySQL+Redis学习笔记算法+JVM+JAVA核心知识整理
- 第三份是Spring全家桶资料

MySQL+Redis学习笔记算法+JVM+JAVA核心知识整理
- 第一份是我的后端JAVA面试大全
[外链图片转存中…(img-8D4Lxohy-1715719739035)]
后端JAVA面试大全
- 第二份是MySQL+Redis学习笔记+算法+JVM+JAVA核心知识整理
[外链图片转存中…(img-nFNCJIOf-1715719739035)]
MySQL+Redis学习笔记算法+JVM+JAVA核心知识整理
- 第三份是Spring全家桶资料
[外链图片转存中…(img-Sb2AWFyd-1715719739036)]
MySQL+Redis学习笔记算法+JVM+JAVA核心知识整理


 被折叠的 条评论
为什么被折叠?
被折叠的 条评论
为什么被折叠?
 到【灌水乐园】发言


