


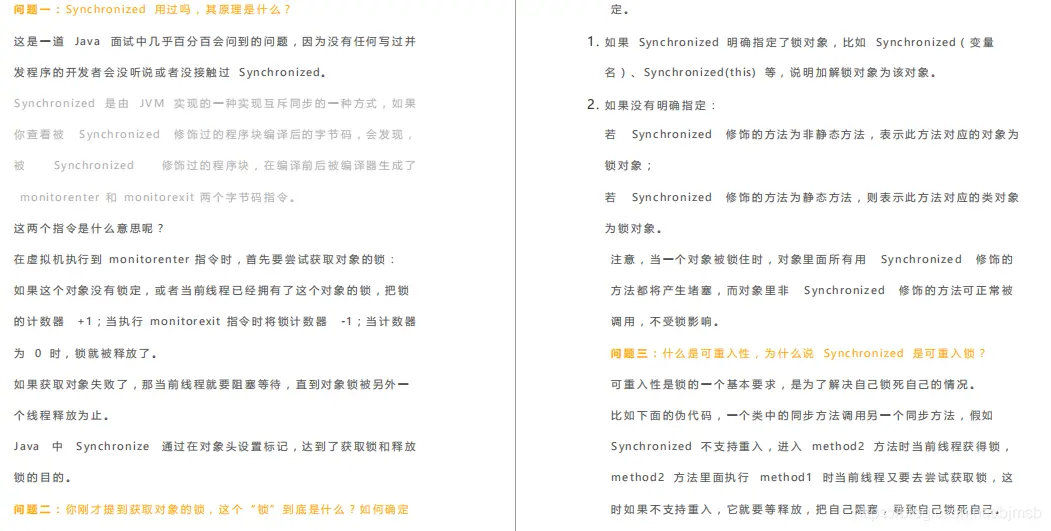
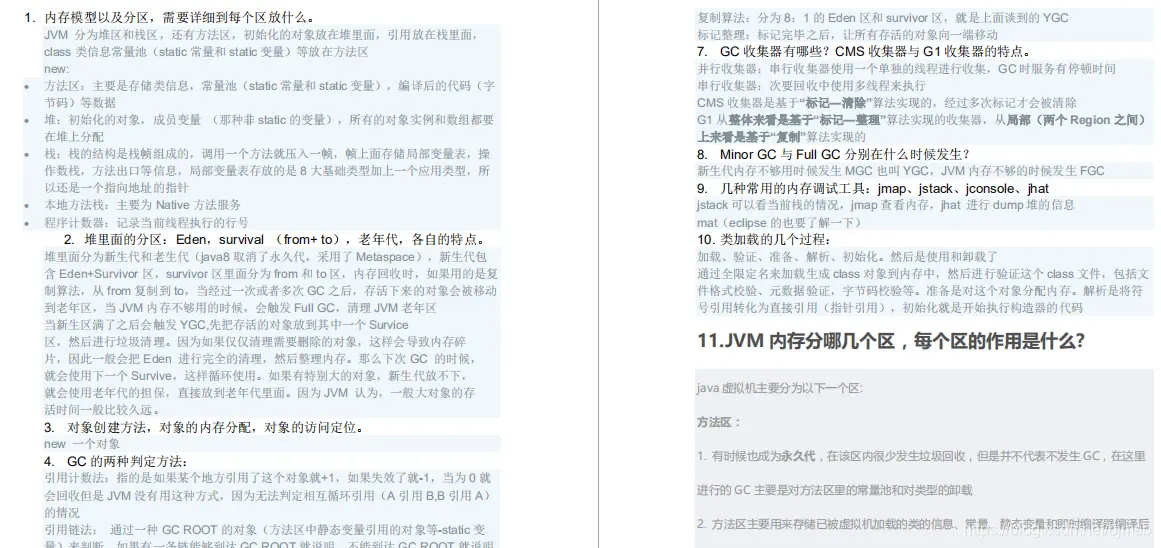
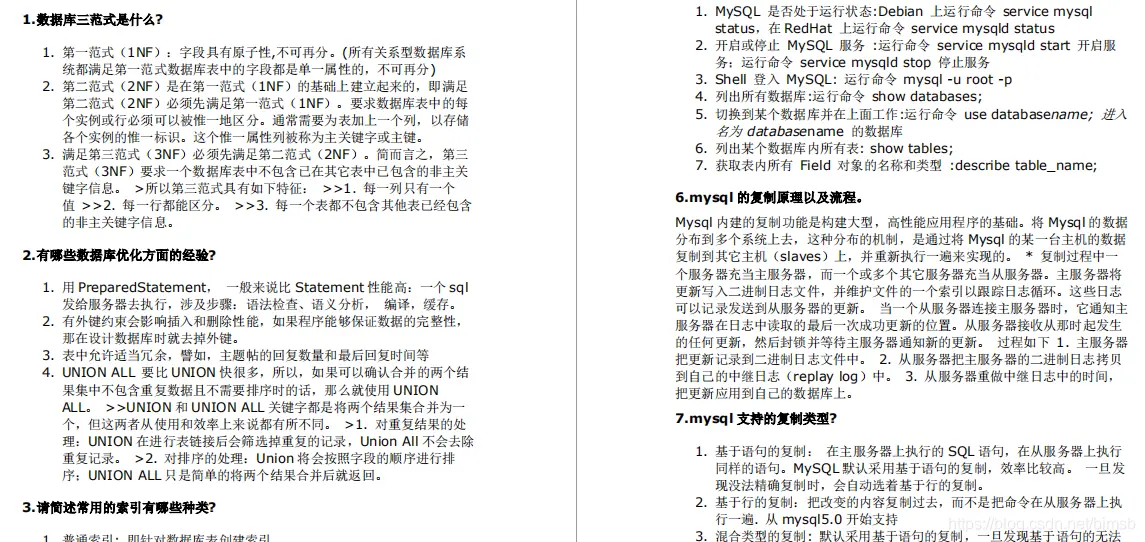
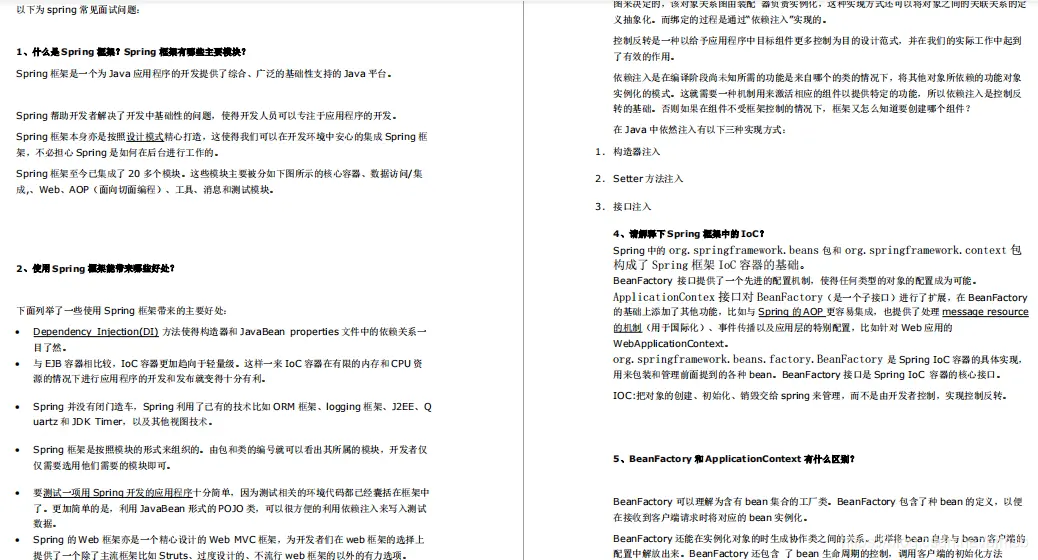
总结
虽然面试套路众多,但对于技术面试来说,主要还是考察一个人的技术能力和沟通能力。不同类型的面试官根据自身的理解问的问题也不尽相同,没有规律可循。
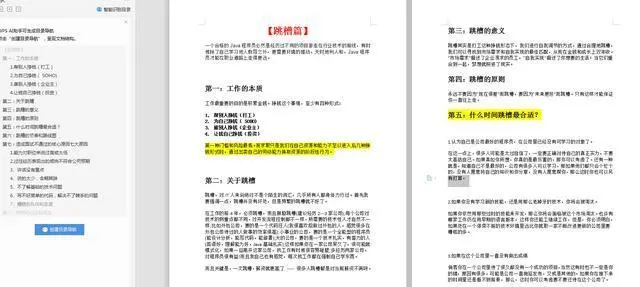
上面提到的关于这些JAVA基础、三大框架、项目经验、并发编程、JVM及调优、网络、设计模式、spring+mybatis源码解读、Mysql调优、分布式监控、消息队列、分布式存储等等面试题笔记及资料
有些面试官喜欢问自己擅长的问题,比如在实际编程中遇到的或者他自己一直在琢磨的这方面的问题,还有些面试官,尤其是大厂的比如 BAT 的面试官喜欢问面试者认为自己擅长的,然后通过提问的方式深挖细节,刨根到底。
descriptor: ()V
flags: ACC_PUBLIC
Code:
stack=1, locals=1, args_size=1
0: aload_0
1: invokespecial #1 // Method java/lang/Object."
"😦)V
4: return
LineNumberTable:
line 6: 0
LocalVariableTable:
Start Length Slot Name Signature
0 5 0 this Lcn/itcast/jvm/t3/bytecode/Demo3_1;
public static void main(java.lang.String[]);
descriptor: ([Ljava/lang/String;)V
flags: ACC_PUBLIC, ACC_STATIC
Code:
stack=2, locals=4, args_size=1
0: bipush 10
2: istore_1
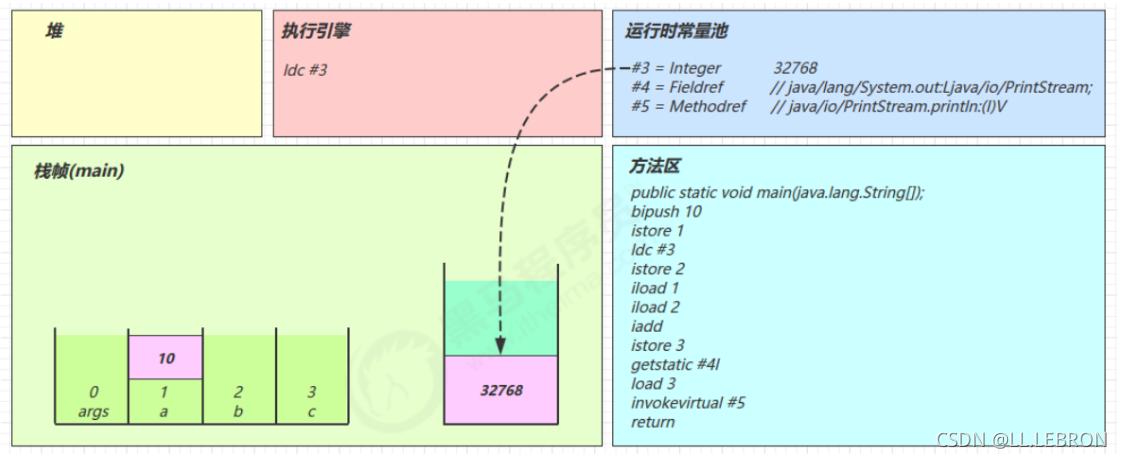
3: ldc #3 // int 32768
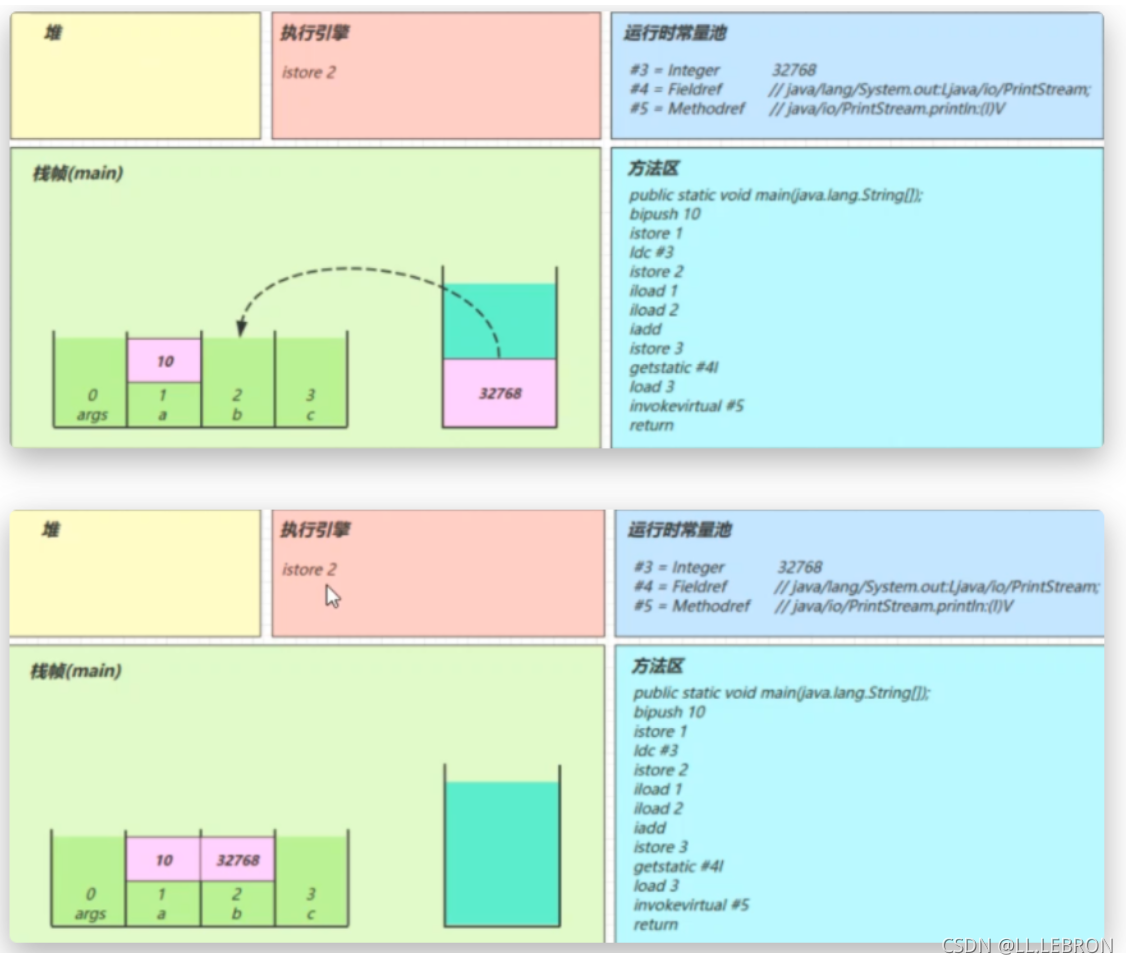
5: istore_2
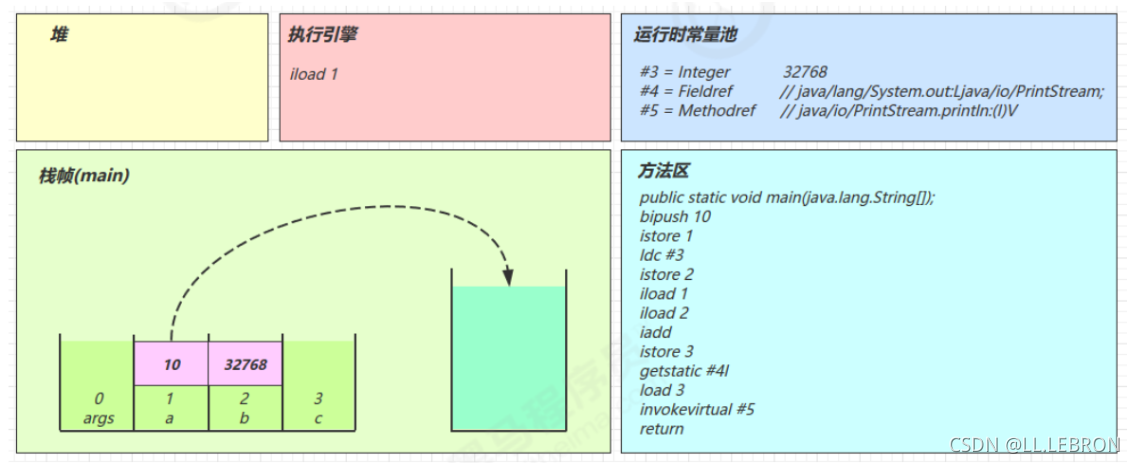
6: iload_1
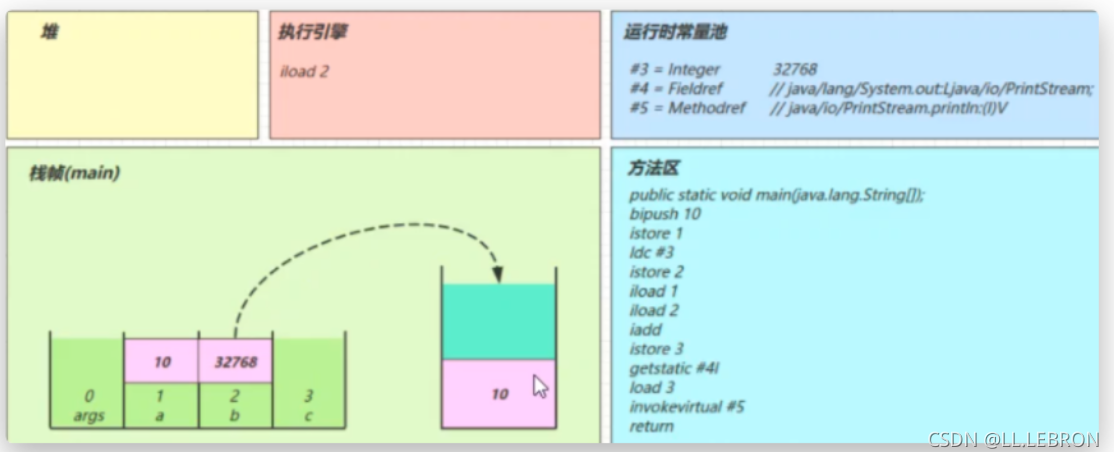
7: iload_2
8: iadd
9: istore_3
10: getstatic #4 // Field
java/lang/System.out:Ljava/io/PrintStream;
13: iload_3
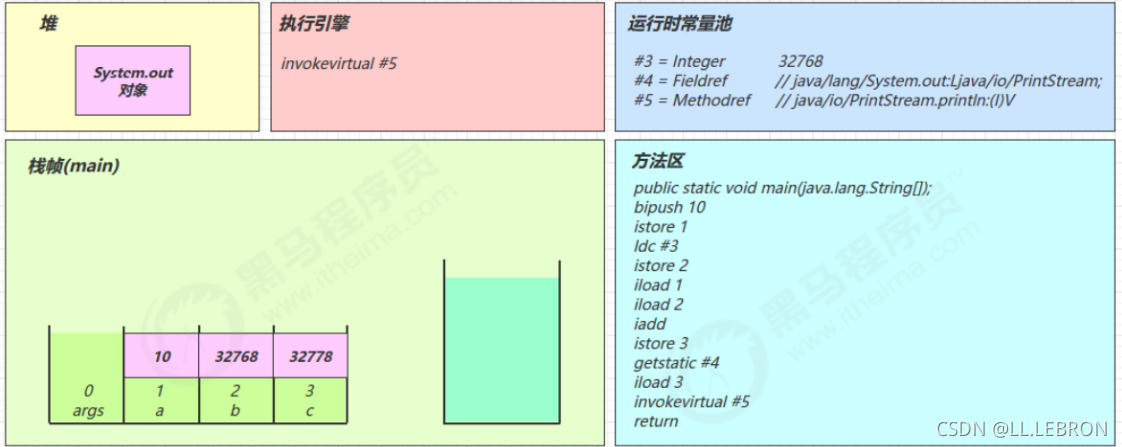
14: invokevirtual #5 // Method
java/io/PrintStream.println:(I)V
17: return
LineNumberTable:
line 8: 0
line 9: 3
line 12: 17
LocalVariableTable:
Start Length Slot Name Signature
0 18 0 args [Ljava/lang/String;
3 15 1 a I
6 12 2 b I
10 8 3 c I
MethodParameters:
Name Flags
args
}
(3)常量池载入运行时常量池
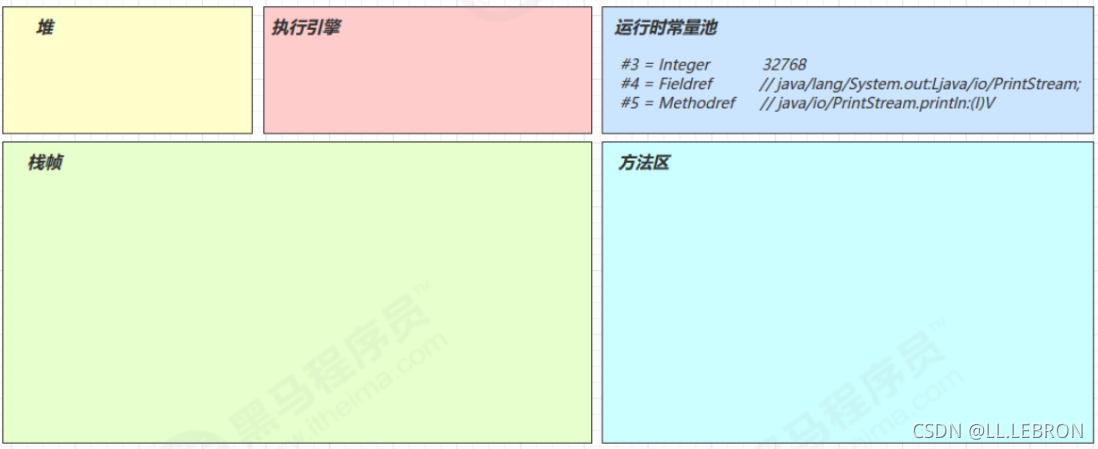
(4)方法字节码载入方法区
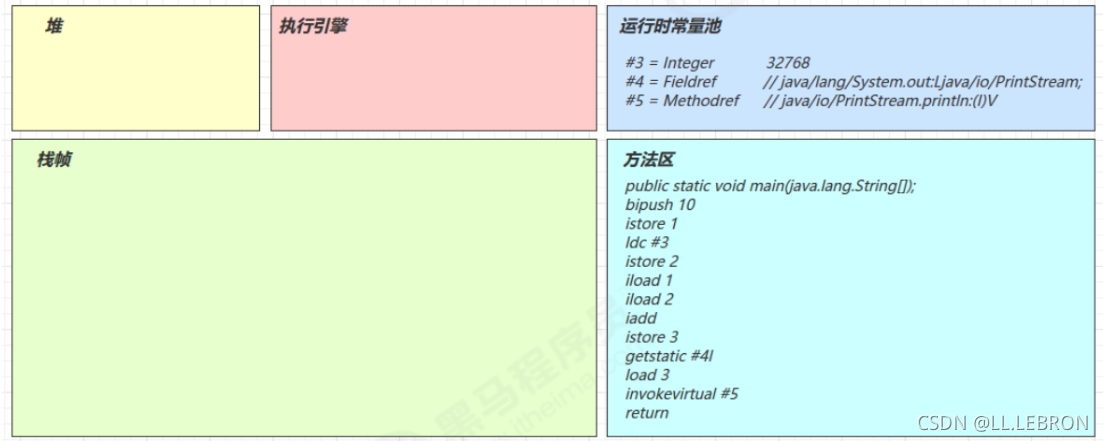
(5)main 线程开始运行,分配栈帧内存
stack=2,locals=4) 对应操作数栈有2个空间(每个空间4个字节),局部变量表中有4个槽位

(6)执行引擎开始执行字节码
bipush 10:
-
将一个 byte 压入操作数栈(其长度会补齐 4 个字节),类似的指令还有
-
sipush 将一个 short 压入操作数栈(其长度会补齐 4 个字节)
-
ldc 将一个 int 压入操作数栈
-
ldc2_w 将一个 long 压入操作数栈(分两次压入,因为 long 是 8 个字节)
-
这里小的数字都是和字节码指令存在一起,超过 short 范围的数字存入了常量池

istore 1:
- 将操作数栈栈顶元素弹出,放入局部变量表的slot 1中

ldc #3:
-
从常量池加载 #3 数据到操作数栈
-
注意
Short.MAX_VALUE是 32767,所以 32768 = Short.MAX_VALUE + 1 实际是在编译期间计算好的
istore_2:
将操作数栈中的元素弹出,放到局部变量表的2号位置
iload1:
将局部变量表中1号位置的元素放入操作数栈中
iload2:
将局部变量表中2号位置的元素放入操作数栈中
iadd:
将操作数栈中的两个元素弹出栈并相加,结果在压入操作数栈中
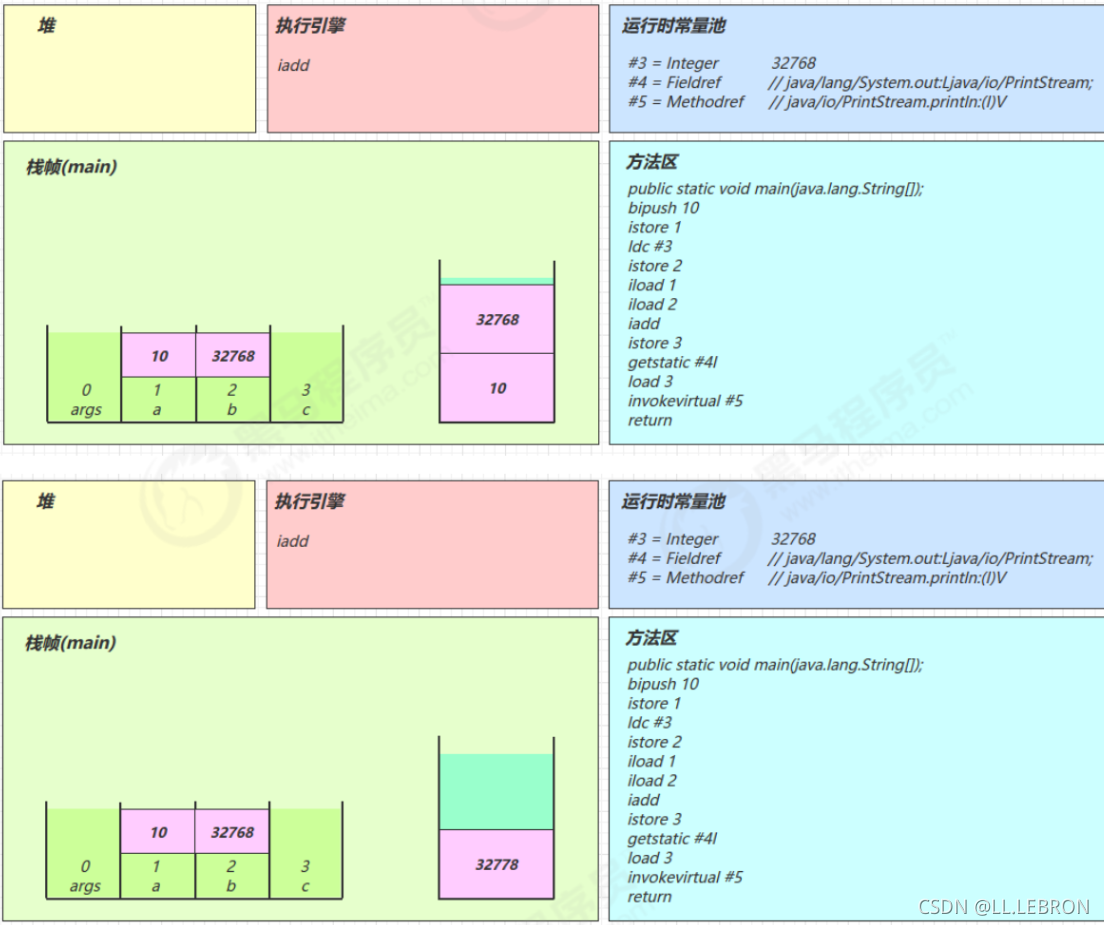
istore 3:
将操作数栈中的元素弹出,放入局部变量表的3号位置

getstatic #4:
在运行时常量池中找到#4,发现是一个对象
在堆内存中找到该对象,并将其引用放入操作数栈中
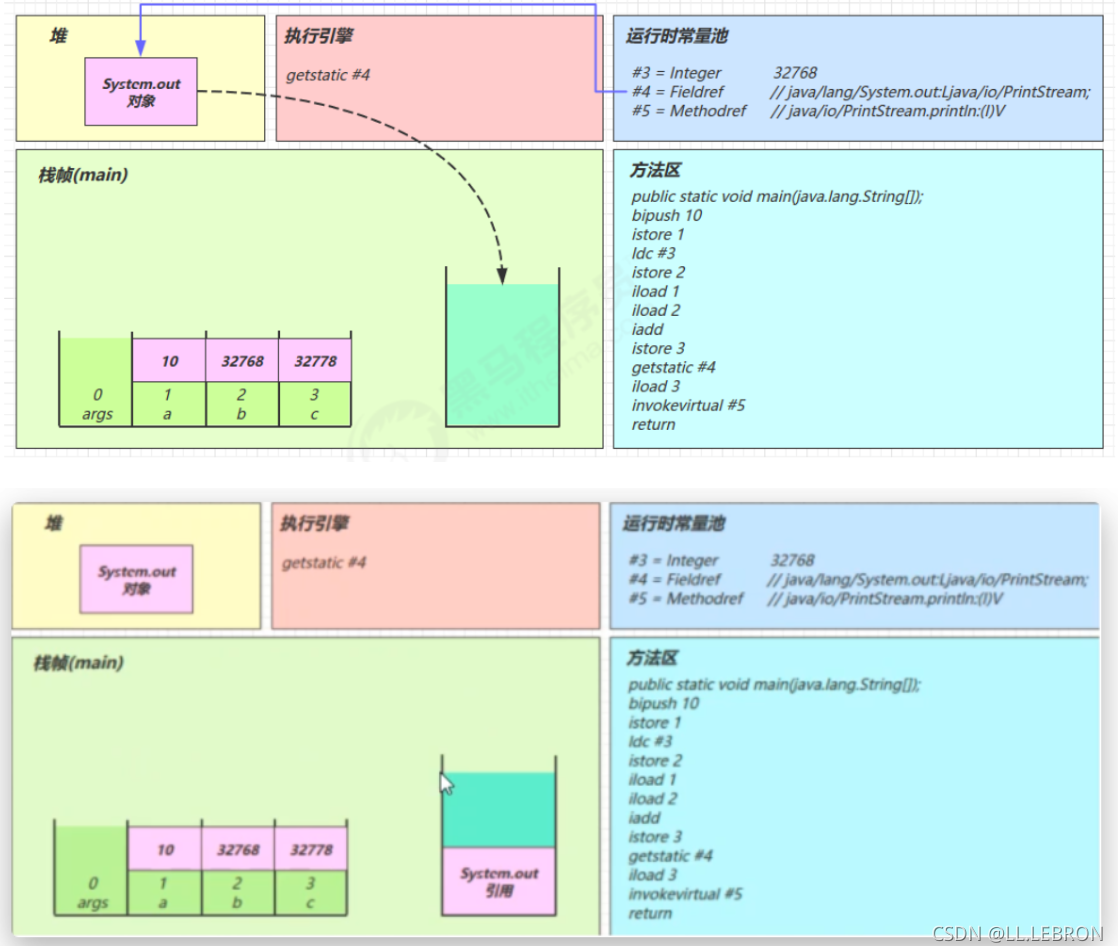
iload 3:

invokevirtual 5:
-
找到常量池 #5 项
-
定位到方法区
java/io/PrintStream.println:(I)V方法 -
生成新的栈帧(分配 locals、stack等)
-
传递参数,执行新栈帧中的字节码

-
执行完毕,弹出栈帧
-
清除 main 操作数栈内容
return:
-
完成 main 方法调用,弹出 main 栈帧
-
程序结束
2-3 练习-判断结果
Java代码:
public class Main {
public static void main(String[] args) {
int i = 0;
int x = 0;
while (i < 10) {
x = x++;
i++;
}
System.out.println(x); //输出为0
}
}
分析字节码指令:
Code:
stack=2, locals=3, args_size=1 //操作数栈分配两个空间,局部变量表分配3个空间
0: iconst_0 //常数0
1: istore_1 //将常数0放入局部变量表的1号位 i=0
2: iconst_0 //常数0
3: istore_2 //将常数0放入局部变量表的2号位 x=0
4: iload_1 //将局部变量表1号位的数放入操作数栈中
5: bipush 10 //将数字10放入操作数栈
7: if_icmpge 21 //比较操作数栈中的两个数,如果下面的数大于上面的数,就跳转到21。这里的比较是将两个数做减法。因为涉及运算操作,所以会将两个数弹出操作数栈来进行运算。运算结束后操作数栈为空
10: iload_2 //将局部变量2号位的数放入操作数栈中,放入的值为为0
11: iinc 2, 1 //将局部变量2号位的数加1,自增后,槽位中的值为1
14: istore_2 //将操作数栈中的数放入到局部变量表的2号位,2号位的值又变为了0
15: iinc 1, 1 //1号位的值自增1
18: goto 4 //跳转到第4条指令
21: getstatic #2 // Field java/lang/System.out:Ljava/io/PrintStream;
24: iload_2
25: invokevirtual #3 // Method java/io/PrintStream.println:(I)V
28: return
2-4 构造方法
(1)cinit()V
Java代码:
public class Main {
static int i = 10;
static {
i = 20;
}
static {
i = 30;
}
}
编译器会按从上至下的顺序,收集所有 static 静态代码块和静态成员赋值的代码,合并为一个特殊的方法 cinit()V :
0: bipush 10
2: putstatic #2 // Field i:I
5: bipush 20
7: putstatic #2 // Field i:I
10: bipush 30
12: putstatic #2 // Field i:I
15: return
cinit()V 方法会在类加载的初始化阶段被调用
(2)init()V
Java代码:
public class Main {
private String a = “s1”;
{
b = 20;
}
private int b = 10;
{
a = “s2”;
}
public Main(String a, int b) {
this.a = a;
this.b = b;
}
public static void main(String[] args) {
Main d = new Main(“s3”, 30);
System.out.println(d.a);//s3
System.out.println(d.b);//30
}
}
编译器会按从上至下的顺序,收集所有 {} 代码块和成员变量赋值的代码,形成新的构造方法,但原始构造方法内的代码总是在后
Code:
stack=2, locals=3, args_size=3
0: aload_0
1: invokespecial #1 // super.()V
4: aload_0
5: ldc #2 // <- “s1”
7: putfield #3 // -> this.a
10: aload_0
11: bipush 20 // <- 20
13: putfield #4 // -> this.b
16: aload_0
17: bipush 10 // <- 10
19: putfield #4 // -> this.b
22: aload_0
23: ldc #5 // <- “s2”
25: putfield #3 // -> this.a
28: aload_0 // ------------------------------
29: aload_1 // <- slot 1(a) “s3” |
30: putfield #3 // -> this.a |
33: aload_0 |
34: iload_2 // <- slot 2(b) 30 |
35: putfield #4 // -> this.b --------------------
38: return
2-5 方法调用
看一下几种不同的方法调用对应的字节码指令
package main;
public class Main {
public Main() {
}
private void test1() {
}
private final void test2() {
}
public void test3() {
}
public static void test4() {
}
public static void main(String[] args) {
Main m = new Main();
m.test1();
m.test2();
m.test3();
Main.test4();
}
}
不同方法在调用时,对应的虚拟机指令有所区别:
-
私有、构造、被final修饰的方法,在调用时都使用invokespecial指令,属于静态绑定
-
普通成员方法在调用时,使用invokevirtual指令。因为编译期间无法确定该方法的内容,只有在运行期间才能确定,属于动态绑定,即支持多态
-
静态方法在调用时使用invokestatic指令
对应的字节码文件:
Code:
stack=2, locals=2, args_size=1
0: new #2 // class main/Main
3: dup
4: invokespecial #3 // Method “”😦)V
7: astore_1
8: aload_1
9: invokespecial #4 // Method test1:()V
12: aload_1
13: invokespecial #5 // Method test2:()V
16: aload_1
17: invokevirtual #6 // Method test3:()V
20: invokestatic #7 // Method test4:()V
23: return
-
new 是创建【对象】,给对象分配堆内存,执行成功会将【对象引用】压入操作数栈
-
dup 是赋值操作数栈栈顶的内容,本例即为【对象引用】,为什么需要两份引用呢,一个是要配合
invokespecial调用该对象的构造方法"<init>":()V(会消耗掉栈顶一个引用),另一个要配合astore_1赋值给局部变量 -
成员方法与静态方法调用的另一个区别是,执行方法前是否需要【对象引用】
2-6 多态的原理
因为普通成员方法需要在运行时才能确定具体的内容,所以虚拟机需要调用invokevirtual指令
在执行invokevirtual指令时,经历了以下几个步骤
-
先通过栈帧中对象的引用找到对象
-
分析对象头,找到对象实际的Class
-
Class结构中有vtable,它在类加载的链接阶段就已经根据方法的重写规则生成好了
-
查询vtable找到方法的具体地址
-
执行方法的字节码
2-7 异常处理
(1)try-catch
public class Main {
public static void main(String[] args) {
int i = 0;
try {
i = 10;
} catch (Exception e) {
i = 20;
}
}
}
对应的字节码文件(为了抓住重点,下面的字节码省略了不重要的部分):
Code:
stack=1, locals=3, args_size=1
0: iconst_0
1: istore_1
2: bipush 10
4: istore_1
5: goto 12
8: astore_2
9: bipush 20
11: istore_1
12: return
Exception table:
from to target type
2 5 8 Class java/lang/Exception
-
可以看到多出来一个 Exception table 的结构,[from, to) 是前闭后开(也就是检测2~4行)的检测范围,一旦这个范围内的字节码执行出现异常,则通过 type 匹配异常类型,如果一致,进入 target 所指示行号
-
8行的字节码指令 astore_2 是将异常对象引用存入局部变量表的2号位置(为e)
(2)多个 single-catch 块的情况
public class Main {
public static void main(String[] args) {
int i = 0;
try {
i = 10;
} catch (ArithmeticException e) {
i = 20;
} catch (Exception e) {
i = 30;
}
}
}
对应的字节码文件:
Code:
stack=1, locals=3, args_size=1
0: iconst_0
1: istore_1
2: bipush 10
4: istore_1
5: goto 19
8: astore_2
9: bipush 20
11: istore_1
12: goto 19
15: astore_2
16: bipush 30
18: istore_1
19: return
Exception table:
from to target type
2 5 8 Class java/lang/ArithmeticException
2 5 15 Class java/lang/Exception
- 因为异常出现时,只能进入 Exception table 中一个分支,所以局部变量表 slot 2 位置被共用
(3)finally
public class Main {
public static void main(String[] args) {
int i = 0;
try {
i = 10;
} catch (Exception e) {
i = 20;
} finally {
i = 30;
}
}
}
对应的字节码文件:
Code:
stack=1, locals=4, args_size=1
0: iconst_0
1: istore_1
//try块
2: bipush 10
4: istore_1
5: bipush 30
//try块执行完后,会执行finally
7: istore_1
8: goto 27
//catch块
11: astore_2
12: bipush 20
14: istore_1
//catch块执行完,会执行finally
15: bipush 30
17: istore_1
18: goto 27
//出现异常,但未被Exception捕获,会抛出其他异常,这时也需要执行finally块中的代码
21: astore_3
22: bipush 30
24: istore_1
25: aload_3
26: athrow //抛出异常
27: return
Exception table:
from to target type
2 5 11 Class java/lang/Exception
2 5 21 any //剩余的异常类型,比如 Error
11 15 21 any //剩余的异常类型,比如 Erro
可以看到 finally 中的代码被复制了 3 份,分别放入 try 流程,catch 流程以及 catch 剩余的异常类型流程
注意:
虽然从字节码指令看来,每个块中都有finally块,但是finally块中的代码只会被执行一次
(4)finally中的return
public class Main {
public static void main(String[] args) {
int result = test();
System.out.println(result);//20
}
public static int test() {
try {
return 10;
} finally {
return 20;
}
}
}
对应的字节码文件:
Code:
stack=1, locals=2, args_size=0
0: bipush 10
2: istore_0
3: bipush 20
5: ireturn // 返回栈顶 int(20)
6: astore_1
7: bipush 20
9: ireturn // 返回栈顶 int(20)
Exception table:
from to target type
0 3 6 any
-
由于 finally 中的 ireturn 被插入了所有可能的流程,因此返回结果肯定以 finally 的为准
-
跟前一个中的 finally 相比,发现没有 athrow 了,这告诉我们:如果在 finally 中出现了 return,会吞掉异常
运行下面的代码,不会抛出异常:
public class Main {
public static void main(String[] args) {
int result = test();
System.out.println(result);
}
public static int test() {
try {
int i = 1 / 0;
return 10;
} finally {
return 20;
}
}
}
(5)finally不带return
public class Main {
public static void main(String[] args) {
int i = Main.test();
System.out.println(i);//输出为10
}
public static int test() {
int i = 10;
try {
return i;
} finally {
i = 20;
}
}
}
对应的字节码文件:
Code:
stack=1, locals=3, args_size=0
0: bipush 10
2: istore_0 //赋值给i 10
3: iload_0 //加载到操作数栈顶
4: istore_1 //加载到局部变量表的1号位置
5: bipush 20
7: istore_0 //赋值给i 20
8: iload_1 //加载局部变量表1号位置的数10到操作数栈
9: ireturn //返回操作数栈顶元素 10
10: astore_2
11: bipush 20
13: istore_0
14: aload_2 //加载异常
15: athrow //抛出异常
Exception table:
from to target type
3 5 10 any
2-8 synchronized
public class Main {
public static void main(String[] args) {
int i = 10;
Object lock = new Object();
synchronized (lock) {
System.out.println(i);
}
}
}
对应的字节码文件:
Code:
stack=2, locals=5, args_size=1
0: bipush 10
2: istore_1
3: new #2 // class java/lang/Object
6: dup
7: invokespecial #1 // Method java/lang/Object.“”😦)V
10: astore_2
11: aload_2
12: dup
13: astore_3
14: monitorenter //加锁
15: getstatic #3 // Field java/lang/System.out:Ljava/io/PrintStream;
18: iload_1
19: invokevirtual #4 // Method java/io/PrintStream.println:(I)V
22: aload_3
23: monitorexit //解锁
24: goto 34
//异常操作
27: astore 4
29: aload_3
30: monitorexit //解锁
31: aload 4
33: athrow
34: return
Exception table:
from to target type
15 24 27 any
27 31 27 any
所谓的 语法糖 ,其实就是指 java 编译器把 *.java 源码编译为 *.class 字节码的过程中,自动生成和转换的一些代码,主要是为了减轻程序员的负担,算是 java 编译器给我们的一个额外福利(给糖吃嘛)
3-1 默认构造器
public class Candy1 {
}
编译成class后的代码:
public class Candy1 {
// 这个无参构造是编译器帮助我们加上的
public Candy1() {
super(); // 即调用父类 Object 的无参构造方法,即调用 java/lang/Object.“”😦)V
}
}
3-2 自动拆装箱
这个特性是 JDK 5 开始加入的, 如下代码 :
public class Candy2 {
public static void main(String[] args) {
Integer x = 1;
int y = x;
}
}
这段代码在 JDK 5 之前是无法编译通过的,必须改写下面这样 :
public class Candy2 {
public static void main(String[] args) {
//基本类型转包装类型→装箱
Integer x = Integer.valueOf(1);
//包装类型转基本类型→拆箱
int y = x.intValue();
}
}
3-3 泛型集合取值
泛型也是在 JDK 5 开始加入的特性,但 java 在编译泛型代码后会执行泛型擦除 的动作,即泛型信息在编译为字节码之后就丢失了,实际的类型都当做了 Object 类型来处理:
public class Candy3 {
public static void main(String[] args) {
List list = new ArrayList<>();
list.add(10); // 实际调用的是 List.add(Object e)
Integer x = list.get(0); // 实际调用的是 Object obj = List.get(int index);
}
}
所以在取值时,编译器真正生成的字节码中,还要额外做一个类型转换的操作:
// 需要将 Object 转为 Integer
Integer x = (Integer)list.get(0);
如果前面的 x 变量类型修改为 int 基本类型那么最终生成的字节码是:
// 需要将 Object 转为 Integer, 并执行拆箱操作
int x = ((Integer)list.get(0)).intValue();
对应字节码:
Code:
stack=2, locals=3, args_size=1
0: new #2 // class java/util/ArrayList
3: dup
4: invokespecial #3 // Method java/util/ArrayList.“”😦)V
7: astore_1
8: aload_1
9: bipush 10
11: invokestatic #4 // Method java/lang/Integer.valueOf:(I)Ljava/lang/Integer;
//这里进行了泛型擦除,实际调用的是add(Objcet o)
14: invokeinterface #5, 2 // InterfaceMethod java/util/List.add:(Ljava/lang/Object;)Z
19: pop
20: aload_1
21: iconst_0
//这里也进行了泛型擦除,实际调用的是get(Object o)
22: invokeinterface #6, 2 // InterfaceMethod java/util/List.get:(I)Ljava/lang/Object;
//这里进行了类型转换,将Object转换成了Integer
27: checkcast #7 // class java/lang/Integer
30: astore_2
31: return
3-4 可变参数
可变参数也是 JDK 5 开始加入的新特性: 例如:
public class Candy4 {
public static void foo(String… args) {
String[] array = args; // 直接赋值
System.out.println(array);
}
public static void main(String[] args) {
foo(“hello”, “world”);
}
}
可变参数 String... args 其实是一个 String[] args ,从代码中的赋值语句中就可以看出来。 同 样 java 编译器会在编译期间将上述代码变换为:
public class Candy4 {
public static void foo(String[] args) {
String[] array = args; // 直接赋值
System.out.println(array);
}
public static void main(String[] args) {
foo(new String[]{“hello”, “world”});
}
}
注意: 如果调用了 foo() 则等价代码为 foo(new String[]{}) ,创建了一个空的数组,而不会 传递 null 进去
3-5 foreach循环
仍是 JDK 5 开始引入的语法糖,数组的循环:
public class Candy5_1 {
public static void main(String[] args) {
int[] array = {1, 2, 3, 4, 5}; // 数组赋初值的简化写法也是语法糖哦
for (int e : array) {
System.out.println(e);
}
}
}
会被编译器转换为:
public class Candy5_1 {
public Candy5_1() {
}
public static void main(String[] args) {
int[] array = new int[]{1, 2, 3, 4, 5};
for(int i = 0; i < array.length; ++i) {
int e = array[i];
System.out.println(e);
}
}
}
如果是集合呢?
public class Candy5_2 {
public static void main(String[] args) {
List list = Arrays.asList(1,2,3,4,5);
for (Integer i : list) {
System.out.println(i);
}
}
}
实际被编译器转换为对迭代器的调用:
public class Candy5_2 {
public Candy5_2() {
}
public static void main(String[] args) {
List list = Arrays.asList(1, 2, 3, 4, 5);
Iterator iter = list.iterator();
while(iter.hasNext()) {
Integer e = (Integer)iter.next();
System.out.println(e);
}
}
}
注意 :foreach 循环写法,能够配合数组,以及所有实现了 Iterable 接口的集合类一起使用,其 中 Iterable 用来获取集合的迭代器( Iterator )
3-6 switch 字符串
从 JDK 7 开始,switch 可以作用于字符串和枚举类,这个功能其实也是语法糖,例如:
public class Candy6_1 {
public static void choose(String str) {
switch (str) {
case “hello”: {
System.out.println(“h”);
break;
}
case “world”: {
System.out.println(“w”);
break;
}
}
}
}
注意: switch 配合 String 和枚举使用时,变量不能为null,原因分析完语法糖转换后的代码应当自然清楚
会被编译器转换为:
public class Candy6_1 {
public Candy6_1() {
}
public static void choose(String str) {
byte x = -1;
switch(str.hashCode()) {
case 99162322: // hello 的 hashCode
if (str.equals(“hello”)) {
x = 0;
}
break;
case 113318802: // world 的 hashCode
if (str.equals(“world”)) {
x = 1;
}
}
switch(x) {
case 0:
System.out.println(“h”);
break;
case 1:
System.out.println(“w”);
}
}
}
以看到,执行了两遍 switch,第一遍是根据字符串的 hashCode 和 equals 将字符串的转换为相应 byte 类型,第二遍才是利用 byte 执行进行比较。
问:为什么第一遍时必须既比较 hashCode,又利用 equals 比较呢?hashCode 是为了提高效率,减少可能的比较;而 equals 是为了防止 hashCode 冲突。
例如
BM和C.这两个字符串的hashCode值都是 2123 ,如果有如下代码:
public class Candy6_1 {
public static void choose(String str) {
switch (str) {
case “BM”: {
System.out.println(“h”);
break;
}
case “C.”: {
System.out.println(“w”);
break;
}
}
}
}
会被编译器转换为:
public class Candy6_1 {
public Candy6_1() {
}
public static void choose(String var0) {
byte var2 = -1;
switch(var0.hashCode()) {
case 2123:
if (var0.equals(“C.”)) {
var2 = 1;
} else if (var0.equals(“BM”)) {
var2 = 0;
}
default:
switch(var2) {
case 0:
System.out.println(“h”);
break;
case 1:
System.out.println(“w”);
}
}
}
}
3-7 switch 枚举
public enum Sex {
MALE,FEMALE
}
public class Candy7 {
public static void foo(Sex sex){
switch (sex){
case MALE:
System.out.println(“男”);
break;
case FEMALE:
System.out.println(“女”);
break;
}
}
}
会被编译器转换为:
最后
笔者已经把面试题和答案整理成了面试专题文档
162322: // hello 的 hashCode
if (str.equals(“hello”)) {
x = 0;
}
break;
case 113318802: // world 的 hashCode
if (str.equals(“world”)) {
x = 1;
}
}
switch(x) {
case 0:
System.out.println(“h”);
break;
case 1:
System.out.println(“w”);
}
}
}
以看到,执行了两遍 switch,第一遍是根据字符串的 hashCode 和 equals 将字符串的转换为相应 byte 类型,第二遍才是利用 byte 执行进行比较。
问:为什么第一遍时必须既比较 hashCode,又利用 equals 比较呢?hashCode 是为了提高效率,减少可能的比较;而 equals 是为了防止 hashCode 冲突。
例如
BM和C.这两个字符串的hashCode值都是 2123 ,如果有如下代码:
public class Candy6_1 {
public static void choose(String str) {
switch (str) {
case “BM”: {
System.out.println(“h”);
break;
}
case “C.”: {
System.out.println(“w”);
break;
}
}
}
}
会被编译器转换为:
public class Candy6_1 {
public Candy6_1() {
}
public static void choose(String var0) {
byte var2 = -1;
switch(var0.hashCode()) {
case 2123:
if (var0.equals(“C.”)) {
var2 = 1;
} else if (var0.equals(“BM”)) {
var2 = 0;
}
default:
switch(var2) {
case 0:
System.out.println(“h”);
break;
case 1:
System.out.println(“w”);
}
}
}
}
3-7 switch 枚举
public enum Sex {
MALE,FEMALE
}
public class Candy7 {
public static void foo(Sex sex){
switch (sex){
case MALE:
System.out.println(“男”);
break;
case FEMALE:
System.out.println(“女”);
break;
}
}
}
会被编译器转换为:
最后
笔者已经把面试题和答案整理成了面试专题文档
[外链图片转存中…(img-BO2hS6dw-1715654906855)]
[外链图片转存中…(img-O0lOB1hy-1715654906855)]
[外链图片转存中…(img-M5JgFrhx-1715654906856)]
[外链图片转存中…(img-9CO35K36-1715654906856)]
[外链图片转存中…(img-MXJAyGKp-1715654906857)]
[外链图片转存中…(img-rlihQ282-1715654906857)]


 162
162

 被折叠的 条评论
为什么被折叠?
被折叠的 条评论
为什么被折叠?
 到【灌水乐园】发言


