


前言
本篇博客是基于软件工程的作业,和同学合作共同完成小米便签的部署,以及遇到的一些问题。
一.软件的安装
我下载的Android Studio的版本是2024.2.1,SDK版本为API 24,Gradle版本为8.9。首先在Android Studio官网找到对应版本进行下载,
二.下载小米便签项目源码
1.我们先从github上的开源代码仓库上下载小米便签的源码包。下载地址:https://codeload.github.com/MiCode/Notes/zip/master ,然后将下载的zip包进行解压提取出来。
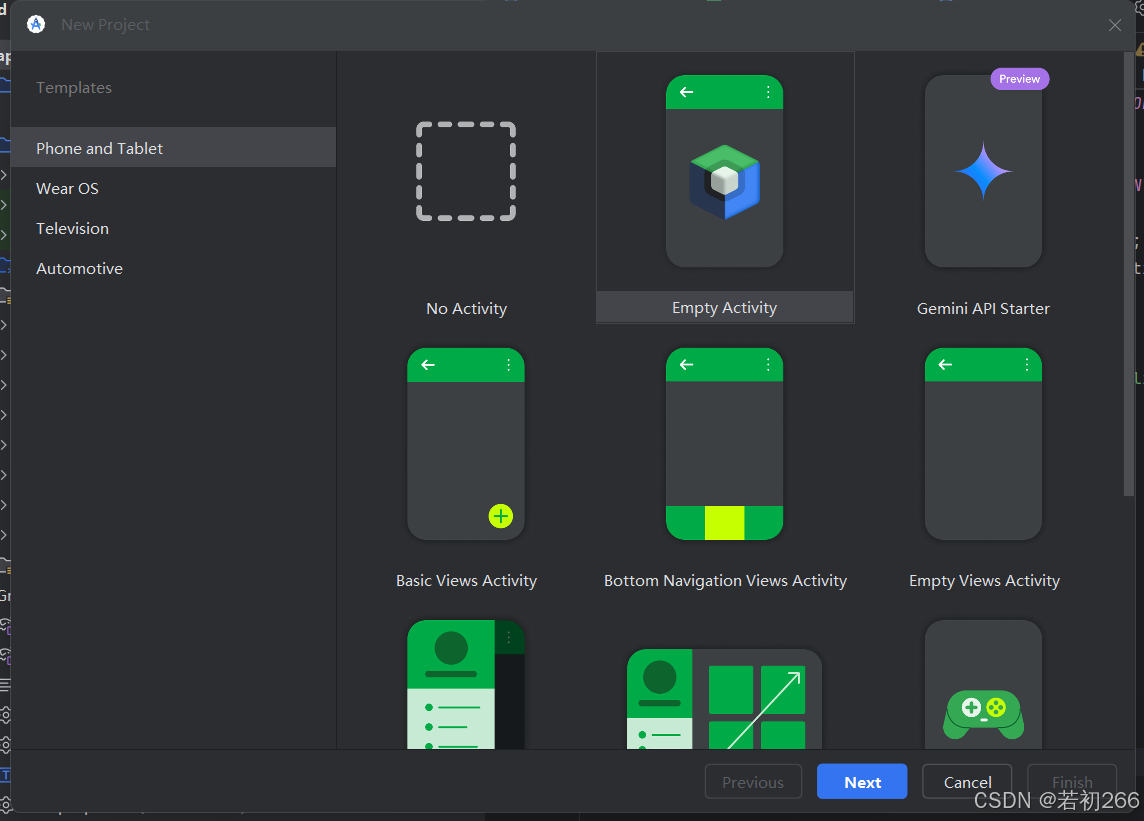
2.建立空项目
选择New Project,选择Empty Views Activity,新建一个空项目:
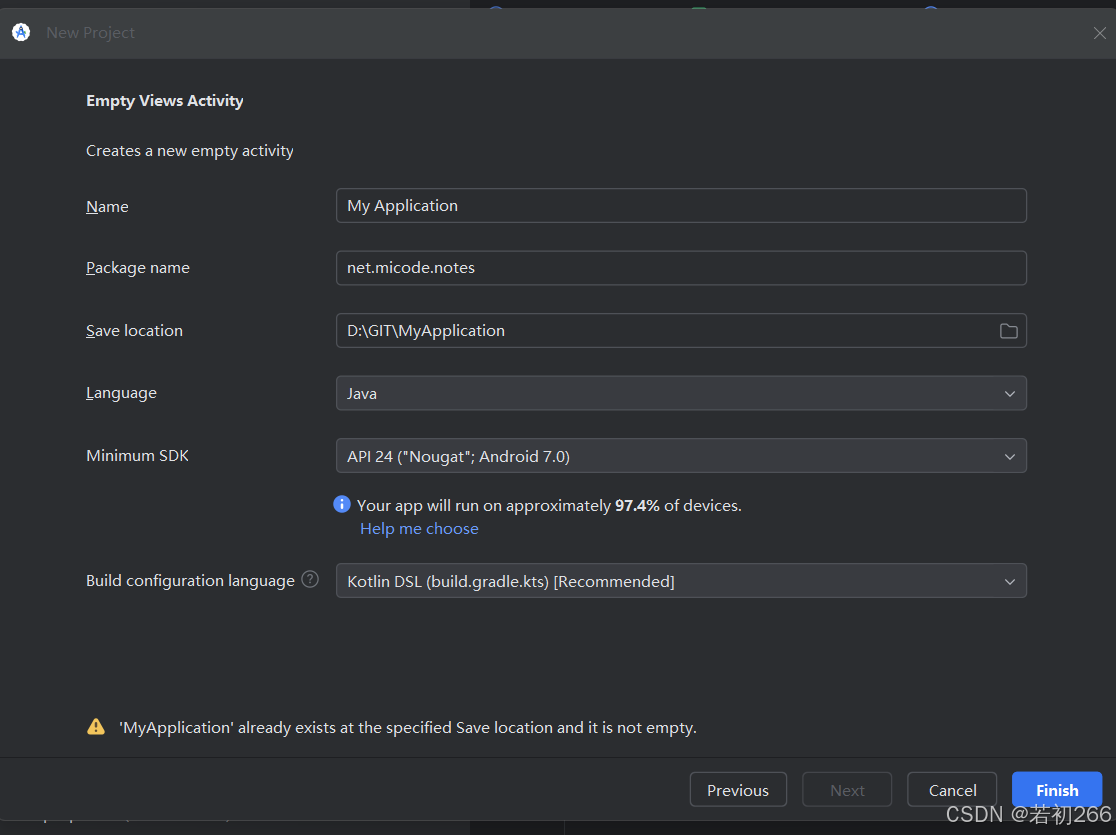
修改如下配置,注意包名为net.micode.notes,因为原项目的开发语言是用Java的,故我们Language也选择Java:
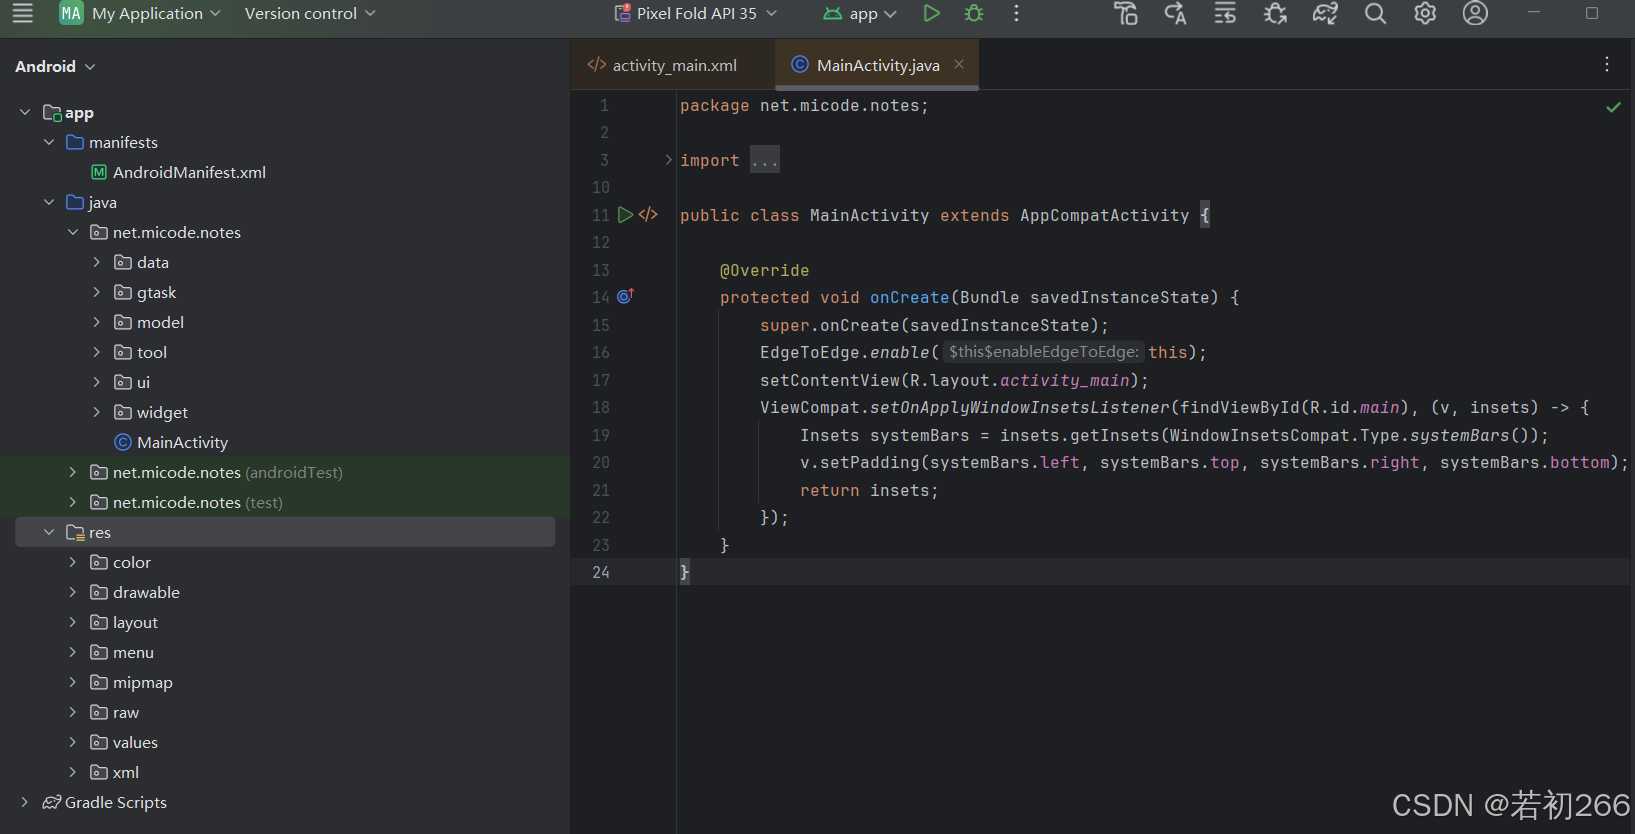
然后新建的项目如下
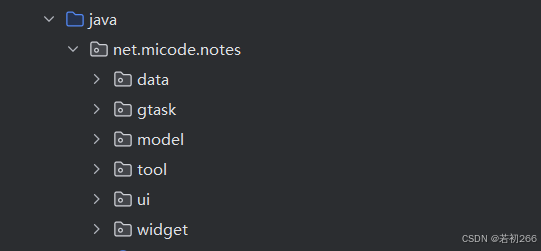
三.将源码对应的文件复制到 Android 项目的对应目录及文件下
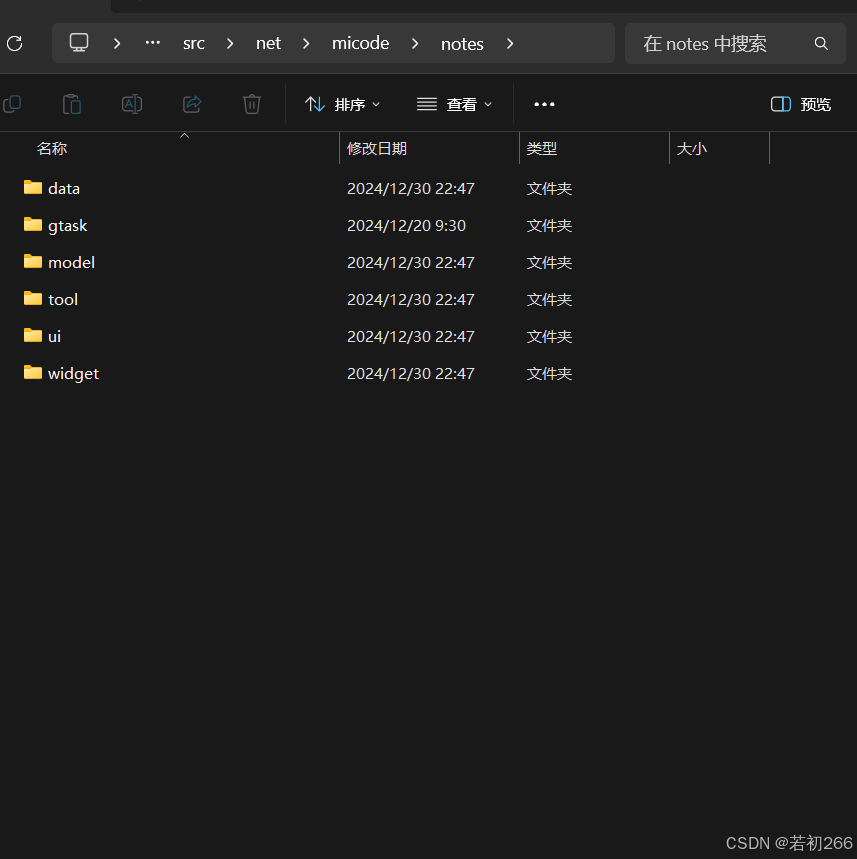
1、首先把项目 Notes-master\src\net\micode\notes 下的包全部导入 Android Studio 的 net\micode\notes 下
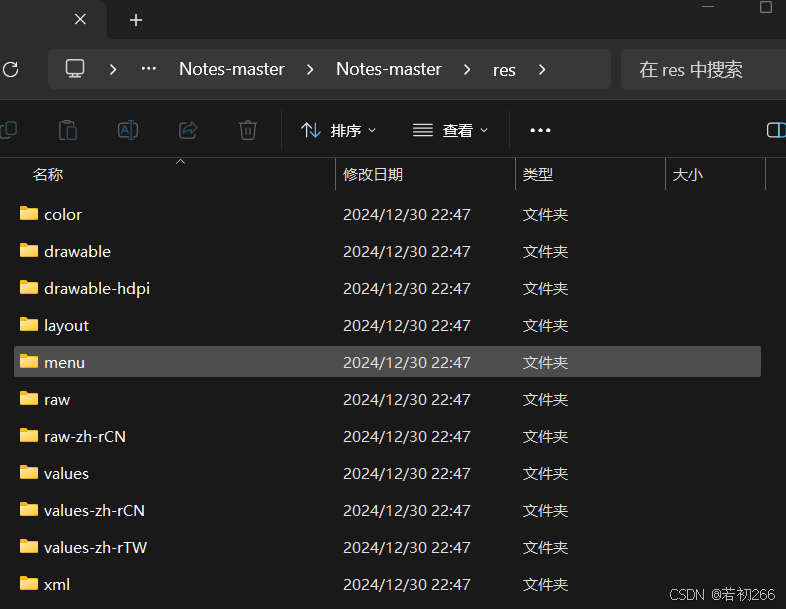
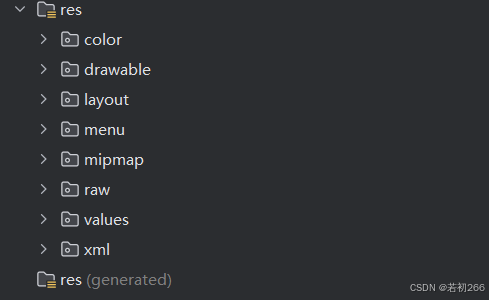
2.把 Notes-master\res 目录下的包全部导入 Android Studio 的 res 中:
将以下代码导入到AndroidManifest.xml文件中:
<?xml version="1.0" encoding="utf-8"?>
<manifest xmlns:android="http://schemas.android.com/apk/res/android"
    xmlns:tools="http://schemas.android.com/tools">

    <uses-permission android:name="android.permission.WRITE_EXTERNAL_STORAGE" />
    <uses-permission android:name="com.android.launcher.permission.INSTALL_SHORTCUT" />
    <uses-permission android:name="android.permission.INTERNET" />
    <uses-permission android:name="android.permission.READ_CONTACTS" />
    <uses-permission android:name="android.permission.MANAGE_ACCOUNTS" />
    <uses-permission android:name="android.permission.AUTHENTICATE_ACCOUNTS" />
    <uses-permission android:name="android.permission.GET_ACCOUNTS" />
    <uses-permission android:name="android.permission.USE_CREDENTIALS" />
    <uses-permission android:name="android.permission.RECEIVE_BOOT_COMPLETED" />

    <application
        android:allowBackup="true"
        android:dataExtractionRules="@xml/data_extraction_rules"
        android:fullBackupContent="@xml/backup_rules"
        android:icon="@mipmap/ic_launcher"
        android:label="@string/app_name"
        android:roundIcon="@mipmap/ic_launcher_round"
        android:supportsRtl="true"
        android:theme="@style/Theme.Notesmaster"
        tools:targetApi="31">

        <activity
            android:name=".ui.NotesListActivity"
            android:configChanges="keyboardHidden|orientation|screenSize"
            android:label="@string/app_name"
            android:launchMode="singleTop"
            android:theme="@style/NoteTheme"
            android:uiOptions="splitActionBarWhenNarrow"
            android:windowSoftInputMode="adjustPan"
            android:exported="true">

            <intent-filter>
                <action android:name="android.intent.action.MAIN" />
                <category android:name="android.intent.category.LAUNCHER" />
            </intent-filter>
        </activity>

        <activity
            android:name=".ui.NoteEditActivity"
            android:configChanges="keyboardHidden|orientation|screenSize"
            android:launchMode="singleTop"
            android:theme="@style/NoteTheme"
            android:exported="true">

            <intent-filter>
                <action android:name="android.intent.action.VIEW" />
                <category android:name="android.intent.category.DEFAULT" />
                <data android:mimeType="vnd.android.cursor.item/text_note" />
                <data android:mimeType="vnd.android.cursor.item/call_note" />
            </intent-filter>

            <intent-filter>
                <action android:name="android.intent.action.INSERT_OR_EDIT" />
                <category android:name="android.intent.category.DEFAULT" />
                <data android:mimeType="vnd.android.cursor.item/text_note" />
                <data android:mimeType="vnd.android.cursor.item/call_note" />
            </intent-filter>

            <intent-filter>
                <action android:name="android.intent.action.SEARCH" />
                <category android:name="android.intent.category.DEFAULT" />
            </intent-filter>

            <meta-data
                android:name="android.app.searchable"
                android:resource="@xml/searchable" />
        </activity>


        <provider
            android:name="net.micode.notes.data.NotesProvider"
            android:authorities="micode_notes"
            android:multiprocess="true" />

        <receiver
            android:name=".widget.NoteWidgetProvider_2x"
            android:label="@string/app_widget2x2"
            android:exported="true">
            <intent-filter>
                <action android:name="android.appwidget.action.APPWIDGET_UPDATE" />
                <action android:name="android.appwidget.action.APPWIDGET_DELETED" />
                <action android:name="android.intent.action.PRIVACY_MODE_CHANGED" />
            </intent-filter>

            <meta-data
                android:name="android.appwidget.provider"
                android:resource="@xml/widget_2x_info" />
        </receiver>
        <receiver
            android:name=".widget.NoteWidgetProvider_4x"
            android:label="@string/app_widget4x4"
            android:exported="true">

            <intent-filter>
                <action android:name="android.appwidget.action.APPWIDGET_UPDATE" />
                <action android:name="android.appwidget.action.APPWIDGET_DELETED" />
                <action android:name="android.intent.action.PRIVACY_MODE_CHANGED" />
            </intent-filter>

            <meta-data
                android:name="android.appwidget.provider"
                android:resource="@xml/widget_4x_info" />
        </receiver>

        <receiver android:name=".ui.AlarmInitReceiver"
            android:exported="true">
            <intent-filter>
                <action android:name="android.intent.action.BOOT_COMPLETED" />
            </intent-filter>
        </receiver>

        <receiver
            android:name="net.micode.notes.ui.AlarmReceiver"
            android:process=":remote" >
        </receiver>

        <activity
            android:name=".ui.AlarmAlertActivity"
            android:label="@string/app_name"
            android:launchMode="singleInstance"
            android:theme="@android:style/Theme.Holo.Wallpaper.NoTitleBar" >
        </activity>

        <activity
            android:name="net.micode.notes.ui.NotesPreferenceActivity"
            android:label="@string/preferences_title"
            android:launchMode="singleTop"
            android:theme="@android:style/Theme.Holo.Light" >
        </activity>

        <service
            android:name="net.micode.notes.gtask.remote.GTaskSyncService"
            android:exported="false" >
        </service>

        <meta-data
            android:name="android.app.default_searchable"
            android:value=".ui.NoteEditActivity" />

        <!--        <activity-->
        <!--            android:name=".MainActivity"-->
        <!--            android:exported="true">-->
        <!--            <intent-filter>-->
        <!--                <action android:name="android.intent.action.MAIN" />-->

        <!--                <category android:name="android.intent.category.LAUNCHER" />-->
        <!--            </intent-filter>-->
        <!--        </activity>-->

    </application>

</manifest>
错误一:错误提示乱码
双击shift,然后搜索vmoption,然后点击Edit Custom VM Options...

然后最末尾补充如下代码:-Dfile.encoding=UTF-8:
重新启动项目,然后点击绿色的小锤子,就可以看见报错信息用中文表示了:

下载依赖
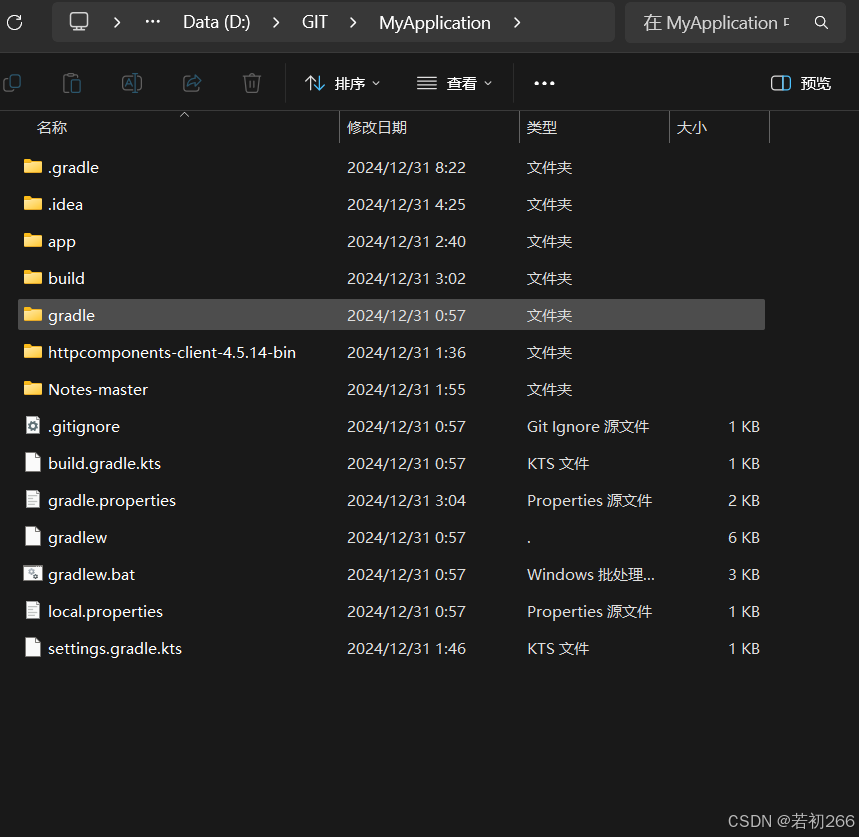
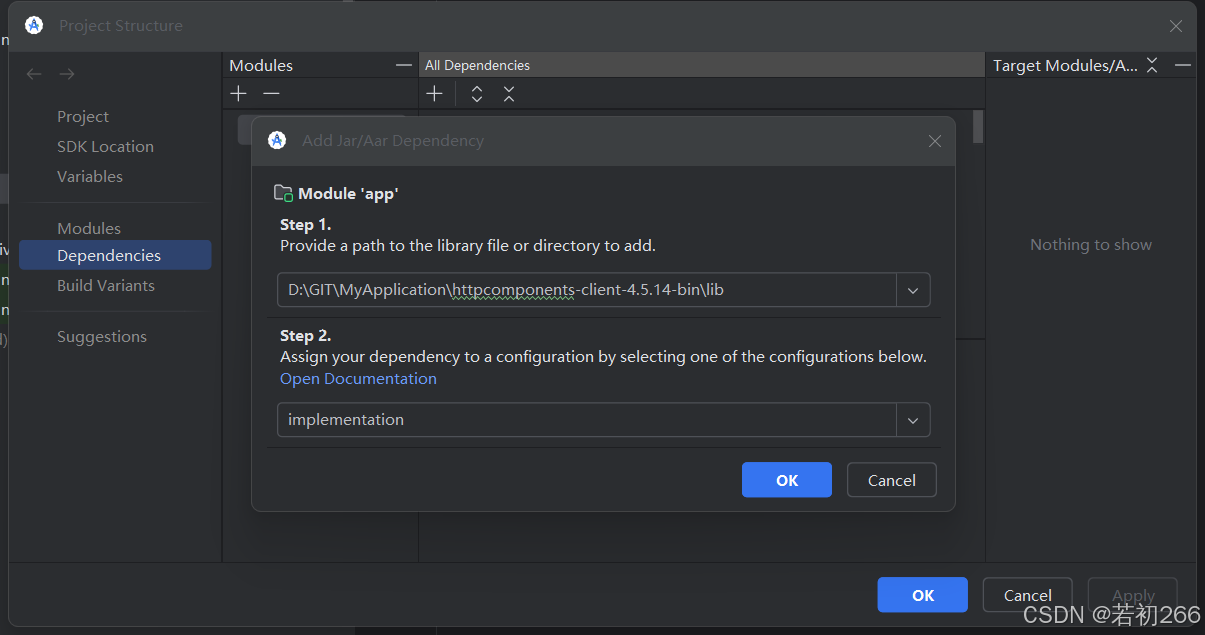
源码依赖于一个httpcomponents-client组件,以执行网络服务,这里我们需要去下载依赖:
下载链接:
https://dlcdn.apache.org//httpcomponents/httpclient/binary/httpcomponents-client-4.5.14-bin.zip
然后我们把下载好后的zip包解压并放在如下目录:
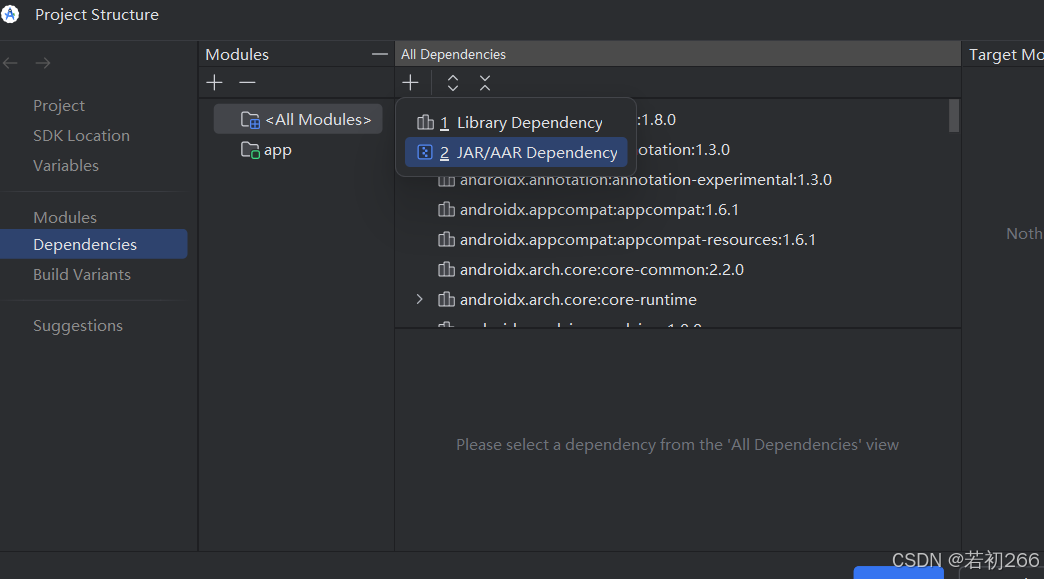
在 Android Studio 中导入依赖:
选择File -> Project Structure -> All Dependencies -> +
这里我们填绝对路径,我的下载路径:"D:\GIT\MyApplication\httpcomponents-client-4.5.14-bin\lib"
错误二:找不到符号 notification.setLatestEventInfo...
注释如下代码
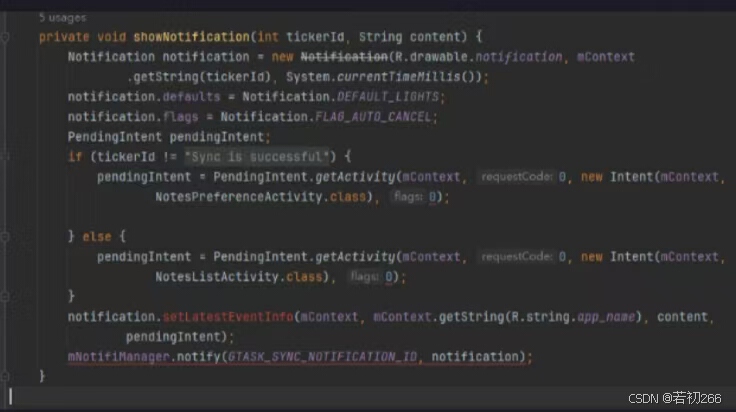
修改为:
private void showNotification(int tickerId, String content) {
        PendingIntent pendingIntent;
        if (tickerId != R.string.ticker_success) {
            pendingIntent = PendingIntent.getActivity(mContext, 0, new Intent(mContext,
                    NotesPreferenceActivity.class), PendingIntent.FLAG_IMMUTABLE);
        } else {
            pendingIntent = PendingIntent.getActivity(mContext, 0, new Intent(mContext,
                    NotesListActivity.class), PendingIntent.FLAG_IMMUTABLE);
        }
        Notification.Builder builder = new Notification.Builder(mContext)
                .setAutoCancel(true)
                .setContentTitle(mContext.getString(R.string.app_name))
                .setContentText(content)
                .setContentIntent(pendingIntent)
                .setWhen(System.currentTimeMillis())
                .setOngoing(true);
        Notification notification=builder.getNotification();
        mNotifiManager.notify(GTASK_SYNC_NOTIFICATION_ID, notification);
    }
错误三:需要常量表达式

解决办法:在gradle.properties加入如下代码即可解决

错误四: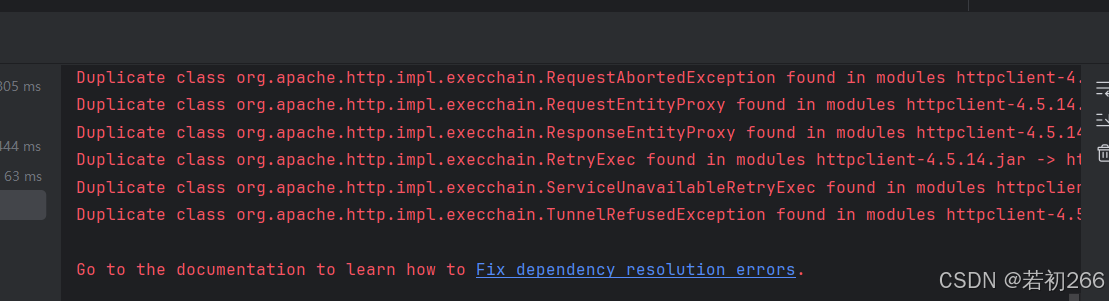
导入的依赖包有问题,在build.gradle里进行修改 错误五:项目构建完成后,虚拟机出不来
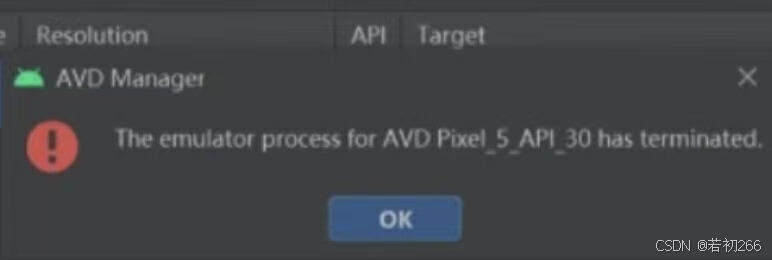
错误原因:可能是avd存放路径有中文名称,把用户名称改成中文即可解决
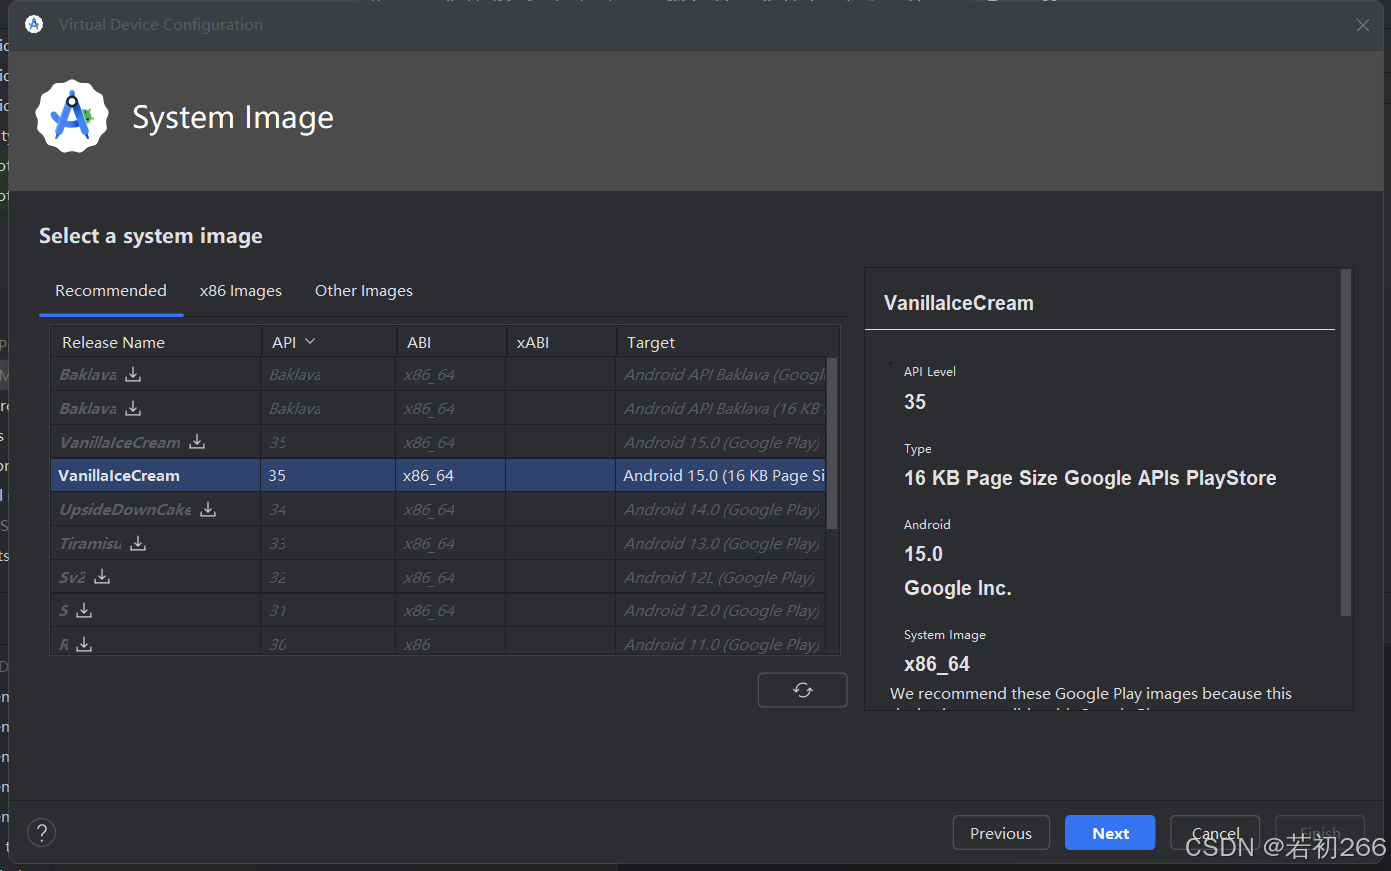
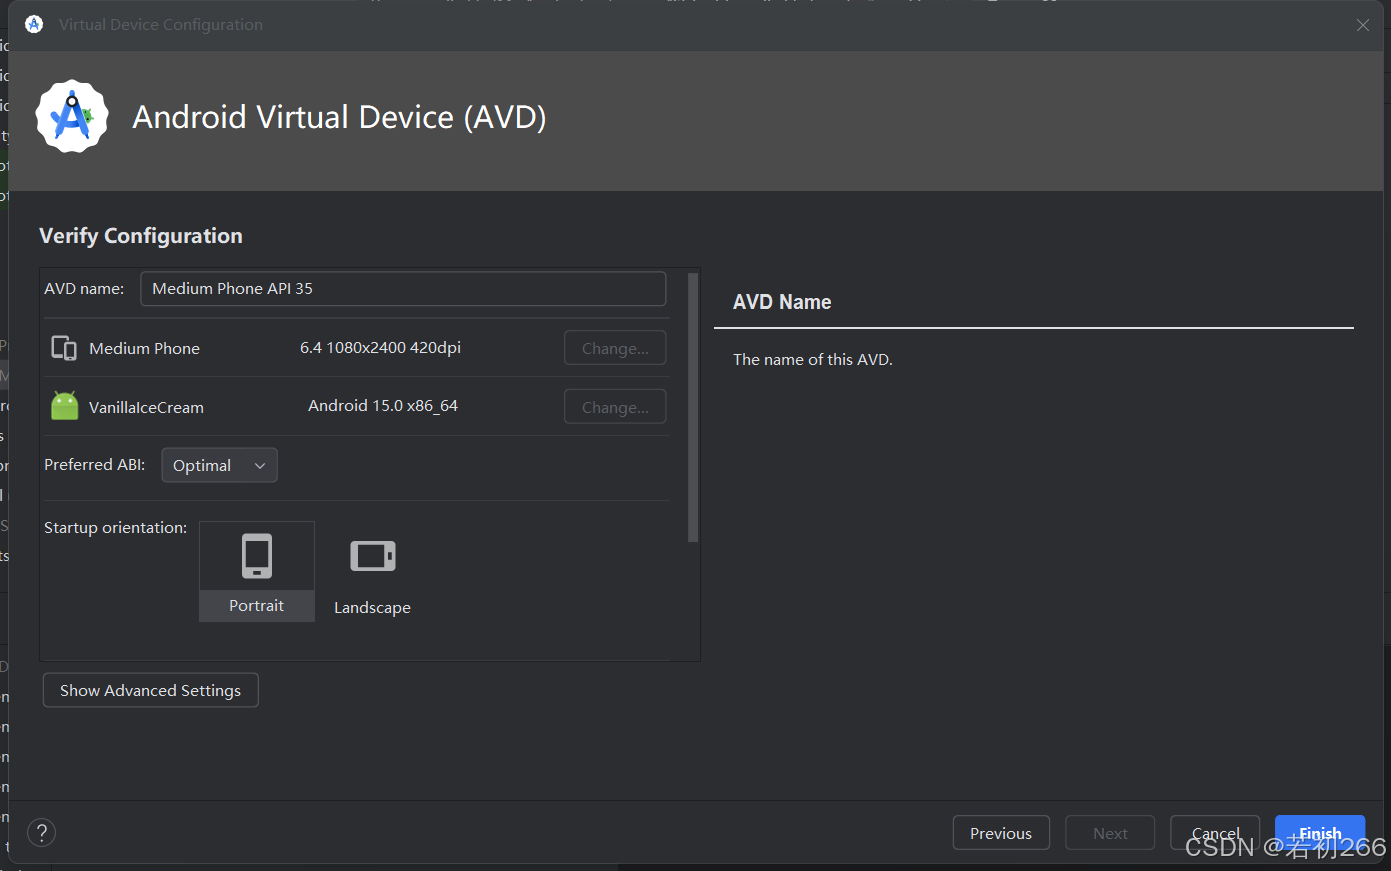
四.部署虚拟机
运行出结果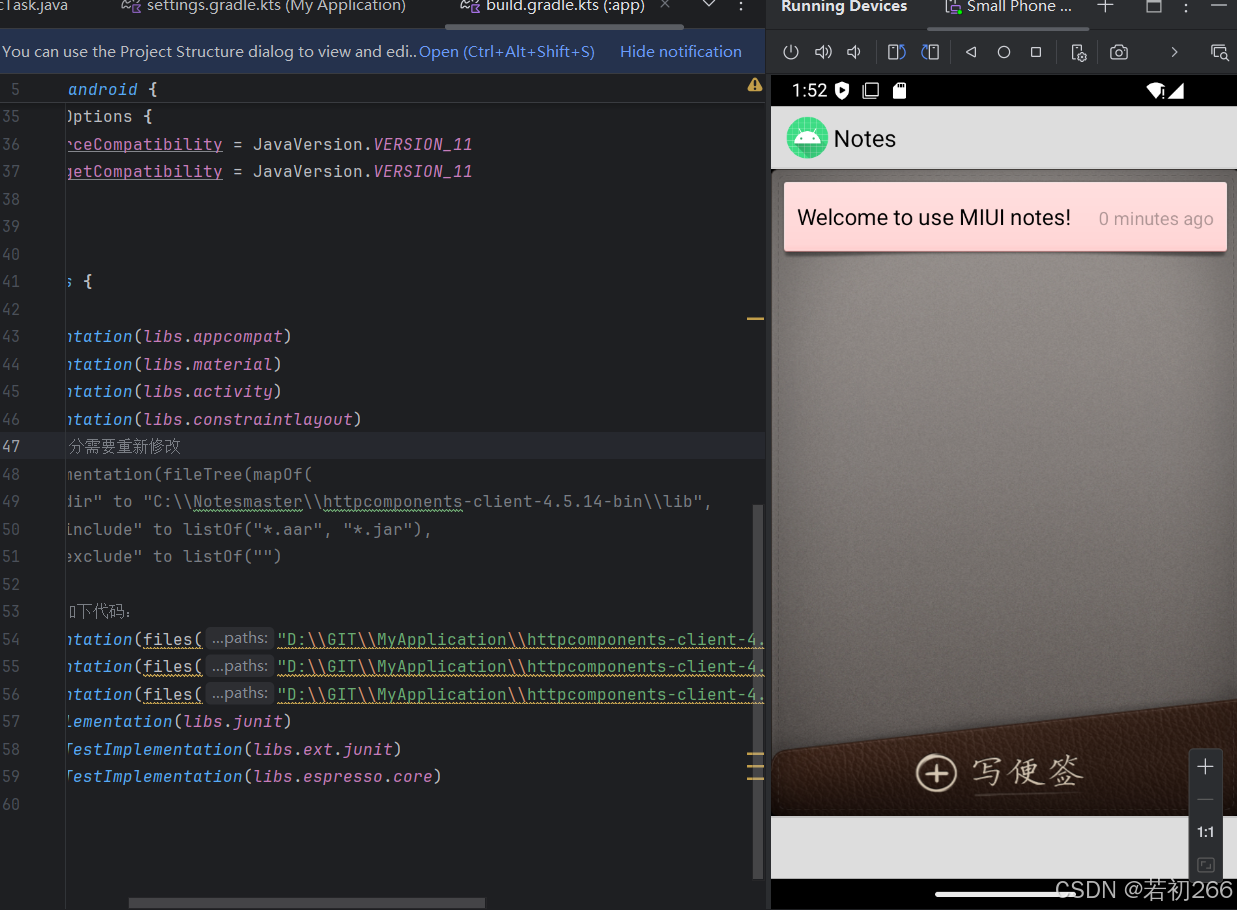


 2648
2648

 被折叠的 条评论
为什么被折叠?
被折叠的 条评论
为什么被折叠?
 到【灌水乐园】发言


