目录
原文作者为:微信公众号:若冰说css
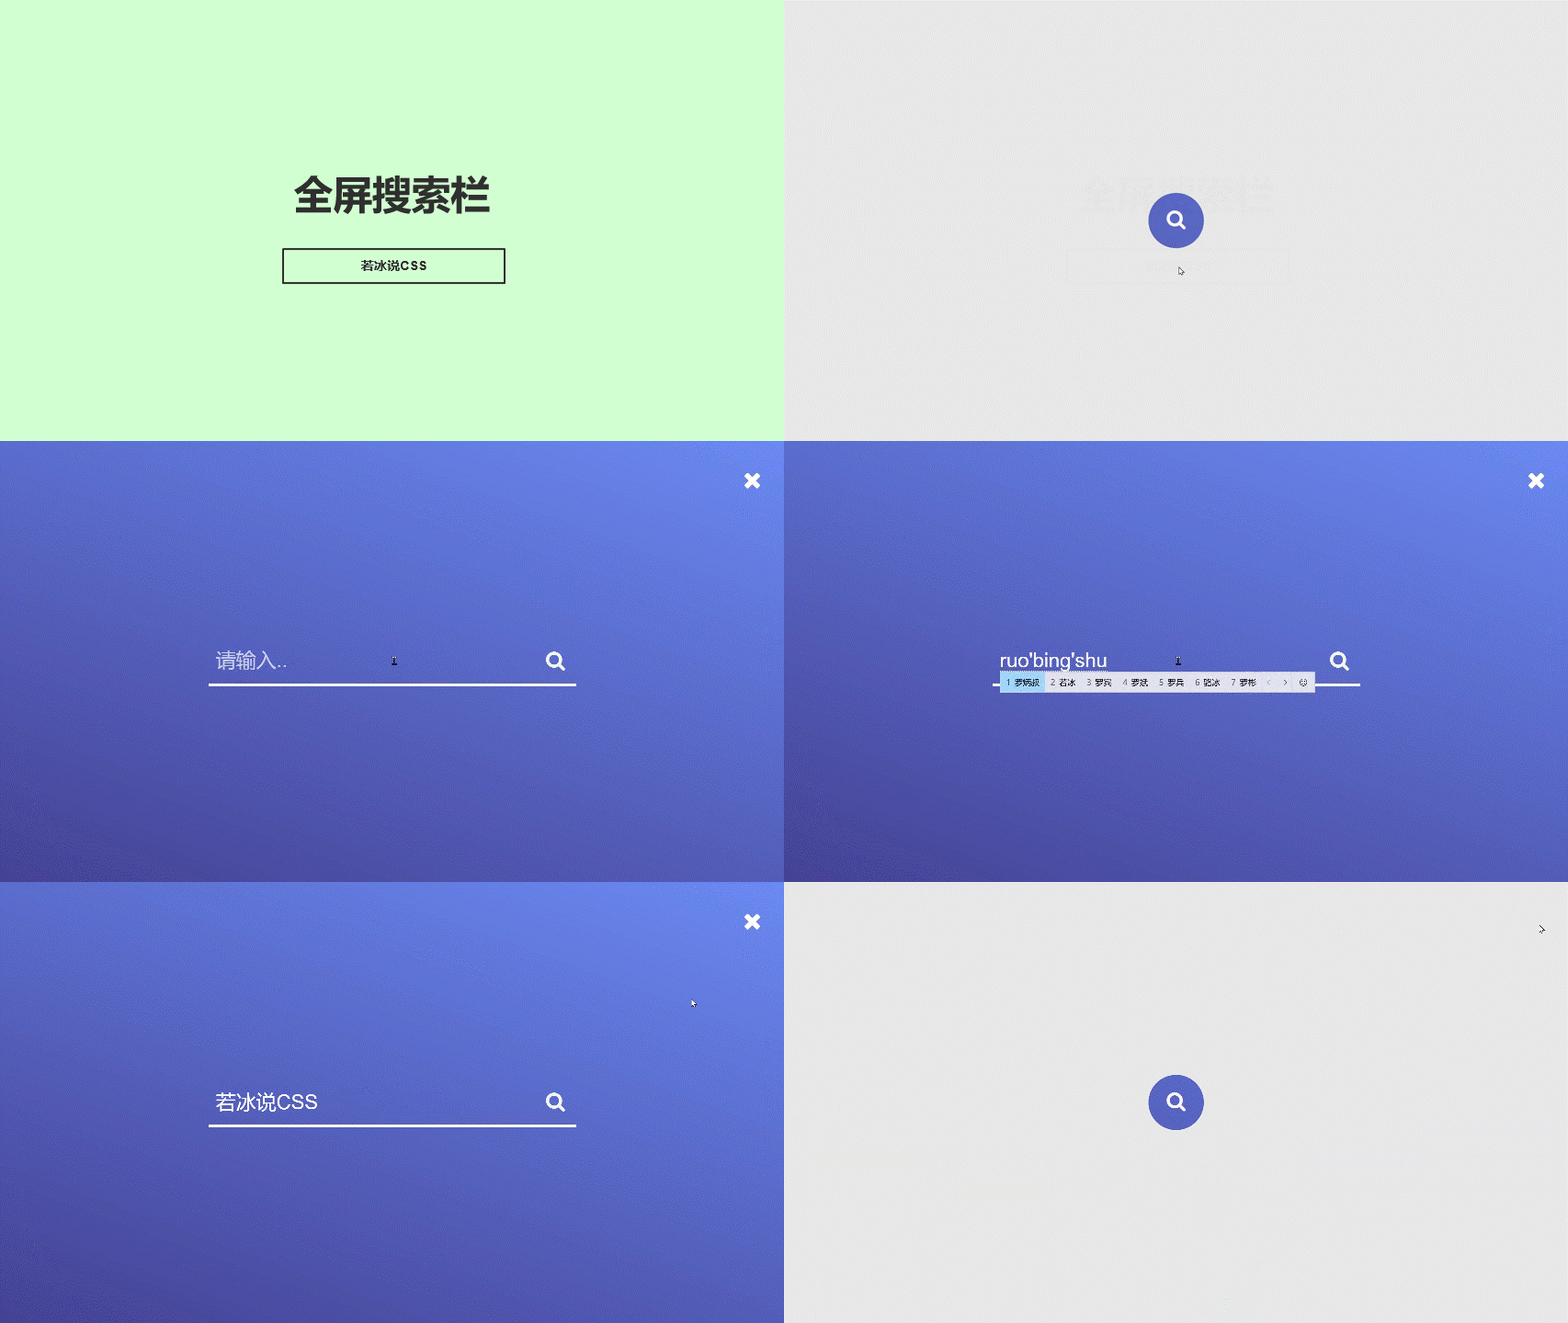
HTML+CSS 全屏搜索栏
<!DOCTYPE html>
<html lang="en">

<head>
    <meta charset="UTF-8">
    <meta name="viewport" content="width=device-width, initial-scale=1.0">
    <title>全屏搜索栏</title>
    <link href="https://cdn.bootcdn.net/ajax/libs/font-awesome/4.7.0/css/font-awesome.min.css" rel="stylesheet">
    <style>
    * {
    margin: 0;
    padding: 0;
}

body {
    height: 100vh;
    display: flex;
    justify-content: center;
    align-items: center;
    background-color: #e8e8e8;
}

.search-btn {
    position: relative;
    z-index: 1;
    width: 60px;
    height: 60px;
    line-height: 60px;
    text-align: center;
    cursor: pointer;
}

.search-btn .fa {
    color: #fff;
    font-size: 22px;
}

.close-btn {
    position: absolute;
    top: 25px;
    right: 25px;
    z-index: 1;
    font-size: 25px;
    color: #fff;
    cursor: pointer;
    display: none;
}

.container {
    position: fixed;
    width: 100%;
    height: 100%;
    display: flex;
    justify-content: center;
    align-items: center;
    background: linear-gradient(200deg, #6e86ee, #453c90);
    clip-path: circle(30px at 50% 50%);
    transition: 0.4s;
}

.search-box {
    width: 0;
    height: 50px;
    display: flex;
    border-bottom: 3px solid #fff;
    overflow: hidden;
    transition: 0.3s;
}

.search-box input {
    width: 100%;
    height: 50px;
    border: none;
    background: none;
    outline: none;
    color: #fff;
    font-size: 22px;
    text-indent: 8px;
}

.search-box input::placeholder {
    color: rgba(255, 255, 255, 0.7);
}

.search-box .fa {
    width: 50px;
    height: 50px;
    line-height: 50px;
    text-align: center;
    color: #fff;
    font-size: 22px;
    cursor: pointer;
}

#search_btn:checked~.search-btn {
    display: none;
}

#search_btn:checked~.close-btn {
    display: block;
}

#search_btn:checked~.container {
    clip-path: circle(100%);
}

#search_btn:checked~.container .search-box {
    width: 400px;
}
    </style>
</head>

<body>
    <input type="checkbox" id="search_btn" hidden>
    <label for="search_btn" class="search-btn">
        <i class="fa fa-search" aria-hidden="true"></i>
    </label>
    <label for="search_btn" class="close-btn">
        <i class="fa fa-close" aria-hidden="true"></i>
    </label>
    <div class="container">
        <div class="search-box">
            <input type="text" placeholder="请输入..">
            <i class="fa fa-search" aria-hidden="true"></i>
        </div>
    </div>
</body>

</html>
* {
margin: 0;
padding: 0;
}
body {
height: 100vh;
display: flex;
justify-content: center;
align-items: center;
background-color: #e8e8e8;
}
.search-btn {
position: relative;
z-index: 1;
width: 60px;
height: 60px;
line-height: 60px;
text-align: center;
cursor: pointer;
}
.search-btn .fa {
color: #fff;
font-size: 22px;
}
.close-btn {
position: absolute;
top: 25px;
right: 25px;
z-index: 1;
font-size: 25px;
color: #fff;
cursor: pointer;
display: none;
}
.container {
position: fixed;
width: 100%;
height: 100%;
display: flex;
justify-content: center;
align-items: center;
background: linear-gradient(200deg, #6e86ee, #453c90);
clip-path: circle(30px at 50% 50%);
transition: 0.4s;
}
.search-box {
width: 0;
height: 50px;
display: flex;
border-bottom: 3px solid #fff;
overflow: hidden;
transition: 0.3s;
}
.search-box input {
width: 100%;
height: 50px;
border: none;
background: none;
outline: none;
color: #fff;
font-size: 22px;
text-indent: 8px;
}
.search-box input::placeholder {
color: rgba(255, 255, 255, 0.7);
}
.search-box .fa {
width: 50px;
height: 50px;
line-height: 50px;
text-align: center;
color: #fff;
font-size: 22px;
cursor: pointer;
}
#search_btn:checked~.search-btn {
display: none;
}
#search_btn:checked~.close-btn {
display: block;
}
#search_btn:checked~.container {
clip-path: circle(100%);
}
#search_btn:checked~.container .search-box {
width: 400px;
}实现思路拆分
* {
    margin: 0;
    padding: 0;
}
这段代码是设置所有元素的外边距和内边距为0,以避免不同浏览器的默认样式差异。
body {
    height: 100vh;
    display: flex;
    justify-content: center;
    align-items: center;
}
这段代码是设置页面主体元素body的高度为100%的视口高度,同时使用flex布局使其子元素在水平和垂直方向上居中对齐。
.search-btn {
    position: relative;
    z-index: 1;
    width: 60px;
    height: 60px;
    line-height: 60px;
    text-align: center;
    cursor: pointer;
}
这段代码是设置搜索按钮的样式,包括相对定位、z轴层级、宽度、高度、行高、文本居中和鼠标指针样式。
.search-btn .fa {
    color: #fff;
    font-size: 22px;
}
这段代码是设置搜索按钮内部的图标样式,包括颜色和字体大小。
.close-btn {
    position: absolute;
    top: 25px;
    right: 25px;
    z-index: 1;
    font-size: 25px;
    color: #fff;
    cursor: pointer;
    display: none;
}
这段代码是设置关闭按钮的样式,包括绝对定位、上边距、右边距、z轴层级、字体大小、颜色、鼠标指针样式和初始隐藏。
.container {
    position: fixed;
    width: 100%;
    height: 100%;
    display: flex;
    justify-content: center;
    align-items: center;
    background: linear-gradient(200deg, #6e86ee, #453c90);
    clip-path: circle(30px at 50% 50%);
    transition: 0.4s;
}
这段代码是设置搜索框容器的样式,包括固定定位、宽度、高度、flex布局、水平和垂直居中对齐、背景渐变色、圆形裁剪、过渡效果。
.search-box {
    width: 0;
    height: 50px;
    display: flex;
    border-bottom: 3px solid #fff;
    overflow: hidden;
    transition: 0.3s;
}
这段代码是设置搜索框的样式,包括初始宽度为0、高度、flex布局、底部边框、溢出隐藏和过渡效果。
.search-box input {
    width: 100%;
    height: 50px;
    border: none;
    background: none;
    outline: none;
    color: #fff;
    font-size: 22px;
    text-indent: 8px;
}
这段代码是设置搜索框内部输入框的样式,包括宽度、高度、无边框、无背景、无外边框、字体颜色、字体大小和文本缩进。
.search-box input::placeholder {
    color: rgba(255, 255, 255, 0.7);
}
这段代码是设置搜索框内部输入框的占位符文本颜色。
.search-box .fa {
    width: 50px;
    height: 50px;
    line-height: 50px;
    text-align: center;
    color: #fff;
    font-size: 22px;
    cursor: pointer;
}
这段代码是设置搜索框内部图标的样式,包括宽度、高度、行高、文本居中、颜色、字体大小和鼠标指针样式。
#search_btn:checked ~ .search-btn {
    display: none;
}
这段代码是设置当搜索框被选中时,隐藏搜索按钮。
#search_btn:checked ~ .close-btn {
    display: block;
}
这段代码是设置当搜索框被选中时,显示关闭按钮。
#search_btn:checked ~ .container {
    clip-path: circle(100%);
}
这段代码是设置当搜索框被选中时,将搜索框容器的圆形裁剪半径变为100%,实现展开效果。
#search_btn:checked ~ .container .search-box {
    width: 400px;
}
这段代码是设置当搜索框被选中时,将搜索框的宽度变为400px,实现展开效果。
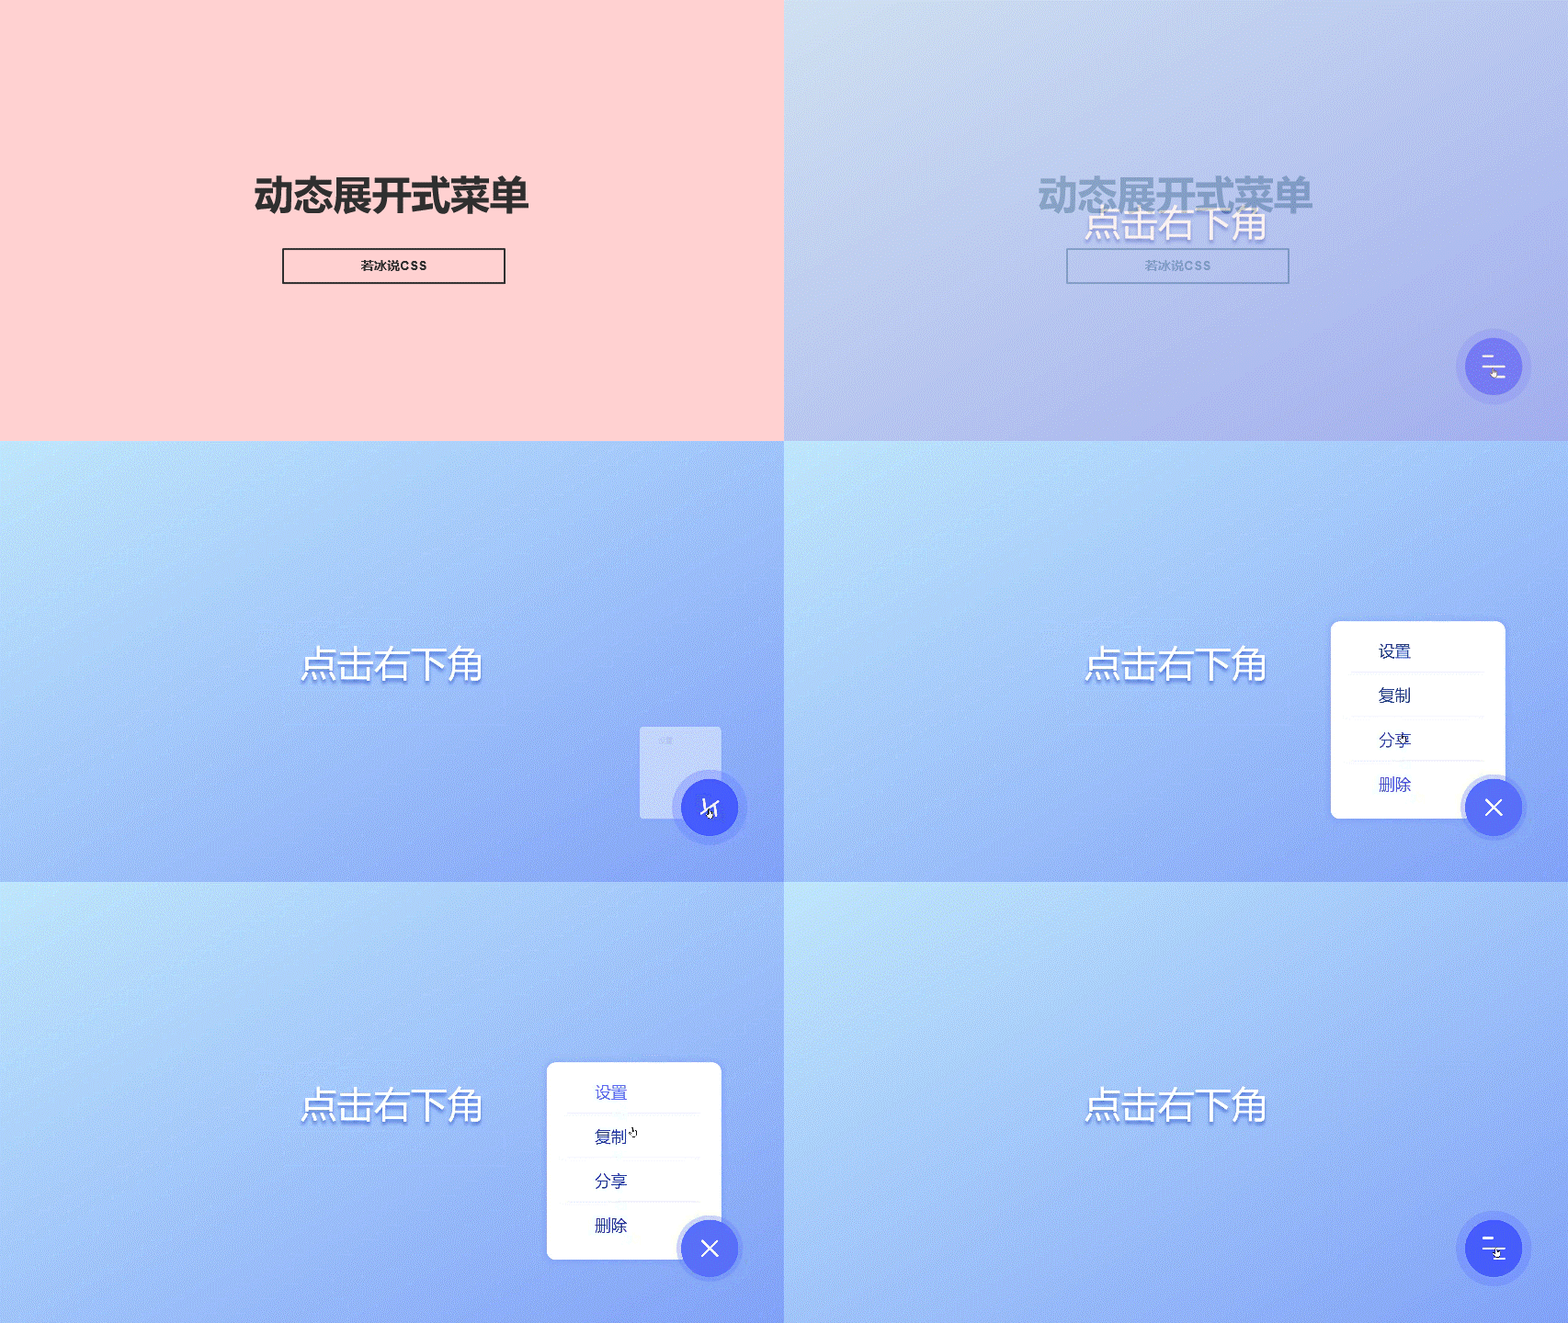
HTML+CSS+JS 动态展开式菜单
<!DOCTYPE html>
<html lang="en">

<head>
    <meta charset="UTF-8">
    <meta name="viewport" content="width=device-width, initial-scale=1.0">
    <title>动态展开式菜单</title>
    <style>
		* {
		    margin: 0;
		    padding: 0;
		}

		body {
		    height: 100vh;
		    display: flex;
		    justify-content: center;
		    align-items: center;
		    background: linear-gradient(to top left, #84a0f4, #c2e9fb);
		}

		body::before {
		    content: "点击右下角";
		    color: #fff;
		    font-size: 32px;
		    text-shadow: 0 3px 3px #4c6ed3;
		}

		.menu-box {
		    position: fixed;
		    bottom: 40px;
		    right: 40px;
		}

		.menu-button {
		    width: 50px;
		    height: 50px;
		    background-color: #5c67ff;
		    border-radius: 50%;
		    box-shadow: 0 0 0 4px rgba(92, 103, 255, 0.3);
		    color: #fff;
		    display: flex;
		    justify-content: center;
		    align-items: center;
		    position: relative;
		    z-index: 1;
		    cursor: pointer;
		    transition: 0.2s ease-in;
		}

		.menu-button:hover {
		    background-color: #4854ff;
		    box-shadow: 0 0 0 8px rgba(92, 103, 255, 0.3);
		}

		.menu-button .line-box {
		    width: 20px;
		    height: 20px;
		    display: flex;
		    flex-direction: column;
		    justify-content: space-between;
		    cursor: pointer;
		    transition: transform 0.3s ease-out;
		}

		.menu-button .line {
		    background-color: #fff;
		    width: 100%;
		    height: 2px;
		    border-radius: 2px;
		}

		.menu-button .line:first-child {
		    width: 50%;
		    transform-origin: right;
		    transition: transform 0.3s ease-in-out;
		}

		.menu-button .line:last-child {
		    width: 50%;
		    align-self: flex-end;
		    transform-origin: left;
		    transition: transform 0.3s ease-in-out;
		}

		.menu-list {
		    width: 140px;
		    height: 160px;
		    background-color: #fff;
		    border-radius: 8px;
		    list-style: none;
		    padding: 6px;
		    box-shadow: 0 0 4px 4px rgba(92, 103, 255, 0.15);
		    position: absolute;
		    right: 15px;
		    bottom: 15px;
		    opacity: 0;
		    transform: scale(0);
		    transform-origin: bottom right;
		    transition: 0.3s ease;
		    transition-delay: 0.1s;
		}

		.menu-list li {
		    display: flex;
		    align-items: center;
		    padding: 10px;
		    color: #1c3991;
		    cursor: pointer;
		    position: relative;
		    opacity: 0;
		    transform: translateX(-10px);
		    transition: 0.2s ease-in;
		}

		.menu-list li:hover {
		    color: #5c67ff;
		}

		.menu-list li::before {
		    content: "";
		    width: calc(100% - 24px);
		    height: 1px;
		    background-color: rgba(92, 103, 255, 0.1);
		    position: absolute;
		    bottom: 0;
		    left: 12px;
		}

		.menu-list li:last-child::before {
		    display: none;
		}

		.menu-list .fa {
		    font-size: 18px;
		    width: 18px;
		    height: 18px;
		    display: flex;
		    justify-content: center;
		    align-items: center;
		}

		.menu-list span {
		    font-size: 14px;
		    margin-left: 8px;
		}

		.active .line-box {
		    transform: rotate(-45deg);
		}

		.active .line-box .line:first-child {
		    transform: rotate(-90deg) translateX(1px);
		}

		.active .line-box .line:last-child {
		    transform: rotate(-90deg) translateX(-1px);
		}

		.active .menu-list {
		    opacity: 1;
		    transform: scale(1);
		}

		.active .menu-list li {
		    animation: fade-in-item 0.4s linear forwards;
		}

		.active .menu-list li:nth-child(1) {
		    animation-delay: 0.1s;
		}

		.active .menu-list li:nth-child(2) {
		    animation-delay: 0.2s;
		}

		.active .menu-list li:nth-child(3) {
		    animation-delay: 0.3s;
		}

		.active .menu-list li:nth-child(4) {
		    animation-delay: 0.4s;
		}

		@keyframes fade-in-item {
		    100% {
		        transform: translateX(0);
		        opacity: 1;
		    }
		}
	</style>
</head>

<body>
    <div class="menu-box">
        <div class="menu-button">
            <div class="line-box">
                <div class="line"></div>
                <div class="line"></div>
                <div class="line"></div>
            </div>
        </div>
        <ul class="menu-list">
            <li><i class="fa fa-sliders"></i><span>设置</span></li>
            <li><i class="fa fa-clone"></i><span>复制</span></li>
            <li><i class="fa fa-share-square-o"></i><span>分享</span></li>
            <li><i class="fa fa-trash-o"></i><span>删除</span></li>
        </ul>
    </div>
</body>

<script>
	const menu_box=document.querySelector('.menu-box');
	const menu_button=document.querySelector('.menu-button');

	menu_button.addEventListener('click',function(){
	    menu_box.classList.toggle('active');
	})
</script>

</html>
<!DOCTYPE html>
<html lang="en">

<head>
    <meta charset="UTF-8">
    <meta name="viewport" content="width=device-width, initial-scale=1.0">
    <title>动态展开式菜单</title>
    <link rel="stylesheet" href="./14-动态展开式菜单.css">
</head>

<body>
    <div class="menu-box">
        <div class="menu-button">
            <div class="line-box">
                <div class="line"></div>
                <div class="line"></div>
                <div class="line"></div>
            </div>
        </div>
        <ul class="menu-list">
            <li><i class="fa fa-sliders"></i><span>设置</span></li>
            <li><i class="fa fa-clone"></i><span>复制</span></li>
            <li><i class="fa fa-share-square-o"></i><span>分享</span></li>
            <li><i class="fa fa-trash-o"></i><span>删除</span></li>
        </ul>
    </div>
</body>

</html>

<script src="./14-动态展开式菜单.js"></script>
* {
    margin: 0;
    padding: 0;
}

body {
    height: 100vh;
    display: flex;
    justify-content: center;
    align-items: center;
    background: linear-gradient(to top left, #84a0f4, #c2e9fb);
}

body::before {
    content: "点击右下角";
    color: #fff;
    font-size: 32px;
    text-shadow: 0 3px 3px #4c6ed3;
}

.menu-box {
    position: fixed;
    bottom: 40px;
    right: 40px;
}

.menu-button {
    width: 50px;
    height: 50px;
    background-color: #5c67ff;
    border-radius: 50%;
    box-shadow: 0 0 0 4px rgba(92, 103, 255, 0.3);
    color: #fff;
    display: flex;
    justify-content: center;
    align-items: center;
    position: relative;
    z-index: 1;
    cursor: pointer;
    transition: 0.2s ease-in;
}

.menu-button:hover {
    background-color: #4854ff;
    box-shadow: 0 0 0 8px rgba(92, 103, 255, 0.3);
}

.menu-button .line-box {
    width: 20px;
    height: 20px;
    display: flex;
    flex-direction: column;
    justify-content: space-between;
    cursor: pointer;
    transition: transform 0.3s ease-out;
}

.menu-button .line {
    background-color: #fff;
    width: 100%;
    height: 2px;
    border-radius: 2px;
}

.menu-button .line:first-child {
    width: 50%;
    transform-origin: right;
    transition: transform 0.3s ease-in-out;
}

.menu-button .line:last-child {
    width: 50%;
    align-self: flex-end;
    transform-origin: left;
    transition: transform 0.3s ease-in-out;
}

.menu-list {
    width: 140px;
    height: 160px;
    background-color: #fff;
    border-radius: 8px;
    list-style: none;
    padding: 6px;
    box-shadow: 0 0 4px 4px rgba(92, 103, 255, 0.15);
    position: absolute;
    right: 15px;
    bottom: 15px;
    opacity: 0;
    transform: scale(0);
    transform-origin: bottom right;
    transition: 0.3s ease;
    transition-delay: 0.1s;
}

.menu-list li {
    display: flex;
    align-items: center;
    padding: 10px;
    color: #1c3991;
    cursor: pointer;
    position: relative;
    opacity: 0;
    transform: translateX(-10px);
    transition: 0.2s ease-in;
}

.menu-list li:hover {
    color: #5c67ff;
}

.menu-list li::before {
    content: "";
    width: calc(100% - 24px);
    height: 1px;
    background-color: rgba(92, 103, 255, 0.1);
    position: absolute;
    bottom: 0;
    left: 12px;
}

.menu-list li:last-child::before {
    display: none;
}

.menu-list .fa {
    font-size: 18px;
    width: 18px;
    height: 18px;
    display: flex;
    justify-content: center;
    align-items: center;
}

.menu-list span {
    font-size: 14px;
    margin-left: 8px;
}

.active .line-box {
    transform: rotate(-45deg);
}

.active .line-box .line:first-child {
    transform: rotate(-90deg) translateX(1px);
}

.active .line-box .line:last-child {
    transform: rotate(-90deg) translateX(-1px);
}

.active .menu-list {
    opacity: 1;
    transform: scale(1);
}

.active .menu-list li {
    animation: fade-in-item 0.4s linear forwards;
}

.active .menu-list li:nth-child(1) {
    animation-delay: 0.1s;
}

.active .menu-list li:nth-child(2) {
    animation-delay: 0.2s;
}

.active .menu-list li:nth-child(3) {
    animation-delay: 0.3s;
}

.active .menu-list li:nth-child(4) {
    animation-delay: 0.4s;
}

@keyframes fade-in-item {
    100% {
        transform: translateX(0);
        opacity: 1;
    }
}
const menu_box=document.querySelector('.menu-box');
const menu_button=document.querySelector('.menu-button');
menu_button.addEventListener('click',function(){
menu_box.classList.toggle('active');
})实现思路拆分
* {
  margin: 0;
  padding: 0;
}
这段代码是设置所有元素的外边距和内边距为0,这是为了避免不同浏览器之间的默认样式差异。
body {
  height: 100vh;
  display: flex;
  justify-content: center;
  align-items: center;
  background: linear-gradient(to top left, #84a0f4, #c2e9fb);
}
这段代码设置了body元素的高度为100vh,使其占据整个视口的高度。使用flex布局,使其内容垂直和水平居中。同时设置了一个渐变背景色。
body::before {
  content: "点击右下角";
  color: #fff;
  font-size: 32px;
  text-shadow: 0 3px 3px #4c6ed3;
}
这段代码使用伪元素before在body元素前插入一个文本节点,提示用户点击右下角的按钮。
.menu-box {
  position: fixed;
  bottom: 40px;
  right: 40px;
}
这段代码设置了一个菜单盒子的位置,固定在页面的右下角。
.menu-button {
  width: 50px;
  height: 50px;
  background-color: #5c67ff;
  border-radius: 50%;
  box-shadow: 0 0 0 4px rgba(92, 103, 255, 0.3);
  color: #fff;
  display: flex;
  justify-content: center;
  align-items: center;
  position: relative;
  z-index: 1;
  cursor: pointer;
  transition: 0.2s ease-in;
}
这段代码设置了菜单按钮的样式,包括宽度、高度、背景色、圆角、阴影、颜色、居中等。同时设置了过渡效果,使按钮的样式在鼠标悬停时有变化。
.menu-button:hover {
  background-color: #4854ff;
  box-shadow: 0 0 0 8px rgba(92, 103, 255, 0.3);
}
这段代码设置了菜单按钮在鼠标悬停时的样式,包括背景色和阴影。
.menu-button .line-box {
  width: 20px;
  height: 20px;
  display: flex;
  flex-direction: column;
  justify-content: space-between;
  cursor: pointer;
  transition: transform 0.3s ease-out;
}
这段代码设置了菜单按钮中三条横线的样式,包括宽度、高度、方向、间距、光标和过渡效果。
.menu-button .line {
  background-color: #fff;
  width: 100%;
  height: 2px;
  border-radius: 2px;
}
这段代码设置了菜单按钮中三条横线的样式,包括背景色、宽度、高度和圆角。
.menu-button .line:first-child {
  width: 50%;
  transform-origin: right;
  transition: transform 0.3s ease-in-out;
}

.menu-button .line:last-child {
  width: 50%;
  align-self: flex-end;
  transform-origin: left;
  transition: transform 0.3s ease-in-out;
}
这段代码设置了菜单按钮中第一条和第三条横线的样式,包括宽度、变换原点和过渡效果。
.menu-list {
  width: 140px;
  height: 160px;
  background-color: #fff;
  border-radius: 8px;
  list-style: none;
  padding: 6px;
  box-shadow: 0 0 4px 4px rgba(92, 103, 255, 0.15);
  position: absolute;
  right: 15px;
  bottom: 15px;
  opacity: 0;
  transform: scale(0);
  transform-origin: bottom right;
  transition: 0.3s ease;
  transition-delay: 0.1s;
}
这段代码设置了菜单列表的样式,包括宽度、高度、背景色、圆角、列表样式、内边距、阴影、位置、透明度、缩放、变换原点和过渡效果。
.menu-list li {
  display: flex;
  align-items: center;
  padding: 10px;
  color: #1c3991;
  cursor: pointer;
  position: relative;
  opacity: 0;
  transform: translateX(-10px);
  transition: 0.2s ease-in;
}
这段代码设置了菜单列表中每个选项的样式,包括布局、对齐、内边距、颜色、光标、位置、透明度、平移和过渡效果。
.menu-list li:hover {
  color: #5c67ff;
}
这段代码设置了菜单列表中每个选项在鼠标悬停时的样式,包括颜色。
.menu-list li::before {
  content: "";
  width: calc(100% - 24px);
  height: 1px;
  background-color: rgba(92, 103, 255, 0.1);
  position: absolute;
  bottom: 0;
  left: 12px;
}

.menu-list li:last-child::before {
  display: none;
}
这段代码设置了菜单列表中每个选项之间的分隔线的样式,包括内容、宽度、高度、背景色、位置和显示。
.menu-list .fa {
  font-size: 18px;
  width: 18px;
  height: 18px;
  display: flex;
  justify-content: center;
  align-items: center;
}

.menu-list span {
  font-size: 14px;
  margin-left: 8px;
}
这段代码设置了菜单列表中每个选项中图标和文字的样式,包括字体大小、宽度、高度、布局、对齐和间距。
.active .line-box {
  transform: rotate(-45deg);
}

.active .line-box .line:first-child {
  transform: rotate(-90deg) translateX(1px);
}

.active .line-box .line:last-child {
  transform: rotate(-90deg) translateX(-1px);
}

.active .menu-list {
  opacity: 1;
  transform: scale(1);
}

.active .menu-list li {
  animation: fade-in-item 0.4s linear forwards;
}

.active .menu-list li:nth-child(1) {
  animation-delay: 0.1s;
}

.active .menu-list li:nth-child(2) {
  animation-delay: 0.2s;
}

.active .menu-list li:nth-child(3) {
  animation-delay: 0.3s;
}

.active .menu-list li:nth-child(4) {
  animation-delay: 0.4s;
}
这段代码设置了菜单按钮和菜单列表在展开状态下的样式,包括菜单按钮中三条横线的变换、菜单列表的透明度和缩放、菜单列表中每个选项的动画效果和延迟时间。
@keyframes fade-in-item {
  100% {
    transform: translateX(0);
    opacity: 1;
  }
}
这段代码定义了一个动画效果,用于菜单列表中每个选项的出现,包括平移和透明度的变化。
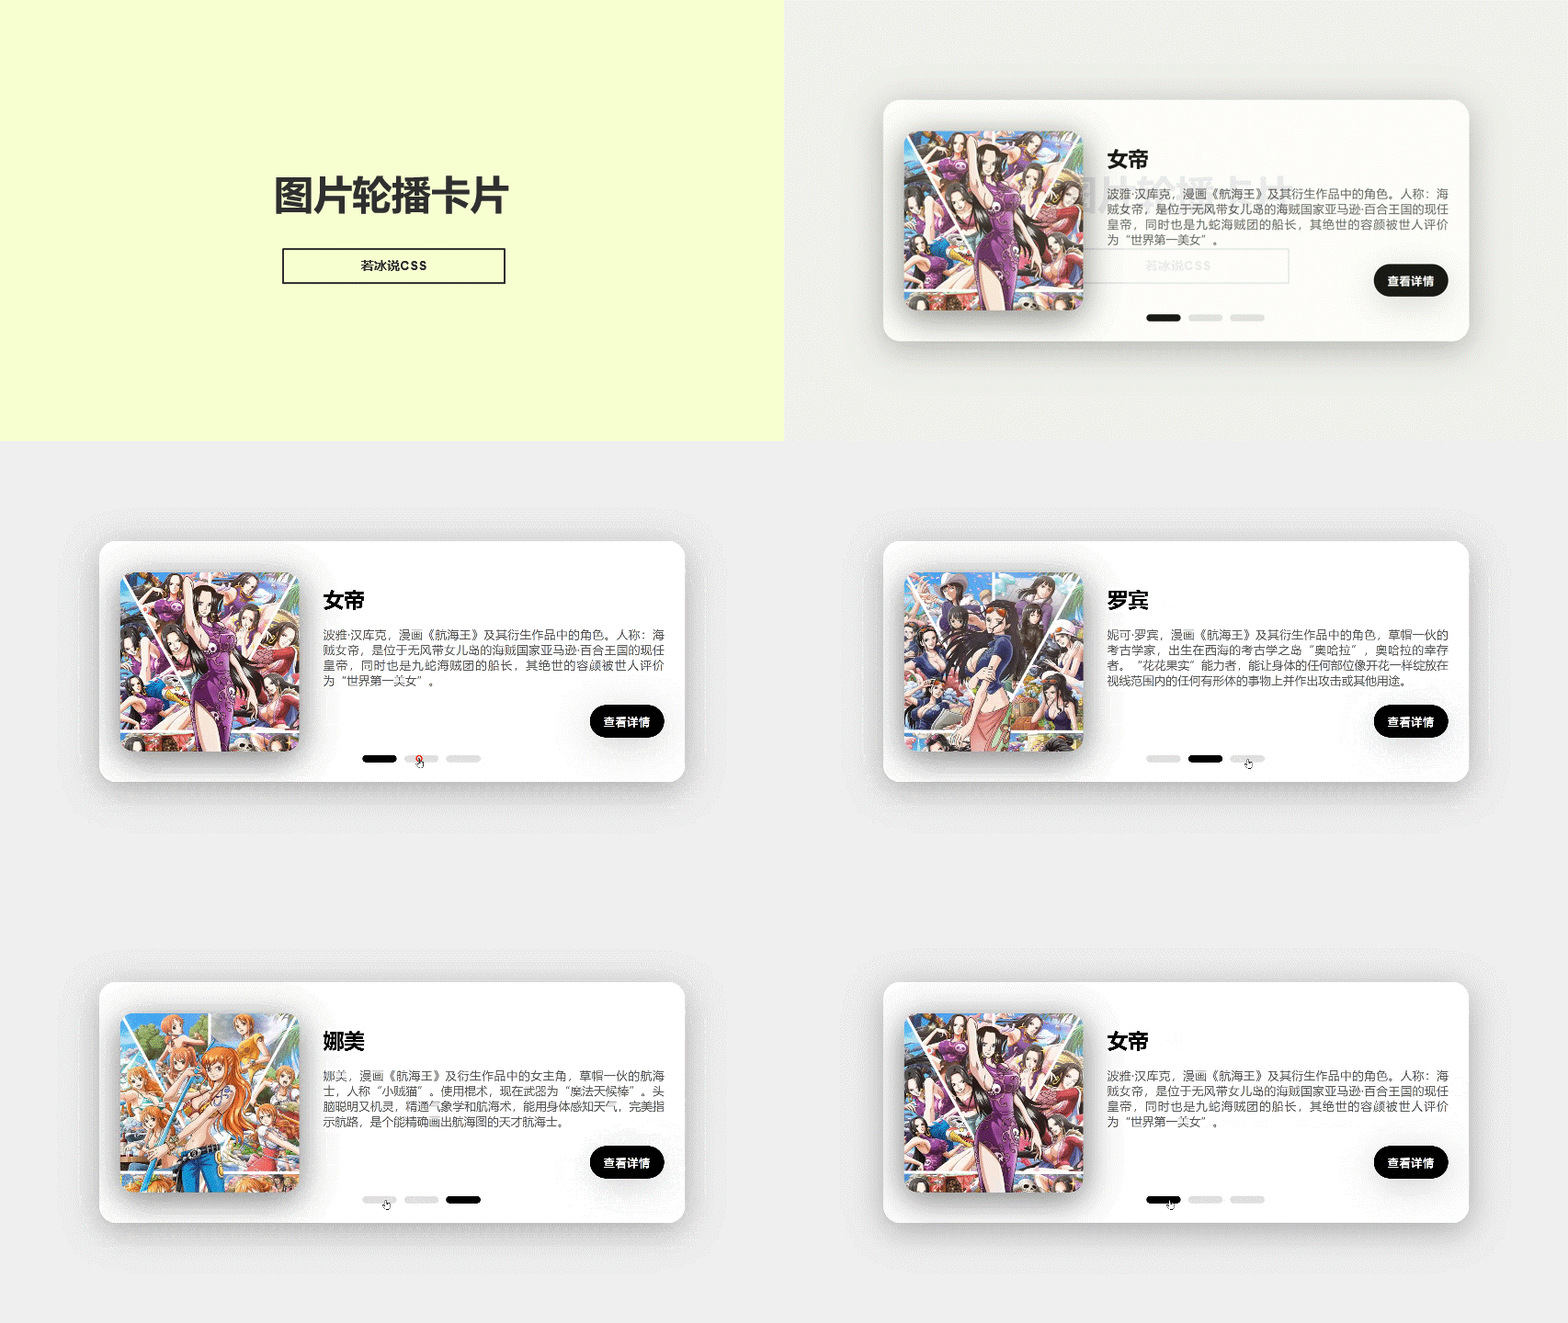
HTML+CSS 图片轮播卡片
<!DOCTYPE html>
<html lang="en">

<head>
    <meta charset="UTF-8">
    <meta name="viewport" content="width=device-width, initial-scale=1.0">
    <title>图片轮播卡片</title>
    <style>
    * {
    margin: 0;
    padding: 0;
    box-sizing: border-box;
}

body {
    height: 100vh;
    display: flex;
    justify-content: center;
    align-items: center;
    background-color: #efefef;
}

.container {
    width: 100vw;
    max-width: 850px;
    height: 350px;
    background-color: #fff;
    border-radius: 25px;
    box-shadow: 0 10px 50px rgba(0, 0, 0, 0.3);
    position: relative;
}

.card {
    display: flex;
    align-items: center;
    width: 100%;
    height: 350px;
    padding-left: 30px;
    position: absolute;
    overflow: hidden;
}

.card .img {
    width: 260px;
    height: 260px;
    border-radius: 20px;
    overflow: hidden;
    flex-shrink: 0;
    box-shadow: 0 10px 50px rgba(0, 0, 0, 0.2);
}

.card .img img {
    width: 100%;
    height: 100%;
    opacity: 0;
    transition: 0.6s;
}

#slide_1:checked ~ .card-1 img,
#slide_2:checked ~ .card-2 img,
#slide_3:checked ~ .card-3 img {
    opacity: 1;
    transition-delay: 0.2s;
}

.card .content {
    flex: 1;
    padding: 0 30px 0 35px;
    position: relative;
    left: 50px;
    opacity: 0;
    transition: 0.6s;
}

#slide_1:checked ~ .card-1 .content,
#slide_2:checked ~ .card-2 .content,
#slide_3:checked ~ .card-3 .content {
    opacity: 1;
    z-index: 9;
    left: 0;
    transition-delay: 0.3s;
}

.card .title {
    font-size: 30px;
    font-weight: 700;
    margin-bottom: 20px;
}

.card .text {
    font-size: 17px;
    color: #555;
    text-align: justify;
    margin-bottom: 25px;
}

.card a {
    padding: 13px 20px;
    background-color: #000;
    color: #fff;
    text-decoration: none;
    border-radius: 50px;
    letter-spacing: 1px;
    font-weight: 600;
    box-shadow: 0 10px 50px rgba(0, 0, 0, 0.2);
    float: right;
}

.slider {
    position: absolute;
    bottom: 25px;
    left: 55%;
    transform: translateX(-50%);
    z-index: 1;
}

.slider .slide {
    width: 50px;
    height: 10px;
    background-color: #dfdfdf;
    display: inline-flex;
    margin: 0 3px;
    border-radius: 5px;
    cursor: pointer;
    position: relative;
    overflow: hidden;
}

.slider .slide::before {
    content: "";
    width: 0%;
    height: 100%;
    background-color: #000;
    border-radius: 5px;
    position: absolute;
    left: 0;
    top: 0;
    transform: scaleX(0);
    transform-origin: left;
    transition: transform 0.6s;
}

#slide_1:checked ~ .slider .slide-1::before,
#slide_2:checked ~ .slider .slide-2::before,
#slide_3:checked ~ .slider .slide-3::before {
    width: 100%;
    transform: scaleX(1);
}
    </style>
</head>

<body>
    <div class="container">
        <input type="radio" name="select" id="slide_1" checked hidden>
        <input type="radio" name="select" id="slide_2" hidden>
        <input type="radio" name="select" id="slide_3" hidden>

        <div class="slider">
            <label for="slide_1" class="slide slide-1"></label>
            <label for="slide_2" class="slide slide-2"></label>
            <label for="slide_3" class="slide slide-3"></label>
        </div>

        <div class="card card-1">
            <div class="img">
                <img src="./images/1.jpg" alt="波雅·汉库克">
            </div>
            <div class="content">
                <div class="title">女帝</div>
                <div class="text">
                    波雅·汉库克,漫画《航海王》及其衍生作品中的角色。人称:海贼女帝,是位于无风带女儿岛的海贼国家亚马逊·百合王国的现任皇帝,同时也是九蛇海贼团的船长,其绝世的容颜被世人评价为“世界第一美女”。
                </div>
                <a href="#">查看详情</a>
            </div>
        </div>
        <div class="card card-2">
            <div class="img">
                <img src="./images/2.jpg" alt="妮可·罗宾">
            </div>
            <div class="content">
                <div class="title">罗宾</div>
                <div class="text">
                    妮可·罗宾,漫画《航海王》及其衍生作品中的角色,草帽一伙的考古学家,出生在西海的考古学之岛“奥哈拉”,奥哈拉的幸存者。“花花果实”能力者,能让身体的任何部位像开花一样绽放在视线范围内的任何有形体的事物上并作出攻击或其他用途。
                </div>
                <a href="#">查看详情</a>
            </div>
        </div>
        <div class="card card-3">
            <div class="img">
                <img src="./images/3.jpg" alt="娜美,漫画">
            </div>
            <div class="content">
                <div class="title">娜美</div>
                <div class="text">
                    娜美,漫画《航海王》及衍生作品中的女主角,草帽一伙的航海士,人称“小贼猫”。使用棍术,现在武器为“魔法天候棒”。头脑聪明又机灵,精通气象学和航海术,能用身体感知天气,完美指示航路,是个能精确画出航海图的天才航海士。
                </div>
                <a href="#">查看详情</a>
            </div>
        </div>
    </div>
</body>

</html>
* {
margin: 0;
padding: 0;
box-sizing: border-box;
}
body {
height: 100vh;
display: flex;
justify-content: center;
align-items: center;
background-color: #efefef;
}
.container {
width: 100vw;
max-width: 850px;
height: 350px;
background-color: #fff;
border-radius: 25px;
box-shadow: 0 10px 50px rgba(0, 0, 0, 0.3);
position: relative;
}
.card {
display: flex;
align-items: center;
width: 100%;
height: 350px;
padding-left: 30px;
position: absolute;
overflow: hidden;
}
.card .img {
width: 260px;
height: 260px;
border-radius: 20px;
overflow: hidden;
flex-shrink: 0;
box-shadow: 0 10px 50px rgba(0, 0, 0, 0.2);
}
.card .img img {
width: 100%;
height: 100%;
opacity: 0;
transition: 0.6s;
}
#slide_1:checked ~ .card-1 img,
#slide_2:checked ~ .card-2 img,
#slide_3:checked ~ .card-3 img {
opacity: 1;
transition-delay: 0.2s;
}
.card .content {
flex: 1;
padding: 0 30px 0 35px;
position: relative;
left: 50px;
opacity: 0;
transition: 0.6s;
}
#slide_1:checked ~ .card-1 .content,
#slide_2:checked ~ .card-2 .content,
#slide_3:checked ~ .card-3 .content {
opacity: 1;
z-index: 9;
left: 0;
transition-delay: 0.3s;
}
.card .title {
font-size: 30px;
font-weight: 700;
margin-bottom: 20px;
}
.card .text {
font-size: 17px;
color: #555;
text-align: justify;
margin-bottom: 25px;
}
.card a {
padding: 13px 20px;
background-color: #000;
color: #fff;
text-decoration: none;
border-radius: 50px;
letter-spacing: 1px;
font-weight: 600;
box-shadow: 0 10px 50px rgba(0, 0, 0, 0.2);
float: right;
}
.slider {
position: absolute;
bottom: 25px;
left: 55%;
transform: translateX(-50%);
z-index: 1;
}
.slider .slide {
width: 50px;
height: 10px;
background-color: #dfdfdf;
display: inline-flex;
margin: 0 3px;
border-radius: 5px;
cursor: pointer;
position: relative;
overflow: hidden;
}
.slider .slide::before {
content: "";
width: 0%;
height: 100%;
background-color: #000;
border-radius: 5px;
position: absolute;
left: 0;
top: 0;
transform: scaleX(0);
transform-origin: left;
transition: transform 0.6s;
}
#slide_1:checked ~ .slider .slide-1::before,
#slide_2:checked ~ .slider .slide-2::before,
#slide_3:checked ~ .slider .slide-3::before {
width: 100%;
transform: scaleX(1);
}实现思路拆分
* {
    margin: 0;
    padding: 0;
    box-sizing: border-box;
}
这段代码是设置所有元素的外边距和内边距为0,并且使用border-box盒模型。
body {
    height: 100vh;
    display: flex;
    justify-content: center;
    align-items: center;
    background-color: #efefef;
}
这段代码是设置body元素的高度为100vh,使其占据整个视口的高度。使用flex布局,使其水平和垂直居中。同时设置背景颜色为#efefef。
.container {
    width: 100vw;
    max-width: 850px;
    height: 350px;
    background-color: #fff;
    border-radius: 25px;
    box-shadow: 0 10px 50px rgba(0, 0, 0, 0.3);
    position: relative;
}
这段代码是设置卡片容器的宽度为100vw,最大宽度为850px,高度为350px。同时设置背景颜色为#fff,圆角为25px,阴影效果为0 10px 50px rgba(0, 0, 0, 0.3)。并且设置其为相对定位。
.card {
    display: flex;
    align-items: center;
    width: 100%;
    height: 350px;
    padding-left: 30px;
    position: absolute;
    overflow: hidden;
}
这段代码是设置卡片的布局方式为flex,并且使其水平和垂直居中。同时设置宽度为100%,高度为350px,左侧内边距为30px。并且设置其为绝对定位,超出容器部分隐藏。
.card .img {
    width: 260px;
    height: 260px;
    border-radius: 20px;
    overflow: hidden;
    flex-shrink: 0;
    box-shadow: 0 10px 50px rgba(0, 0, 0, 0.2);
}
这段代码是设置卡片中图片的宽度和高度为260px,圆角为20px,超出部分隐藏。同时设置flex-shrink为0,使其不缩小。并且设置阴影效果为0 10px 50px rgba(0, 0, 0, 0.2)。
.card .img img {
    width: 100%;
    height: 100%;
    opacity: 0;
    transition: 0.6s;
}
这段代码是设置图片的宽度和高度为100%,透明度为0,过渡效果为0.6s。
#slide_1:checked ~ .card-1 img,
#slide_2:checked ~ .card-2 img,
#slide_3:checked ~ .card-3 img {
    opacity: 1;
    transition-delay: 0.2s;
}
这段代码是设置当滑动条选中第1个、第2个或第3个时,对应的图片透明度为1,过渡延迟为0.2s。
.card .content {
    flex: 1;
    padding: 0 30px 0 35px;
    position: relative;
    left: 50px;
    opacity: 0;
    transition: 0.6s;
}
这段代码是设置卡片中内容区域的布局方式为flex,并且占据剩余空间。同时设置左右内边距为30px和35px,相对定位,左侧偏移50px,透明度为0,过渡效果为0.6s。
#slide_1:checked ~ .card-1 .content,
#slide_2:checked ~ .card-2 .content,
#slide_3:checked ~ .card-3 .content {
    opacity: 1;
    z-index: 9;
    left: 0;
    transition-delay: 0.3s;
}
这段代码是设置当滑动条选中第1个、第2个或第3个时,对应的内容区域透明度为1,z-index为9,左侧偏移为0,过渡延迟为0.3s。
.card .title {
    font-size: 30px;
    font-weight: 700;
    margin-bottom: 20px;
}
这段代码是设置标题的字体大小为30px,字体粗细为700,下方外边距为20px。
.card .text {
    font-size: 17px;
    color: #555;
    text-align: justify;
    margin-bottom: 25px;
}
这段代码是设置文本的字体大小为17px,颜色为#555,文本对齐方式为两端对齐,下方外边距为25px。
.card a {
    padding: 13px 20px;
    background-color: #000;
    color: #fff;
    text-decoration: none;
    border-radius: 50px;
    letter-spacing: 1px;
    font-weight: 600;
    box-shadow: 0 10px 50px rgba(0, 0, 0, 0.2);
    float: right;
}
这段代码是设置链接的内边距为13px和20px,背景颜色为#000,字体颜色为#fff,无下划线,圆角为50px,字母间距为1px,字体粗细为600,阴影效果为0 10px 50px rgba(0, 0, 0, 0.2),右浮动。
.slider {
    position: absolute;
    bottom: 25px;
    left: 55%;
    transform: translateX(-50%);
    z-index: 1;
}
这段代码是设置滑动条的布局方式为绝对定位,底部外边距为25px,左侧偏移为55%,水平居中,z-index为1。
.slider .slide {
    width: 50px;
    height: 10px;
    background-color: #dfdfdf;
    display: inline-flex;
    margin: 0 3px;
    border-radius: 5px;
    cursor: pointer;
    position: relative;
    overflow: hidden;
}
这段代码是设置滑动条中每个滑块的宽度为50px,高度为10px,背景颜色为#dfdfdf,使用inline-flex布局,左右外边距为3px,圆角为5px,鼠标指针为手型,相对定位,超出部分隐藏。
.slider .slide::before {
    content: "";
    width: 0%;
    height: 100%;
    background-color: #000;
    border-radius: 5px;
    position: absolute;
    left: 0;
    top: 0;
    transform: scaleX(0);
    transform-origin: left;
    transition: transform 0.6s;
}
这段代码是设置滑动条中每个滑块的前景色。使用伪元素::before,设置宽度为0%,高度为100%,背景颜色为#000,圆角为5px,相对定位,左侧和顶部偏移为0,水平方向缩放为0,变换原点为左侧,过渡效果为0.6s。
#slide_1:checked ~ .slider .slide-1::before,
#slide_2:checked ~ .slider .slide-2::before,
#slide_3:checked ~ .slider .slide-3::before {
    width: 100%;
    transform: scaleX(1);
}
这段代码是设置当滑动条选中第1个、第2个或第3个时,对应的滑块前景色宽度为100%,水平方向缩放为1。
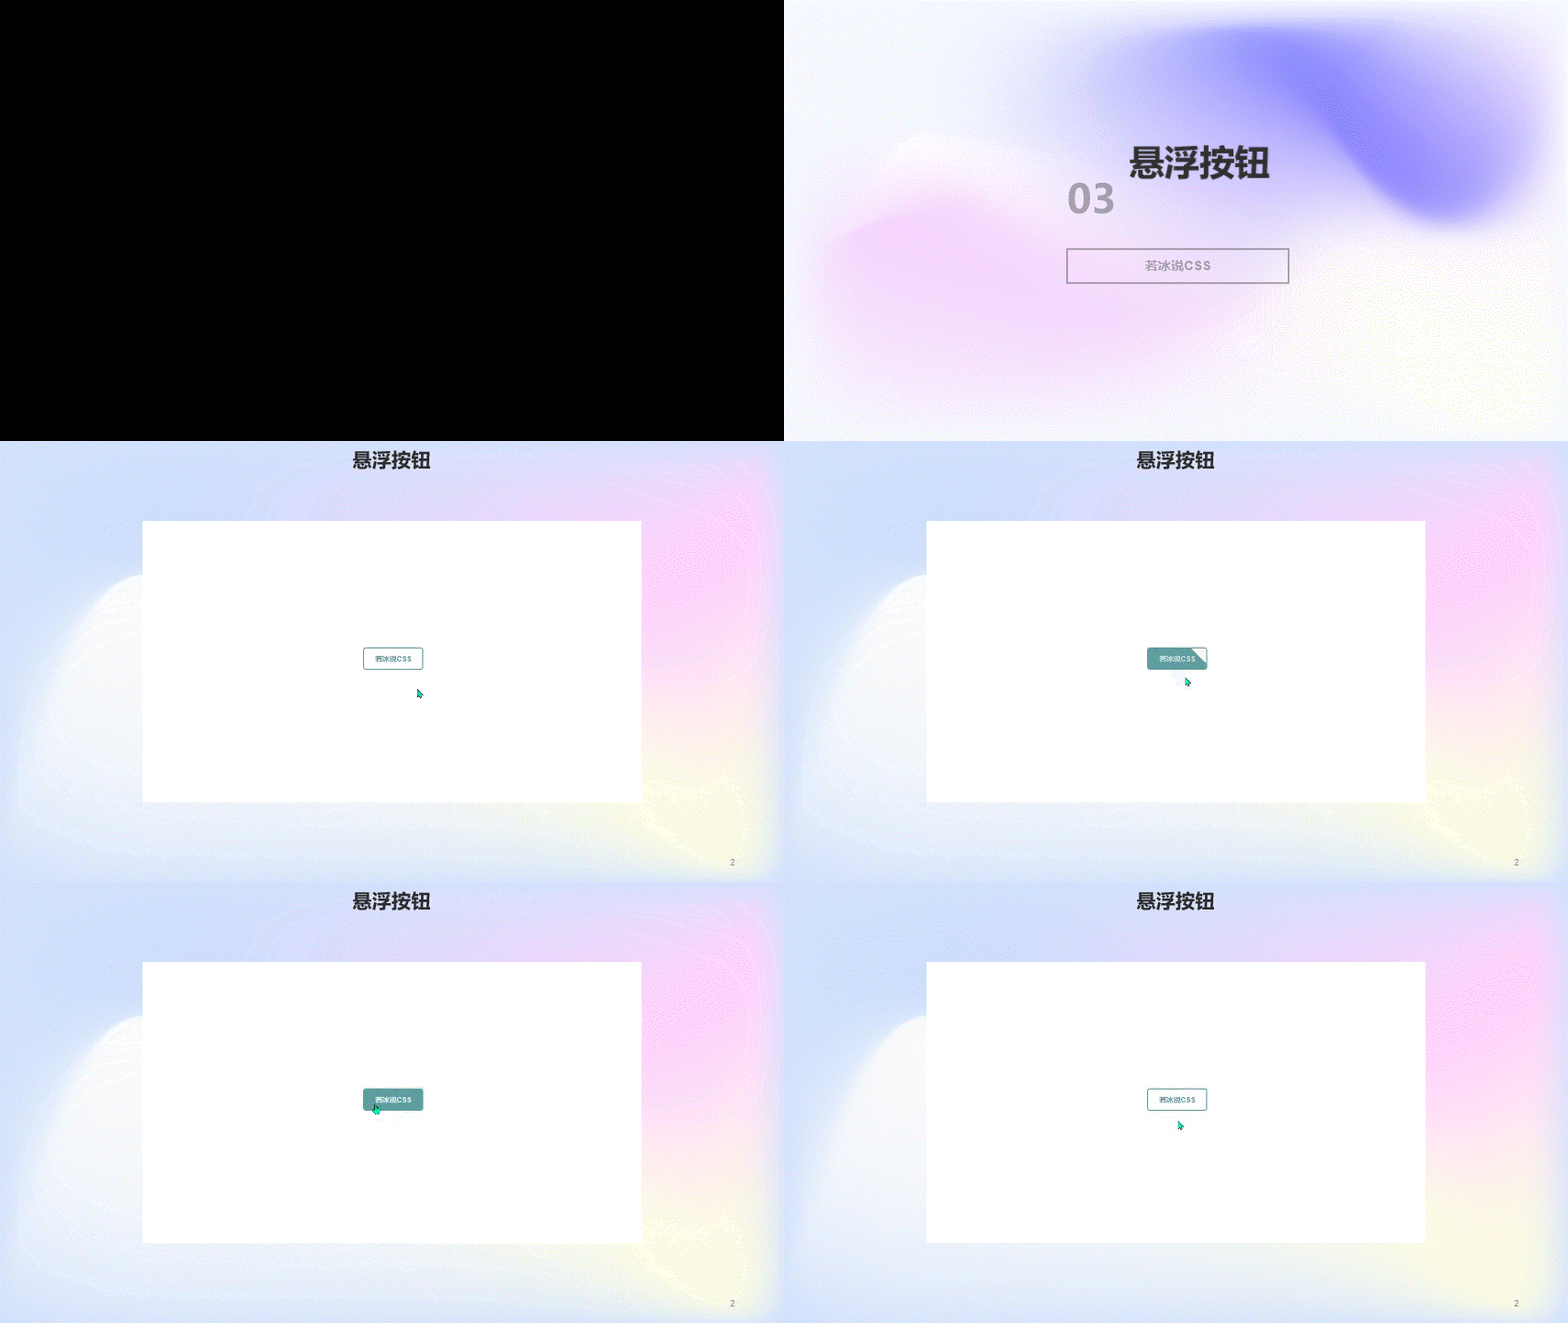
HTML+CSS悬浮按钮
<!DOCTYPE html>
<html>
	<head>
		<meta charset="utf-8">
		<title></title>
    <style>
    body {
  height: 100vh;
  display: flex;
  justify-content: center;
  align-items: center;
}
.btn {
  background-color: transparent;
  border-radius: 5px;
  cursor: pointer;
  border: 2px solid cadetblue;
  color: cadetblue;
  padding: 10px 20px;
  font-weight: bold;
  position: relative;
  transition: all 1s;
  overflow: hidden;
}
.btn::before {
  content: '';
  display: block;
  height: 100%;
  width: 0%;
  background-color: cadetblue;
  position: absolute;
  left: -30px;
  top: 0;
  transform: skewX(45deg);
  transition: all 1s;
  z-index: -1;
}

.btn:hover::before {
  width: 180%;
}
.btn:hover {
  font-weight: bold;
  color: white;
}
    </style>
	</head>
	<body>
		<button class="btn">
    若冰说CSS
</button>
	</body>

</html>
body {
height: 100vh;
display: flex;
justify-content: center;
align-items: center;
}
.btn {
background-color: transparent;
border-radius: 5px;
cursor: pointer;
border: 2px solid cadetblue;
color: cadetblue;
padding: 10px 20px;
font-weight: bold;
position: relative;
transition: all 1s;
overflow: hidden;
}
.btn::before {
content: '';
display: block;
height: 100%;
width: 0%;
background-color: cadetblue;
position: absolute;
left: -30px;
top: 0;
transform: skewX(45deg);
transition: all 1s;
z-index: -1;
}
.btn:hover::before {
width: 180%;
}
.btn:hover {
font-weight: bold;
color: white;
}实现思路拆分
body {
  height: 100vh;
  display: flex;
  justify-content: center;
  align-items: center;
}- 将body元素的高度设置为视口的高度(100vh)
- 使用flexbox将body元素的内容水平和垂直居中
.btn {
  background-color: transparent;
  border-radius: 5px;
  cursor: pointer;
  border: 2px solid cadetblue;
  color: cadetblue;
  padding: 10px 20px;
  font-weight: bold;
  position: relative;
  transition: all 1s;
  overflow: hidden;
}- 为类名为.btn的元素添加样式:
-
- 设置背景颜色为透明
- 设置边框的圆角为5像素
- 设置光标样式为指针
- 设置边框为2像素的cadetblue颜色
- 设置文本颜色为cadetblue
- 设置内边距为10像素的上下和20像素的左右
- 设置字体加粗
- 设置为相对定位
- 添加所有属性的过渡效果,过渡时间为1秒
- 隐藏溢出的内容
.btn::before {
  content: '';
  display: block;
  height: 100%;
  width: 0%;
  background-color: cadetblue;
  position: absolute;
  left: -30px;
  top: 0;
  transform: skewX(45deg);
  transition: all 1s;
  z-index: -1;
}- 为.btn类的元素的伪元素::before添加样式:
-
- 设置内容为空
- 将显示属性设置为块级元素
- 设置高度为100%
- 设置宽度为0%
- 设置背景颜色为cadetblue
- 设置绝对定位
- 将左侧位置设置为-30像素
- 将顶部位置设置为0
- 使用skewX(45deg)变换将元素沿X轴倾斜45度
- 添加所有属性的过渡效果,过渡时间为1秒
- 设置z-index为-1,将其放置在.btn元素的下方
.btn:hover::before {
  width: 180%;
}- 当鼠标悬停在.btn元素上时,将伪元素::before的宽度设置为180%
- 这将使伪元素的宽度从0%过渡到180%,产生一个展开的效果
.btn:hover {
  font-weight: bold;
  color: white;
}- 当鼠标悬停在.btn元素上时,将文本字体加粗,并将文本颜色设置为白色
HTML+CSS动态卡片
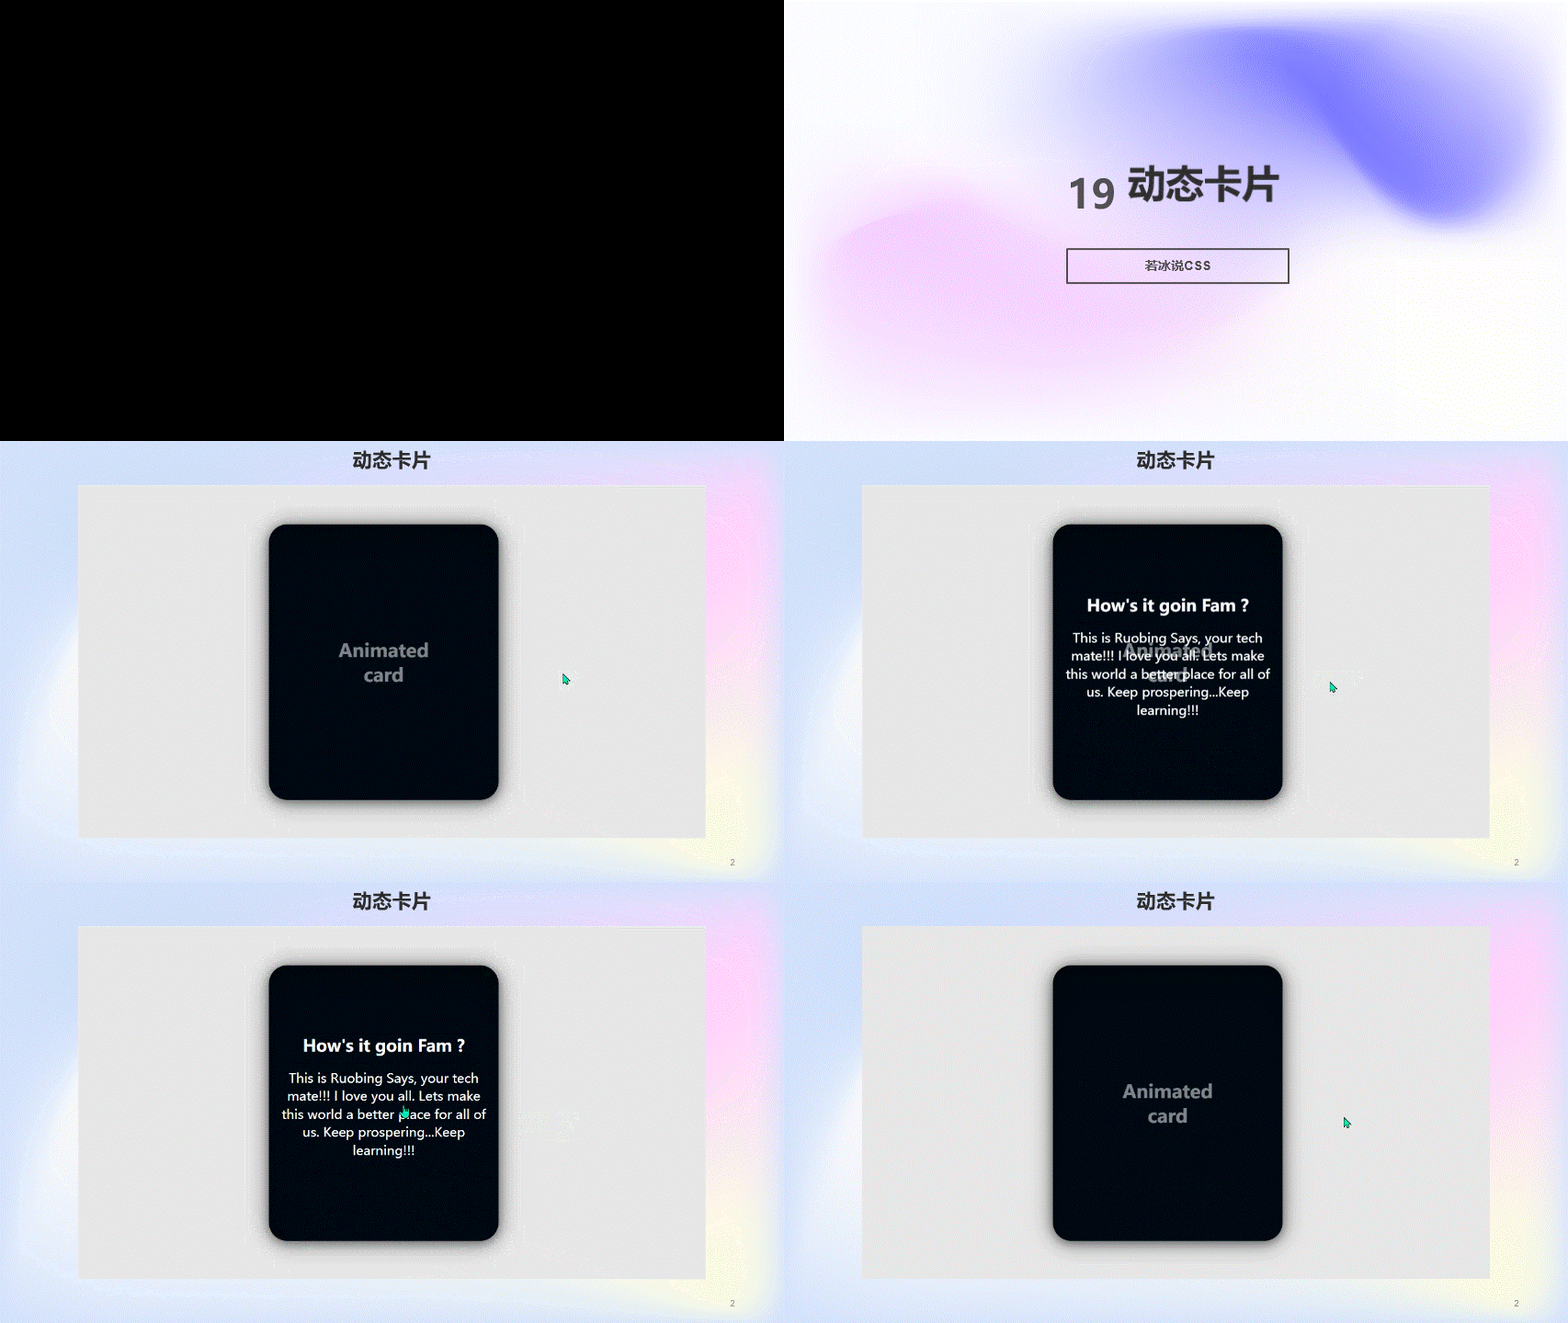
<!DOCTYPE html>
<html>
	<head>
		<meta charset="utf-8">
		<title></title>
		<style>
			body {
  height: 100vh;
  display: flex;
  justify-content: center;
  align-items: center;
  background-color: #e8e8e8;
}

.cardBox {
  width: 250px;
  height: 300px;
  position: relative;
  display: grid;
  place-items: center;
  overflow: hidden;
  border-radius: 20px;
  box-shadow: rgba(0, 0, 0, 0.4) 0px 2px 10px 0px,
    rgba(0, 0, 0, 0.5) 0px 2px 25px 0px;
}

.card {
  position: absolute;
  width: 95%;
  height: 95%;
  background: #000814;
  border-radius: 20px;
  z-index: 5;
  display: flex;
  justify-content: center;
  align-items: center;
  flex-direction: column;
  text-align: center;
  color: #ffffff;
  overflow: hidden;
  padding: 20px;
  cursor: pointer;
  box-shadow: rgba(0, 0, 0, 0.4) 0px 30px 60px -12px inset,
    rgba(0, 0, 0, 0.5) 0px 18px 36px -18px inset;
}

.card .h4 {
  position: absolute;
  top: 50%;
  left: 50%;
  transform: translate(-50%, -50%);
  font-size: 20px;
  font-weight: 800;
  pointer-events: none;
  opacity: .5;
}

.card .content .h3 {
  font-size: 18px;
  font-weight: 800;
  margin-bottom: 10px;
}

.card .content p {
  font-size: 14px;
  line-height: 1.4em;
}

.card .content {
  transform: translateY(100%);
  opacity: 0;
  transition: 0.3s ease-in-out;
}

.card:hover .content {
  transform: translateY(0);
  opacity: 1;
}

.card:hover .h4 {
  opacity: 0;
}

.cardBox::before {
  content: "";
  position: absolute;
  width: 40%;
  height: 150%;
  background: #40E0D0;
  background: -webkit-linear-gradient(to right, #FF0080, #FF8C00, #40E0D0);
  background: linear-gradient(to right, #FF0080, #FF8C00, #40E0D0);
  transform-origin: center;
  animation: glowing_401 5s linear infinite;
}

@keyframes glowing_401 {
  0% {
    transform: rotate(0);
  }

  100% {
    transform: rotate(360deg);
  }
}
		</style>
	</head>
	<body>
<div class="cardBox">
    <div class="card">
        <div class="h4">Animated card</div>

        <div class="content">
            <div class="h3">How's it goin Fam ?</div>
            <p>This is Ruobing Says, your tech mate!!! I love you all.
                pLets make this world a better place for all
                of us. Keep prospering...Keep learning!!!</p>
        </div>
    </div>
</div>

	</body>

</html>
body {
height: 100vh;
display: flex;
justify-content: center;
align-items: center;
background-color: #e8e8e8;
}
.cardBox {
width: 250px;
height: 300px;
position: relative;
display: grid;
place-items: center;
overflow: hidden;
border-radius: 20px;
box-shadow: rgba(0, 0, 0, 0.4) 0px 2px 10px 0px,
rgba(0, 0, 0, 0.5) 0px 2px 25px 0px;
}
.card {
position: absolute;
width: 95%;
height: 95%;
background: #000814;
border-radius: 20px;
z-index: 5;
display: flex;
justify-content: center;
align-items: center;
flex-direction: column;
text-align: center;
color: #ffffff;
overflow: hidden;
padding: 20px;
cursor: pointer;
box-shadow: rgba(0, 0, 0, 0.4) 0px 30px 60px -12px inset,
rgba(0, 0, 0, 0.5) 0px 18px 36px -18px inset;
}
.card .h4 {
position: absolute;
top: 50%;
left: 50%;
transform: translate(-50%, -50%);
font-size: 20px;
font-weight: 800;
pointer-events: none;
opacity: .5;
}
.card .content .h3 {
font-size: 18px;
font-weight: 800;
margin-bottom: 10px;
}
.card .content p {
font-size: 14px;
line-height: 1.4em;
}
.card .content {
transform: translateY(100%);
opacity: 0;
transition: 0.3s ease-in-out;
}
.card:hover .content {
transform: translateY(0);
opacity: 1;
}
.card:hover .h4 {
opacity: 0;
}
.cardBox::before {
content: "";
position: absolute;
width: 40%;
height: 150%;
background: #40E0D0;
background: -webkit-linear-gradient(to right, #FF0080, #FF8C00, #40E0D0);
background: linear-gradient(to right, #FF0080, #FF8C00, #40E0D0);
transform-origin: center;
animation: glowing_401 5s linear infinite;
}
@keyframes glowing_401 {
0% {
transform: rotate(0);
}
100% {
transform: rotate(360deg);
}
}实现思路拆分
body {
  height: 100vh; /* 设置整个页面的高度为视口高度 */
  display: flex; /* 设置盒子为弹性盒子 */
  justify-content: center; /* 设置盒子内部元素水平居中对齐 */
  align-items: center; /* 设置盒子内部元素垂直居中对齐 */
  background-color: #e8e8e8; /* 设置背景颜色为浅灰色 */
}
这段代码定义了整个页面的样式,包括高度、对齐方式、背景颜色等。
.cardBox {
  width: 250px; /* 设置盒子的宽度为250像素 */
  height: 300px; /* 设置盒子的高度为300像素 */
  position: relative; /* 设置盒子为相对定位 */
  display: grid; /* 设置盒子为网格布局 */
  place-items: center; /* 设置盒子内部元素居中对齐 */
  overflow: hidden; /* 设置盒子内容溢出隐藏 */
  border-radius: 20px; /* 设置盒子圆角半径为20像素 */
  box-shadow: rgba(0, 0, 0, 0.4) 0px 2px 10px 0px, /* 设置盒子阴影效果 */
    rgba(0, 0, 0, 0.5) 0px 2px 25px 0px;
}
这段代码定义了cardBox盒子的样式,包括宽度、高度、对齐方式、布局方式、溢出隐藏、圆角半径、阴影效果等。
.card {
  position: absolute; /* 设置卡片为绝对定位 */
  width: 95%; /* 设置卡片的宽度为95% */
  height: 95%; /* 设置卡片的高度为95% */
  background: #000814; /* 设置卡片的背景颜色为深蓝色 */
  border-radius: 20px; /* 设置卡片的圆角半径为20像素 */
  z-index: 5; /* 设置卡片的堆叠顺序为5 */
  display: flex; /* 设置卡片为弹性盒子 */
  justify-content: center; /* 设置卡片内部元素水平居中对齐 */
  align-items: center; /* 设置卡片内部元素垂直居中对齐 */
  flex-direction: column; /* 设置卡片内部元素垂直排列 */
  text-align: center; /* 设置卡片内部元素水平居中对齐 */
  color: #ffffff; /* 设置卡片内部元素文本颜色为白色 */
  overflow: hidden; /* 设置卡片内部元素溢出隐藏 */
  padding: 20px; /* 设置卡片内部元素内边距为20像素 */
  cursor: pointer; /* 设置卡片为可点击的 */
  box-shadow: rgba(0, 0, 0, 0.4) 0px 30px 60px -12px inset, /* 设置卡片阴影效果 */
    rgba(0, 0, 0, 0.5) 0px 18px 36px -18px inset;
}
这段代码定义了卡片的标题和内容的样式,以及卡片盒子的阴影和渐变背景的样式。下面是每行代码的作用和注释:
.card.h4 {
  position: absolute; /* 设置标题为绝对定位 */
  top: 50%; /* 设置标题距离顶部50% */
  left: 50%; /* 设置标题距离左侧50% */
  transform: translate(-50%, -50%); /* 设置标题水平和垂直居中 */
  font-size: 20px; /* 设置标题字体大小为20像素 */
  font-weight: 800; /* 设置标题字体粗细为800 */
  pointer-events: none; /* 设置标题不可点击 */
  opacity:.5; /* 设置标题透明度为0.5 */
}
这段代码定义了卡片的标题样式,包括位置、大小、字体粗细、透明度等。
.card.content.h3 {
  font-size: 18px; /* 设置标题字体大小为18像素 */
  font-weight: 800; /* 设置标题字体粗细为800 */
  margin-bottom: 10px; /* 设置标题下边距为10像素 */
}
这段代码定义了卡片内容的标题样式,包括字体大小、字体粗细、下边距等。
.card.content p {
  font-size: 14px; /* 设置内容字体大小为14像素 */
  line-height: 1.4em; /* 设置内容行高为1.4倍字体大小 */
}
这段代码定义了卡片内容的文本样式,包括字体大小、行高等。
.card.content {
  transform: translateY(100%); /* 设置内容向下移动100% */
  opacity: 0; /* 设置内容透明度为0 */
  transition: 0.3s ease-in-out; /* 设置内容过渡效果 */
}
这段代码定义了卡片内容的样式,包括位置、透明度、过渡效果等。
.card:hover.content {
  transform: translateY(0); /* 设置内容向上移动0 */
  opacity: 1; /* 设置内容透明度为1 */
}
这段代码定义了鼠标悬停在卡片上时,卡片内容的样式,包括位置、透明度等。
.card:hover.h4 {
  opacity: 0; /* 设置标题透明度为0 */
}
这段代码定义了鼠标悬停在卡片上时,卡片标题的样式,包括透明度等。
.cardBox::before {
  content: ""; /* 设置伪元素内容为空 */
  position: absolute; /* 设置伪元素为绝对定位 */
  width: 40%; /* 设置伪元素宽度为40% */
  height: 150%; /* 设置伪元素高度为150% */
  background: #40E0D0; /* 设置伪元素背景颜色为深绿色 */
  background: -webkit-linear-gradient(to right, #FF0080, #FF8C00, #40E0D0); /* 设置伪元素渐变背景 */
  background: linear-gradient(to right, #FF0080, #FF8C00, #40E0D0);
  transform-origin: center; /* 设置伪元素旋转中心为中心 */
  animation: glowing_401 5s linear infinite; /* 设置伪元素动画效果 */
}
这段代码定义了卡片盒子的阴影和渐变背景的样式,包括位置、大小、背景颜色、渐变方向、旋转中心、动画效果等。
@keyframes glowing_401 {
  0% {
    transform: rotate(0); /* 设置动画起始状态,将卡片盒子的阴影和渐变背景旋转0度 */
  }

  100% {
    transform: rotate(360deg); /* 设置动画结束状态,将卡片盒子的阴影和渐变背景旋转360度 */
  }
}
这段代码定义了一个名为glowing_401的动画效果,包括两个状态(0%和100%)。在0%状态下,将卡片盒子的阴影和渐变背景旋转0度,从而创建出一个静态的效果。在100%状态下,将卡片盒子的阴影和渐变背景旋转360度,从而创建出一个闪烁的效果。通过设置不同的旋转角度,可以控制闪烁的速度和效果。


 2989
2989

 被折叠的 条评论
为什么被折叠?


