


 本文介绍了如何在Spring框架中创建Blog类的实例,通过XML配置文件进行Bean的管理,并展示了控制反转和依赖注入的概念。通过测试方法演示了如何使用ApplicationContext解析并获取配置文件中的Bean对象。
public class Blog {
private String name;
public Blog(){}
public Blog(String name) {
this.name = name;
}
public String getName() {
return name;
}
public void setName(String name) {
this.name = name;
}
@Override
public String toString() {
return “Blog{” +
“name='” + name + ‘’’ +
‘}’;
}
}
第三步 编写XML文件
在resources目录下编写bean1.xml文件:
<?xml version="1.0" encoding="UTF-8"?><beans xmlns=“http://www.springframework.org/schema/beans”
xmlns:xsi=“http://www.w3.org/2001/XMLSchema-instance”
xsi:schemaLocation="http://www.springframework.org/schema/beans
http://www.springframework.org/schema/beans/spring-beans.xsd">
第四步 编写测试方法
@Test
public void test(){
//解析beans.xml文件 , 生成管理相应的Bean对象
ApplicationContext context = new ClassPathXmlApplicationContext(“bean1.xml”);
//getBean : 参数即为spring配置文件中bean的id .
Blog blog = (Blog) context.getBean(“blog”);
System.out.println(blog);
}
运行结果:
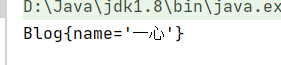
看到这里的输出,就说明成功了。
2.控制反转与依赖注入
===========
看到以上的程序,我们来思考两个问题。
< 最低0.47元/天 解锁文章


 3万+
3万+

 被折叠的 条评论
为什么被折叠?
被折叠的 条评论
为什么被折叠?
 到【灌水乐园】发言


