


目录
2.3.配置修改(application.properties)
3.2.1.@SpringBootConfiguration
3.2.3.@EnableAutoConfiguration
1.简单概述
SpringBoot是基于Spring开发,本身并不提供Spring框架的核心特性以及扩展功能,也就是说,它并不是用来代替Spring 的解决方案,而是和Spring框架紧密结合用于提升Spring开发者的体验工具
SpringBoot 是约定大于配置。采用 SpringBoot 可以大大的简化开发模式,它集成了大量常用的第三方库配置,所有你想集成的常用框架,它都有对应的组件支持,例如 Redis、MongoDB、Jpa、kafka,Hakira 等等。Spring Boot 应用中这些第三方库几乎可以零配置地开箱即用,大部分的 Spring Boot 应用都只需要非常少量的配置代码,开发者能够更加专注于业务逻辑 。
简单来说SpringBoot不是新的框架,它默认配置了很多框架的使用方式,就像Maven整合所有的jar包,SpringBoot整合了所有框架
2.快速入门
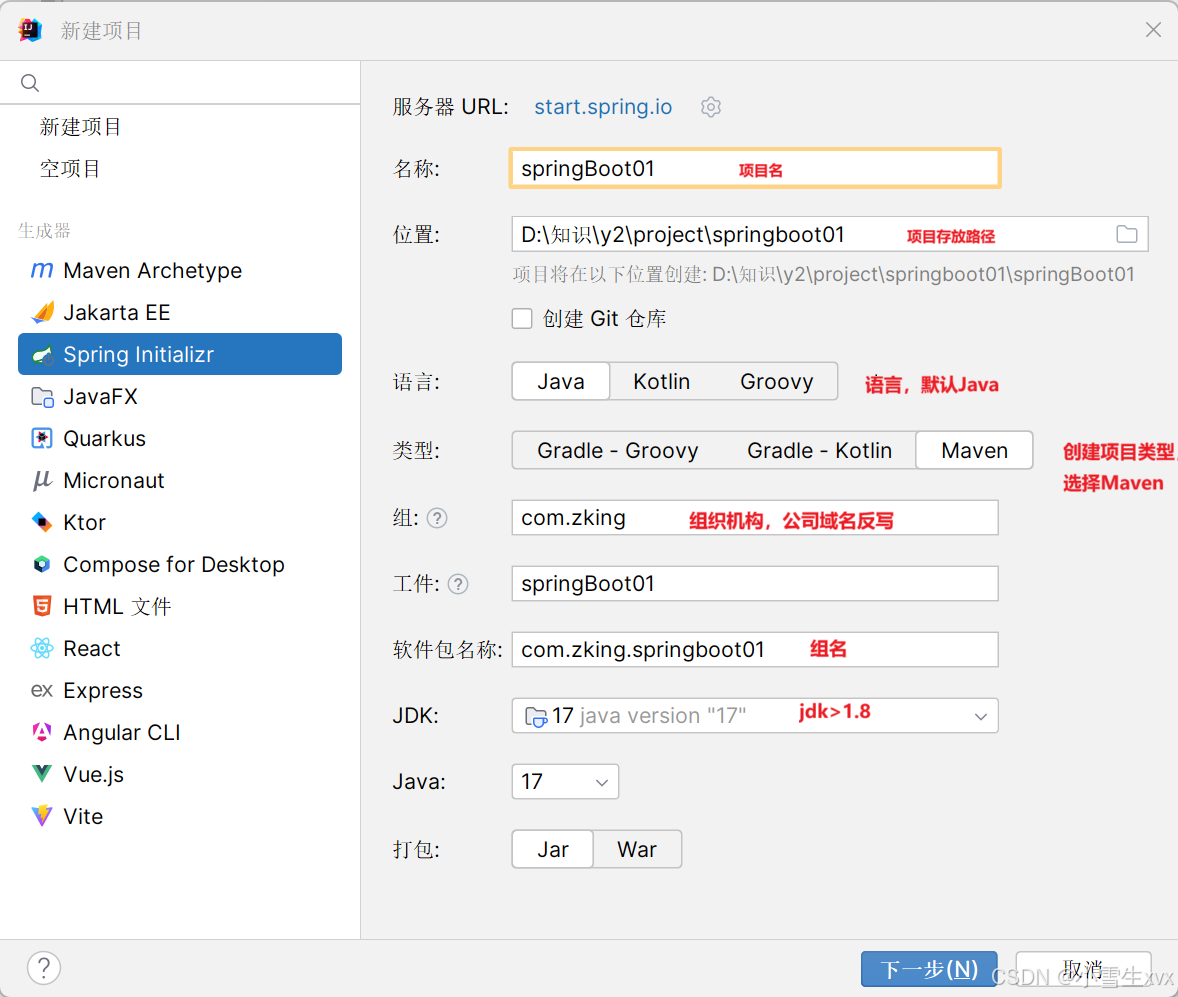
2.1.创建SpringBoot项目
点击新建项目,选择Spring Initializr
点击下一步
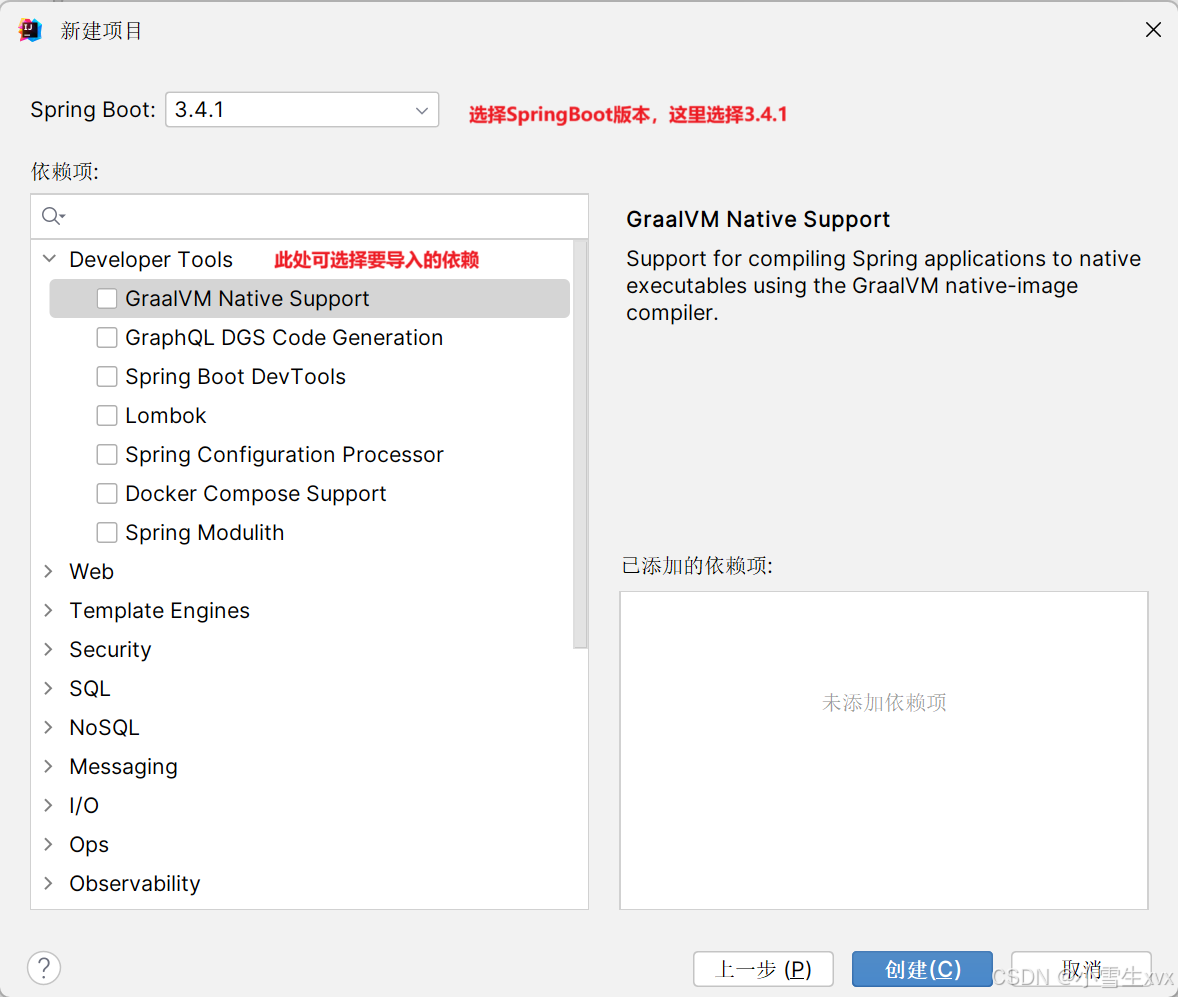
点击创建 ,即可完成SpringBoot项目的创建
2.2.目录介绍
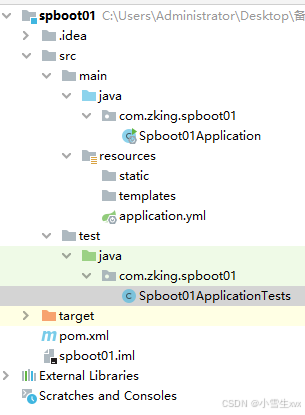
- src/main/java:存放java代码,主程序入口
Spboot01Application,可以通过直接运行该类来启动Spring Boot应用 - src/main/resources:配置目录,该目录用来存放应用的一些配置信息,比如应用名、服务端口、数据库配置等。由于我们应用了
Web模块,因此产生了static目录与templates目录,前者用于存放静态资源,如图片、CSS、JavaScript等;后者用于存放Web页面的模板文件。 - src/test:测试目录
application.properties/application.yml:用于存放程序的各种依赖模块的配置信息,比如:服务端口,数据库连接配置等
包和类不能乱改哦, 只能在
com.zking.springboot建子包,因为程序只加载Spboot01Application.java所在包及其子包下的内容
2.3.配置修改(application.properties)
server:
  # 配置端口
  port: 8080
  # 项目名
  servlet:
    context-path: /
2.4.配置pom.xml
修改pom.xml,引入spring-boot-starter-web
<?xml version="1.0" encoding="UTF-8"?>
<project xmlns="http://maven.apache.org/POM/4.0.0" xmlns:xsi="http://www.w3.org/2001/XMLSchema-instance"
         xsi:schemaLocation="http://maven.apache.org/POM/4.0.0 https://maven.apache.org/xsd/maven-4.0.0.xsd">
    <modelVersion>4.0.0</modelVersion>
    <parent>
        <groupId>org.springframework.boot</groupId>
        <artifactId>spring-boot-starter-parent</artifactId>
        <version>3.4.1</version>
        <relativePath/> <!-- lookup parent from repository -->
    </parent>
    <groupId>com.zking</groupId>
    <artifactId>springboot01</artifactId>
    <version>0.0.1-SNAPSHOT</version>
    <name>springboot01</name>
    <description>springboot01</description>
    <url/>
    <licenses>
        <license/>
    </licenses>
    <developers>
        <developer/>
    </developers>
    <scm>
        <connection/>
        <developerConnection/>
        <tag/>
        <url/>
    </scm>
    <properties>
        <java.version>17</java.version>
    </properties>
    <dependencies>
        <dependency>
            <groupId>org.springframework.boot</groupId>
            <artifactId>spring-boot-starter</artifactId>
        </dependency>

        <dependency>
            <groupId>org.springframework.boot</groupId>
            <artifactId>spring-boot-starter-web</artifactId>
        </dependency>


        <dependency>
            <groupId>org.springframework.boot</groupId>
            <artifactId>spring-boot-starter-test</artifactId>
            <scope>test</scope>
        </dependency>


    </dependencies>

    <build>
        <plugins>
            <plugin>
                <groupId>org.springframework.boot</groupId>
                <artifactId>spring-boot-maven-plugin</artifactId>
            </plugin>
        </plugins>
    </build>

</project>
2.5.启动项目
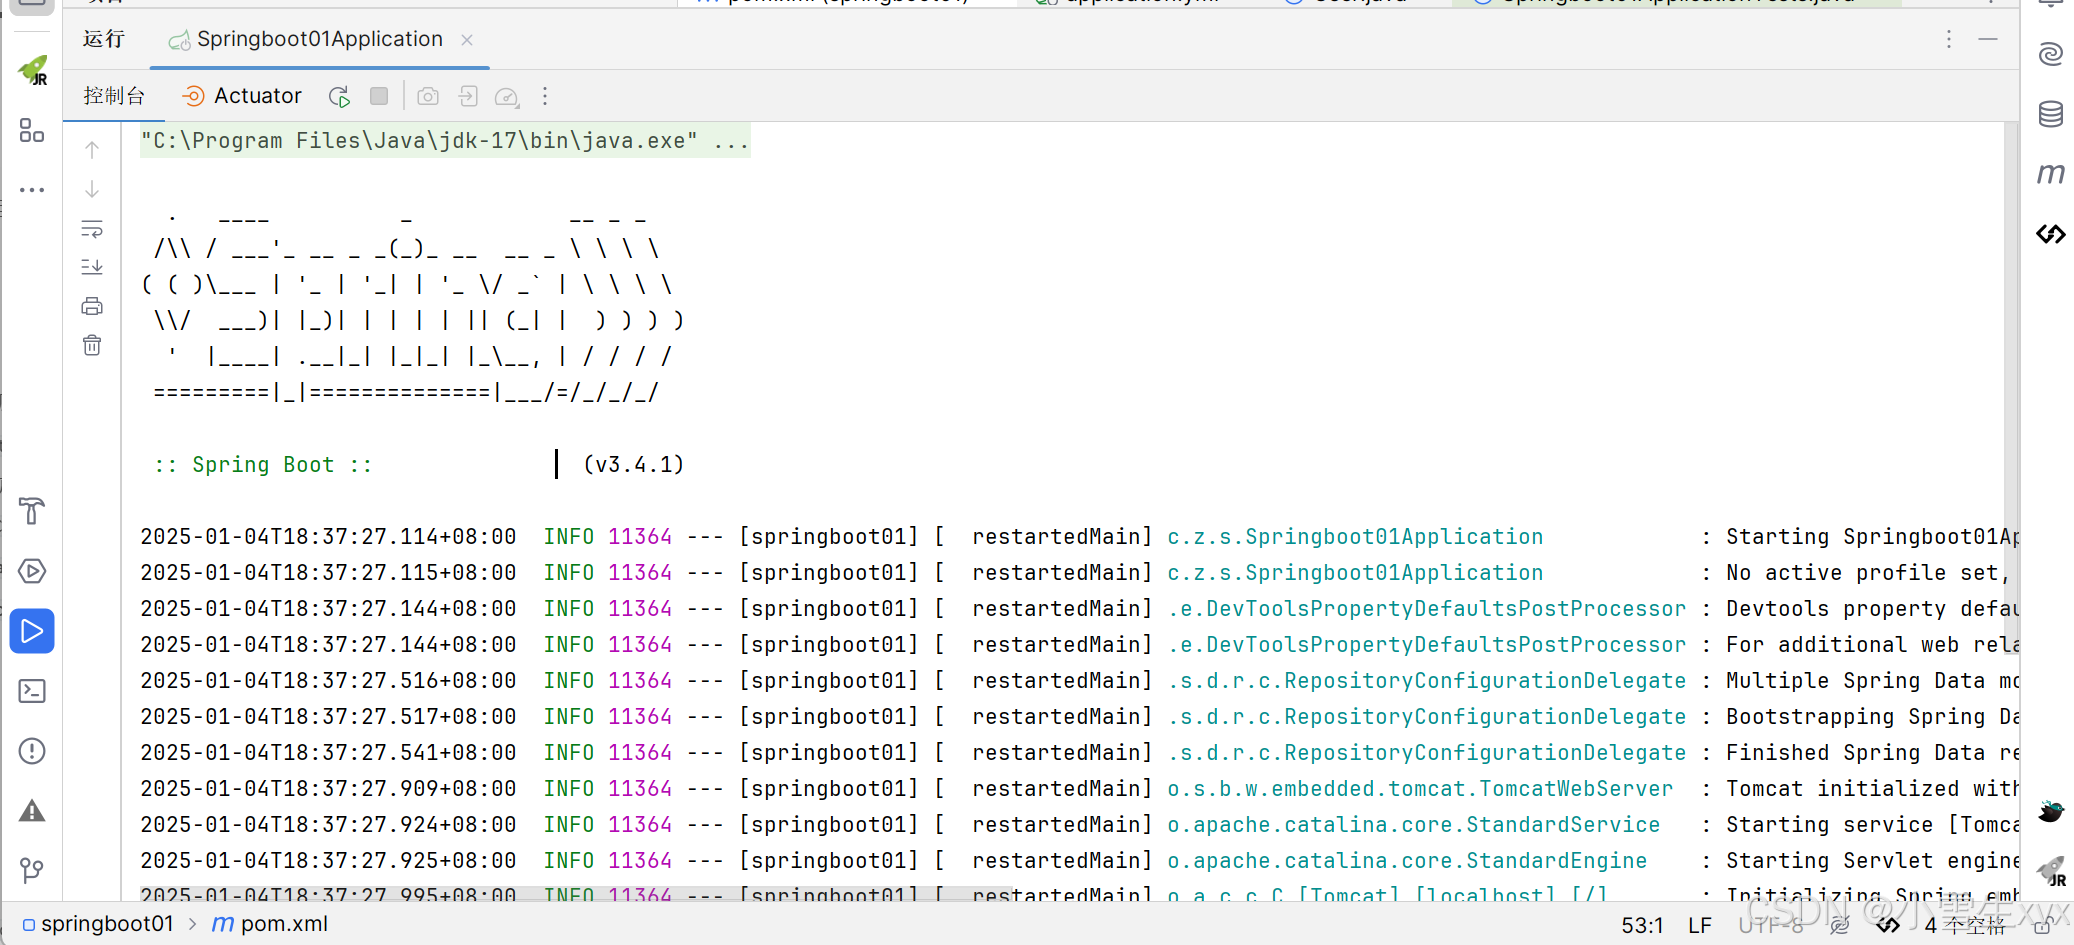
注:SpringBoot内部集成了Tomcat,不需要手动配置,我们只需要业务逻辑
3.SpringBoot自动装配原理
3.1.什么是SpringBoot自动装配
Spring Boot 定义了一套接口规范,这套规范规定:Spring Boot 在启动时会扫描外部引用 jar 包中的 META-INF/spring.factories 文件,将文件中配置的类型信息加载到 Spring 容器,并执行类中定义的各种操作。对于外部 jar 来说,只需要按照 Spring Boot 定义的标准,就能将自己的功能装置进 Spring Boot。
没有 Spring Boot 的情况下,如果我们需要引入第三方依赖,需要手动配置,非常麻烦。但是,Spring Boot 中,我们直接引入一个 starter 即可。比如你想要在项目中使用 redis 的话,直接在pom.xml引入即可。
<dependency>
<groupId>org.springframework.boot</groupId>
<artifactId>spring-boot-starter-data-redis</artifactId>
</dependency>
3.2.SpringBoot如何实现自动装配
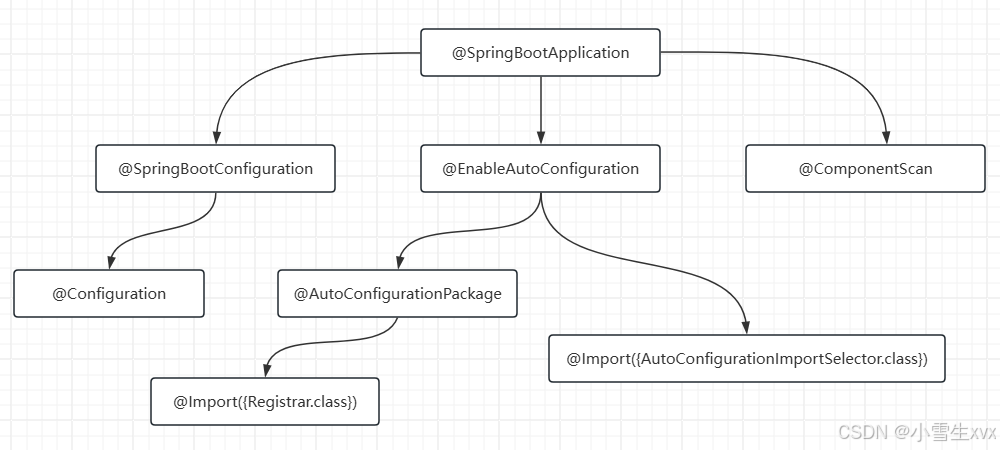
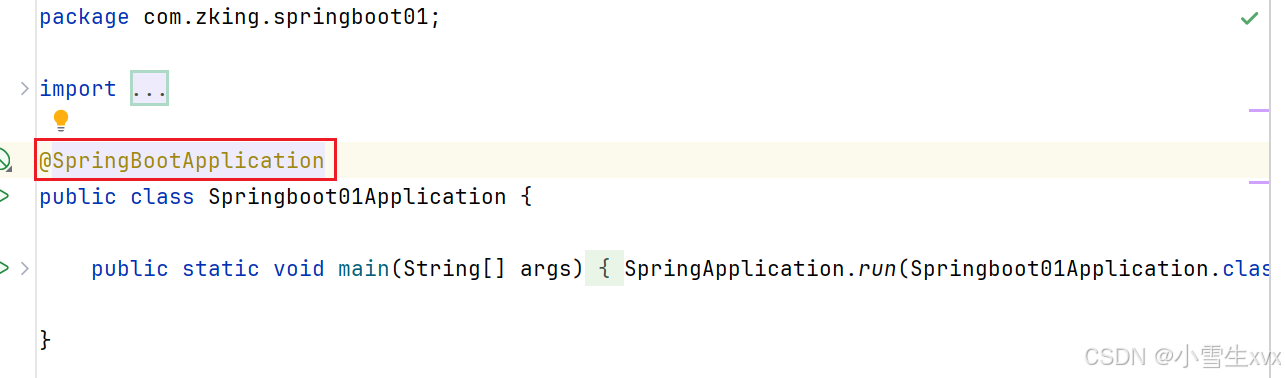
直接追踪 @SpringBootApplication 的源码,可以看到其实 @SpringBootApplication 是一个组合注解,分别是由底下这些注解组成:
@Target({ElementType.TYPE})
@Retention(RetentionPolicy.RUNTIME)
@Documented
@Inherited
@SpringBootConfiguration
@EnableAutoConfiguration
@ComponentScan(
excludeFilters = {@Filter(
type = FilterType.CUSTOM,
classes = {TypeExcludeFilter.class}
), @Filter(
type = FilterType.CUSTOM,
classes = {AutoConfigurationExcludeFilter.class}
)}
)
大概可以把 @SpringBootApplication 看作是 @Configuration、@EnableAutoConfiguration、@ComponentScan 注解的集合。这些注解虽然看起来很多,但是除去元注解,真正起作用的注解只有以下三个注解:
@SpringBootConfiguration
@EnableAutoConfiguration
@ComponentScan
3.2.1.@SpringBootConfiguration
允许在上下文中注册额外的 bean 或导入其他配置类 ,在跟踪@SpringBootConfiguration的源代码
@Target({ElementType.TYPE})
@Retention(RetentionPolicy.RUNTIME)
@Documented
@Configuration
@Indexed
public @interface SpringBootConfiguration {
    @AliasFor(
        annotation = Configuration.class
    )
    boolean proxyBeanMethods() default true;
}
可以看到,除去元注解,就剩下 @Configuration注解。而 Spring Boot 为什么可以去除 xml 配置,靠的就是@Configuration 这个注解。所以,它的作用就是将当前类申明为配置类,同时还可以使用 @bean 注解将类以方法的形式实例化到 spring 容器(SpringIOC容器),而方法名就是实例名,如:
@Configuration
public class HelloConfiguration {

    @Bean
    public IHelloService helloService(){
        return new HelloServiceImpl();
    }
}
作用等同于xml的配置文件
<?xml version="1.0" encoding="UTF-8"?>
<beans xmlns="http://www.springframework.org/schema/beans"
       xmlns:xsi="http://www.w3.org/2001/XMLSchema-instance"
       xsi:schemaLocation="http://www.springframework.org/schema/beans http://www.springframework.org/schema/beans/spring-beans.xsd">

    <bean id="helloService" class="com.zking.spboot01.service.impl.HelloServiceImpl"/>

</beans>
3.2.2.@ComponentScan
作用就是扫描当前包以及子包,将有@Component,@Controller,@Service,@Repository等注解的类注册到 Spring IOC 容器中 ,可以自定义不扫描某些 bean
@Configuration
@ComponentScan(basePackages = "com.zking.spboot01")
public class Spboot01Configuration {
   ...
}
相当于xml中的
<?xml version="1.0" encoding="UTF-8"?>
<beans xmlns="http://www.springframework.org/schema/beans"
       xmlns:xsi="http://www.w3.org/2001/XMLSchema-instance"
       xmlns:context="http://www.springframework.org/schema/context"
       xsi:schemaLocation="http://www.springframework.org/schema/beans http://www.springframework.org/schema/beans/spring-beans.xsd http://www.springframework.org/schema/context https://www.springframework.org/schema/context/spring-context.xsd">

    <context:component-scan base-package="com.zking.spboot01"/>
</beans>
3.2.3.@EnableAutoConfiguration
跟踪 @EnableAutoConfiguration 的源码,发现其中有两个非常重要的注解,分别是:@AutoConfigurationPackage 和 @Import({AutoConfigurationImportSelector.class}) 。
描述一下两个注解的作用:
@AutoConfigurationPackage:指定了默认的包规则就是将主程序类所在包及所有子包下的组件扫描到Spring容器中@Import({AutoConfigurationImportSelector.class}):通过@Import注解导入AutoConfigurationImportSelector类,然后通过该类的selectImports方法去读取MATE-INF/spring.factories文件中配置的组件的全类名,并按照一定的规则过滤掉不符合要求的组件的全类名,将剩余读取到的各个组件的全类名集合返回给IOC容器并将这些组件注册为Spring Bean
源码跟踪:
我们先进入 AutoConfigurationImportSelector 类,可以看到他有一个方法 selectImports() 方法,该方法主要用于获取所有符合条件的类的全限定类名,这些类需要被加载到 IoC 容器中
@Override
public String[] selectImports(AnnotationMetadata annotationMetadata) {
    //1.判断是否开启了自动装配
    if (!isEnabled(annotationMetadata)) {
        return NO_IMPORTS;
    }
    //2.获取所有需要装配的bean
    AutoConfigurationEntry autoConfigurationEntry = getAutoConfigurationEntry(annotationMetadata);
    return StringUtils.toStringArray(autoConfigurationEntry.getConfigurations());
}
这里需要重点关注一下 getAutoConfigurationEntry() 方法,这个方法主要负责加载自动配置类的
protected AutoConfigurationEntry getAutoConfigurationEntry(AnnotationMetadata annotationMetadata) {
    //1.判断自动装配开关是否打开。默认spring.boot.enableautoconfiguration=true,可在 application.properties 或 application.yml 中设置
    if (!isEnabled(annotationMetadata)) {
        return EMPTY_ENTRY;
    }
    //2.用于获取EnableAutoConfiguration注解中的 exclude 和 excludeName。
    AnnotationAttributes attributes = getAttributes(annotationMetadata);
    //3.获取需要自动装配的所有配置类,读取META-INF/spring.factories
    List<String> configurations = getCandidateConfigurations(annotationMetadata, attributes);
    configurations = removeDuplicates(configurations);
    Set<String> exclusions = getExclusions(annotationMetadata, attributes);
    checkExcludedClasses(configurations, exclusions);
    configurations.removeAll(exclusions);
    configurations = getConfigurationClassFilter().filter(configurations);
    fireAutoConfigurationImportEvents(configurations, exclusions);
    return new AutoConfigurationEntry(configurations, exclusions);
}
继续跟踪 getCandidateConfigurations(annotationMetadata, attributes) 方法,看看为什么在这里返回一个List集合
protected List<String> getCandidateConfigurations(AnnotationMetadata metadata, AnnotationAttributes attributes) {
    List<String> configurations = new ArrayList<>(
        SpringFactoriesLoader.loadFactoryNames(getSpringFactoriesLoaderFactoryClass(), getBeanClassLoader()));
    ImportCandidates.load(AutoConfiguration.class, getBeanClassLoader()).forEach(configurations::add);
    Assert.notEmpty(configurations,
                    "No auto configuration classes found in META-INF/spring.factories nor in META-INF/spring/org.springframework.boot.autoconfigure.AutoConfiguration.imports. If you "
                    + "are using a custom packaging, make sure that file is correct.");
    return configurations;
}
可以看到这里有个方法,这个方法的作用就是读取 classpath 下的 META-INF/spring.factories 文件的配置,将 key 为 org.springframework.boot.autoconfigure.EnableAutoConfiguration 对应的配置项读取出来,通过反射机制实例化为配置文件,然后注入 spring 容器。
直接在 SpringFactoriesLoader.loadFactoryNames 这个方法后面打个断点,可以在返回的集合里找到配置文件路径!
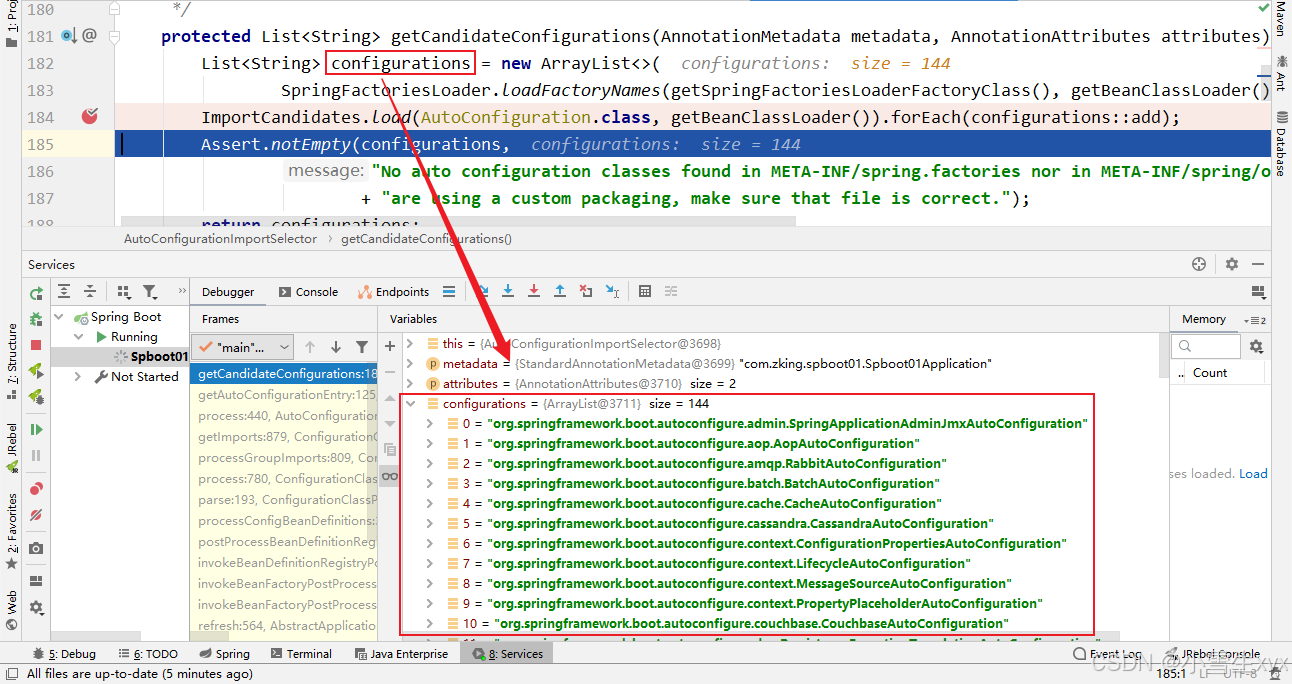
这里不光只读取某一个依赖下的META-INF/spring.factories,而是将所有 Spring Boot Starter 下的META-INF/spring.factories 都会被读取到。
这里可以随便打开一个 Spring Boot Starter ,在 META-INF 目录下均有 spring.factories ,每一个spring.factories 配置文件中又有很多配置项。那么问题来了!“ spring.factories 中这么多配置,每次启动都要全部加载么?”
很明显,这是不现实的。我们 debug 到后面你会发现,configurations 的值变小了。
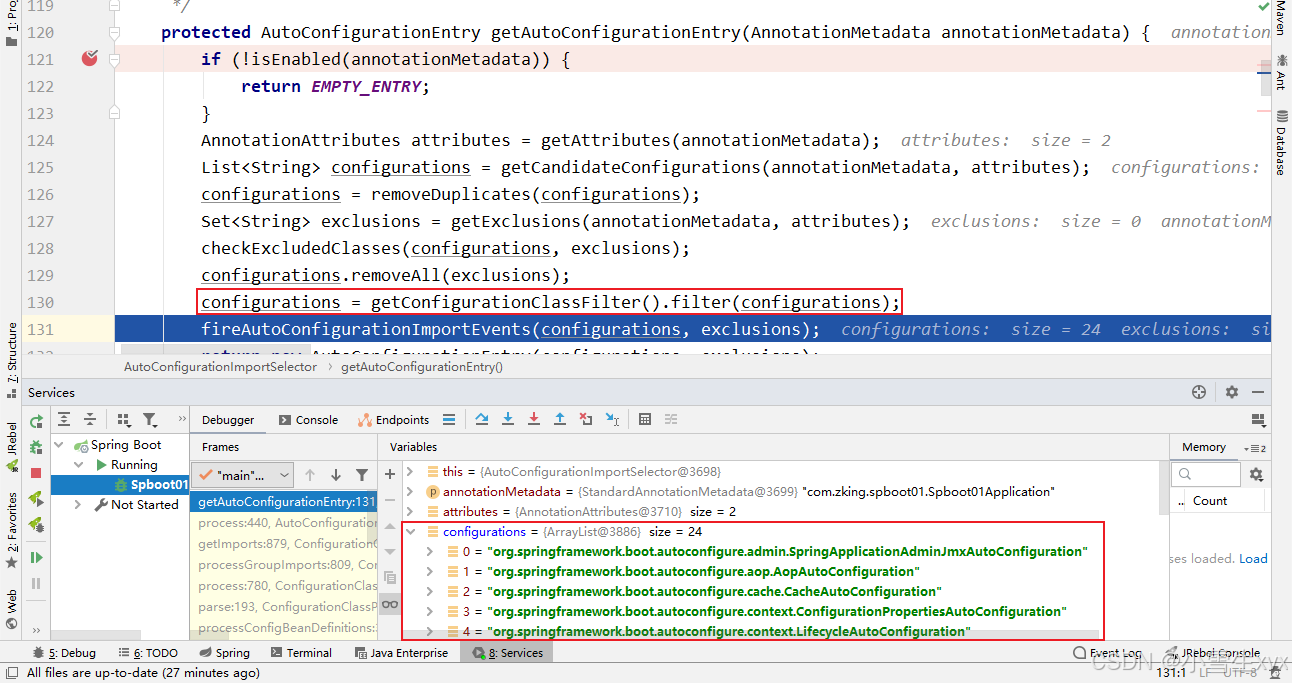 。
。
因为这里会有一个筛选的过程,只有满足了特定的条件才会被加载装配。
4.单元测试
4.1.JUnit5介绍
Spring Boot 2.2.0 版本开始引入 JUnit5 作为单元测试默认库,JUnit5作为最新版本的 JUnit 框架,它与之前版本的 JUnit框架有很大的不同,由三个不同子项目的几个不同模块组成
JUnitPlatform:是在JVM上启动测试框架的基础,不仅支持JUnit自制的测试引擎,其它测试引擎也都可以接入JUnitJupiter:提供了JUnit5的新的编程模型,是JUnit5新特性的核心;内部包含了一个测试引擎,用于在JUnitPlatform上运行JUnitVintage:由于JUnit已经发展多年,为了照顾老的项目,JUnitVintage提供了兼容JUnit 4.x,JUnit 3.x的测试引擎
4.2.JUnit5常用注解
| 注解 | 说明 |
| @SpringBootTest | 用于指定测试类启用Spring Boot Test,默认会提供Mock环境。 |
| @Test | 表示方法是测试方法,但是与 JUnit4 的 @Test 不同,它的职责非常单一不能声明任何属性,拓展的测试将会由 Jupiter 提供额外测试 |
| @DisplayName | 为测试类或者测试方法设置展示名称 |
| @BeforeAll | 表示在所有单元测试之前执行 |
| @BeforeEach | 表示在每个单元测试之前执行 |
| @Timeout | 表示测试方法运行如果超过了指定时间将会返回错误 |
| @Disabled | 表示测试类或测试方法不执行 |
| @RepeatedTest | 表示测试方法可重复执行 |
| @Extendwith | 为测试类或测试方法提供扩展类引用 |
| @AfterEach | 表示在每个单元测试之后执行 |
| @AfterAll | 表示在所有单元测试之后执行 |
| @AutocONFIGUREmOCKmVC | 启用MockMvc的自动配置,可用于测试接口。 |
4.3.案例
@SpringBootTest  //启用Spring Boot Test测试类
public class Spboot01ApplicationTests {

    @Test
    @BeforeAll
    public static void beforeAll() {
        System.out.println("@BeforeAll: 表示在所有单元测试之前执行");
    }

    @Test
    @AfterAll
    public static void afterAll(){
        System.out.println("@AfterAll:表示在所有单元测试之后执行");
    }

    @BeforeEach
    public void beforeEach() {
        System.out.println("@BeforeEach: 表示在每个单元测试之前执行");
    }

    @AfterEach
    public void afterEach(){
        System.out.println("@AfterEach:表示在每个单元测试之后执行");
    }

    @Test
    @DisplayName("测试方法一")
    public void test01() {
        System.out.println("@DisplayName: 为测试类或者测试方法设置展示名称");
    }

    @Test
    @DisplayName("测试方法二")
    @Timeout(value=1,unit = TimeUnit.MICROSECONDS)
    public void test02() {
        System.out.println("@Timeout: 表示测试方法运行如果超过了指定时间将会返回错误");
    }

    @Test
    @DisplayName("测试方法三")
    @Disabled
    public void test03(){
        System.out.println("@Disabled:表示测试类或测试方法不执行。");
    }

    @DisplayName("测试方法四")
    @RepeatedTest(2)  //重复执行2次
    public void test04(){
        System.out.println("@RepeatedTest:表示方法可重复执行");
    }
}
4.4.MockMvc
Spring MVC 测试框架(也称为 MockMvc)旨在为 Spring MVC 控制器提供更完整的测试,而无需运行服务器。
- mockMvc.perform:执行一个
RequestBuilder请求,会自动执行Spring MVC的流程并映射到相应的控制器执行处理 - MockMvcRequestBuilders.get("/sayHello"):构造一个get请求
- andExpect:添加
ResultMatcher验证规则,验证控制器执行完成后结果是否正确 - andDo:添加
ResultHandler结果处理器,比如调试时打印结果到控制台 - andReturn:最后返回相应的
MvcResult,然后进行自定义验证/进行下一步的异步处理
这里可以创建HelloController和User对象,完成以下案例
@SpringBootTest
@AutoConfigureMockMvc
class Spboot01ApplicationTests {
	@Resource
    private MockMvc mockMvc;

    @Resource
    private HelloController helloController;

    @Test
    public void demo() throws Exception {
		//示例一:发起get请求并打印结果
		mockMvc.perform(MockMvcRequestBuilders.get("/sayHello?name=Mock"))
            .andDo(MockMvcResultHandlers.print());

		//示例二:获取JSON返回结果
		String result = mockMvc.perform(MockMvcRequestBuilders.get("/sayHello")
                .param("name", "MockMvc"))
                .andReturn().getResponse().getContentAsString();
		System.out.println("结果:"+result);

		//示例三:JSON参数传递
        User user =new User();
        user.setPassword("123456");
        user.setUsername("admin");
        ObjectMapper mapper=new ObjectMapper();
        mockMvc.perform(MockMvcRequestBuilders
                .post("/addHello")
                .contentType(MediaType.APPLICATION_JSON)
                .content(mapper.writeValueAsBytes(user)))
                .andDo(MockMvcResultHandlers.print());

		//实例四:andExpect结果验证
        mockMvc.perform(MockMvcRequestBuilders
                .post("/query/2"))
                .andExpect(MockMvcResultMatchers.jsonPath("$.username").value("ww"))
                .andDo(MockMvcResultHandlers.print());

        //示例五:自定义断言
        MvcResult result = mockMvc.perform(MockMvcRequestBuilders
                .post("/query/1"))
            	//等同于Assertions.assertEquals(200,status);
                //.andExpect(MockMvcResultMatchers.status().isOk())
            	//等同于Assertions.assertEquals("ww",user.getUsername());
                //.andExpect(MockMvcResultMatchers.jsonPath("$.username").value("ww"))
                .andReturn();
        int status = result.getResponse().getStatus();
        String contentAsString = result.getResponse().getContentAsString();
        ObjectMapper mapper=new ObjectMapper();
        User user = mapper.readValue(contentAsString,User.class);
        System.out.println(user.getUsername());
        //自定义断言
        Assertions.assertEquals(200,status);
        Assertions.assertEquals("ww",user.getUsername());
    }
}
5.热部署
5.1.导入坐标
在pom.xml中添加devtools依赖
<dependency>
<groupId>org.springframework.boot</groupId>
<artifactId>spring-boot-devtools</artifactId>
<scope>runtime</scope>
</dependency>
5.2.编写配置
在application.yml中添加devtools配置
spring:
devtools:
restart:
#设置开启热部署,false即不开启热部署
enabled: true
#指定热部署的目录
additional-paths: src/main/java
#指定目录不更新
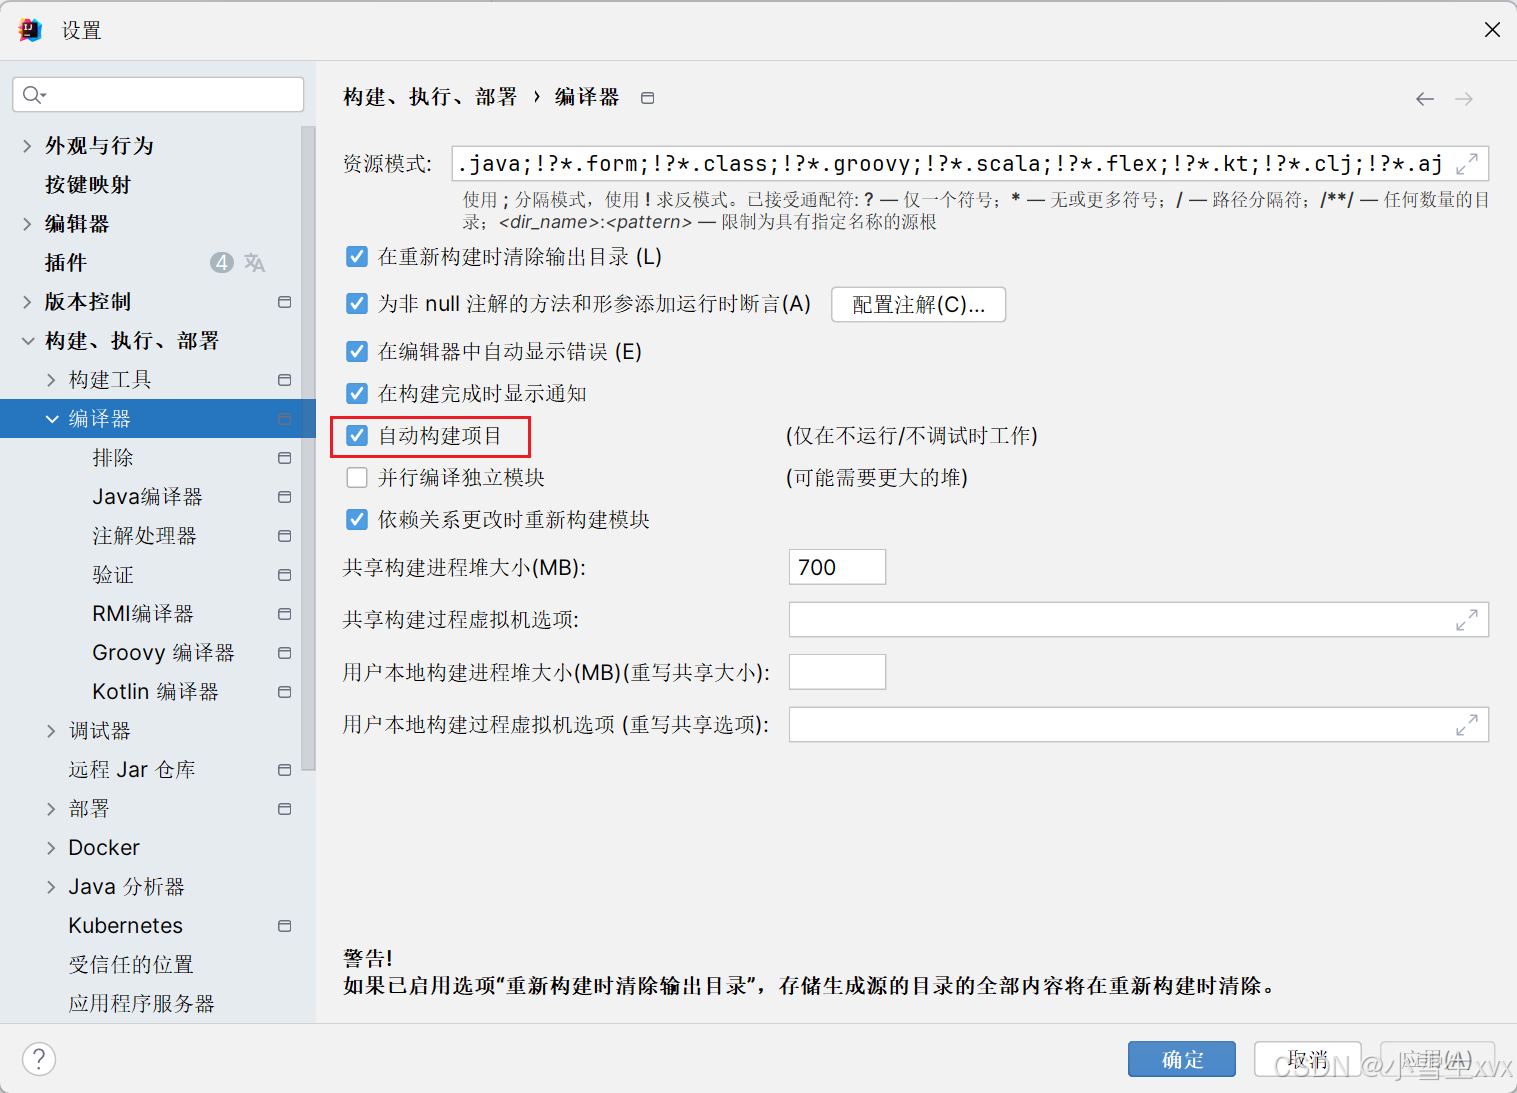
exclude: static/**Settings(设置)页面 ,在Build,Execution,Deployment(构建,执行,部署),选择Compiler(编译器),勾选Build project automatically(自动构建项目)
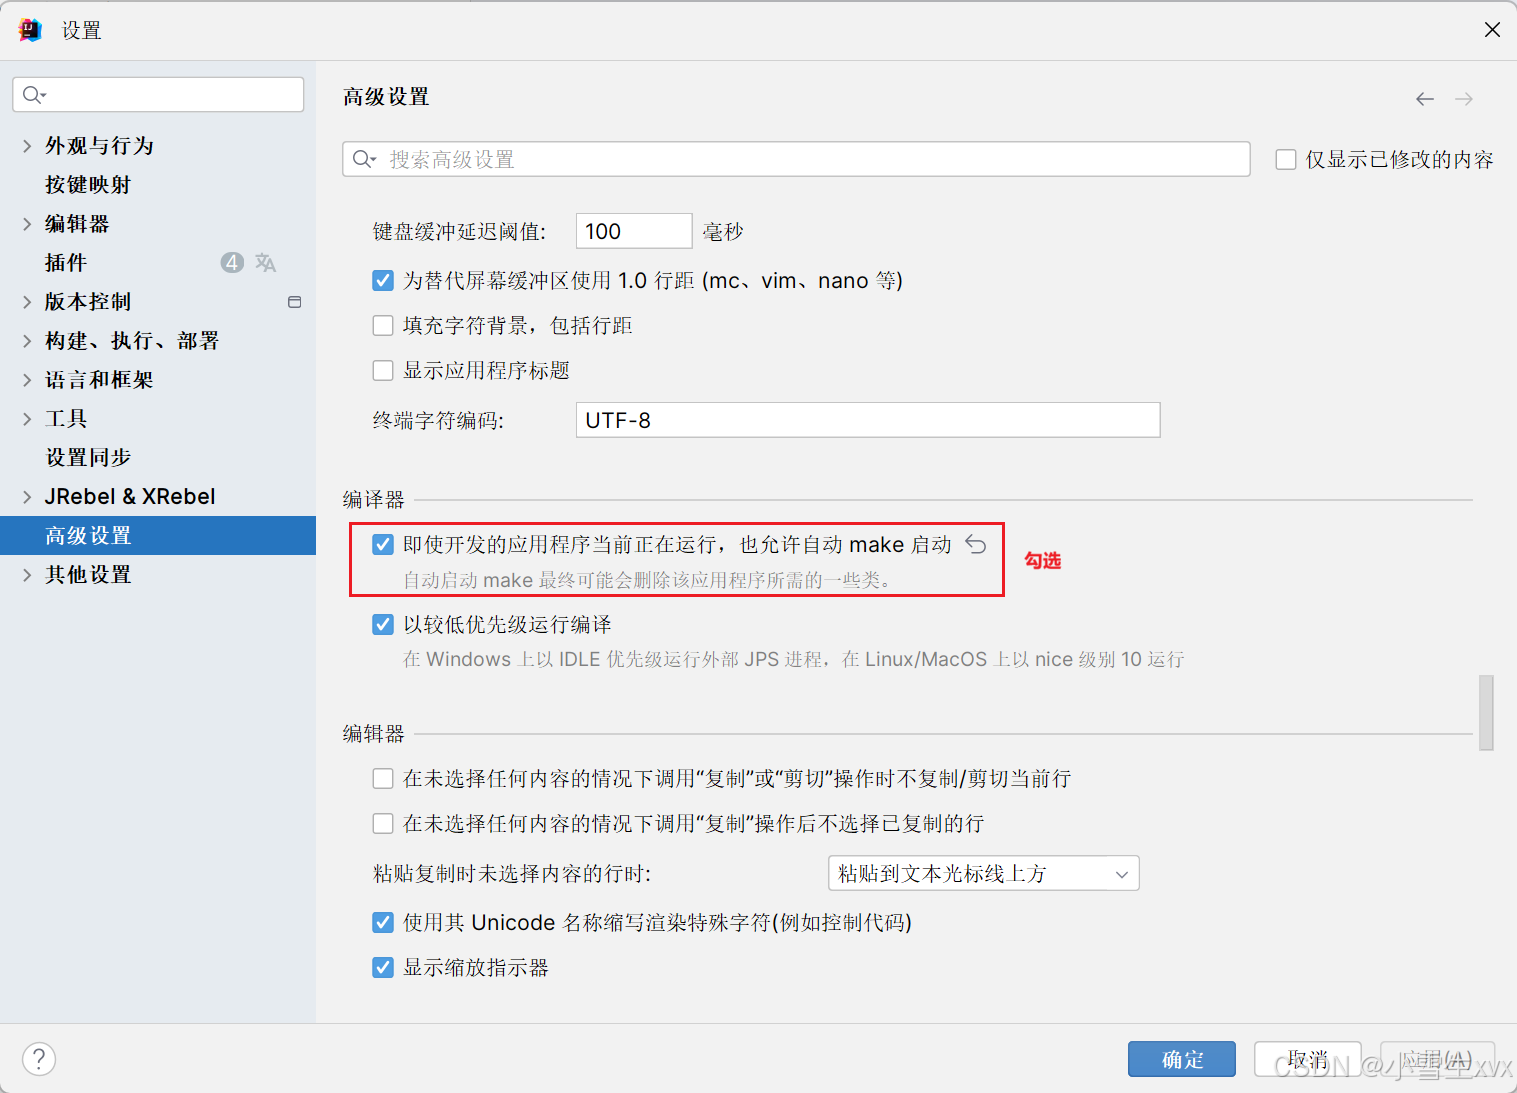
在找到 Advanced Settings(高级设置),勾选勾选Allow auto make to start even if developed application is currently running ,点击确定-->应用
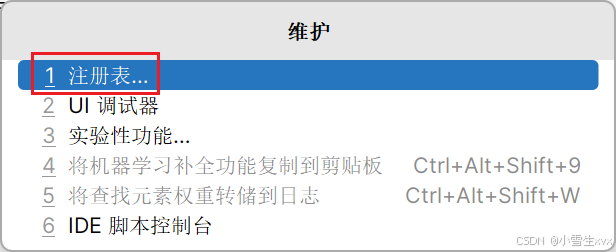
同时按住 Ctrl + Alt + Shift + / ,出现弹窗,选择Registry(注册表)
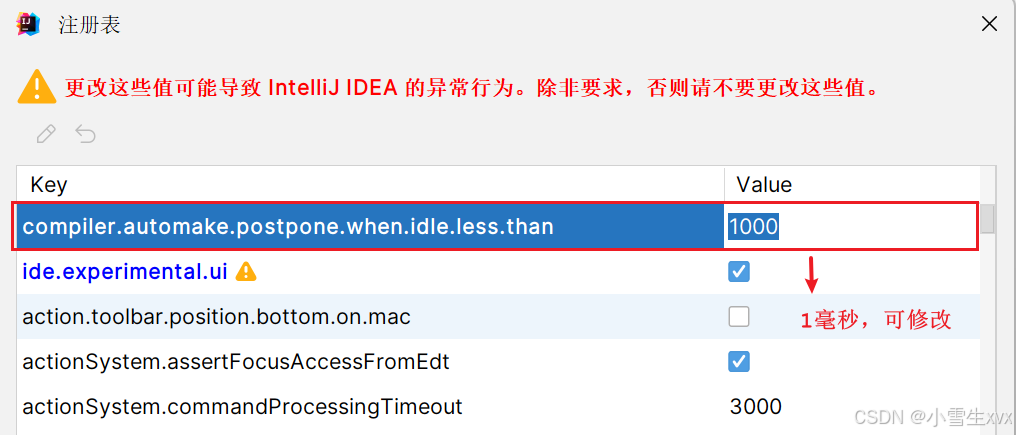
搜索:compiler.automake.postpone.when.idle.less.than,根据自己的需求修改value值(毫秒)
最后,观察热部署效果。保存代码更改后,观察控制台日志。你会看到 Spring DevTools 自动检测到代码更改并重新加载应用上下文,无需手动重启应用


 812
812

 被折叠的 条评论
为什么被折叠?
被折叠的 条评论
为什么被折叠?
 到【灌水乐园】发言


