


本周工作:小组完成了项目基础框架的搭建,我负责单词学习(制定学习计划、查看实时学习进度、查看学习历史)、单词查询(全文索引、单词库模糊查询)、单词音标表等功能的实现。在此期间学习了kotlin经典四层框架的搭建、JetpackCompose安卓原生组件的基本语法和组件类型。
一、基础框架搭建
我们的项目使用kotlin编程语言,分为数据层、领域层、表示层和依赖注入四层结构。
1.数据层:app/data/
主要负责数据的获取和存储,包括本地数据库和API,其中:
local/: 负责本地数据存储。
dao/: DAO为数据访问对象,定义了数据库操作方法。
entity/: 数据库实体,对应类。
AppDatabase.kt: 数据库的定义类。
repository/: 数据存取逻辑的实现。
model/: 定义数据模型,用于数据转换。
2.领域层:app/domain/
用于封装业务规则,通过Repository 接口访问数据,使得数据获取方式。
model/: 定义与 UI 交互的数据结构(模型)。
repository/: 定义接口,使数据层和业务逻辑层解耦。
usecase/: 用例,每个 UseCase 类执行一个特定的业务逻辑。
3.表示层:app/presentation/
负责 UI 逻辑,通过 ViewModel 从 UseCase 获取数据,并绑定到 Jetpack Compose 组件。
component/: 可复用的Jetpack Compose 组件。
screen/: 各个功能的UI界面。
theme/: 应用主题。
navigation/: 应用导航栏。
viewmodel/: ViewModel 层。
4.依赖注入:di/
负责依赖注入配置,使用DaggerHilt进行管理,便于对依赖管理。
app/
├── data/
│   ├── local/          # 本地数据源
│   │   ├── dao/        # Room DAO接口
│   │   ├── entity/     # 数据库实体
│   │   └── AppDatabase.kt
│   ├── repository/     # 仓库实现
│   └── model/          # 数据模型
├── domain/
│   ├── model/          # 领域模型
│   ├── repository/     # 仓库接口
│   └── usecase/        # 业务用例
├── presentation/
│   ├── component/      # 可复用Compose组件
│   ├── screen/         # 各功能屏幕
│   ├── theme/          # 应用主题
│   ├── navigation/     # 导航配置
│   └── viewmodel/      # ViewModel
└── di/                 # 依赖注入配置
二、Jetpack Compose
我们的项目使用Jetpack Compose安卓原生组件实现UI布局。
使用原因:
声明式编程: Jetpack Compose使用声明式编程范式,代码简洁、好学。
Kotlin 原生支持: 完全使用 Kotlin 编写,与 Kotlin 语言可以无缝集成。
添加相关依赖:
implementation 'androidx.compose.runtime:runtime:1.4.1'
    implementation "androidx.compose.ui:ui:1.4.1"
    implementation "androidx.compose.ui:ui-tooling-preview:1.4.1"
    implementation "androidx.compose.material3:material3:1.1.0-beta02"
    implementation "androidx.compose.material3:material3-window-size-class:1.1.0-beta02"
    implementation "androidx.compose.animation:animation:1.4.1"
需要配置kotlin的相关插件:
plugins {
    id 'kotlin-kapt'
    id 'com.android.application'
    id 'org.jetbrains.kotlin.android'
    id 'org.jetbrains.kotlin.plugin.serialization'
    id 'com.google.dagger.hilt.android'
相关学习网站:
Android开发实战班 - 现代 UI 开发之 Jetpack Compose 基础-优快云博客
Android-Jetpack-Compose-最全上手指南 - 简书
从0上手Jetpack Compose,看这一篇就够了~不破不立,未来可期~ 不破不立,未来可期~ 不破不立,未来可期~ - 掘金
三、单词学习功能
模块架构:
将每个模块的实现分离为四个比部分:
PlanViewModel :负责数据获取和处理,并通过 PlanUiState 提供数据;
PlanScreen :根据 PlanUiState 渲染 UI,显示学习计划的详细内容;
StudyHistoryChart: UI 组件,通过 PlanUiState 中的历史数据进行渲染;
PlanUiState:定义不同状态(加载中、已存在、空),并通过状态驱动 UI 更新。
1.实现指定学习计划
指定学习计划应包括选择要学习的单词本、选择每日学习量、选择开始学习的日期等。
实现选择单词本:
NewPlanSectionTitle(
    iconId = R.drawable.ic_vocabulary_24dp,
    textId = R.string.new_plan_vocabulary_title,
)
LazyRow(
    contentPadding = PaddingValues(vertical = 4.dp),
    modifier = Modifier.fillMaxWidth().height(156.dp)
) {
    items(vocabularyList) {
        VocabularyItem(
            vocabulary = it,
            updateNewPlanVocabulary = updateNewPlanVocabulary
        )
        Spacer(modifier = Modifier.padding(end = 8.dp))
    }
}
这里设置了一个滚栏用来放单词本,调用updateNewPlanVocabular方法更新学习计划。
选择每日学习量:
NewPlanSectionTitle(
    iconId = R.drawable.ic_word_list_size_24dp,
    textId = R.string.new_plan_word_list_size_title,
)
LazyRow(
    contentPadding = PaddingValues(vertical = 2.dp),
    modifier = Modifier.fillMaxWidth()
) {
    items(studyAmountList) {
        OutlinedButton(
            onClick = { updateNewPlanWordListSize(it) },
            shape = MaterialTheme.shapes.medium,
            border = BorderStroke(1.dp, MaterialTheme.colorScheme.tertiary),
            modifier = Modifier.padding(end = 16.dp, top = 4.dp, bottom = 4.dp)
        ) {
            Text(
                text = it.toString(),
                style = MaterialTheme.typography.bodyLarge,
                color = MaterialTheme.colorScheme.onBackground
            )
        }
    }
}
选择开始日期:
NewPlanSectionTitle(
iconId = R.drawable.ic_date_24dp,
textId = R.string.new_plan_start_date_title,
)
Row(
modifier = Modifier
.padding(vertical = 4.dp)
.fillMaxWidth()
) {
OutlinedButton(
onClick = { updateNewPlanStartDate(getTodayDateTime()) },
shape = MaterialTheme.shapes.medium,
border = BorderStroke(1.dp, MaterialTheme.colorScheme.secondary),
) {
Text(
text = stringResource(R.string.new_plan_today_btn),
style = MaterialTheme.typography.bodyMedium,
color = MaterialTheme.colorScheme.onBackground
)
}
OutlinedButton(
onClick = { updateNewPlanStartDate(getTomorrowDateTime()) },
shape = MaterialTheme.shapes.medium,
border = BorderStroke(1.dp, MaterialTheme.colorScheme.secondary),
) {
Text(
text = stringResource(R.string.new_plan_tomorrow_btn),
style = MaterialTheme.typography.bodyMedium,
color = MaterialTheme.colorScheme.onBackground
)
}
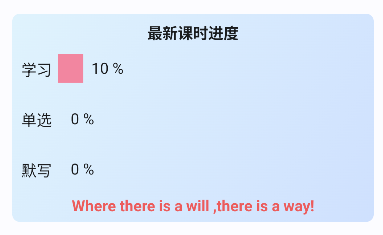
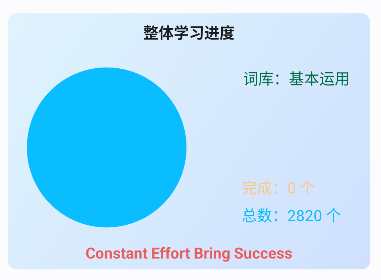
}2.实现学习计划、学习历史的可视化
构建学习计划进度条和饼状图:
chartDataList.forEachIndexed { index, section ->
            val sectionTextLayoutResult = sectionTextLayout(section.first)
            val sectionTextSize = sectionTextLayoutResult.size
            val sectionTextStartX = textIndent - (sectionTextSize.width / 2f)
            val sectionTextStartY = dp48Px * 1.2f - (sectionTextSize.height / 2f) + (index * lineGap)
            val sectionProgressStartX = dp16Px * 1.4f + sectionTextSize.width * 0.8f
            val sectionProgressStartY = dp48Px * 1.12f - (sectionTextSize.height / 2f) + (index * lineGap)
            val progressWidth = fullProgressWidth * (section.second / 100f)

            drawText(
                textLayoutResult = sectionTextLayoutResult,
                topLeft = Offset(sectionTextStartX, sectionTextStartY),
            )

            drawRoundRect(
                color = section.third,
                topLeft = Offset(sectionProgressStartX, sectionProgressStartY),
                size = Size(
                    width = progressWidth,
                    height = sectionTextSize.height * 1.3f
                )
            )

            val progressTextLayoutResult = sectionTextLayout("${section.second.toInt()} %")
            val progressTextSize = progressTextLayoutResult.size
            val progressTextStartX = textIndent + sectionTextSize.width + progressWidth + dp16Px - (progressTextSize.width / 2f)
            val progressTextStartY = dp48Px * 1.18f - (progressTextSize.height / 2f) + (index * lineGap)

            drawText(
                textLayoutResult = progressTextLayoutResult,
                topLeft = Offset(progressTextStartX, progressTextStartY),
            )
        }

        drawText(
            textLayoutResult = mottoTextLayout,
            topLeft = Offset(
                (this.size.width / 2f) - (mottoTextSize.width / 2f),
                heightPx - dp16Px * 1.1f - (mottoTextSize.height / 2f)
            ),
        )

drawCircle(
            color = totalColor,
            radius = radius,
            center = circleCenterOffset
        )

        drawArc(
            color = learnedColor,
            startAngle = -90f,
            sweepAngle = learnedAngle,
            useCenter = true,
            size = Size(radius * 2f, radius * 2f),
            topLeft = Offset(
                x = circleCenterOffset.x - radius,
                y = circleCenterOffset.y - radius
            )
        )

        drawText(
            textLayoutResult = dictionaryTextLayout,
            color = dictionaryColor,
            topLeft = Offset(
                this.size.width - dp48Px * 1.6f - (dictionaryTextSize.width / 2f),
                dp48Px * 1.4f - (dictionaryTextSize.height / 2f)
            ),
        )
构建学习历史柱状图:
val chartArea = Size(
            width = size.width - chartPadding * 2,
            height = heightPx - chartPaddingV * 2 - dp24
        )

        val maxValue = historyData.maxOfOrNull { it.second }?.toFloat() ?: 1f
        val barWidth = (chartArea.width / historyData.size) * 0.9f
        val barSpacing = (chartArea.width / historyData.size) * 0.15f

        historyData.forEachIndexed { index, (date, value) ->
            val barHeight = (value / maxValue) * chartArea.height
            val xPos = chartPadding + (barWidth + barSpacing) * index
            val yPos = heightPx - dp36 - barHeight

            drawRoundRect(
                color = barColor,
                topLeft = Offset(xPos, yPos),
                size = Size(barWidth, barHeight),
                cornerRadius = CornerRadius(4.dp.toPx())
            )

            val dateLayout = textMeasurer.measure(date, labelStyle)
            drawText(
                textLayoutResult = dateLayout,
                topLeft = Offset(
                    xPos + barWidth / 2 - dateLayout.size.width / 2,
                    heightPx - chartPaddingV + 8.dp.toPx()
                )
            )

            val valueLayout = textMeasurer.measure("$value", labelStyle)
            drawText(
                textLayoutResult = valueLayout,
                topLeft = Offset(
                    xPos + barWidth / 2 - valueLayout.size.width / 2,
                    yPos - valueLayout.size.height - 4.dp.toPx()
                )
            )
视觉效果:

数据处理部分:
表示层获取数据方法:
val simulatedHistory = generateSimulatedHistory()
            PlanUiState.Existed(
                studyPlan = plan,
                progressReport = progressRepository.getLatestLessonReport(
                    wordListSize = plan.wordListSize
                ),
                totalReport = progressRepository.getTotalReport(
                    vocabularySize = plan.vocabularySize
                ),
                studyHistory = simulatedHistory
            )
领域层设计访问数据的接口:
private val studyPlanDAO: StudyPlanDAO
) {

    fun getStudyPlanFlow() = studyPlanDAO.getStudyPlanFlow()
        .flowOn(Dispatchers.IO)

    suspend fun getStudyPlan() =
        studyPlanDAO.getStudyPlan()
四、单词查询功能
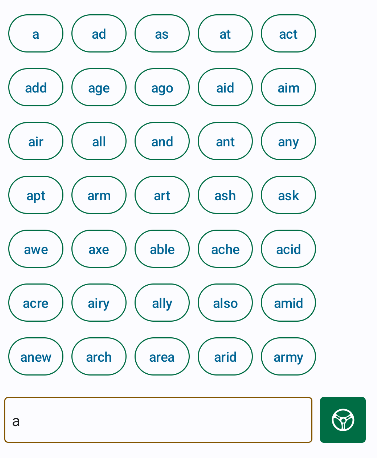
1.实现单词实时查询逻辑
采用智能列表布局:
FlowRow {
    suggestionList.forEach { suggestion ->
        OutlinedButton(onClick = { setWord(suggestion) }) {
            Text(text = suggestion)
        }
    }
}
自定义一个输入键盘,符合26键键盘的常规布局:
Spacer(modifier = Modifier.padding(vertical = 4.dp))
        LandingKeyboard(
            write = write,
            remove = clearAlphabet,
            modifier = Modifier
                .padding(bottom = 32.dp)
                .weight(4.2f)
                .fillMaxWidth()
        )
数据加载逻辑:
sealed interface SearchUiState {
    object Loading : SearchUiState
    data class Default(
        val spelling: String = "请输入要搜索的单词",
        val suggestionList: List<String> = emptyList(),
        val searchHistory: Flow<PagingData<SearchHistoryItem>>,
        val dialog: Dialog = Dialog.None
    ) : SearchUiState {
        enum class Dialog { History, None }
    }
}
搜索逻辑:
fun write(alphabet: String) {
    viewModelScope.launch {
        val suggestions = wordRepository.getSearchSuggestions(updated)
        updateState(suggestions)
    }
}
基于当前输入实时获取搜索结果,异步处理。符合APP用户的一般搜索习惯。
界面效果:
2.数据层实现模糊搜索功能
模糊搜索SQL语句:
@Query(
        """
        SELECT spelling FROM word_list WHERE spelling LIKE :spelling
        ORDER BY LENGTH(spelling) LIMIT $MAX_SUGGESTIONS_NUM
        """
    )
使用LIKE操作符来模糊匹配,然后按长度排序,取前MAX_SUGGESTIONS_NUM个结果。
建立索引优化搜索性能:
CREATE INDEX idx_word_spelling ON word_list(spelling)五、音标功能
音标表UI布局:
每行布局:
Row(
        verticalAlignment = Alignment.CenterVertically,
        modifier = modifier
            .fillMaxWidth()
            .padding(vertical = 2.dp)
            .background(
                Color(0xFFE3E3E3).copy(alpha = 0.4f),
                shape = RoundedCornerShape(4.dp)
            )
            .padding(horizontal = 1.dp)
    )
类卡片式布局,用略深的底色区分每行。
表格布局:
LazyColumn(
        modifier = Modifier.fillMaxSize()
    ) {
        items(ipaList) {
            IpaListItem(
                ipa = it,
                playPron = playPron,
                modifier = Modifier
                    .padding(16.dp)
                    .fillMaxWidth()
                    .height(IntrinsicSize.Min)
            )
        }
    }
音标数据获取:
 @Query("SELECT * FROM ipa")
    suspend fun getIpaList(): List<Ipa>
分辅音/原音
UI效果:


 被折叠的 条评论
为什么被折叠?
被折叠的 条评论
为什么被折叠?
 到【灌水乐园】发言


